Zebra GX430t Troubleshooting: Quick Fixes That Work
Most Zebra GX430t problems come from media setup, calibration, print settings, drivers, or a simple connection fault.
Zebra GX430t troubleshooting is much easier when you follow a clear order instead of changing many settings at once. The GX430t is a compact thermal transfer printer, so issues often involve labels, ribbon tension, sensor position, print darkness, or the printer driver. This guide explains proven checks for poor print quality, skipped labels, flashing lights, connection errors, and calibration problems, with practical tips that help you restore reliable printing.
Understand the Zebra GX430t Before Troubleshooting
The Zebra GX430t can print with direct thermal or thermal transfer media. Direct thermal media reacts to heat and does not use a ribbon. Thermal transfer media uses a ribbon to move ink onto the label.
This difference matters. If the printer is set for thermal transfer but no ribbon is installed, labels may come out blank. If the printer expects direct thermal media while you use a ribbon, print quality and sensing may become unreliable.
The printer may also use different command languages, such as ZPL or EPL. Your label software, driver, and printer must use compatible settings. A mismatch can cause strange symbols, missing labels, or jobs that stay in the print queue.
Before starting Zebra GX430t troubleshooting, note these details:
• Media type: direct thermal or thermal transfer
• Label size and gap style
• Ribbon width and coating direction
• Connection type: USB, serial, or network print server
• Operating system and printer driver
• Application used to create the label
• Exact light pattern or error message
Start With a Safe Basic Check
Many printer faults have a simple cause. Begin with the physical parts before changing software settings.
Turn off the printer and unplug it for about 30 seconds. Check the power adapter, power cord, outlet, and rear connector. Then reconnect the printer and make sure the power light becomes steady.
Open the media cover and inspect the inside. Look for torn labels, adhesive buildup, a loose ribbon, or media that has shifted away from the guides. Even a small label fragment can block the sensor or platen roller.
Use this quick inspection:
- Remove loose labels from the media path.
- Confirm the label roll sits straight.
- Adjust the media guides so they touch the roll without squeezing it.
- Check that the printhead is fully closed.
- Make sure the ribbon is tight and loaded in the correct direction.
- Confirm the media moves freely by hand.
- Close the cover until it latches firmly.
A useful field lesson is to avoid making several changes at once. If you replace the roll, change the driver, and adjust darkness together, you may not know which step fixed the problem.

Zebra GX430t Troubleshooting for Power and Light Errors
The GX430t uses indicator lights to show its condition. A steady green light usually means the printer is ready. Amber or red states can indicate a paused printer, an open printhead, a media problem, or another fault.
The exact meaning can depend on the light pattern and printer firmware. Check whether the light is steady or flashing, then record the pattern before restarting the printer.
Try these steps:
• Press the pause button once if the printer may be paused.
• Open and close the printhead to reset a cover sensor.
• Check for labels stuck under the printhead.
• Remove the roll and reload it carefully.
• Replace a damaged ribbon or crushed media roll.
• Power cycle the printer after clearing the fault.
If the printer powers off during printing, check the power supply first. A weak or incorrect adapter can cause resets when the printhead draws more power. Do not use an adapter with the wrong voltage or connector.
If the light returns after the printer is empty and correctly loaded, the issue may involve a sensor, printhead, main board, or power circuit. At that point, repeated resets are unlikely to help. Service or replacement may be more practical, especially because the GX430t is an older model.

Fix Labels That Print Blank
Blank labels are one of the most common GX430t problems. The cause is often a mismatch between the media type and the printer setup.
First, test the label surface. Scratch the label with a fingernail or a blunt plastic edge. Direct thermal media usually creates a dark mark from friction. Do not use a sharp object that could damage the label or injure you.
If the label does not react, it may be non-thermal stock. You will need a ribbon and thermal transfer media. Load the ribbon with the ink coating facing the label side. A ribbon loaded backward may move normally but leave the label blank.
Also check these settings:
• Select thermal transfer when using a ribbon.
• Select direct thermal when printing without a ribbon.
• Confirm the driver uses the correct print method.
• Clean the printhead with a recommended cleaning pen.
• Increase darkness only in small steps.
• Confirm the label design is not white text on a white background.
A printhead that is dirty, worn, or damaged can also create blank areas. If only one section of every label is blank, inspect that part of the printhead for residue or broken elements.

Solve Poor Print Quality
Poor print quality may appear as faint text, dark bars, blurred edges, white lines, or uneven darkness. The best fix depends on the pattern.
Start with cleaning. Turn off the printer and let the printhead cool. Wipe the printhead from side to side with a Zebra-approved cleaning pen or an appropriate cleaning swab. Clean the platen roller as well, but avoid flooding the printer with liquid.
Use the correct media and ribbon combination. The ribbon should be at least as wide as the label, and the ribbon coating must face the label. A ribbon that is too narrow can expose the printhead and cause wear.
For light or uneven printing:
- Confirm the print speed is not too high.
- Increase print darkness gradually.
- Reduce speed for small text or barcodes.
- Check that the printhead pressure is even.
- Replace old, wrinkled, or poorly stored media.
- Clean the printhead and platen roller.
For dark, smeared, or fuzzy printing, lower the darkness and check the ribbon. Excess heat can reduce image quality and shorten printhead life. A slower speed with moderate darkness often works better than maximum darkness.
White vertical lines that stay in the same place may indicate blocked or damaged printhead elements. Cleaning can remove dirt, but it cannot repair a failed element. Print a test label to confirm whether the fault repeats in the same position.

Calibrate the Media Sensor
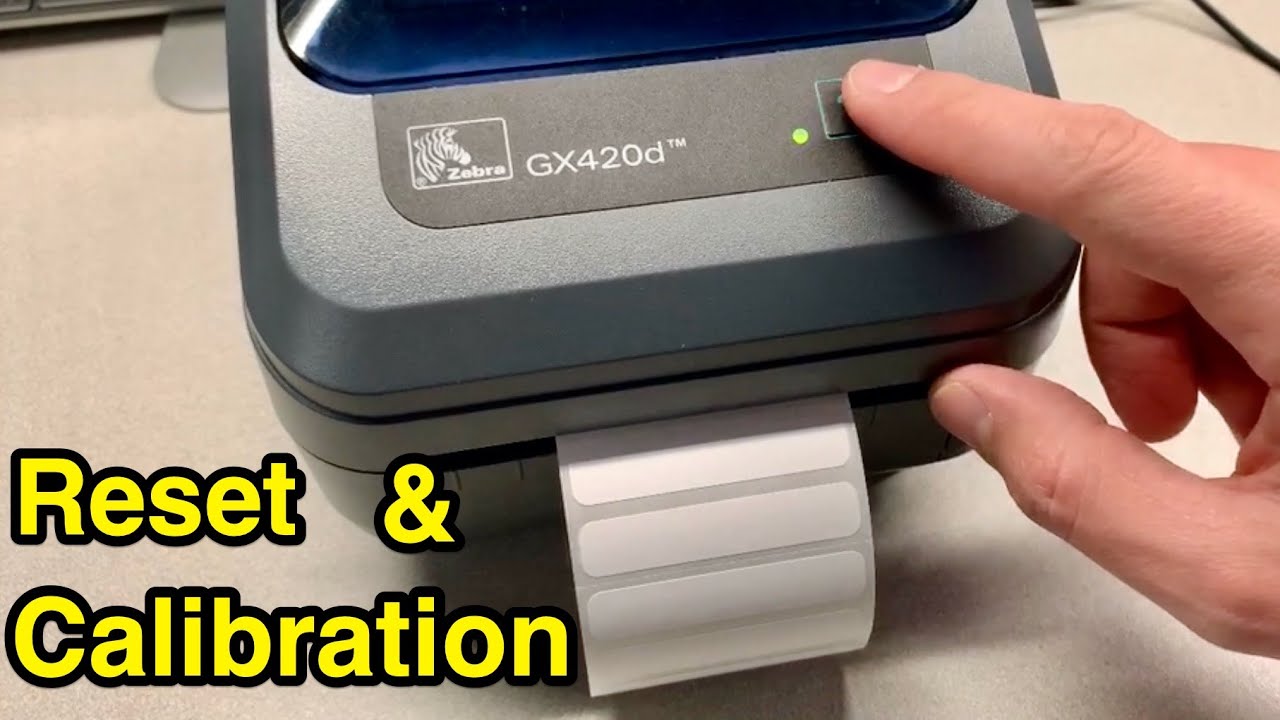
Calibration teaches the printer where one label ends and the next begins. Without correct calibration, the GX430t may skip labels, stop with a media error, or print across gaps.
Before calibration, load the correct media and close the printhead. Make sure the label guides are close to the media edges. Loose guides can let the roll drift and confuse the sensor.
A basic calibration process is:
- Turn the printer on.
- Press and hold the feed button.
- Wait for the indicator to flash through its normal sequence.
- Release the button at the correct calibration stage.
- Allow the printer to feed several labels.
- Press the feed button once to test one label.
The exact button timing can vary by firmware and configuration. If the printer feeds continuously, stop the process, reload the media, and use the printer’s official user guide for the correct sequence.
You may also calibrate through Zebra printer utilities or driver tools. This can be more convenient when the printer is connected to a computer.
Sensor settings must match the media:
• Gap or web sensing works with labels separated by spaces.
• Mark sensing works with black marks on the media backing.
• Continuous mode is used for media without gaps or marks.
Do not use gap calibration on black-mark media. The printer may search for a gap that does not exist.
Stop Skipped Labels and Wrong Label Length
If the printer skips labels, prints two labels at once, or advances too far, check the physical media first. The roll may contain damaged gaps, labels may be stuck together, or the sensor may be blocked.
Confirm the label dimensions in the driver and label software. For example, if the real label is 4 inches long but the software sends a 3-inch format, the printer will not position the content correctly.
Review these items:
• Label width
• Label height
• Gap height
• Left and top position
• Print speed
• Media tracking mode
• Rotation setting
• Sensor type
A common mistake is to measure only the adhesive label and ignore the gap between labels. The printer needs both values to place the next label correctly.
If the first label looks correct but later labels drift, inspect the platen roller and media path. Dust or adhesive can cause the media to slip. Clean the roller and make sure the roll is not rubbing against the inside wall.
After every change, print several labels. A single successful label does not always prove that tracking is fixed.

Fix Ribbon Wrinkles, Breaks, and Slipping
Ribbon problems can damage print quality and create unnecessary waste. Wrinkles often appear as diagonal lines, pale sections, or repeated blank areas.
Reload the ribbon from the supply roll to the take-up roll. Keep the ribbon centered and remove slack before closing the printhead. The ribbon should move smoothly without touching the side frame.
Check the ribbon coating direction. One simple test is to press the coated side against a label and rub the back with a fingernail. The correct side should transfer a small mark. Do not rely on color alone because ribbon colors and coatings vary.
If the ribbon breaks:
• Lower print darkness.
• Reduce print speed.
• Clean the printhead.
• Check for sharp edges near the ribbon path.
• Use ribbon that matches the media.
• Confirm the printhead pressure is not excessive.
If the ribbon does not advance, it may be installed incorrectly or the take-up spindle may not be engaged. Remove and reload it rather than pulling hard on the ribbon.

Resolve USB, Serial, and Network Printing Problems
A printer can be mechanically healthy and still fail because the computer sends the job to the wrong port or driver.
For USB printing, connect the GX430t directly to the computer during testing. Avoid hubs, docking stations, and long extension cables until the printer works. Check whether the operating system detects the printer and whether the selected port matches the actual connection.
For serial printing, compare the printer and computer settings. Baud rate, parity, data bits, stop bits, and flow control must match. Serial problems often produce partial labels, random characters, or jobs that never finish.
For network printing through a print server, confirm the printer’s IP address and check whether it responds on the network. A changed IP address can make a previously working queue appear broken.
Useful connection checks include:
- Print a printer configuration label if available.
- Confirm the active port in the operating system.
- Pause and clear old jobs.
- Send one small test label.
- Try a known-good cable.
- Test from another computer.
- Reinstall the correct Zebra driver if needed.
Do not assume that a successful USB connection proves the label software is correct. The driver may still use the wrong media size, print method, or command language.

Clear Print Queue and Driver Errors
A stuck print queue can make the printer look broken. First cancel pending jobs from the operating system. If a job will not clear, restart the print spooler or restart the computer.
Make sure only one printer queue is active. Older computers often contain several copies of the same Zebra printer, each linked to a different port. Give the correct queue a clear name and remove unused copies.
Driver settings should match the printer and media. Review:
• Printer model
• Port
• Label dimensions
• Orientation
• Print speed
• Darkness
• Media type
• Sensor mode
• Command language
If the printer outputs unreadable characters, the application may be sending EPL data to a printer configured for ZPL, or the reverse. Use the language required by your label software and printer configuration.
When installing a driver, download it from a trusted manufacturer or business support source. Avoid random driver sites. Old printers may not have full support on newer operating systems, so test the driver with a simple configuration label before changing production settings.
Print a Configuration or Test Label
A test label can separate printer hardware problems from computer software problems. If the printer can produce its own test label, the print engine, media path, and printhead may be working even if computer jobs fail.
Print the configuration label using the printer’s documented feed-button method or an approved utility. The label can show firmware, communication settings, media settings, darkness, speed, and sensor mode.
Look for:
• Correct label length
• Correct print method
• Correct sensor setting
• Unexpected darkness or speed values
• Wrong communication parameters
• A different printer language than expected
If the internal test label is good but a computer label is bad, focus on the driver, application, label format, or connection. If the internal test label is also poor, focus on media, cleaning, calibration, or hardware.
This is one of the most useful steps in Zebra GX430t troubleshooting because it prevents unnecessary driver changes when the real issue is mechanical.
Reset Settings Carefully
A reset can fix incorrect stored settings, but it also removes custom configuration. Record the current settings before using one.
A reset may be useful when:
• The printer was used with several media types.
• The sensor mode is unknown.
• A previous driver changed printer settings.
• The printer behaves differently after a failed calibration.
• Communication settings are no longer known.
After a reset, reload the media, select the correct print method, calibrate the sensor, and test a small label. Do not reset a production printer without planning because network, darkness, speed, and label settings may need to be restored.
If the printer is shared by several users, save the final configuration. A short written record can prevent repeated Zebra GX430t troubleshooting later.
Know When the Printhead or Platen Roller Needs Replacement
Cleaning solves many faults, but not all of them. A damaged printhead may show a fixed white line, missing dots, or repeated blank sections. The defect usually appears in the same location on every label.
A worn platen roller may look shiny, cracked, flattened, or sticky. It can cause slipping, uneven darkness, crooked labels, and poor feeding. Replacing it may restore proper movement.
Before ordering parts, check the exact printer model and printhead resolution. GX430t units may use different configurations, and incorrect parts can create fit or quality problems.
Use safe service habits:
• Turn off and unplug the printer.
• Let the printhead cool.
• Protect the printhead from static electricity.
• Use approved cleaning tools.
• Never scrape the printhead with metal.
• Replace parts with compatible components.
If the printer has a damaged main board, unstable power circuit, or repeated sensor failure, compare repair costs with a newer printer. A repair is worthwhile when the printer is reliable and parts are available, but not every old unit is economical to restore.
A Practical Zebra GX430t Troubleshooting Workflow
When time matters, use this short sequence. It avoids guesswork and helps you identify the fault layer.
- Check power and indicator lights.
- Inspect labels, ribbon, guides, and the printhead latch.
- Confirm direct thermal or thermal transfer mode.
- Clean the printhead and platen roller.
- Reload media and ribbon.
- Calibrate the sensor.
- Print an internal test or configuration label.
- Check label size and driver settings.
- Test the cable and selected port.
- Try a known-good label file.
- Reset settings only after recording them.
- Contact a qualified technician if the same hardware fault remains.
In practice, the fastest diagnosis is often a controlled test. Use one known-good roll, one simple label, one cable, and one computer. Change only one item at a time.
Keep a small troubleshooting log. Write down the media type, settings, light pattern, and result of each test. This simple habit can save hours when several GX430t printers share the same workspace.
Prevent Future GX430t Problems
Routine care reduces downtime. Clean the printhead whenever you change media types or when print quality begins to fade. Clean more often in dusty areas or when printing large batches.
Store labels and ribbons in a cool, dry place. Heat, moisture, and sunlight can change media performance. Use stock that matches the printer and label application.
Good maintenance habits include:
• Keep the printer covered when it is not in use.
• Use the correct ribbon width.
• Avoid touching the printhead with bare fingers.
• Keep adhesive away from the platen roller.
• Save a copy of working driver settings.
• Label each printer and cable.
• Test a few labels before a large print run.
• Replace worn media guides and rollers.
A short test before shipping labels, inventory labels, or barcode batches is a smart safety net. It is much easier to catch a calibration issue on three labels than after printing several hundred.
Frequently Asked Questions About Zebra GX430t Troubleshooting
Why is my Zebra GX430t printing blank labels?
The printer may be set to the wrong media mode, the ribbon may be loaded backward, or the labels may not be thermal-sensitive. Check the print method, ribbon coating direction, printhead condition, and label type.
How do I calibrate a Zebra GX430t?
Load the correct media, close the printhead, and use the documented feed-button calibration sequence or Zebra printer utility. The printer should feed several labels and stop at the correct gap or mark.
Why does the Zebra GX430t skip labels?
Skipping usually results from incorrect sensor mode, poor calibration, wrong label dimensions, damaged gaps, or a blocked sensor. Reload the media, select gap or mark sensing correctly, and calibrate again.
Why is my GX430t printing faded?
Faded output can come from a dirty printhead, high print speed, low darkness, poor ribbon contact, or old media. Clean the printhead, lower the speed, check the ribbon, and increase darkness in small steps.
Why does my Zebra GX430t print random symbols?
Random symbols often indicate a driver, port, or command-language mismatch. Check whether the software sends ZPL or EPL data and confirm that the correct driver and communication port are selected.
How do I fix a Zebra GX430t that will not feed?
Check the power light, media path, printhead latch, and sensor. Remove stuck labels, reload the roll, verify the media mode, and run a calibration before testing the feed button again.
Should I replace or repair an old GX430t?
Repair may make sense when the problem is a roller, printhead, cable, or cleaning issue. If the printer has repeated board or power faults, compare repair costs with a newer model and consider operating system compatibility.
Conclusion
Reliable Zebra GX430t troubleshooting starts with the basics: check power, inspect the media path, load the ribbon correctly, clean the printhead, calibrate the sensor, and verify the driver. Test the printer by itself before blaming the label software, and change one setting at a time.
Most problems can be narrowed down by using a known-good roll, a simple test label, and a clear troubleshooting log. Apply these steps in order, save your working settings, and check the printer before every large print job. Explore the printer’s official manual for model-specific procedures, and share your results or questions in the comments.