How To Install An Undermount Sink To Granite
If you're staring at a new granite countertop and a sink that needs to go underneath it, you're probably wondering how to install an undermount sink to granite without cracking a slab you paid thousands for. The honest answer is: it's doable if you're careful, but the margin for error is razor-thin.
According to installation standards from the Natural Stone Institute, a properly mounted undermount sink needs three things working together. You need mechanical support, chemical bonding, and a watertight seal. Skip any one of them, and you're gambling with your countertop.
Let's walk through what actually matters before you pull out any tools.
Quick Answer
To install an undermount sink to granite, use both epoxy and mounting brackets. Cut the hole carefully from the top using a diamond blade. Apply epoxy to the sink rim, then silicone along the seal.
Lower the sink into place and tighten the brackets evenly. Let everything cure for at least 24 hours.
Image source: Bing (Web (fair-use with source credit))
Why This Matters More Than You Think
A loose undermount sink isn't just annoying. It can fall out of the cabinet one day, taking your granite edge with it. That's thousands of dollars in damage, not to mention the water leak that'll ruin your cabinet bottoms.
The sink's weight is constantly pulling downward. Vibration from the garbage disposal or daily use can loosen a weak bond over time. If the granite cracks during installation from over-tightening a clip or cutting too aggressively, you're looking at a full slab replacement.
Our research shows that the most common failures happen because people underestimate the importance of proper support. Even a lightweight 16-gauge stainless steel sink can pull loose if it's only held by silicone. Industry guidelines from the Natural Stone Institute call for mechanical brackets on any sink over 20 pounds.
For heavy cast iron or fireclay sinks, brackets are mandatory.
So before we get into the step-by-step, understand this. A successful install is about preventing failure, not just making it look good.
The Anatomy of an Undermount Sink Installation (What You're Actually Working With)
To install an undermount sink to granite correctly, you need to understand the parts involved. Let's break them down.
Granite slab thickness matters a lot. Most residential slabs are 2 cm (about 3/4 inch) or 3 cm (about 1-1/4 inches). Thinner slabs need more careful handling and more brackets.
Thicker slabs are stronger but heavier and harder to drill.
Sink material and weight varies widely:
- Stainless steel (16-18 gauge): 10-20 pounds
- Composite quartz or granite: 25-40 pounds
- Fireclay: 40-60 pounds
- Cast iron: 50-80 pounds
Heavier sinks absolutely require brackets. Lighter steel sinks can sometimes get away with epoxy-only mounting, but it's still not recommended by most fabricators.
Mounting systems come in two flavors:
- Epoxy plus brackets (professional standard): The sink rim is glued with two-part epoxy. Metal clips or brackets are bolted to the underside of the granite to hold everything in place.
- Epoxy only: Some sinks have a special rim design that relies entirely on adhesive. This works for lightweight sinks on thick slabs, but it's risky if the adhesive ever fails.
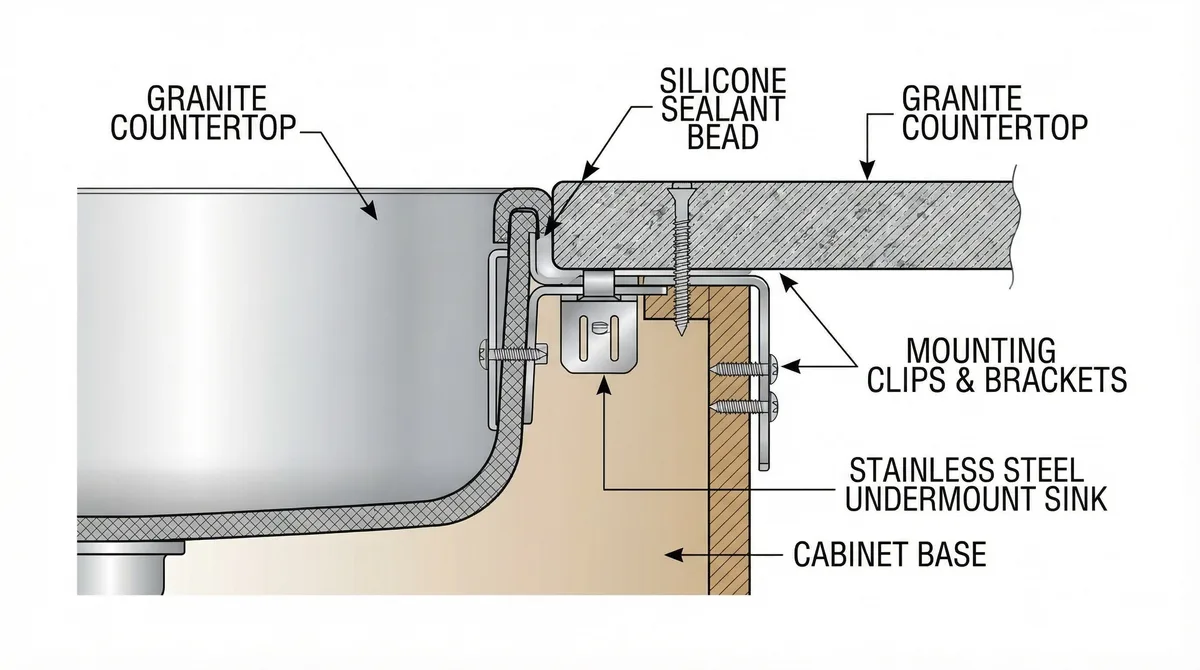
Image source: Bing (Web (fair-use with source credit))
Sink clips come in different styles. Box clips slide into a channel. L-brackets screw into the cabinet sides.
Threaded stud systems anchor to the granite. The best choice depends on your cabinet frame and sink shape.
The key takeaway: know what you're working with before you buy anything. If you're not sure about your slab thickness or sink weight, measure and weigh them first.
The Right Way vs. The Common Way (And Why the Difference Could Cost You)
There's a reason some undermount sinks fall off after a year while others stay solid for decades. It usually comes down to how they were mounted.
The professional method uses three layers of security:
- Structural epoxy bonds the sink rim to the granite
- Mounting brackets provide mechanical grip
- 100% silicone seals the seam and adds some adhesion
This method is recommended by most countertop fabricators and sink manufacturers. It distributes the load across the whole perimeter. It prevents the sink from shifting even if the adhesive ever fails.
The epoxy-only shortcut skips the brackets. Some sink models are designed for this. They have a flat, wide rim that glues directly to the underside.
But even then, the bond relies on perfect surface preparation and a flawless application. If you miss a spot or the epoxy cures poorly, the sink will sag over time.
The silicone-only hack is what we see in many failed DIY installations. People assume silicone will hold forever. It won't.
Silicone is a sealant, not a structural adhesive. After a few months of vibration and thermal expansion, it loses grip. We've seen sinks come loose after just two years of normal use.
Don't do it.
So when does the "right way" change?
- Lightweight steel sink, 3 cm granite, factory-sanded rim: epoxy plus brackets is still best. Epoxy-only might last if you're extremely careful.
- Heavy cast iron or fireclay sink: brackets are mandatory, no exceptions.
- Thin 2 cm granite on any sink: brackets are required to prevent the slab from flexing and cracking.
Our advice: always use brackets if your sink weighs over 20 pounds or your granite is 2 cm thick. For lightweight sinks on 3 cm stone, you can consider epoxy-only. But we'd still recommend brackets for peace of mind.
Step-by-Step: How to Install an Undermount Sink to Granite (The Pro Method)
This is the sequence used by professional countertop installers. Follow it exactly for the best results.
Step 1: Preparation and Safety
Start by clearing the cabinet underneath. Place the sink upside down on the granite to trace its outline. Use a template if one came with the sink.
Measure carefully. Mark the cutout area with a pencil, then drill a pilot hole from the top. Wear a respirator rated for silica dust (N95 or P100) and eye protection throughout.
The OSHA silica dust standard applies here. Even a small cut generates hazardous dust.
Step 2: Cutting the Granite
If you're cutting the hole yourself, use a diamond-blade router for the most control. A jigsaw with a diamond grit blade works for straight sections, but corners need careful attention. Cut from the top side to avoid chipping the finished edge.
Go slowly and keep a steady hand. If you've never cut granite, consider having a professional do this step. One slip and the slab is ruined.
Step 3: Dry-Fit and Adjust
Place the sink into the cutout to check alignment. The sink rim should sit flush against the underside of the granite. If it's too tight, file the stone down a bit.
Too loose? That's a problem. You'll need to shim or adjust.
Most sinks fit with a 1/8-inch gap around the perimeter for adhesive.
Step 4: Apply Epoxy and Silicone
Clean both surfaces with denatured alcohol. Mix a two-part epoxy according to the instructions. Apply a continuous bead to the sink rim, then press it against the granite.
Immediately apply a bead of 100% silicone along the outside edge of the seam. This seals against water.
Step 5: Install Brackets and Tighten
Attach the mounting clips or brackets per the manufacturer's instructions. Tighten them evenly. Think of it like tightening lug nuts on a wheel.
Go around in a star pattern, a little at a time. Over-tightening is the number one cause of cracked granite. The brackets should feel snug, not torqued.
Step 6: Temporary Support and Cure
Place a wooden brace or a 2×4 under the sink to hold it up while the epoxy cures. Do not rest the sink on the granite alone. Let everything sit for 24 to 72 hours without any weight in the sink.
Check the adhesive manufacturer's label for exact cure time.
Step 7: Final Hookup
After curing, connect the drain assembly, P-trap, and water lines. Apply a final bead of silicone caulk along the visible seam between the sink and granite. Let that dry for another 24 hours before running water.
Mistakes That Will Crack Your Granite (Or Worse)
Even experienced DIYers make these errors. Let's flag them clearly.
Over-tightening clips. This is the most common mistake. People crank down on the brackets to feel secure. The pressure concentrates at one spot.
Granite is strong in compression but weak in tension. A tightly clamped bracket can create a stress point that cracks the slab. Tighten until the sink is held firmly, then stop.
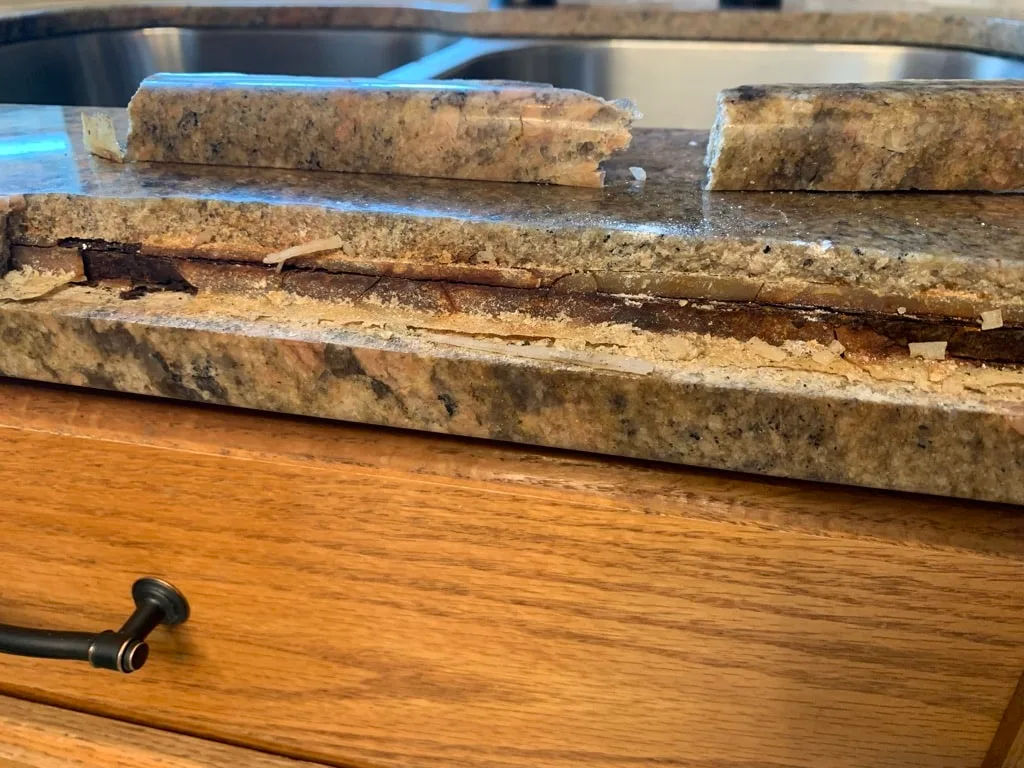
Image source: Bing (Web (fair-use with source credit))
Skipping the template or cutting too small. A cutout that's a hair too narrow will force the sink in. This puts tension on the granite. A cutout too large leaves no lip for the adhesive to grab.
Always dry-fit before gluing.
Using the wrong adhesive. Some two-part epoxies are too brittle for stone. Use one labeled for stone or granite. Avoid construction adhesives that remain flexible.
They don't provide enough hold over time.
Not supporting the sink during cure. If you let the sink hang by the adhesive alone while it cures, the bond will be weak. The sink can sag before the epoxy hardens. This creates an uneven seam.
Use a temporary brace.
Ignoring silica dust. Breathing granite dust during cutting can cause lung damage. That's not an exaggeration. Use a wet saw if possible.
At minimum, use a shop vac with a HEPA filter. Your health is worth more than saving an hour.
When to Call a Pro (And When You Can DIY)
Not every granite countertop is a candidate for DIY installation. Let's be honest about when you should step back and hire a fabricator.
You should call a pro if any of these apply:
- You've never cut stone before. The learning curve is steep and expensive.
- Your slab is 2 cm thick. Thin granite needs specialized handling and more brackets.
- You're installing a farmhouse or apron-front sink. These require precise cutouts and heavy support systems.
- Your sink weighs over 40 pounds. Cast iron and fireclay are a nightmare to lift and align alone.
- The cutout is complex. Multiple sink basins, odd shapes, or corners near the edge increase crack risk.
You can reasonably DIY if all of these are true:
- Your sink is lightweight stainless steel (under 20 pounds).
- The granite is 3 cm thick and already cut to size with a hole you can enlarge.
- You have experience with power tools and understand how to handle stone.
- You're patient enough to wait 72 hours for the epoxy to cure.
- You have a helper for the lifting and alignment.
What a pro charges vs. the cost of a mistake. A professional installation typically runs $200 to $500 for labor. This depends on your area and sink complexity. Compare that to replacing a cracked granite slab.
A single slab of mid-grade granite can cost $1,500 to $3,000 installed. A mistake means you're buying a whole new countertop.
The one scenario where DIY makes sense. You have a pre-cut hole in your granite. Your sink is lightweight. You're comfortable with epoxy and brackets.
In that case, you're essentially just doing the mounting and sealing. The risky part (cutting the stone) is already done. Even then, follow the steps carefully and don't skip the cure time.
Frequently Asked Questions
Can I install an undermount sink without cutting the granite myself?
Yes, you can. Many stone fabricators will cut the hole for you for a fee. You then take the slab home and do the mounting yourself.
This removes the highest-risk step and leaves you with the manageable part of the installation.
How long does the adhesive really need to cure?
Most two-part epoxies reach handling strength in 24 hours. Full cure takes 72 hours. Do not use the sink, run water, or place heavy items in it during that time.
The manufacturer's label on your specific epoxy is the final authority.
What if my sink is already falling? Can I fix it without removing it?
Sometimes. If the sink is loose but hasn't dropped, you can try adding additional brackets from underneath. Use a 2×4 brace to push the sink up, then screw in new clips.
For a sink that has already separated, removal and reinstallation is the only reliable fix.
Is silicone alone enough to hold an undermount sink?
No. Silicone is a sealant, not a structural adhesive. It will lose grip over time from vibration and thermal expansion.
Use it only as a sealant over the epoxy and brackets. Never rely on silicone alone for support.
Can I use construction adhesive instead of epoxy?
Not recommended. Most construction adhesives are designed for porous materials like wood or drywall. They don't bond well to polished granite or stainless steel.
Use a two-part epoxy specifically labeled for stone or metal to granite.
What's the worst that can happen if I install it wrong?
A sink that falls out of the cabinet can shatter on the floor. It can damage your plumbing and flood your kitchen. A cracked granite slab requires a full replacement.
Water leaks from a poor seal can rot the cabinet base and cause mold. The stakes are high. That's why professional installation is often worth the money.

Similar Posts