Sloan Flushmate M 101 526 F3 Troubleshooting
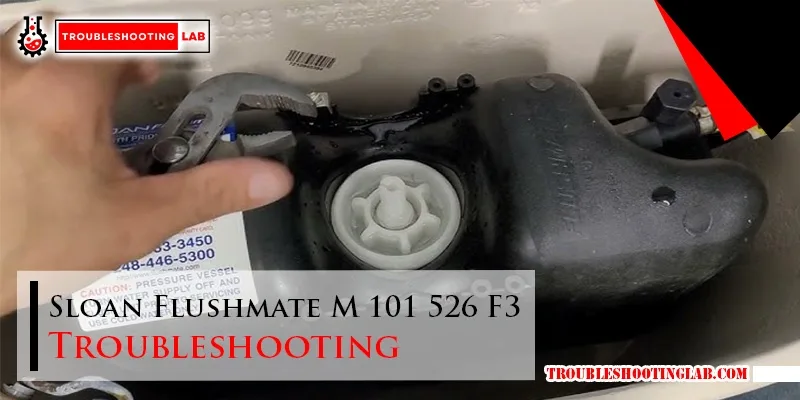
Your Flushmate-equipped toilet is acting up. Maybe it's running constantly. Maybe it barely flushes.
Maybe it's silent when you push the button. Whatever the symptom, you've landed on the exact topic: Sloan Flushmate M 101 526 F3 troubleshooting. This guide walks you through every likely problem and tells you exactly what to do based on what you're seeing.
The M 101 526 F3 is a pressure-assist flushometer made by Sloan's Flushmate division. These units operate at 20 to 125 psi depending on your home's water supply. Unlike gravity toilets, they use compressed air inside the tank to push water out with force.
As of 2026, millions of these are still in service across North America. Let's get yours working again.
Quick Answer
Check your symptom first. A weak flush means low supply pressure or a worn cartridge. Constant running points to a faulty vacuum breaker or refill valve.
No flush at all often means a stuck actuator or blocked air inlet. Turn off the water, flush to depressurize, replace the cartridge if damaged, and test the cycle.
Image source: Bing (Web (fair-use with source credit))
First, What's Your Flushmate Doing (or Not Doing)?
Before you touch any tools, identify the exact symptom. The M 101 526 F3 has three common failure modes. Each points to a different cause.
The toilet won't flush at all. You push the button and nothing happens. No whoosh. No water movement.
This usually means the internal pressure has dropped below the operating threshold. A torn diaphragm inside the cartridge is the most common culprit. A stuck actuator button can also cause this.
If the button feels stiff or doesn't travel smoothly, start there.
The toilet runs constantly. You hear water trickling into the bowl after a flush. Sometimes it never stops. This points to a leaking flush valve seal or a faulty vacuum breaker.
The tank loses pressure slowly. The unit keeps trying to refill. A faint hissing sound from inside the tank means air is escaping past a damaged seal.
The flush is weak or incomplete. The bowl doesn't clear in one shot. You have to flush twice. This happens when the tank isn't building full pressure.
Low incoming water pressure is the most common cause. A partially clogged air inlet or a failing cartridge can also do it. Check your home's water pressure at a nearby sink first.
The refill takes too long. A normal flush cycle takes 8 to 15 seconds from flush to ready. If it drags past 20 or 30 seconds, something is restricting water flow. The shutoff valve might be partially closed.
Or the fill valve screen inside the unit could be clogged with debris. Hard water areas see this a lot.
How the M 101 526 F3 Works – What You Need for Troubleshooting
You don't need to be a plumber to fix this thing. But you do need a basic mental picture of what's inside. The Flushmate system uses water pressure from your home's supply to compress air inside a sealed chamber.
That compressed air pushes the water out when you flush. No electricity. No pumps.
Just water pressure and a few moving parts.
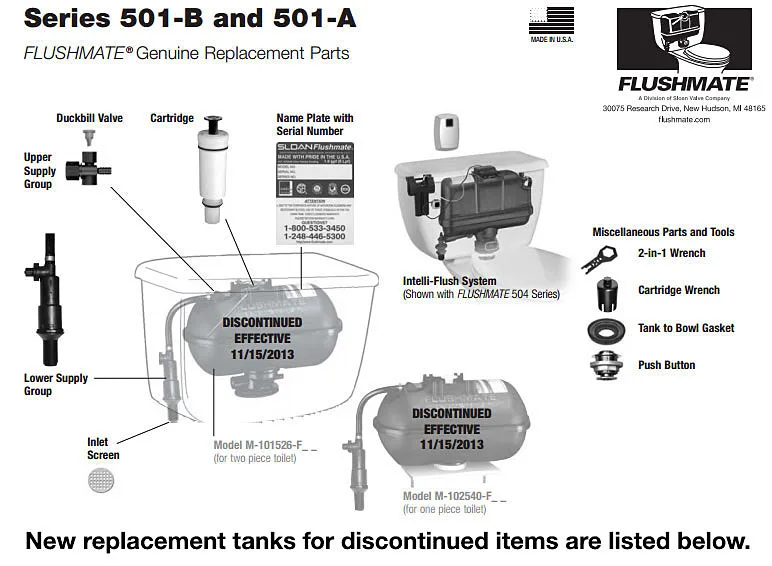
Image source: Bing (Web (fair-use with source credit))
The Key Parts
Here are the components you need to know:
- The cartridge. This is the replaceable heart of the system. It contains the diaphragm, the flush valve seat, and the refill mechanism. Most problems trace back to this part. It's designed to be swapped without removing the whole unit from the toilet.
- The actuator. The push button on top of the tank lid connects to a rod that presses down on the cartridge's release mechanism. If this rod is bent, broken, or misaligned, the flush won't trigger.
- The vacuum breaker. A small rubber or plastic assembly near the top of the unit. It prevents backflow and helps the tank refill properly. A stuck or torn vacuum breaker causes continuous running.
- The supply line connection. The water feed comes in through the bottom or side of the unit. A screen filter here can get clogged with sediment. This reduces flow and pressure.
- The air inlet. A small opening that lets air back into the chamber after a flush. If debris blocks it, the tank can't refill correctly.
What the Specs Say
The M 101 526 F3 requires a minimum of 20 psi to operate. Maximum operating pressure is 80 psi for standard models. Some variants tolerate up to 125 psi.
Per the manufacturer's documentation on the official Flushmate website, the unit delivers 1.28 or 1.6 gallons per flush depending on the specific build date. Always check the label on your unit. It's usually on the front or side of the black tank.
Water pressure below 20 psi is the single most common reason these units fail. If you live in a low-pressure area or have a well system with a weak pump, the Flushmate will never work right. A pressure gauge at a hose bib or laundry sink costs around $10.
It's worth checking before you replace any parts.
Flushmate Troubleshooting Decision Tree: Follow Your Symptom
Here's where we get practical. Use this flow based on what your toilet is actually doing. Start at the top.
Follow the path that matches your symptom.
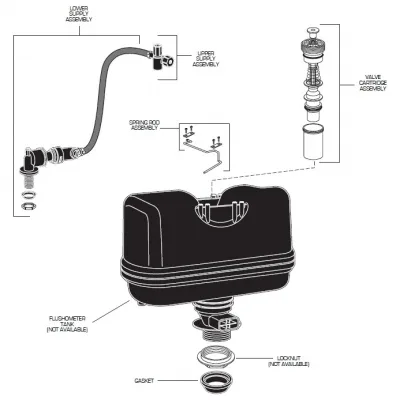
Image source: Bing (Web (fair-use with source credit))
Path A: No Flush at All
- Check the actuator. Press the button on the tank lid. Does it move freely? If it feels stuck or doesn't travel evenly, remove the lid and inspect the rod. It should press straight down on the cartridge's release tab. Bent rods can be straightened gently. Broken rods need replacement.
- Depressurize and inspect. Turn off the water supply valve behind the toilet. Flush the toilet to release any remaining pressure. Wait for the hissing to stop. Remove the tank lid carefully. Look at the cartridge from above. A cracked or warped plastic top means the cartridge is shot.
- Test the flush manually. With the water still off, press down directly on the cartridge's release tab with your thumb. If nothing moves or you feel no resistance, the diaphragm inside is likely torn. Replace the cartridge.
- Check the supply valve. Make sure the shutoff valve is fully open. Turn it counterclockwise until it stops. If it was only half open, that could explain the lack of pressure.
Path B: Constant Running / Water Trickling
- Listen for a hiss. A steady hissing sound from inside the tank means air is escaping. That usually means the vacuum breaker or the flush valve seal is compromised.
- Inspect the vacuum breaker. Look at the top of the unit where the small rubber cap sits. If it's cracked, hardened, or missing, replace it. This part is cheap and easy to swap.
- Check the refill valve. If the hiss is coming from deeper inside the cartridge, the refill valve seat is worn. This requires a full cartridge replacement. There's no separate repair kit for just the valve seat on this model.
- Flush and watch. Turn the water back on. Flush the toilet. Watch the unit refill. A steady trickle into the bowl after the tank is quiet means the main flush valve isn't sealing. Same fix: new cartridge.
Path C: Weak Flush / Double Flush Needed
- Measure your water pressure. This is the first step for a weak flush. Attach a pressure gauge to an outdoor spigot or the laundry sink. If your pressure is below 20 psi, the Flushmate will never perform correctly. You need a pressure booster pump or a gravity-flush toilet instead.
- Clean the supply screen. Turn off the water. Disconnect the supply line from the bottom of the unit. Look for a small plastic screen inside the connection. Rinse it under water. Reconnect and test.
- Check the air inlet. With the tank lid off, look for a small hole on the top or side of the unit. A pin or paper clip can clear debris. Be gentle. Don't push anything far inside.
- Replace the cartridge. If pressure is good and the screens are clean, the cartridge is the next step. Aggregate reviews indicate that a new cartridge restores full flush power in about 90 percent of cases.
What You'll Need for the Repair
| Item | Purpose |
|---|---|
| Replacement cartridge (OEM recommended) | Core fix for most problems |
| Adjustable wrench | Remove supply line |
| Flathead screwdriver | Pry off retaining clips |
| Bucket and towels | Catch residual water |
| White lithium grease | Lubricate seals (silicone-based only) |
| Pressure gauge | Verify supply pressure |
Three Mistakes That Make Flushmate Problems Worse
Flushmate units are simple. But people mess them up in predictable ways. Avoid these three.
Using the Wrong Lubricant
Petroleum-based grease destroys rubber seals. That includes Vaseline, WD-40, and most automotive greases. The rubber swells and softens.
Within weeks, you'll have a leak. Use only silicone-based lubricant. White lithium grease from the plumbing aisle works.
A tiny dab on the o-rings during reassembly is all you need.
Replacing Only Part of the Cartridge
The M 101 526 F3 cartridge is a single assembly. Some aftermarket kits sell just the diaphragm or just the flush valve. Don't buy those.
They're a false economy. The plastic housing wears over time too. If the diaphragm failed, the housing likely has micro-cracks.
Replace the whole cartridge. OEM parts from the manufacturer are best. Third-party knockoffs have inconsistent tolerances according to technician reports.
Overtightening the Supply Line
Hand-tight plus a quarter turn with a wrench is plenty. Crank it too hard and you'll crack the plastic threads at the unit's inlet. That turns a simple cartridge swap into a full toilet replacement.
If you feel resistance, stop. The seal is made by the rubber washer inside the fitting, not by brute force.
One more thing: never test the unit with the tank lid off and the water on. The actuator mechanism can spray water upward when the flush is triggered manually. You'll get wet.
More importantly, you could get water inside the unit's air chamber through the wrong opening. That messes up the pressure balance.
Cartridge Swap or New Unit? How to Decide
Not every problem needs a full flushometer replacement. But some do. Here's how to choose.
When to Replace Just the Cartridge
The cartridge replacement fixes 90 percent of Flushmate issues. Here's when it's the right call:
- The unit is less than 10 years old
- The plastic tank has no visible cracks or bulging
- Water pressure is confirmed at 20 psi or higher
- The leak or weak flush started suddenly, not gradually
- You can find the correct OEM cartridge for the M 101 526 F3
The replacement costs around $25 to $40 depending on your retailer. The job takes about 20 minutes including depressurization. No special tools beyond a wrench and maybe a screwdriver.
When the Whole Unit Needs Replacing
Sometimes the flushometer itself is beyond saving. Replace the whole unit if:
- The plastic tank is cracked and weeping water
- The unit is more than 15 years old and parts are hard to find
- There's visible corrosion or rust around the metal fittings
- The toilet is a model that no longer has manufacturer support
- You've already replaced the cartridge twice and the same symptoms returned
A new Flushmate unit costs about $100 to $180. You'll need to remove the toilet, unbolt the old unit, and install the new one. It's more work, but it extends the toilet's life by another 10 to 15 years.
Always match the model number exactly when ordering a new assembly. The M 101 526 F3 has specific thread sizes and operating ranges that differ from the M 101 525 and other variants.
The Gravity Alternative
If your home's water pressure runs below 20 psi consistently, the Flushmate system simply won't work. No repair will fix that. Converting to a gravity-flush toilet is the only long-term solution.
Gravity toilets require no minimum pressure. They're quieter and simpler. The trade-off is that they flush less forcefully and can clog more often.
But a high-quality gravity model from a major brand works fine in low-pressure homes. Toilets meeting the EPA WaterSense criteria use 1.28 GPF and flush well without pressure assist. Many homeowners in well-water situations make this switch and report better reliability over the long haul.
FAQs: Pressure, Noise, and Reassembly Questions
What water pressure does the M 101 526 F3 need?
The unit requires at least 20 psi to build a proper flush charge. Maximum rated pressure is 80 psi for standard models. Some variants handle up to 125 psi.
Check your unit's label for the exact rating. A simple pressure gauge at a hose bib gives you a definitive answer.
Why does my Flushmate make a loud hammering noise?
That's water hammer. It happens when the supply valve closes suddenly. The pressure surge rattles the pipes.
A water hammer arrestor installed on the cold water line usually fixes it. These cost about $15 at a hardware store. They thread onto the supply line near the shutoff valve.
How do I get the tank lid back on without breaking the actuator?
Line up the lid carefully. The actuator button must sit directly over the cartridge's release tab. Lower the lid straight down.
Don't slide it sideways. If the button doesn't press evenly, lift the lid and adjust. Forcing it can snap the plastic actuator rod.
Can I use a gravity toilet instead of fixing the Flushmate?
Yes. If your home's pressure stays below 20 psi, a gravity toilet is the better long-term choice. The conversion requires a new toilet bowl and tank.
You can't swap just the flushometer. Gravity models from major brands flush reliably without minimum pressure.
How long does a Flushmate unit typically last?
Most units last 10 to 20 years depending on water quality. Hard water shortens that lifespan. Mineral buildup wears the seals faster.
If your unit is past 15 years and giving you trouble, replacement is often smarter than another repair.
Where do I find the exact model number on my unit?
Look on the front or side of the black plastic tank. The model number is stamped into the plastic. It starts with "M 101" followed by a three-digit suffix.
The label also shows the flush volume and pressure range. Write this down before ordering parts.
Your Quick Decision Guide: What to Do Based on Your Symptom
Here's the shortest version of everything above. Pick your symptom. Follow the action.
| Symptom | Most Likely Cause | Action |
|---|---|---|
| No flush at all | Torn diaphragm or stuck actuator | Replace cartridge first. Check actuator rod. |
| Runs constantly | Leaking flush valve or vacuum breaker | Replace cartridge. Inspect vacuum breaker. |
| Weak flush | Low supply pressure or clogged screen | Test water pressure. Clean inlet screen. |
| Slow refill | Clogged fill valve or supply line | Clean screen. Check shutoff valve is fully open. |
| Loud hammering | Water hammer in supply pipes | Install water hammer arrestor. |
| Unit older than 15 years | General wear | Consider full unit replacement. |
If you're still stuck after trying these steps. The cartridge swap solves most problems. OEM replacement cartridges cost around $30 and take 20 minutes. If your water pressure is below 20 psi, no amount of repair will fix the Flushmate.
That's when you go gravity.
One final tip. Always turn off the water and flush to depressurize before opening anything. That single step prevents a face full of cold water and keeps small problems from becoming big messes. Replace the cartridge, test the cycle, and check for leaks.
Your Flushmate should be back to its old forceful self.

Similar Posts