Where To Place Recessed Lights In Kitchen
Where To Place Recessed Lights In Kitchen
If you have ever stood at your kitchen counter chopping vegetables under your own shadow, you already know the answer matters more than most people think. Get the layout wrong, and you end up with dark spots on your counters, glare off the backsplash, or a row of lights that looks like an airport runway. Get it right, and your kitchen feels bigger, brighter, and much more functional.
Per Illuminating Engineering Society (IES) guidelines, a well-lit kitchen needs about 35 to 50 footcandles on task surfaces. You cannot hit that number by guessing or by scattering lights evenly across the ceiling. You need a system.
Here is how that system works.
Quick Answer
Place recessed lights 24 inches from cabinets and walls. Space them based on your ceiling height divided by two. For an 8-foot ceiling, that means 4 feet apart.
Offset rows to cover countertops, not the center of the room. Put island lights over the countertop, not over seating.
Why Layout Comes First
Most people start a kitchen lighting project by picking out fixtures. That is backward. The housing type, trim style, beam angle, and even the dimmer switch you need all depend on where the lights go.
The single biggest mistake is buying lights first and figuring out placement after. You end up with trims that do not match the beam spread you need. Or housings that will not fit between joists.
Or a dimmer that flickers because the LED driver is not compatible with the switch you picked.
Layout determines everything else. It tells you how many lights you need, what size aperture works, whether you need gimbal trims for tilting, and whether the housings need to be IC-rated because there is insulation above. Without a layout plan, you are buying parts in the dark.
Start with a tape measure and graph paper. Measure the length and width of the kitchen. Mark the location of cabinets, the island, the sink, the stove, and the refrigerator.
Then draw your light rows. That drawing is worth more than any spec sheet.
As of 2026, the National Electrical Code (NEC) requires all recessed housings in insulated ceilings to be IC-rated. Check your local code before buying anything. More on that when we talk about obstacles.
Ceiling Height and Kitchen Zones
Two variables control your entire layout. Get these right, and the rest is just math.
Ceiling height determines spacing. The standard rule from the IES Lighting Handbook is to divide your ceiling height by two. That gives you the distance between light centers.
| Ceiling Height | Spacing Between Lights | Distance From Wall |
|---|---|---|
| 8 feet | 4 feet | 2 feet |
| 9 feet | 4.5 feet | 2.25 feet |
| 10 feet | 5 feet | 2.5 feet |
That is a starting point. You will adjust it based on the zones.
Kitchens have three lighting zones. Ambient light fills the room. Task light hits your work surfaces. Accent light picks out a backsplash or open shelving.
Your recessed lights need to serve at least the first two.
For task zones, you want the light pool to land on the counter, not on your head. That means the row of lights above those countertops needs to be offset from the wall. About 24 inches from the cabinet face to the center of the light usually does it.
For ambient zones, you can use wider beam angles or space lights farther apart. Just do not expect ambient lights to give you good task visibility. They will not.
The Countertop Rule
Here is why so many kitchens have dark counters despite having plenty of ceiling lights. The lights were placed in the center of the room instead of over the counter.
Your body blocks light. If the light is directly above you, your head and shoulders cast a shadow onto the countertop. That is physics.
You cannot fix it by adding more lights to the same center row. You fix it by moving the lights closer to the cabinets.
The rule is simple. Measure 24 inches from the wall or cabinet face. That is where your light center should be for a row serving a countertop.
This works for both base cabinets and upper cabinets. If you have upper cabinets, the 24 inch measurement starts from the front face of those cabinets, not from the wall. That puts the light past your head position when you are standing at the counter.
For a kitchen with an 8-foot ceiling, your first row of lights sits 2 feet from the wall. The next row sits 4 feet from the wall following the ceiling-height spacing rule. That second row hits the center of a typical kitchen and provides ambient fill.
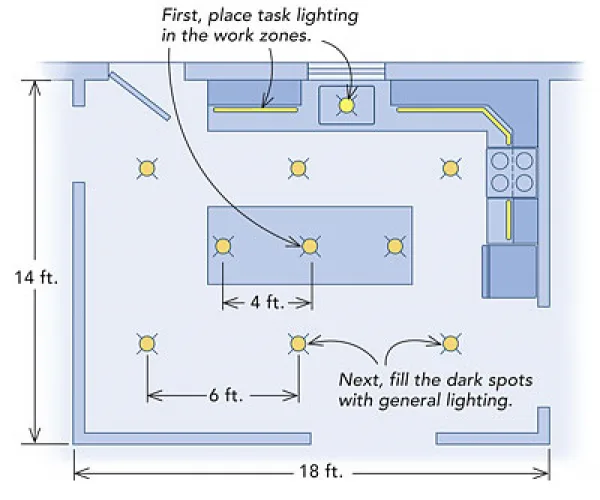
Here is what a properly laid-out kitchen looks like from above.
Image source: Bing (Web (fair-use with source credit))
Notice how the lights are not centered in the room. They are offset to cover the counters. The narrow kitchen has one row.
The wider kitchen has two rows, with the second row filling the center.
Countertop depth matters. Standard base cabinets are 24 inches deep. With a 1.5-inch overhang on the countertop, the front edge of your counter sits about 25.5 inches from the wall. Placing a light 24 inches from the wall puts it just behind the front edge of the counter.
That is exactly where you want it.
Island Lighting
Kitchen islands are where the centered-light mistake happens most often. People measure the island, find the exact center, and put a row of lights there. Then they sit at the island and get blinded.
An island serves two functions. Prep work and seating. Those two functions need different light placements.
For prep work on the island surface, you want lights centered over the countertop. That part is correct. But if the island has seating on one side, centering the lights over the full island places them directly above the heads of anyone sitting there.
They get a glare. You get complaints.
The fix is to split the island into two zones. The work zone sits under the lights. The seating zone sits outside the light row.
Here is how you do it. Measure the island width. Subtract 12 inches on the seating side.
Center your lights in the remaining width. That moves the row off the seats and onto the counter.
For a 48-inch-wide island with seating on one side, center your lights 18 inches from the cabinet face on the work side. That leaves 30 inches of open space on the seating side. The light pools land on the granite or butcher block, not on your guests.
Here is a visual showing the difference.
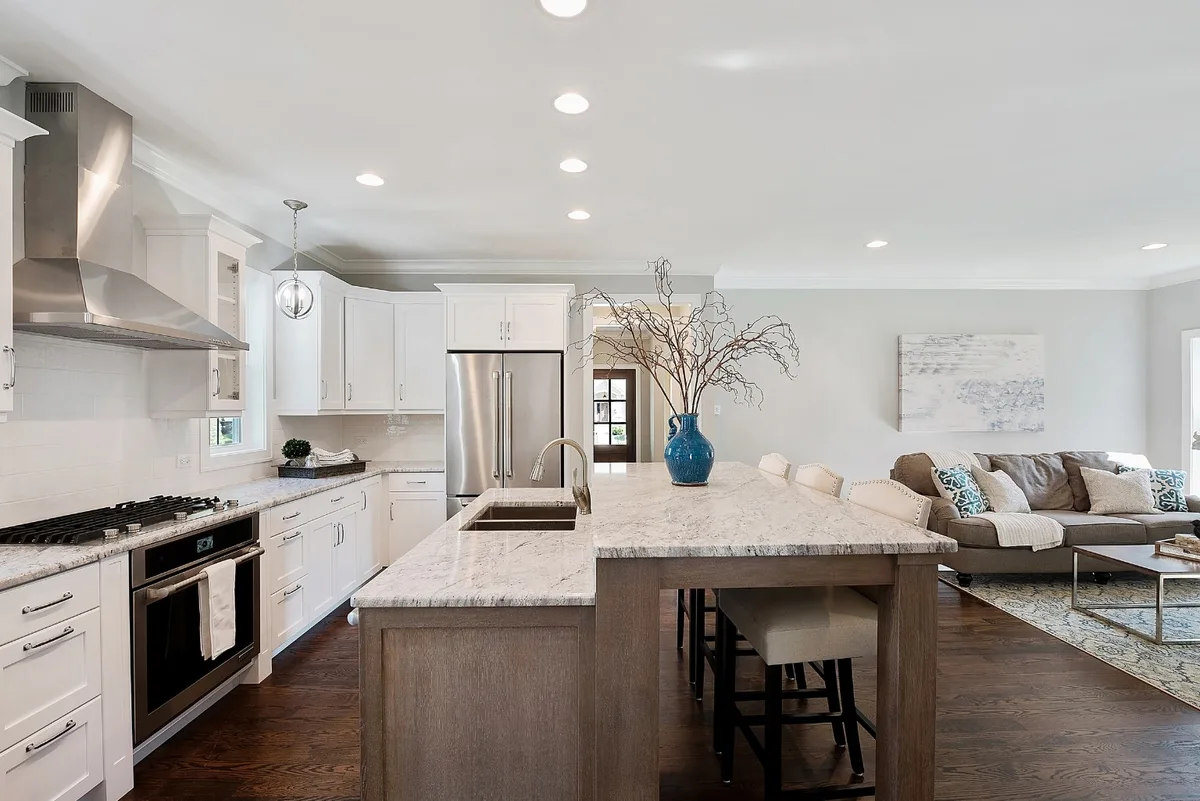
Image source: Bing (Web (fair-use with source credit))
Gimbal trims help here. If your island is narrow or you need to shift the beam slightly, a gimbal trim lets you tilt the light up to 30 degrees. That can save a layout that is slightly off. But do not rely on gimbals as a crutch.
Get the position right in the plan.
Number of lights on an island matters too. For islands under 4 feet long, two lights spaced evenly across the work zone work well. For islands 5 to 7 feet, consider three lights.
Anything longer than 7 feet, you are usually better with four lights or a combination of recessed and pendants.
Working Around Obstacles
The perfect layout on paper hits the real ceiling, and suddenly there is a joist exactly where your third light needs to go. This is where most DIY layouts fall apart.
Your ceiling has structure. Joists run in one direction, typically 16 or 24 inches on center. You cannot cut a hole through a joist.
You cannot move a joist without an engineer. You have to work around it.
First, learn which direction your joists run. Look in the attic if you have access. Use a stud finder on the ceiling. Check the attic hatch.
The orientation tells you if you can install lights in a straight row parallel to the joists, or if you need to stagger them between spans.
If your ideal light position lands under a joist, you have three options.
- Shift the light 8 inches left or right to sit between joists. This is the easiest fix and usually does not ruin the layout.
- Use a remodel housing with a junction box that fits between joists. Make sure the housing you buy is rated for the space you have.
- Switch to a wafer-thin LED light. These are low-profile and can fit in tight spaces where standard housings will not go.
Ductwork is harder to dodge. Forced air ducts and plumbing vents often run through ceilings, especially near the kitchen. If you hit a duct, you cannot cut through it. You have to move the light at least 6 inches away, sometimes more.
This is where the grid layout on paper proves its value. You can see all your light positions and shift them together. Move one light, and you might need to move the whole row to keep spacing consistent.
Pipes are the hidden danger. Water supply lines and drain pipes do not show up on a stud finder. If you are remodeling, take photos of the ceiling before it is closed. If it is already closed, use a borescope from a small drill hole to peek above before cutting your light holes.
A single cut into a copper pipe means a plumber visit you did not budget for.
Trim and Beam Angle
You can nail the spacing and still end up with a kitchen that feels wrong. The culprit is usually the trim style and beam angle.
Beam angle controls how wide or narrow the light pool is on your counter. Narrow beams under 40 degrees create tight, dramatic pools. Wide beams over 60 degrees spread light evenly.
For most kitchens, a medium beam of 50 to 60 degrees works best.
Trim style changes how the light reads in the room. Baffle trims have ridged interiors that absorb stray light and reduce glare. They are the best choice for kitchens because they prevent harsh reflected glare off glossy countertops and backsplash tile.
Reflector trims have smooth, shiny interiors that bounce more light downward. They look brighter but create more glare. Use them only in spaces with matte surfaces or where you need maximum punch from each light.
Gimbal trims let you tilt the light up to 30 degrees. They are useful for accenting a backsplash or for hitting a specific task zone when your light position is slightly off.
Here is a visual comparison showing how beam angle changes the coverage.
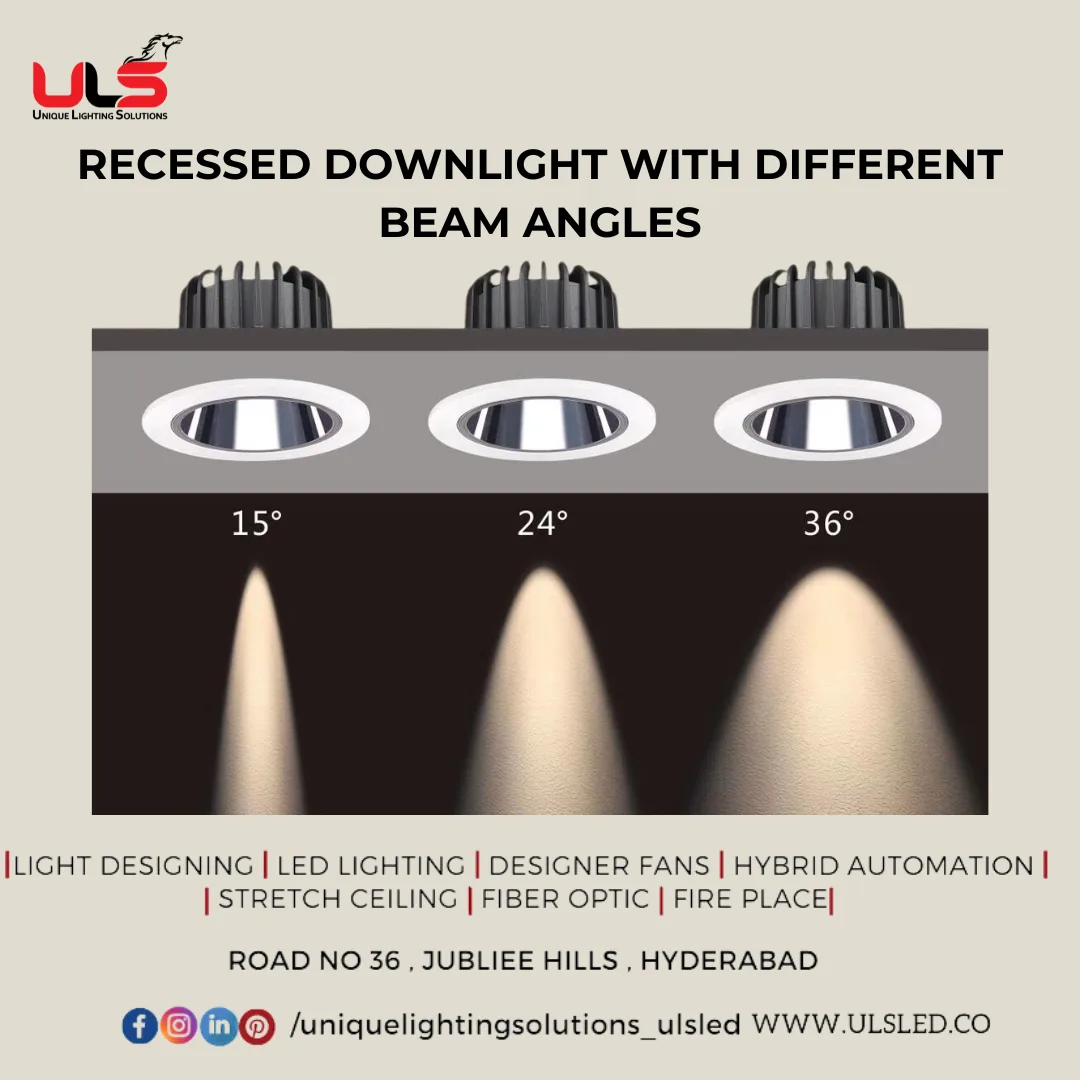
Image source: Bing (Web (fair-use with source credit))
Color temperature matters for kitchen feel. Our research consistently shows that 3000K works best for general kitchen lighting. It renders food colors naturally without feeling clinical. Avoid 4000K and above unless you want a commercial kitchen look.
CRI is the hidden spec people overlook. A Color Rendering Index of 90 or higher ensures that reds look red and greens look green. Low CRI lights make food look unappetizing and can distort your vegetable prep.
Check the spec sheet before buying.
Zones and Controls
One switch for all your recessed lights is a missed opportunity. Separate controls let you tailor the light to the task.
Split your lights into at least two switch zones. Put the counter row on one switch and the island or center row on another. This lets you dim the ambient lights while keeping task lights at full brightness.
Why does this matter? When you are prepping dinner, you want the counter lights on full. When you are eating at the island, you want those island lights dimmed to a soft glow.
One switch cannot do both.
A three-zone setup works even better for larger kitchens.
- Zone 1: Counter task lights (sink, stove, primary prep)
- Zone 2: Island or peninsula lights
- Zone 3: Ambient fill lights (center of room, walking paths)
Dimmers are not optional in a kitchen. LED-compatible dimmers prevent flicker and let you dial the mood from bright and functional to soft and comfortable. As of 2026, most LED drivers are designed for trailing-edge dimmers. Check compatibility before installation.
Veteran electricians we have consulted recommend installing the dimmer at the primary entry point to the kitchen. Put a second dimmer at the other entrance if the kitchen has two access points. That way you never walk into a dark kitchen.
Working With Different Kitchen Shapes
Not every kitchen fits the standard rectangle layout. Your L-shaped, galley, or U-shaped kitchen needs adjustments.
Galley kitchens have counters on two parallel walls. Place a single row of lights offset 24 inches from one wall. If the galley is wider than 8 feet, add a second row on the other side.
Keep the rows 4 feet apart for an 8-foot ceiling to avoid crossing the light pools.
L-shaped kitchens need two rows that follow the counter layout. Run one row along the long counter leg and another along the short counter leg. Where the rows meet at the corner, you can skip one light to avoid overlapping pools.
The corner typically gets enough spill light from the adjacent fixtures.
U-shaped kitchens give you the most even coverage because counters wrap around three sides. Place a row along each of the three counter runs. The center of the U is mostly open floor, so you can use wider beam angles there or skip ambient fixtures altogether if the task rows provide enough fill light.
Open concept kitchens blur the line between kitchen and living space. Keep the kitchen task lights on their own switch. Use a separate row of ambient lights that match the spacing and color temperature of the adjacent living area.
This creates visual continuity without compromising kitchen task visibility.
Frequently Asked Questions
How far from the wall should recessed lights be in a kitchen?
Place them 24 inches from the wall or cabinet face for task lighting over counters. For ambient fill lights, measure half the spacing between lights. On an 8-foot ceiling, that is 2 feet from the wall.
Can recessed lights be too close together?
Yes. Lights closer than 3 feet apart create overlapping pools that look like a ceiling dotted with hot spots. It also wastes money on extra fixtures and installation labor you do not need.
How many recessed lights do I need in a kitchen?
For a typical 10×10 kitchen with an 8-foot ceiling, you need about 6 to 8 lights. Two rows of three lights each covers the counters and fills the center. Use the ceiling height divided by two formula to confirm.
Should I use 4-inch or 6-inch recessed lights in a kitchen?
Use 4-inch lights for task zones and 6-inch lights for ambient fill. Four-inch lights create tighter, more controlled pools. Six-inch lights spread light wider and work well for general room lighting.
Do I need IC-rated housings for a kitchen ceiling?
Yes, if there is insulation above the ceiling. The National Electrical Code requires IC-rated housings whenever the fixture will be in contact with insulation. Non-IC housings can overheat and create a fire risk.
Can I mix recessed lights with pendants in a kitchen?
Absolutely. Use pendants over the island for decorative accent and style. Recessed lights handle the task and ambient work.
Keep the color temperature consistent between them so the room feels cohesive.
Decision Guide by Kitchen Shape
Here is a quick reference for the most common kitchen shapes. Match your layout to find your starting positions.
| Kitchen Shape | Row Placement | Spacing (8 ft ceiling) | Notes |
|---|---|---|---|
| Galley | One row offset 24 in from main counter | 4 ft apart | Add second row if width exceeds 8 ft |
| L-shaped | Two rows along each counter leg | 4 ft apart | Skip corner light where rows meet |
| U-shaped | Three rows along each counter run | 4 ft apart | Center may not need dedicated fixtures |
| Open concept | Kitchen task row plus ambient row | 4 to 5 ft apart | Match ambient to adjacent room |
| Island only | Row centered on work zone, not seats | 4 ft apart | Offset 12 in toward work side |
These numbers are starting points. Adjust if your kitchen has unusual dimensions or obstacles. Your main goal remains the same.
Put light where your hands work, not where your head sits.
That spacing rule, paired with good trim selection and separate zone controls, turns an average kitchen into one that works for cooking, cleaning, and everything in between. Start with the plan on paper. Check your joist direction.
Confirm your ceiling height. Then buy your lights. That order saves time, money, and a lot of frustration.

Similar Posts