How To Install A Smart Thermostat: Easy Step-By-Step Guide

Installing a smart thermostat is mostly about safe wiring, proper setup, and a few careful checks.
A smart thermostat can make your home more comfortable and more efficient, but the install has to be done right. I’ve walked through enough thermostat swaps to know that the job looks simple until you meet an old wire bundle, a missing C-wire, or a system that does not match the box. This guide will show you how to install a smart thermostat step by step, with practical tips, real-world pitfalls, and the kind of detail that helps you finish the job with confidence.
What a Smart Thermostat Does
A smart thermostat is a connected temperature controller that lets you adjust heating and cooling from an app, voice assistant, or on-device display. Many models learn your schedule, track energy use, and help reduce wasted heating and cooling.
In simple terms, it replaces a basic wall thermostat and gives you more control. Depending on the model, it may work with Wi-Fi, geofencing, sensors, and smart home platforms like Amazon Alexa, Google Home, or Apple HomeKit.
Here’s why people usually upgrade:
- Better comfort with more precise temperature control
- Remote access from your phone
- Energy-saving schedules and automation
- Usage reports that help you spot waste
- Alerts for system issues or extreme temperatures
A smart thermostat is not magic, though. It still needs correct wiring, the right HVAC compatibility, and a solid setup. If the install is rushed, even the best device can act flaky.

Before You Install a Smart Thermostat
Before touching any wires, check whether your heating and cooling system is compatible. This is the step that saves the most time, and in my experience, it prevents the most frustration.
You should confirm these things first:
- Your HVAC type, such as forced air, heat pump, boiler, or radiant heat
- Your current thermostat wiring
- Whether you have a C-wire or common wire
- Power to the HVAC system and thermostat
- The smart thermostat model’s compatibility list
Most manufacturers offer compatibility tools and wiring guides. Those tools matter because not every smart thermostat works with every system. Heat pumps, dual-fuel systems, and multi-stage HVAC setups often need special attention.
You should also gather your tools:
- Screwdriver
- Drill and wall anchors, if needed
- Level
- Wire labels or masking tape
- Smartphone or tablet
- Flashlight
- Voltage tester, if you know how to use one safely
One lesson I learned the hard way: take a clear photo of the old wiring before removing anything. It sounds obvious, but that picture can save you when the labels fall off or the wires look less organized than expected.
How to Install a Smart Thermostat
Installing a smart thermostat is usually a straightforward DIY project if your system is compatible and the wiring is standard. The key is to work slowly and keep the wires organized.
1. Turn off power to the HVAC system
Start at the breaker box and shut off power to your furnace, air handler, and air conditioning system. Some homes have separate breakers, so check carefully.
This step is not optional. Thermostat wires are low voltage, but the HVAC equipment they control can still be damaged if you short something by accident.
2. Remove the old thermostat faceplate
Take off the thermostat cover or body. Most snap off or unscrew easily. If the display goes dark and the wiring remains on the wall plate, you are on the right track.
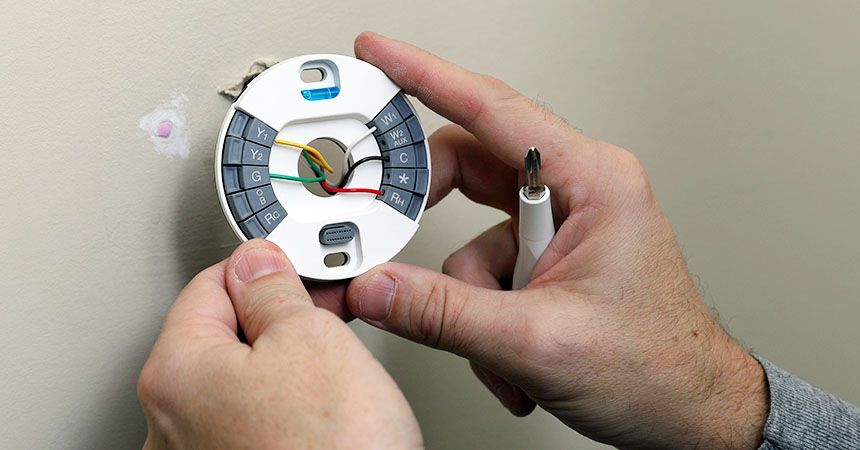
Do not pull the wires out yet. Instead, inspect how they are connected and labeled. If there are labels on the terminals, copy them onto tape or use the thermostat’s app guidance.
3. Label the wires
Before disconnecting anything, label each wire by terminal letter.
Common labels include:
- R or Rc for power
- W for heat
- Y for cooling
- G for fan
- C for common
- O or B for heat pump reversing valve
If your system has more than one wire that looks similar, take several photos. Wire colors are helpful, but terminal labels matter more than color.
4. Remove the old wall plate
Unscrew the mounting plate from the wall. If the new thermostat uses a larger base, you may need to patch or cover old holes. A trim plate can also hide uneven paint marks and old screw holes.
If the wall opening is large, be gentle when pulling the wires forward. You want enough slack to work, but not so much that the wires disappear into the wall.
5. Check for a C-wire
A C-wire provides continuous power to many smart thermostats. Some models can run without one, but others need it for stable power and reliable performance.
If you do not have a C-wire, you may have options:
- Use a manufacturer’s power adapter kit
- Install a C-wire adapter
- Run a new wire from the HVAC system
- Choose a thermostat that supports power-sharing or battery support
This is one of the most common install issues. I have seen people blame the thermostat when the real problem was a weak power setup. If your screen flickers, reboots, or disconnects from Wi-Fi, power is one of the first things to inspect.
6. Mount the new thermostat base
Hold the new wall plate against the wall. Use a level so the thermostat sits straight. Mark the screw holes, drill if needed, and secure the base.
Feed the wires through the opening carefully. Then tighten the mounting screws, but do not over-tighten them. A snug fit is enough.
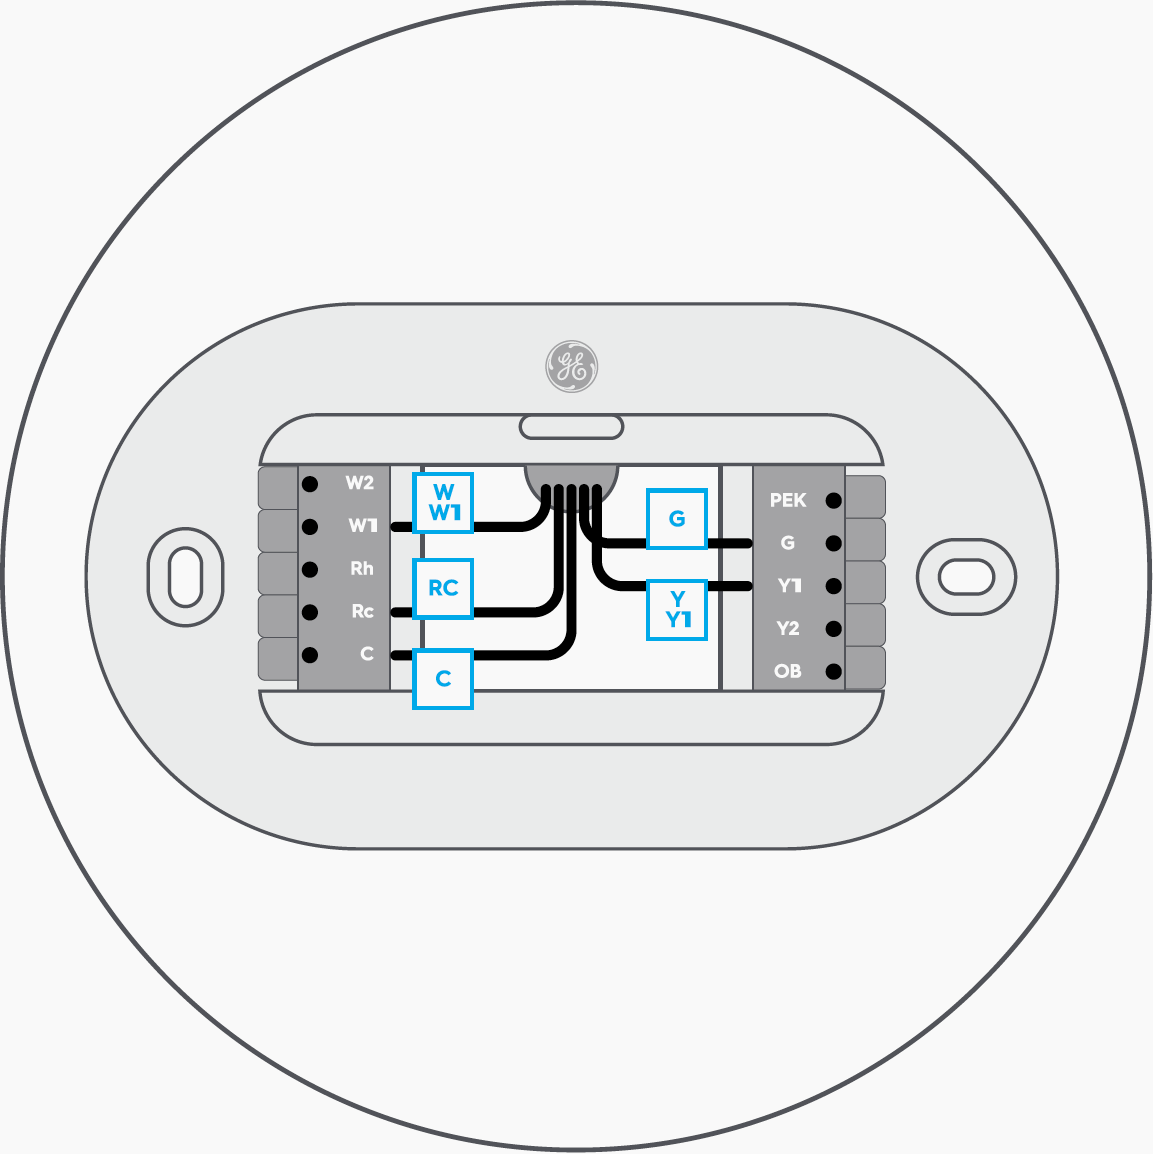
7. Connect the wires
Match each labeled wire to the correct terminal on the new thermostat. Push or screw them in exactly as instructed by the manufacturer.
Common mistakes to avoid:
- Mixing up Rc and Rh
- Putting the C-wire in the wrong terminal
- Confusing heat pump terminals with standard HVAC terminals
- Leaving stray wire strands exposed
- Forgetting to fully seat a wire
If your thermostat uses a dedicated app, it may walk you through the wiring step by step. Follow that guide closely, especially for heat pump systems.
8. Attach the thermostat display
Once the wires are secure, snap or mount the thermostat display onto the base. If it does not click in easily, do not force it. Recheck the wire positions and the base alignment first.
9. Restore power and start setup
Turn the HVAC power back on at the breaker. The thermostat should light up and begin its startup process.
Now follow the on-screen or app setup:
- Choose your Wi-Fi network
- Connect the thermostat to the internet
- Set your location and time zone
- Select heating and cooling system type
- Test fan, heat, and cool modes
- Configure schedules and preferences
This is where the smart part begins. Once connected, the thermostat can learn your routine, send alerts, and help you manage energy use.
10. Test the system carefully
Do not stop after the screen turns on. Test each mode one by one.
Check for:
- Heat turning on when requested
- Cooling starting properly
- Fan operation
- Correct temperature readings
- Stable Wi-Fi connection
- No error messages
If something feels off, go back and verify the wire connections. A tiny wiring mismatch can cause big headaches later.
Common Smart Thermostat Installation Problems
Even a clean install can hit a snag. The good news is that most problems are simple once you know what to look for.
Here are the most common issues:
- No power on the display, often caused by missing C-wire support or breaker issues
- HVAC not responding, often due to wrong wire placement
- Wi-Fi connection problems, often caused by weak signal or router settings
- Short cycling, which may point to setup errors or system compatibility issues
- Wrong temperature readings, sometimes caused by poor thermostat placement
A thermostat placed near a sunny window, vent, or kitchen can read the room wrong. That can make the whole system feel inconsistent, like a weather report with a bad map. Placement matters more than people think.
If the thermostat keeps losing power, do not ignore it. That usually means the wiring or power setup needs another look.
Tips for a Smooth Installation
A smart thermostat install gets much easier when you treat it like a small system project, not just a gadget swap.
Helpful tips from real installs:
- Photograph everything before disconnecting wires
- Label wires even if the colors seem obvious
- Read the compatibility checker before you buy
- Use a level so the thermostat sits cleanly
- Keep the old thermostat until the new one works fully
- Test both heat and cooling, even if you only use one season now
- Set up app alerts right away so you can catch issues early
Another practical tip: update your Wi-Fi password or router settings before installation if your network is being changed soon. Nothing is more annoying than finishing the wiring and then discovering your network changed that same day.
Benefits of Installing a Smart Thermostat
Once installed correctly, a smart thermostat can do more than just change the temperature. It can make your home feel easier to manage.
Main benefits include:
- More comfort through better scheduling
- Lower energy use when you are away
- Remote control when plans change
- Better insight into your heating and cooling habits
- Easier integration with smart home devices
Many households appreciate the convenience most. If you have ever driven home wondering whether you left the heat on too high, an app-connected thermostat can remove that worry in seconds.
There is also an energy angle. The U.S. Department of Energy says programmable temperature control can help reduce heating and cooling waste when used well. Smart thermostats can improve that experience by making scheduling simpler and more automatic.
When to Call a Professional
Some installs are better left to an HVAC technician or licensed electrician. That is not a failure. It is just good judgment.
Consider professional help if you have:
- A heat pump with complex wiring
- A dual-fuel or multi-stage system
- No C-wire and no easy way to add one
- Damaged or confusing thermostat wiring
- A system that behaves strangely after installation
- Any uncertainty about safety or compatibility
I usually tell people this: if the wiring diagram starts looking like a puzzle instead of a plan, it is time to slow down. A pro can save you time and protect the HVAC equipment from damage.
Frequently Asked Questions of How to Install a Smart Thermostat
Do I need a C-wire to install a smart thermostat?
Not always, but many smart thermostats work better with one. A C-wire gives the thermostat steady power, which helps prevent rebooting or connection issues.
Can I install a smart thermostat myself?
Yes, if your HVAC system is compatible and the wiring is standard. Many homeowners can do the job in under an hour with basic tools and careful labeling.
How long does it take to install a smart thermostat?
Most installs take 30 to 60 minutes. If you need a C-wire adapter, run into unusual wiring, or spend time troubleshooting, it can take longer.
Will a smart thermostat work with any HVAC system?
No, not every model fits every system. Heat pumps, boilers, radiant heat, and multi-stage systems may need specific thermostat support, so compatibility should be checked before buying.
What if my smart thermostat does not power on?
First, confirm the breaker is on and the wires are fully seated in the correct terminals. If it still does not power up, the issue may be a missing C-wire, a bad connection, or a compatibility problem.
Can a smart thermostat save money?
It can, especially if you use scheduling, away modes, and energy reports wisely. Savings vary by home, climate, and usage habits, so the thermostat alone is not a guarantee.
Conclusion
Installing a smart thermostat is one of those home upgrades that feels small at first but can make daily life easier fast. When you check compatibility, label wires carefully, and test the system before you call it done, the process is very manageable.
The biggest takeaway is simple: go slow, follow the wiring guide, and do not skip the final testing. If you set it up well, a smart thermostat can give you better comfort, better control, and fewer “Did I leave the heat on?” moments.
If you are ready, choose a compatible model, gather your tools, and start your install with confidence. For more practical home tech tips, keep exploring, subscribe for updates, or leave a comment with your own installation experience.

Similar Posts