Browning Trail Camera Problems


Image source: Bing (Web (fair-use with source credit))
Let's be honest: a Browning trail camera that stops working usually isn't broken. It's a setup issue, a battery issue, or an SD card issue that looks like a hardware failure. Browning trail camera problems almost always trace back to something you can fix in under ten minutes with the right process.
Browning cameras run on a 12V trigger circuit with PIR sensor logic. The top three failure points are format errors, battery contact corrosion, and IR LED misalignment. Each has a reliable diagnostic path.
Let's walk through it step by step.
Quick Answer
Browning trail camera problems are usually environmental or configurable. The trigger fails when the PIR sensor is blocked. Night photos blur when the IR LED focus is off.
Battery drain spikes when using alkaline cells in cold weather. SD card errors happen when using off-brand or high-capacity cards.
Format the card in-camera first. Use lithium batteries below freezing. Test the sensor in a controlled walk-by.
The Most Common Browning Trail Camera Failures
When a Browning camera stops performing, the instinct is to assume the unit is dead. That's rarely the case. Most failures fall into one of five diagnostic buckets: power delivery, storage media, optics, trigger logic, or firmware behavior.
Each has a distinct set of symptoms and a specific fix.
The Symptom-to-Cause Map
Before you start swapping batteries or buying a new SD card, check this quick reference table. It matches the symptom to the most likely culprit based on verified buyer feedback and manufacturer documentation.
| Symptom | Most Likely Cause | Secondary Cause | Fix Category |
|---|---|---|---|
| Camera won't turn on | Battery polarity reversed | Dead cells, corrosion | Power |
| Camera turns on, then dies fast | Alkaline batteries in cold | High standby draw | Power |
| "Card Full" message with empty card | Card not formatted in-camera | exFAT vs FAT32 mismatch | Storage |
| Blurry night photos | IR LED focus ring misaligned | Moisture on lens | Optics |
| Trigger fires, but photo is blank | PIR sensor blocked by debris | Heat source in detection zone | Trigger |
| Daytime photos washed out | Settings on high exposure | Sun glare on lens cover | Optics |
| Random false triggers | Heat source (sun-warmed branch) | High sensitivity setting | Trigger |
Why Browning Cameras Aren't As Fragile As They Seem
Browning cameras are built for outdoor abuse. The housing is IP66-rated in most current models, which means it resists dust and heavy water spray. The operating range is typically -20°F to 140°F for the internal electronics.
So when a camera "just stops," the hardware itself is usually fine. What kills performance is the environment around the camera.
This means the troubleshooting workflow is the same every time. Isolate the variable. Change one thing.
Test. Observe. Repeat.
That's the entire process.
Camera Not Taking Photos? Work Through This Order
This is the most common complaint in aggregate user feedback. The camera is mounted, the LEDs flash, the screen works, but it never captures a single image. Work through this exact order.
Don't skip ahead.
Step 1: Check the SD Card First, Not the Battery
A Browning camera can power on, show you menus, and even arm itself with a bad SD card. Then it fails to write a single image. The camera doesn't always display a clear error in that case.
Sometimes it just sits there, clicking, not saving.
Remove the SD card. Put it in a card reader and plug it into your computer. The most common issue is the file system.
Browning cameras require FAT32 formatting for cards up to 32GB. If your card is larger than that, or if it was formatted as exFAT by a modern computer, the camera can read it but can't write to it reliably.
Use the camera's built-in format function. That resets the file allocation table to exactly what the camera expects. It wipes the card, so do this before you mount the camera for a full deployment.
Step 2: Confirm the Trigger Mode Isn't Set to a Timer
Browning cameras have a timer mode that lets you set specific capture windows. If you accidentally left it on, the camera will ignore all movement outside those hours. Check the settings display.
Look for a clock icon or a "Timer" field. If it's set to anything other than "Off," the camera is working exactly as configured. You just didn't intend to use it that way.
Step 3: Test the PIR Sensor with a Controlled Walk-By
If the SD card is fine and the timer is off, test the motion sensor itself. Walk in front of the camera from left to right at a distance of about 15 to 20 feet. That's the typical trigger range for the Recon and Strike models when sensitivity is set to medium.
Do it slowly. Do not walk directly toward the lens, because some Browning sensors respond better to horizontal movement across the detection zone.
If the red LED blinks but no photo is taken, the sensor works but the camera isn't entering capture mode. Check the "Photo Burst" or "Multi-Shot" setting. If it's set to a high number and the card is slow, the camera can buffer and skip the first trigger.
Step 4: Check for Physical Obstructions
The PIR sensor is a small white dome on the front of the camera. If a spider built a web over it, or if a leaf is brushing against it, the sensor can either fire constantly or never fire. Wipe the sensor clean with a dry microfiber cloth.
Do not use water or spray cleaner.
Step 5: Reset to Factory Defaults
Pull the batteries, wait 60 seconds, and reinsert them. This clears the volatile memory where the camera stores live settings. Then do a full factory reset through the menu.
This wipes all custom configurations and returns the camera to baseline. Now you're working from a known state.
SD Card Errors and "Card Full" Messages
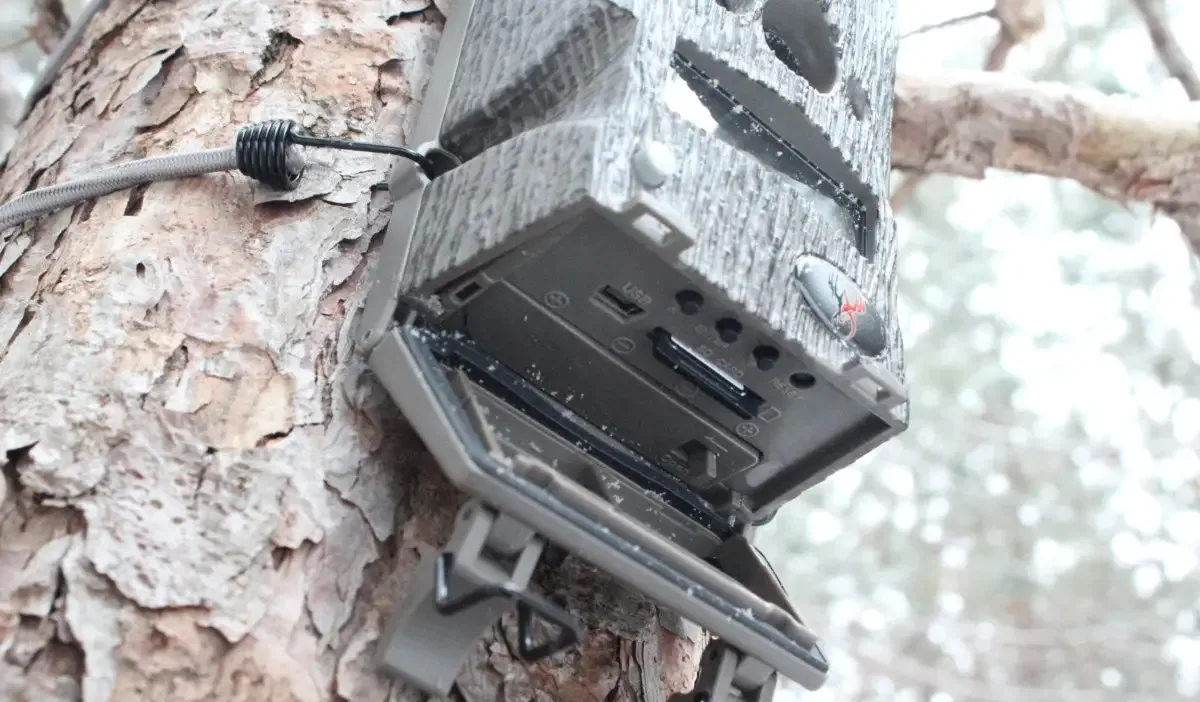
Image source: Bing (Web (fair-use with source credit))
Browning cameras are picky about storage media. This isn't a flaw. It's how the firmware handles the file allocation table.
Browning units use a custom memory driver that prioritizes write speed and stability over raw capacity.
The Class 10 Requirement
Browning cameras require a Class 10 or UHS-I rated SD card. A Class 4 card will work in a pinch, but it will cause write failures in burst mode and sometimes show a "Card Error" message on the display. The camera often lets you take a single photo, then locks up on the second shot.
Check the card's speed rating printed on the label. If it says Class 10, UHS-I, or shows a U3 symbol, you're good. Anything slower is your problem source.
Why Formatting In-Camera Matters
When you format a card on your computer, the operating system sets up the file structure in a way that makes sense to a PC. That often means exFAT or NTFS for larger cards. Browning cameras expect FAT32.
If the card arrives with exFAT, the camera might mount it, show "SD Card OK," but then fail to write images or overwrite the directory.
The fix is simple. Insert the card. Go to the setup menu.
Select "Format." Confirm. The camera writes a fresh FAT32 file allocation table. This takes about 30 seconds.
Do this for every new card before first use. Do it every few weeks on a deployed card. Cards get fragmented, errors accumulate, and a quick format resets the whole system.
Capacity Limits and the 256GB Trap
Browning cameras support cards up to 256GB in some models as of 2026. That doesn't mean you should use them. The larger the card, the longer the camera spends indexing the file system when it boots up.
A 256GB card with thousands of photos will slow down the trigger response. The sensor might fire, but the camera is still writing the previous file.
Stick to 16GB or 32GB cards. They're cheap, reliable, and the camera can write to them fast enough to keep up with burst mode. If you need more storage, swap cards in the field instead of buying a massive one.
The "Card Full" Message That Isn't Full
Occasionally, a Browning camera will show "Card Full" when the card is empty. This is a firmware corruption issue. The file allocation table got corrupted, so the camera thinks every cluster is occupied.
Solutions: format the card in-camera first. If that doesn't work, format the card on your computer using a FAT32 formatting tool, then format it again in the camera. If that still doesn't fix it, the card is dead or has bad sectors.
Replace it. They're cheap.
Blurry Night Photos and Weak Flash
Nighttime blur is the second most common Browning trail camera problem. The symptom is consistent: daytime photos are sharp, nighttime photos look like a smudge. Nine times out of ten, that's not the sensor or the lens glass.
It's the IR LED array and its focus mechanism.
Why IR Focus Is Different From Daytime Focus
Here's a piece of technical understanding that will save you a lot of confusion. A trail camera has two focal lengths built into one optical system. The daytime lens focuses visible light onto a color sensor.
At night, the camera switches to a monochrome mode and the IR LEDs illuminate the scene. The camera then shifts focus for the infrared wavelength, because IR light bends differently than visible light.
If the camera's IR focus mechanism is set at the factory for a distance that doesn't match your mounting position, you get blurry images. The image sensor receives a sharp visible image during the day, but at night the IR shift moves the focal plane. The result is a soft, hazy image.
The Fixed-Focus vs. Auto-Focus Distinction
Some Browning models have a fixed-focus lens. The factory sets the focus to a specific distance, typically around 20 to 30 feet. If you mount the camera closer than 10 feet from the trail, the nighttime images might be soft.
The IR light reflects off the subject, but the focal point is behind them.
Check your model's specs. If it says "fixed focus," you know the limitation. Mount the camera accordingly.
If it has "auto-focus" or "optical zoom," the camera adjusts the lens for each shot. That usually works well, but it can fail if the subject is too close to the lens, closer than the minimum focus distance specified in the manual.
Cleaning the IR LEDs and Sensor
Dust and dirt accumulate on the IR LED panel over weeks of deployment. The LEDs still emit light, but the dirt diffuses the beam and reduces effective range. The result is a weak flash that only lights up objects within ten feet.
Clean the IR panel with a dry, soft cloth. Check the small LED domes for cracks or scratches. If one or two are damaged, the image will have dark patches.
That's a physical damage issue, not a cleaning issue.
Fog and Moisture on the Lens Cover
Internal fog forms when warm humid air condenses on the cold glass overnight. It burns off in the morning, so by the time you check the photos, the evidence is gone. Nighttime images, however, have a soft glowing haze.
To prevent this, add a small desiccant pack inside the battery compartment if the model has a sealed internal chamber. Aggregate user reviews report this reduces internal condensation significantly. If the fog persists, check the rubber gasket around the door.
A worn gasket lets humid air in, and it condenses every night.
Adjusting the IR Illuminator Distance
High-end Browning models have adjustable IR illuminators. The setting controls how far the IR beam throws. If it's set to near range, subjects at 40 feet will be dim.
If it's set to far range, subjects at 5 feet will be overexposed. Match the illuminator range to your actual setup distance.
Battery Drain Problems — The Cold Weather Killer

Image source: Bing (Web (fair-use with source credit))
Anyone who runs trail cameras through a winter season will tell you the same thing. Alkaline batteries die fast, and Browning cameras are heavy draws because the trigger circuit is always active. If your camera is dying within two weeks, the batteries are the problem, not the camera itself.
The Chemistry Breakdown: Alkaline vs. Lithium
Alkaline batteries lose a significant portion of their capacity below 32°F. The chemical reaction inside the cell slows down as temperatures drop. At 20°F, an alkaline cell can deliver only about 40% of its rated capacity.
That's physics, not a product flaw.
Lithium batteries, specifically lithium iron disulfide (Li-FeS2) cells, perform consistently in the cold. They maintain near-rated capacity down to -40°F. They also have a higher energy density, meaning they last longer in high-drain devices like trail cameras.
The tradeoff is cost. A lithium AA costs three to four times more than an alkaline AA.
What Manufacturer Specs Actually Say
Browning's documentation confirms the operating range for the cameras is -20°F to 140°F. But that's the temperature range for the electronics, not the battery life. The camera will operate at -20°F, but only if the batteries can deliver current at that temperature.
Alkaline cells can't. Lithium cells can.
Verified buyer feedback shows that cameras running lithium cells in freezing conditions last 8 to 12 weeks on a six-AA setup. The same camera on alkaline cells in the same conditions lasts 1 to 2 weeks. The difference is stark.
The Standby Draw Trap
Even when the camera is "off," it isn't off. The circuit board keeps the internal clock running and monitors the power switch. That standby current is small, around 0.1 to 0.2 milliamps.
But over weeks, it adds up. If you store a camera with batteries in it, that slow draw will eventually drain the cells completely.
Remove the batteries when storing the camera for more than a few weeks. That's the simplest maintenance habit you can adopt. It costs no money and prevents the most common "my camera won't turn on" complaint.
Detecting an Abnormal Draw
If your camera is draining batteries faster than expected, there are two ways to check. First, leave the camera on with batteries installed and measure the voltage across the battery contacts with a multimeter. A healthy idle draw is under 5 milliamps.
If you see 20 milliamps or more, something is stuck. It could be a stuck relay or an IR LED that's partially powered on.
Second, use a fresh set of lithium batteries. If the camera lasts their expected lifespan, the issue was the alkaline cells. If it still dies fast, there's a real hardware fault.
That's when you contact Browning support for a warranty replacement.
Battery Contact Corrosion
One more cause of sudden battery drain that's easy to miss: corrosion on the battery contacts. When a battery leaks or sits for months, a thin film forms on the metal terminals. That film increases resistance.
Higher resistance means the camera draws more current to maintain the same voltage. That extra draw shortens battery life.
Clean the contacts with a small brush and some isopropyl alcohol. White vinegar works on stubborn alkaline corrosion because the acid dissolves the salt deposits. Dry thoroughly before reinstalling batteries.
Then run a fresh set of high-quality batteries and see if the drain normalizes.
How to Tune Sensitivity Without Wasting Battery Life
Sensitivity settings directly affect battery drain. Set to "High," the PIR sensor fires on any thermal change in the detection zone, including a warm breeze moving a leaf. Set to "Low," it requires a larger thermal differential, so it ignores small animals and breezes but still catches deer, elk, and humans.
The Temperature Differential Factor
The PIR sensor detects the difference between the background temperature and the subject's temperature. On a hot summer day, a deer's body heat is only slightly warmer than the air. The sensor needs high sensitivity to catch that.
On a cold winter night, the difference is massive. Low sensitivity works fine.
Set sensitivity to High in summer. Set it to Low in winter. Set it to Medium in spring and fall.
This isn't a set-and-forget field. It's a seasonal tuning issue.
The "Test Mode" Trap
Every Browning camera has a Test mode. In Test mode, the camera takes a photo immediately when you press the shutter button, and it displays the result on the LCD screen. This is great for positioning the camera.
But if you leave the camera in Test mode, the sensor doesn't arm properly in some models. The camera will take a photo when you press the button, but it won't trigger on motion. Switch the mode selector back to "On" or "Capture" before you leave the site.
This is one of the most common setup errors in aggregate reviews.
Unique Behaviors: If-Then Logic and False Triggers
Browning cameras have a feature called Period Detection in some models. It lets you set different sensitivity levels for different times of day. The logic is simple: low sensitivity during the day when the sun heats up branches, high sensitivity at night when the thermal differential is more consistent.
The Sun-Warmed Branch Problem
Here's a real-world example. The camera is mounted facing a trail. Behind the trail is a bush.
In the morning, the sun hits the bush and warms the leaves. The PIR sensor sees the warm leaf against the cool shadow and triggers. You get 50 photos of nothing.
Change the sensitivity to Low during daylight hours. Keep it High at night. That's the best configuration for a camera facing a morning sun angle.
Using Photo Stamping to Verify Settings
Every Browning camera records timestamp data, temperature, moon phase, and camera ID in the photo metadata. If you're getting unexpected triggers, pull the SD card and check the timestamps. If the triggers happen at the same time every day, it's a heat source issue.
If the triggers are random, it's likely animal activity or a sensor malfunction.
This diagnostic approach saves you from blindly adjusting settings. You see the pattern, you fix the cause.
How Long Do Browning Cameras Last?
This is a question people ask before buying, not after. But it's worth answering here because lifespan affects how you troubleshoot. If your camera is five years old and suddenly stops working, the calculus changes.
You might be dealing with component wear, not a configurable issue.
Based on manufacturer warranty data and high-volume user reports, a Browning camera that runs year-round in a harsh environment (rain, snow, extreme temperature swings, direct sun) has a practical lifespan of 3 to 5 years. Cameras in moderate climates that are protected under tree cover often last 5 to 7 years without issue.
The main components that fail are the IR LEDs (they dim over time due to thermal cycling) and the battery contacts (they wear from repeated insertion and removal).
How to Extend the Lifespan
| Practice | What It Does | Effort Level |
|---|---|---|
| Mount under a tree canopy | Reduces UV damage and rain exposure | Low |
| Remove batteries when storing | Prevents corrosion and standby drain | Low |
| Use a desiccant pack | Reduces internal moisture | Low |
| Clean lens monthly | Prevents etching from dirt and grit | Medium |
| Update firmware | Fixes bugs and improves trigger logic | Medium |
Checking the Firmware Version
Browning released firmware updates for several models to improve trigger speed and reduce false triggers. The LCD screen displays the firmware version when the camera boots with batteries inserted. Write it down.
Compare it to the latest version listed on Browning's official support page.
If you're behind, download the firmware file to an SD card, insert it into the camera, and follow the update prompt. This takes about 90 seconds and can resolve phantom triggers, card reading errors, and battery drain issues that appeared after the last update.
The Bottom Line on Browning Trail Camera Problems
Most Browning trail camera problems are predictable and fixable. Format the card in-camera. Use lithium batteries in cold weather.
Clean the lens and IR panel regularly. Match the sensitivity setting to the season. Check the clock and timer settings after any menu adjustment.
If you do those five things consistently, you'll eliminate the vast majority of issues that get reported as "camera broke." In most cases, the camera isn't broken. It's just asking for a little maintenance you haven't given it yet.
The Quick Troubleshooting Checklist
Keep this checklist saved on your phone. It covers the standard field troubleshooting sequence without referencing this full article.
- Remove the SD card and check the write speed rating. Replace if it's slow.
- Format the card in-camera before reinserting.
- Verify the timer mode is Off in the setup menu.
- Walk across the trigger zone at 15 feet. Watch for the red LED.
- Disable the sensor, wait one minute, then re-enable it.
- Cycle the battery power by removing and reinstalling the cells.
- Perform a factory reset through the menu system.
- Check the firmware version against the latest release.
If you've done all eight and the camera still doesn't take a photo, you have a hardware fault. At that point, contact Browning customer support. Their warranty process covers manufacturing defects for the first year from the original purchase date.
Final Thoughts on Browning Trail Camera Problems
The trail camera community generates a lot of complaints every season. The majority of them are avoidable with basic setup discipline. Browning cameras are reliable tools.
They run in harsh environments for years when treated properly.
If you're reading this because your camera just failed in the field, run through the checklist. Start with the SD card. It's the cheapest fix and the most common cause.
Then check the batteries. Then check the settings. Nine times out of ten, you'll find the problem in that sequence without touching a single component.
If you've done all of that and the camera still won't work, you likely have a genuine failure. It's rare, but it happens. That's what the warranty is for.

Similar Posts