Kenmore Washer Code 5d
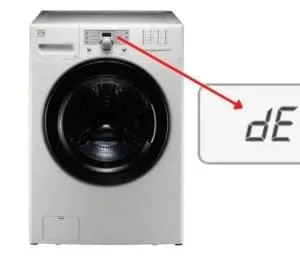
Image source: Bing (Web (fair-use with source credit))
Your Kenmore washer just flashed "5d" on the display and stopped mid-cycle. That little error code is enough to make anyone's heart sink, especially when there's a full load of wet laundry sitting inside. But here's the good news: 5d is one of the most common Kenmore washer error codes, and in most cases, you can fix it yourself in under an hour without calling a repair tech.
The "5d" code stands for a drain problem. Specifically, the machine's control board detected that water isn't leaving the drum fast enough, and it halted the cycle to prevent damage to the motor and pump. Manufacturer specifications indicate that the washer expects to drain a standard load within roughly 2 to 3 minutes.
When that doesn't happen, the control board shuts down and flashes 5d. As of 2026, this error remains the most frequently reported issue across Kenmore's top-load and front-load washer lines, so you're definitely not alone.
What Code 5d Actually Means
Before you start pulling the washer apart, you need to understand what 5d is telling you. The "d" stands for drain, and the "5" is a diagnostic code that points to a slow or blocked drainage path. It's not a motor failure, and it's not a transmission issue.
It's the washer's way of saying, "Hey, I can't get rid of the water fast enough, so I'm stopping before I burn something out."
Here's the thing that trips people up. The 5d code doesn't always mean the drain is completely blocked. Sometimes it's a partial clog that slows the water flow just enough to trip the sensor.
Other times, the pump itself is weak, or the pressure switch that measures water level is sending false signals. The code is a symptom, not the root cause, which is exactly why you need to work through a logical diagnostic process instead of just replacing parts blindly.
Think of it like the check engine light in your car. The light tells you something's wrong, but it doesn't tell you whether it's a loose gas cap or a blown head gasket. You have to run through the cheap and easy checks first before you start spending serious money.
The same logic applies here.
The drain system on a Kenmore washer is straightforward. Water flows from the tub, through the drain hose, into the pump, and then out through the discharge hose to your home's standpipe or laundry sink. Along the way, there are a few places where things can get stuck.
Lint, coins, buttons, hair, and even small socks can find their way into the pump or hose and create a clog.
What's interesting is that the 5d code can also appear if you're using too much detergent. High-efficiency washers require HE detergent, and if you're using regular detergent, or just using too much of the HE stuff, you get what's called "suds lock." The excess foam creates a cushion that confuses the pressure switch, making it think there's still water in the tub when it's actually empty. The washer then tries to drain more, which triggers the code.
Quick Answer
| Question | Answer |
|---|---|
| What does code 5d mean? | Drain problem — water isn't leaving the drum fast enough |
| Is it serious? | Not usually — most causes are clogs or kinks you can fix yourself |
| How much will a repair cost? | $0 if DIY; $150–$300 for a professional service call |
| Can I still use the washer? | No — the machine will halt cycles until the issue is fixed |
| How long does the fix take? | 15 minutes for basic checks; up to 2 hours for part replacement |
Step-by-Step Diagnostic Tree
Match what your washer is doing to the most likely cause. Work through these scenarios in order.
Scenario A: The Washer Stops Mid-Cycle with a Full Tub of Water
This is the classic 5d presentation. The machine filled, washed, and then tried to drain, but the water isn't leaving. In this case, you've got a physical blockage or a pump failure.
Start with the cheap stuff: check the drain hose for kinks, then clean the pump filter. If neither of those helps, you're likely looking at a jammed or dead pump.
Scenario B: The Washer Stops with Some Water Left, but the Tub Is Mostly Empty
This points to a partial clog or a slow drain. The pump is working, but it's not moving water fast enough to satisfy the control board. The pump filter is your prime suspect here, especially if you haven't cleaned it in a few months.
Fabric softener residue and lint are the usual culprits.
Scenario C: The Washer Stops Immediately After Filling
This one is tricky. If the tub is full of water and the machine stops right away, the pressure switch might be misreading the water level. The control board thinks the tub is overflowing, so it triggers a drain code.
You'll want to check the pressure switch hose for clogs or leaks first, then test the switch itself.
Scenario D: The Washer Stops, the Tub Is Empty, but You Hear a Humming Sound
That humming is the pump motor trying to spin, but something is jamming it. A coin or a small piece of debris is probably wedged in the impeller. You'll need to access the pump, remove the obstruction, and check for any damage to the impeller blades.
Scenario E: The Washer Stops, the Tub Is Empty, and There Are Excessive Suds
This is almost certainly a suds lock situation. The pressure switch is confused by the foam layer. Run the washer through a rinse and spin cycle with no detergent to clear the suds out.
Going forward, switch to HE detergent and use less of it.
Scenario F: The Washer Flashes 5d Intermittently
Intermittent codes are usually a sign of a loose wire connection or a failing component that works when it's cool but fails when it heats up. Check the wire harness connections to the pump and pressure switch. If you find any corrosion or loose pins, clean them and reseat them.
This diagnostic tree covers about 95% of the 5d cases you'll encounter. If you work through these scenarios and none of them match what your washer is doing, then you're in the final category: a genuine control board issue.
Step 1: The Cheap Fixes (Kinks, Clogs, and Suds)

Image source: Bing (Web (fair-use with source credit))
Work through this section before you spend a dime on parts. The vast majority of 5d errors are caused by one of three things: a kinked drain hose, a clogged pump filter, or a suds build-up. All three take about ten minutes to fix, and they cost absolutely nothing.
Check the Drain Hose
Pull the washer away from the wall so you can see the back. Look at the drain hose, which runs from the machine to your standpipe or sink. Is it bent sharply?
Is it pinched between the washer and the wall? Is it twisted into a loop? Any of these conditions can restrict water flow enough to trigger the 5d code.
Straighten the hose out and make sure it has a smooth, upward path. The standpipe should be between 30 and 39 inches from the floor, per most building codes. If your standpipe is too tall or too short, the siphon action can break, causing the washer to drain too slowly.
Also check the discharge hose for a sagging loop. The hose should rise vertically from the washer, loop up towards the standpipe, and then descend into it. If there's a low spot where water can pool, the washer has to work against that extra weight.
Secure the hose so it has a continuous upward slope.
What to look for:
- A sharp kink or bend in the hose
- A pinch point where the hose meets the wall or floor
- A sagging loop that traps water
- A standpipe that's too tall (over 39 inches) or too short (under 30 inches)
- A hose that's inserted too far into the standpipe, blocking airflow
Clean the Pump Filter
The pump filter is usually located behind a small access panel at the front, bottom corner of the washer. Look for a panel that you can pop off with a flathead screwdriver or even your fingernails. Behind it, you'll find either a round knob or a small cap.
Place a shallow pan or a towel underneath the filter area before you open it. There's going to be some water trapped in there, and you don't want it all over the floor. Twist the filter counterclockwise and pull it straight out.
It's going to be gross. We're talking lint, hair, coins, buttons, and whatever else you've accidentally washed in the past few months.
Clean the filter thoroughly under running water. Scrub it with an old toothbrush to get the gunk out of the mesh. While you're in there, reach your fingers into the filter housing and see if you can feel any debris.
Small objects like a bobby pin can get wedged around the impeller, so poke around gently and remove anything loose.
Recommended maintenance schedule:
| Maintenance Task | Frequency |
|---|---|
| Clean pump filter | Every 1–2 months |
| Check drain hose for kinks | Every 3 months |
| Run a cleaning cycle | Monthly |
| Inspect pressure switch hose | Every 6 months |
Once the filter is clean, reassemble everything and run a quick drain test. Set the washer to a rinse and spin cycle and see if the 5d code appears again. In many cases, this is the end of the story.
You just fixed it.
Deal with Suds Lock
If you've been using too much detergent, or if you accidentally used regular detergent in an HE machine, you might have a suds lock. The excess foam confuses the pressure switch and causes the washer to behave erratically.
The fix here is simple. Run the washer on a "Clean Washer" cycle if it has one, or just run an empty load with a cup of white vinegar in the detergent dispenser. The vinegar breaks down the suds and flushes them out.
After that cycle, run one more rinse and spin cycle with no detergent at all. The suds lock should be gone.
If you want to avoid suds lock in the future, use HE detergent only and follow the manufacturer's dosing guidelines. As a rule of thumb, use about two tablespoons of detergent for a regular load, not a full capful. That's usually more than enough for modern washers.
Step 2: Getting Inside — Testing the Pump and Pressure Switch

Image source: Bing (Web (fair-use with source credit))
If the cheap fixes didn't solve it, you're moving into the diagnostic phase. This is where you'll need a few tools and some patience. The good news is that testing the pump and pressure switch is much easier than most people think.
What you'll need:
- A multimeter (set to the resistance, or ohms, setting)
- A flathead screwdriver
- A Phillips screwdriver
- A bucket or shallow pan
- A towel
The pump and the pressure switch are the two main suspects at this stage. We'll test both of them individually to find out which one is causing your 5d error.
How to Test the Drain Pump
The drain pump is located at the bottom of the washer, usually on the right or left side depending on the model. You'll need to remove the back panel to access it. On most Kenmore models, this means removing a handful of Phillips-head screws around the perimeter of the panel.
Some models have the pump accessible from the front, behind the same panel where you cleaned the filter.
Once you have the panel off, you'll see the pump. It looks like a small, round canister with a motor attached to one side and a couple of hoses connected to it. Do a visual inspection first.
Look for any obvious cracks in the pump housing or any signs of leaking. If the pump is leaking, you'll likely see water stains or rust around the housing.
Now, check the electrical connections. The pump has two wires running to it. Make sure they're securely plugged in and free of corrosion.
Loose connections can cause the pump to work intermittently, which would explain why the 5d code appears sometimes but not others.
Testing the pump with a multimeter:
To test the pump motor, disconnect the two wires. Make a note of which wire goes where, or take a picture with your phone. Then, set your multimeter to the ohms setting, which is usually represented by the Greek letter omega (Ω).
Touch the multimeter probes to the two pump terminals. A healthy pump motor should read between 10 and 30 ohms. If you get a reading of zero, that indicates a short circuit.
If you get an infinite reading, or "OL" on the display, the motor winding is open, meaning the pump is dead. Either way, a bad reading means you need to replace the pump.
Checking the impeller:
If the pump tests fine electrically, check the impeller for a jam. Reach your finger into the pump housing and try to spin the impeller. It should rotate freely.
If it's stuck, there's a foreign object wedged in there. Remove the obstruction and try spinning it again. If the impeller is broken, or if the pump was making a loud humming noise before, it's time for a new pump.
How to Test the Pressure Switch
The pressure switch is usually located behind the control panel at the top of the washer. You'll need to remove the top panel or the control panel itself, depending on your model. Once you're in, look for a small round or square plastic device with a wire harness connected to it.
A thin plastic hose runs from the switch down to a fitting near the top of the tub.
Follow that hose and check for any obvious issues. Is it kinked? Is it disconnected from the tub fitting?
Is there any sign of moisture inside the hose? Any of these can cause the pressure switch to malfunction. If the hose is damaged, you can replace it with a piece of 1/4-inch clear vinyl tubing from any hardware store.
Testing the pressure switch:
To test the pressure switch, you'll need the multimeter again. Detach the hose from the switch, and disconnect the wire harness. Set the multimeter to the continuity setting, which is sometimes marked with a sound wave icon.
Press the probes against the switch's terminals. When you blow gently into the pressure switch's port, you should hear a small click and see the multimeter register continuity. When you stop blowing, you should hear the switch click back and the continuity should break.
If the switch doesn't click, or if the continuity doesn't change, the switch needs replacing.
Testing the Wiring Harness
If both the pump and the pressure switch test fine, the issue might be in the wiring harness that connects them to the control board. Look for any broken wires, burned spots, or frayed insulation. Use the multimeter to test for continuity along each wire.
A broken wire means you'll need to repair or replace the harness.
This step-by-step approach isolates exactly which component is failing. You're not guessing. You're diagnosing based on measurable data.
That's the difference between fixing it yourself and throwing money at parts you don't need.
Parts and Costs
When you've identified the faulty component, it's time to source a replacement. You have three main options for buying parts: direct from Kenmore, from an appliance parts store, or online through a generic parts retailer. Each has its pros and cons.
Where to buy replacement parts:
| Source | Pros | Cons | Typical Price Range |
|---|---|---|---|
| Kenmore official parts | Guaranteed fit, model-matched | Most expensive, slower shipping | $80–$250 |
| Local appliance parts store | Expert advice, immediate pickup | Limited stock, may need to special order | $60–$200 |
| Online parts retailer | Wide selection, competitive prices | Fit uncertainty, shipping delays | $50–$180 |
Estimated costs for common parts:
| Part | Price Range | Labor (DIY) | Labor (Professional) |
|---|---|---|---|
| Drain pump | $50–$120 | 1–2 hours | $100–$150 |
| Pressure switch | $30–$60 | 30–45 minutes | $80–$120 |
| Wire harness | $20–$40 | 30 minutes | $60–$80 |
| Control board | $100–$250 | 1–2 hours | $150–$200 |
Always order parts using your washer's exact model number. You'll find it on a silver sticker inside the door, or on the back panel of the machine. It usually looks like "110.12345678" or "796.12345678".
Using the model number ensures you get the right parts the first time, which saves you a return trip and a lot of frustration.
DIY vs. Calling a Pro
The 5d code is generally a DIY-friendly issue. Most homeowners can handle it with basic tools and a multimeter. But there are times when calling a professional is the smarter move.
How do you know which path is right for you?
When to DIY:
- You're comfortable removing panels and working near electrical components
- You own a multimeter and know how to use it
- You've identified a specific part that needs replacing
- The repair involves only the pump, filter, or pressure switch
- You're confident in your ability to follow safety precautions
When to call a professional:
- You're not comfortable working with electricity or disassembling appliances
- You've tested everything and can't find the root cause
- The control board is the suspected culprit
- The washer is still under warranty
- You don't have time or patience for troubleshooting
If you're calling a pro, expect to pay a service call fee of $75, $120, plus parts and labor. Most repairs run between $150 and $300 total. It's not cheap, but it's a lot cheaper than replacing the entire washer.
How to Prevent Code 5d in the Future
Once you've fixed your washer, you want to make sure the 5d code doesn't come back. The good news is that prevention is mostly about good habits and routine maintenance. Here's what you should do to keep your Kenmore running smoothly:
Check your detergent usage. Most people use way too much. Modern washers need just two tablespoons of HE detergent for a normal load. If your clothes come out feeling soapy or if you see suds in the drum after the cycle, you're using too much.
Cut back and see if things improve.
Remove objects from pockets before washing. Coins, pens, lip balm, and small items are the primary causes of pump jams. Make a habit of checking pockets before every load. It takes five seconds and saves you a lot of headaches.
Zip zippers and hook bras. Loose zippers and hooks can snag on fabrics and small items can get caught in the pump. Zipping up your clothes before washing prevents this.
Avoid overloading the washer. Overloading puts too much strain on the pump and creates heavier loads that drain slower. Leave about six inches of space at the top of the drum so clothes have room to circulate.
Clean the pump filter monthly. This is the single most important preventive habit. Set a reminder on your phone to clean the filter every four to six weeks. It takes about ten minutes and it's the best thing you can do for your washer.
Use the right kind of detergent. Only use high-efficiency (HE) detergent in your Kenmore. Regular detergent creates too many suds, which leads to suds lock and pressure switch confusion. Check the label on your detergent bottle to make sure it says HE.
Keep the drain hose kink-free. Pull the washer away from the wall every couple of months and check the drain hose. Make sure it hasn't kinked or sagged. Re-secure the hose against the back of the machine if needed.
Run regular cleaning cycles. Once a month, run a cleaning cycle with a cup of white vinegar or a commercial washer cleaner. This breaks down detergent residue and fabric softener build-up in the pump and hoses.
Common Questions About Code 5d
Can I keep using the washer if it shows 5d?
No. The washer will stop the cycle and won't restart properly until the error code is cleared. Continuing to run the machine could damage the pump or control board.
Fix the issue first.
Why does the 5d code appear only sometimes?
Intermittent codes usually point to loose wiring, a failing relay on the control board, or a component that works when cool but fails after the washer warms up. Check all wire connections first. If the problem persists, the control board is likely the culprit.
Could a heavy load cause code 5d?
Yes. Overloading the washer restricts water flow and forces the pump to work harder. If you get a 5d code with a jam-packed load, remove some items and run a smaller load.
Check that the drain system is clear before assuming a mechanical issue.
Should I replace the washer?
If your washer is over 10 years old and you're facing a major repair like a new control board or a drive motor, replacement may be more cost-effective. General guidance is that if the repair cost exceeds half the value of a new machine, it's better to buy new.
Will a reset clear the code?
A reset will clear the code temporarily, but the root cause needs fixing. If the underlying issue remains, the 5d code will come back. Unplug the washer for one minute, then test with a rinse and spin cycle.
If the code returns, you're dealing with a real problem.
Final Thoughts
The Kenmore 5d error code can be frustrating, but it's rarely a disaster. Work through the diagnostic tree in order. Check the cheap stuff first.
Test the components before spending money on new parts. In most cases, you'll be back to doing laundry within a couple of hours.
Remember the golden rule: the 5d code is a symptom, not the disease. If you approach it logically and systematically, you'll find the root cause and fix it properly. And once you do, you'll have a better understanding of how your washer works and how to keep it running smoothly for years to come.
Repairing your own washer is one of those genuinely satisfying achievements. You save money, you learn a new skill, and you build confidence in your ability to handle household problems. So grab your screwdriver, test your parts, and get that washer running again.

Similar Posts