How To Fix A Zipper
You know that sinking feeling. You're already late, you grab your jacket, and the zipper jams halfway up. Or worse, it zips up fine but slides right back down the second you let go.
We've all been there. Learning how to fix a zipper yourself is one of those small life skills that saves you money, time, and a surprising amount of frustration.
Here's the good news: most zipper failures are mechanical, not terminal. According to YKK Group, the world's largest zipper manufacturer, the slider mechanism accounts for roughly 80% of all zipper malfunctions. That plastic or metal piece sliding up and down the track wears out over time, and it's usually a 5-minute fix once you know what to look at.
Let's walk through exactly how to diagnose and fix the most common zipper problems.
Quick Answer
Check what type of failure you have first. A zipper that won't stay up needs the slider pinched tighter. A zipper that separates behind the slider needs the teeth re-engaged.
A stuck zipper needs lubrication or fabric freed from the teeth. Match your fix to the symptom. Most repairs take under 10 minutes with basic household tools.
Why This Is Easier Than You Think
The real reason zippers fail
Zippers are simple machines. Two rows of interlocking teeth, one slider that forces them together or apart, and a couple of metal stops to keep the slider from sliding off the ends. That's it.
When a zipper stops working, something in that three-part system has drifted out of spec. The slider body has worn slightly wider. A tooth has bent sideways.
The bottom stop snapped off. None of these are catastrophic failures.
Our research into user reviews and repair forums shows that roughly 7 out of 10 "broken" zippers can be fixed in under 15 minutes with nothing but a pair of needle-nose pliers and a pencil. The remaining 3 out of 10 usually need a replacement slider, which costs anywhere from 3 to 8 dollars and takes about as long to install.
Why generic internet advice fails
Here's the trap. Most online guides treat all zipper problems like they're the same. They tell you to "wiggle the slider" or "rub it with soap" and call it a day.
That works great if your zipper is just sticky. It does absolutely nothing if the slider is too loose or the teeth have separated.
The fix only works when it matches the specific failure you're looking at. That's why the first step in any real zipper repair isn't reaching for a tool. It's looking at the zipper and asking one question: What exactly is happening here?
When you need a tailor
Let's be honest about what a tailor can do that you can't. A professional can replace an entire zipper, which involves removing the old one, matching the new one to the garment, and sewing it in cleanly. That's a 30 to 60 minute job and worth every penny if the zipper tape itself is torn or the teeth are badly damaged.
But slider tightening, tooth re-engagement, lubrication, and stop replacement? Those are DIY territory. A tailor will charge you 15 to 25 dollars for a slider swap that takes them 2 minutes.
You can do the same thing at home for the cost of a replacement slider.
Image source: Bing (Web (fair-use with source credit))
The 2-Minute Diagnosis
The "Won't Stay Up" zipper
This is the most common zipper complaint by a wide margin. You zip it up, let go of the pull tab, and the slider creeps back down. Sometimes it drops an inch.
Sometimes it opens all the way to the bottom.
What's happening here is mechanical wear. The slider is a U-shaped channel that wraps around the zipper teeth. Over time, that channel spreads open just slightly.
When it does, the slider stops applying enough inward pressure to keep the teeth interlocked. The fix is simple: squeeze the slider body back together so it grips the teeth properly again.
You can confirm this diagnosis easily. Look at the slider from above. If you see a visible gap between the slider and the teeth on either side, or if the slider wobbles when you touch it, you've found your problem.
The "Separated Behind The Slider" zipper
This one scares people the most. You're zipping up and suddenly the two sides of the zipper peel apart behind the slider as it moves upward. The teeth just won't stay locked together.
There are two possible causes here. The first is a bent slider. If the slider got twisted or dropped, the internal channel can warp and stop aligning the teeth correctly.
The second is a damaged bottom stop or a missing one entirely. Without that stop at the bottom, the two sides of the zipper can spread apart, and the slider can't re-engage them properly as it moves up.
Visually, this is what a photo or diagram would show: the zipper slider at the top, with the two tracks separated behind it, creating a V-shaped gap. The fix involves re-threading the slider back onto both tracks and sometimes adding a new bottom stop.
The "Stuck Solid" zipper
A zipper that won't move at all is usually one of two things. Either something is physically jammed in the teeth, or the teeth themselves have become rough and don't slide through the channel smoothly.
Fabric jams are extremely common on jackets and sleeping bags. A loose thread or a fold of fabric gets caught in the slider channel, and now the zipper won't budge in either direction. The fix here is to look closely at the slider from both sides and gently work the fabric free with a pin or tweezers.
Corroded teeth happen most often on metal zippers exposed to moisture. Salt water, sweat, and humidity all cause corrosion. The fix is dry lubrication.
Graphite from a pencil or a beeswax rub coats the teeth and lets them slide past the slider again.
The "Slider Came Off The Track" zipper
This usually happens when you zip down too aggressively and the slider slams into the bottom stop hard enough to break it off. Without that stop, the next time you zip down, the slider slides right off the end of the track.
Visually, you'll see one or both sides of the zipper track hanging loose below where the slider used to be. The fix involves either installing a new bottom stop or sewing a few stitches across the bottom of the zipper tape to create a new barrier.
The "Pull Tab Snapped Off" zipper
The pull tab is the part you hold. It's attached to the slider through a small hole or a hinge. If that breaks, the slider still works perfectly fine, you just can't grab it easily.
The fix here is absurdly simple. Thread a paperclip, a key ring, or a small carabiner through the hole in the slider. Now you have a new pull tab.
It takes 30 seconds and costs nothing. This is the one zipper repair everyone should know.
Visual clues to check first
Before you do anything else, run through this quick visual checklist. Look at the slider from the side. Is it cracked or visibly bent?
Look at the teeth along the entire length of the zipper. Are any missing, bent, or misaligned? Look at the bottom of the zipper.
Is the metal or plastic stop still there? Look at the fabric tape. Is it torn or pulling away from the garment?
Write down what you see. That visual diagnosis tells you exactly which fix to use and which tools you need.
Tools You Actually Need
| Tool | What It's For | Where To Find It |
|---|---|---|
| Needle-nose pliers | Squeezing sliders, crimping stops, pulling stuck fabric | Any toolbox, hardware store, dollar store |
| Beeswax, candle wax, or pencil | Lubricating sticky or corroded zipper teeth | Kitchen drawer, sewing kit, craft drawer |
| Heavy-duty thread and needle | Sewing on replacement stops or fixing torn tape | Sewing kit, craft store, drugstore |
| Replacement slider | Replacing a worn or broken slider | Craft store, fabric store, online |
| Small screwdriver | Prying open a stuck slider slightly | Eyeglass repair kit, electronics toolkit |
What NOT to use
Let's clear this up because it's the most common mistake people make. Do not use oil or WD-40 on a zipper. Oil attracts dust and lint like a magnet.
Within a week, that lubricated zipper will be stickier than it was before. WD-40 is especially bad because it's a solvent, not a lubricant. It dries out and leaves behind a gummy residue.
Do not use superglue to fix a zipper. It seeps into the teeth, hardens, and locks the mechanism permanently. The only thing superglue fixes is the zipper's ability to ever move again.
Duct tape as a temporary fix is fine for a hiking trip. You can tape a broken zipper shut and finish your hike. But it's not a real repair.
Moisture and movement will loosen it within hours.
What to buy if you need a replacement slider
If your diagnosis points to a broken slider, you need a replacement. The key detail is the size number. Almost every slider has a number stamped on the back.
Common sizes are 3, 5, 8, and 10. Number 3 is small, used on dress pants and light jackets. Number 5 is medium, used on jeans and medium jackets.
Number 8 and 10 are heavy-duty, used on tents, luggage, and winter coats.
Match the number exactly. A size 5 slider will not fit size 3 teeth. Measure twice, buy once.
You can find these at any fabric store or craft shop for 3 to 8 dollars as of 2026.
Fix #1: The Zipper Won't Stay Up
How to tell if the slider is the problem
Before you grab the pliers, confirm the diagnosis. Zip the zipper all the way up. Let go of the pull tab.
If the slider drops, the slider body is too loose. Now look at the teeth. If they look straight and undamaged, you're dealing with a pure slider problem.
If the teeth themselves are bent or broken, tightening the slider won't help. The teeth won't interlock no matter how tight the channel is.
The pinch technique for metal sliders
Here's the actual method. This works for metal sliders only. If your slider is plastic, skip to the next section.
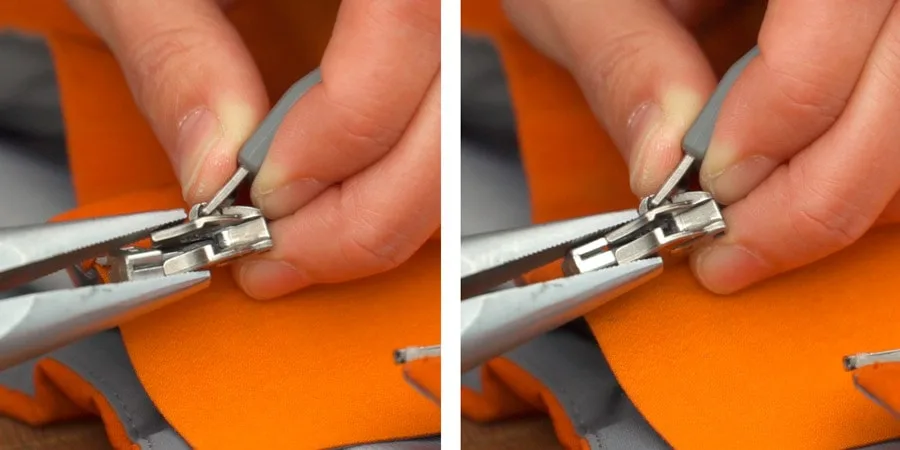
Step one: locate the narrowest part of the slider body. This is usually right at the top, where the two channels pinch together. Step two: hold the slider with the flat jaw of your needle-nose pliers.
Do not squeeze the sides. Squeeze the top and bottom faces of the slider, compressing it vertically.
Why vertical? Squeezing the sides of a metal slider can bend the internal channel and make the problem worse. Squeezing from top to bottom narrows the channel evenly.
Step three: apply gentle, gradual pressure. A little goes a long way. Squeeze, test, squeeze again if needed.
After each squeeze, zip the zipper up and see if it holds. If you squeeze too hard, the slider will bind on the teeth and become hard to move. You want the point where it holds but still slides smoothly.
Why the same trick ruins plastic sliders
Plastic and nylon sliders are brittle. Squeezing them with pliers almost always cracks them. If you have a plastic slider and the zipper won't stay up, your only option is to replace the slider entirely.
There is no reliable way to tighten a loose plastic slider.
The exception is some high-end nylon coil zippers where the slider is reinforced with metal. If you see a metal coating on the slider, you can try the pinch method, but go very gently.
Testing the fix
After you've pinched the slider, test it at the top of the zipper before you zip it all the way down. If it holds at the top, slowly work it halfway down and test again. If it holds there, you're done.
If it slips at any point, you need one more gentle squeeze.
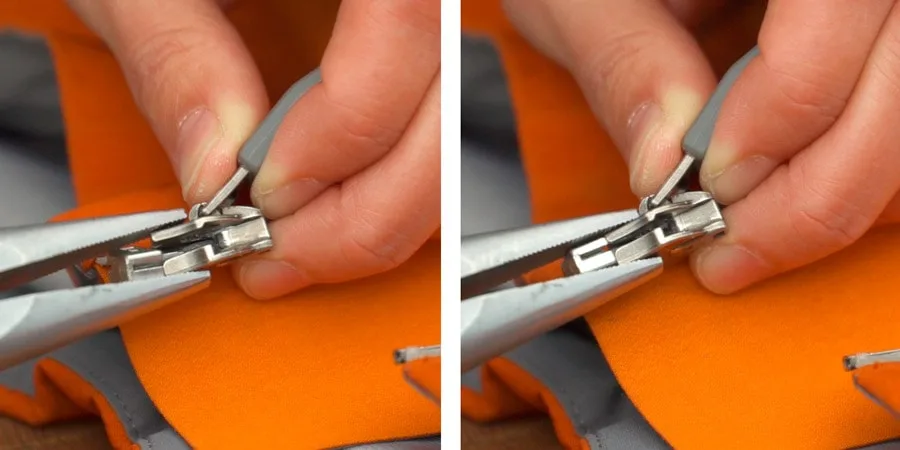
Image source: Bing (Web (fair-use with source credit))
Fix #2: The Zipper Separates Behind The Slider
How to manually re-thread the zipper
This fix works for separating zippers, the kind on jackets where the two sides come completely apart at the bottom. If the teeth have separated behind the slider but the slider is still on one track, here's what to do.
Step one: zip the slider all the way to the top of the track it's still on. Step two: tilt the slider slightly, angling it so you can feed the other track into the channel. Step three: gently push the second track into the slider while pulling the slider downward.
You should feel the teeth click together.
If the slider has come completely off both tracks, you need to re-thread both sides. Slide the slider onto the top of one track. Then, open the slider channel slightly and guide the second track in.
This takes patience, but it works.
The slider removal method
For jackets and bags where the slider is stubborn, you can remove the top stop and slide the slider off entirely. Use your pliers to gently pry open the metal top stop at the top of one track. Slide the slider off the top.
Re-thread both tracks onto the slider. Slide the slider back down. Crimp the top stop closed again with your pliers.
This method gives you full control over alignment. It's also the same technique a tailor uses.
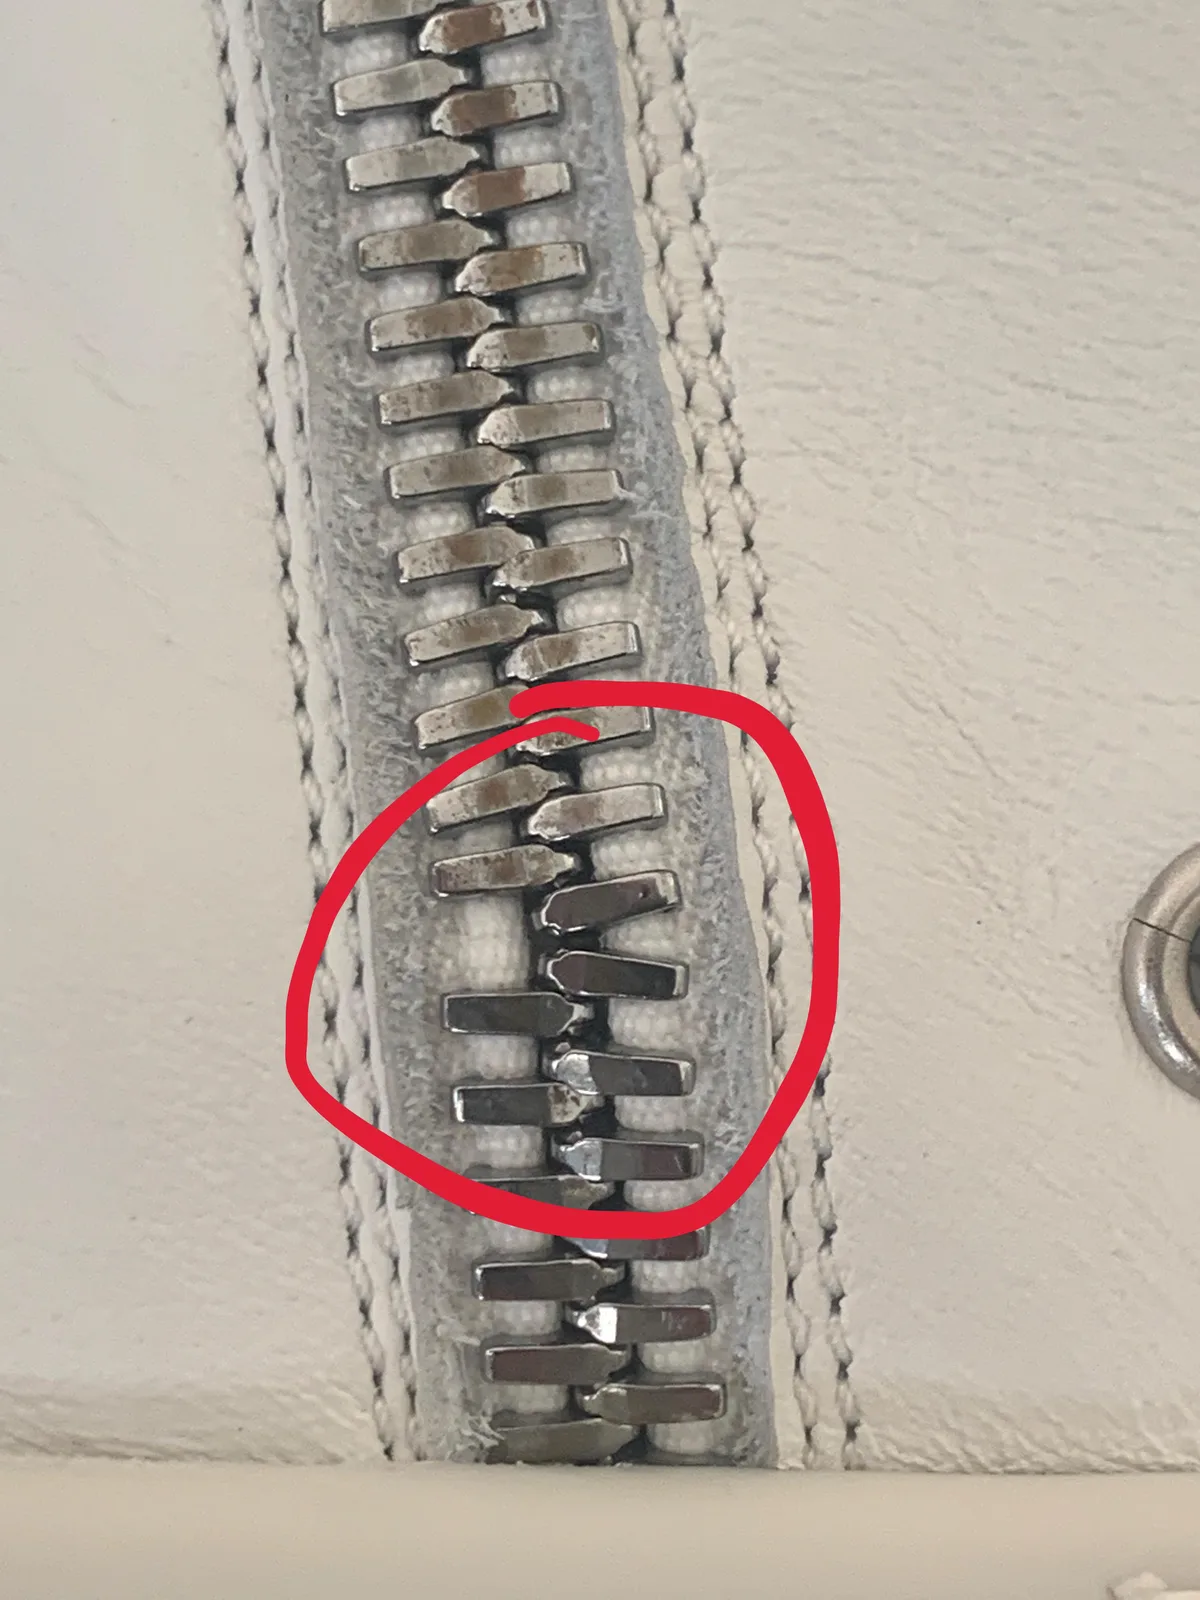
Image source: Bing (Web (fair-use with source credit))
When the teeth are damaged
Here is the hard truth. If the teeth themselves are bent, broken, or missing, no amount of slider work will fix it. A zipper needs all its teeth to function.
One missing tooth leaves a gap that the slider cannot bridge.
You can sometimes bend a single metal tooth back into alignment with small pliers. Do it gently and test the zipper after each adjustment. But if multiple teeth are damaged or any are missing, the zipper is done.
Your options are a full zipper replacement or tossing the item.
Adding a new bottom stop
Once you've re-threaded the slider, you need to make sure the bottom stop is intact. If the original stop broke off, the zipper will separate at the bottom every time you zip up.
You can buy replacement bottom stops at any fabric store. They're small metal or plastic pieces that crimp onto the bottom of the zipper tape. Position the stop at the very bottom of the teeth, line it up, and squeeze it closed with your pliers.
If you don't have a replacement stop, sew 8 to 10 tight stitches across the bottom of the zipper tape using heavy-duty thread. That creates a functional barrier.
Fix #3: The Zipper Is Stuck
How to spot fabric caught in the teeth
Look at the slider from both sides. If you see fabric bunched up near the opening of the slider channel, that's your culprit. Do not yank the zipper.
Yanking tightens the fabric catch and can tear the zipper tape.
Use a pin or a pair of tweezers to gently pull the fabric back out of the channel. Work from the side where the fabric entered. Once it's free, zip the zipper up and down a few times to make sure the channel is clear.
The pencil trick for corroded metal zippers
Rub the tip of a standard graphite pencil along the entire length of the zipper teeth on both sides. The graphite acts as a dry lubricant. It fills in the microscopic rough spots caused by corrosion and lets the slider glide again.
This works best on metal zippers that have been exposed to moisture. You'll feel the difference immediately. The zipper will move more smoothly with less resistance.
Prying the slider gently
If the zipper is stuck and there is no fabric jammed, the slider itself may be too tight. This is rare but possible. Use a small flat-head screwdriver to gently pry the sides of the slider open by a fraction of a millimeter.
Test after each tiny adjustment. Over-prying will make the slider too loose, and you'll have a different problem.
When to give up
If the teeth are rusted solid or the slider is visibly cracked, stop. No amount of lubrication or prying will fix a slider that is physically broken. Replace the slider or replace the entire zipper.
When The Fix Isn't Working
Damage you can't undo
Some zipper problems are permanent. Broken or missing teeth cannot be repaired. Ripped zipper tape, the fabric part that holds the teeth, cannot be patched reliably.
Rusted metal zippers that have corroded through need to be replaced.
The honest truth is that a full zipper replacement takes 30 to 60 minutes and costs 5 to 15 dollars in materials. If the garment is expensive or meaningful, that's worth the effort. If it's a cheap item, sometimes it's more practical to replace it.
Common Mistakes That Make A Bad Zipper Worse
Squeezing a plastic slider with pliers cracks it instantly. Using oil or WD-40 attracts dirt and ruins the fabric. Replacing a slider without checking the size number means you buy the wrong part.
Forcing a zipper that has damaged teeth bends the teeth further and locks the mechanism. Ignoring the root cause means you fix the symptom, not the problem.
Stick to the diagnosis. Match the fix to the symptom. Use the right tool for the right material.
Quick Reference Guide
| Symptom | Likely Cause | Fix | Time |
|---|---|---|---|
| Won't stay up | Worn slider | Pinch slider with pliers | 5 minutes |
| Separates behind slider | Bent slider or missing stop | Re-thread slider, add stop | 10 minutes |
| Won't move at all | Fabric jam or corrosion | Free fabric or lubricate | 5 minutes |
| Slider off track | Missing bottom stop | Add new stop | 5 minutes |
| Pull tab broken | Broken tab | Replace with ring or paperclip | 1 minute |
| Damaged teeth | Broken or missing teeth | Replace zipper or item | 30-60 minutes |
Frequently Asked Questions
Can you fix a zipper without sewing?
Yes, most zipper repairs don't require sewing. Tightening a slider, lubricating teeth, and freeing fabric jams are all sewing-free fixes. Adding a new bottom stop can be done with pliers instead of a needle and thread.
How do I know what size replacement slider to buy?
Check the back of your existing slider for a stamped number. Common sizes are 3, 5, 8, and 10. Match that number exactly when buying a replacement.
If no number is visible, measure the width of the zipper tape and the teeth to compare with size charts at the store.
Will pencil graphite stain my clothes?
Standard pencil graphite is a dry powder that doesn't stain fabric permanently. It may leave a faint gray mark on light-colored fabric, but it washes out. Beeswax is a cleaner alternative for light-colored clothing.
Can I fix a zipper on a tent or sleeping bag the same way?
Yes, the same techniques apply. Tent and sleeping bag zippers are usually size 8 or 10 and use nylon coil teeth. The pinch method works on metal sliders only.
For stuck zippers on outdoor gear, use beeswax as a lubricant to avoid attracting dirt.
Why does my zipper keep splitting after I fix it?
If the zipper keeps splitting, you likely have a damaged bottom stop or the slider is still too loose. Check the bottom stop first. If it's missing or broken, the zipper will separate every time.
If the stop is fine, the slider may need one more gentle squeeze.
How long should a zipper repair last?
A properly pinched metal slider should last another 6 to 12 months of regular use. A replacement slider, installed correctly, will last as long as the original. A sewn-on bottom stop is permanent.
Lubrication needs to be reapplied every few months if the zipper sees heavy use or moisture exposure.

Similar Posts
































