Predator 3500 Generator Troubleshooting
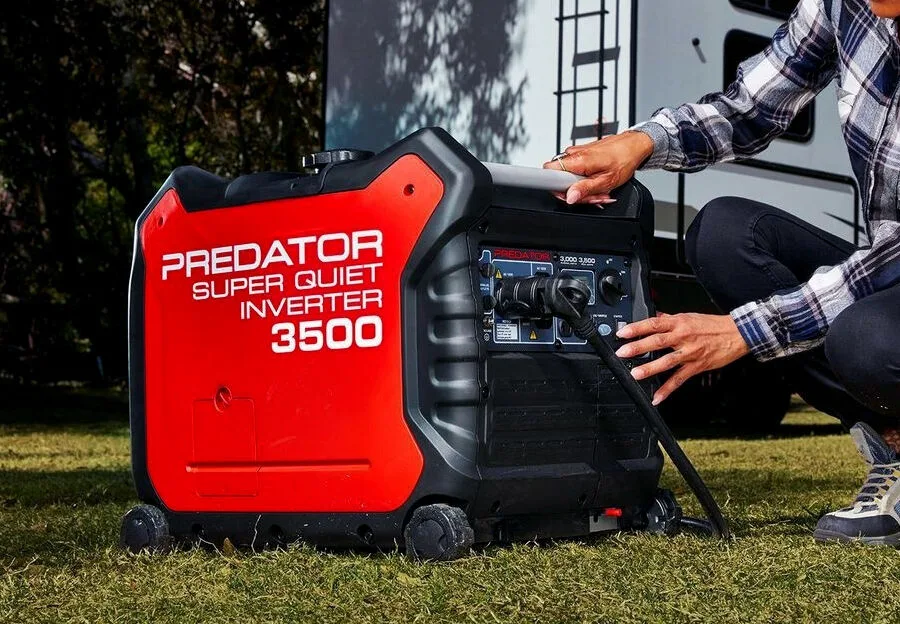
Image source: Bing (Web (fair-use with source credit))
Your Predator 3500 generator won't start, or it runs for a minute then dies, or the outlets are dead. That frustration is common, but the fix is usually simpler than you think. Predator 3500 Generator Troubleshooting comes down to a quick process of elimination.
You are not looking for a magic bullet. You are looking for the one broken link in the chain.
In our research, most issues trace back to five things: old fuel, a dirty carburetor, a dead battery, the low-oil sensor, or a tripped breaker. Manufacturer specs list a runtime of about 11 hours on gasoline at 25% load. Even that 2.64-gallon tank won't save you from ethanol gumming up the carburetor.
Let's walk through the symptoms and get you sorted.
Quick Answer
Check the fuel first. Drain the carburetor bowl. Charge the battery.
Verify the oil level. Reset the breaker. These five steps solve roughly 70% of Predator 3500 problems.
Work through them in order before replacing any parts.
Start Here: Match Your Symptom to the Right Fix
The fastest way to fix your Predator 3500 is to identify the symptom first. Then the fix becomes obvious. Use the table below to jump straight to the section that matches your problem.
| Symptom | Most Likely Culprit | Jump To |
|---|---|---|
| Nothing happens when you press start | Dead battery, blown fuse, faulty starter | Section 3 |
| Clicks, then nothing | Weak battery, corroded terminals | Section 3 |
| Cranks over but won't start | No fuel, bad spark, choke off | Section 4 |
| Starts, then dies after a few seconds | Low-oil sensor, dirty carb, fuel flow | Section 5 |
| Engine runs but no power from outlets | Tripped breaker, inverter board | Section 6 |
If the quick answer doesn't do it, do not skip ahead. Work through the sections in order. The generator's systems are linked.
A quick visual check now saves you from replacing parts that are fine.
Safety First: What to Check Before You Touch the Generator
Before you start pulling fuel lines or testing spark plugs, take 60 seconds to protect yourself. A generator is a small engine with a few real hazards tucked in. None of them are scary if you respect them.
Carbon monoxide is the big one. The Predator 3500's CO shutdown sensor is there for a reason. It won't help if you run the unit inside a garage, shed, or camper. Only run the generator outdoors.
Keep it at least 20 feet away from doors and windows. The EPA and fire safety agencies repeat this for good reason.
Check oil before anything else. The low-oil sensor kills the engine to protect it. If the oil is low, the machine won't start or will stall shortly after. Pull the dipstick.
Wipe it clean. Reinsert it. Check the level.
The 212cc engine takes about 15.3 ounces of 10W-30 oil. Top it up if needed.
Make sure the ground is solid. The generator's frame is grounded through the engine. If you connect it to an RV or transfer switch, follow the neutral-ground rules in your owner's manual. A floating neutral on a bonded RV system can cause shocks or damage.
Check fuel for leaks. If you use propane, sniff around the regulator and the hose. Apply soapy water to connections and look for bubbles. Never test leaks with a flame.
That's a one-way ticket to a bad day.
Have a fire extinguisher nearby. Not because the generator is dangerous. Because fuel work is fuel work. A small ABC extinguisher in the garage or trailer gives you peace of mind.
Once those basics are handled, you can start diagnosing. Safety is done. Time to find the fault.
No Crank, Clicking, or Nothing When You Press Start: Battery and Starter Checks
If you press the start button and get silence, or a single click, the problem is almost always electrical. The Predator 3500 has an electric start, a remote start fob, and a recoil starter. We will work through the electric path first.
Check the battery voltage. The factory starter battery needs at least 12.4 volts to crank the 212cc engine reliably. Grab a multimeter. Set it to DC volts.
Test across the battery terminals. If you are under 12 volts, charge the battery. If it won't hold a charge after 24 hours, replace it.
Look at the battery connections. Corrosion on the terminals is standard after a season of storage. Even a thin white crust can stop the starter motor from getting current. Remove the red and black cables.
Clean the posts and connectors with a wire brush or baking soda paste. Tighten them back down. The ground wire must be solid to the frame too.
Test the starter solenoid. That click you hear is the solenoid engaging, but the starter motor isn't spinning. Use a jumper wire between the large battery positive terminal and the starter positive post. If the motor spins with the jumper, the solenoid is bad.
If it does nothing, the starter motor itself is the issue.
Remote start fob not working? Replace the small battery inside the fob. The owner's manual lists the button cell type. If the fob still won't communicate with the generator, use the button on the panel.
It is an override, not a band-aid.
Use the recoil starter as a backup diagnostic. If the engine starts and runs with the pull cord, then the electric start system is the only problem. If it won't start with the recoil either, move to the fuel and spark section next. Do not ignore that clue.
Cranks Strong But Won't Fire: Fuel, Spark, Choke, and Carburetor
Your engine cranks over with authority, but it just won't fire. That means the electrical side is fine. You are dealing with fuel or ignition.
Let's test them one at a time.
First, give it a shot of starter fluid. Remove the air filter cover. Squirt a two-second burst into the carburetor throat. Pull the starter.
If it pops, runs briefly, then dies, you have a fuel delivery problem. If it doesn't pop at all, you are likely chasing spark.
Check the choke plate. The Predator 3500 uses a manual choke lever. For a cold start, the choke should be fully closed. That means the plate blocks air flow to enrich the mixture.
If the lever moves but the plate doesn't, the linkage is stuck or the cable is off. That is common after shipping or hard storage.
Pull the spark plug and inspect it. A carbon-fouled plug won't spark well. Set the gap to 0.030 inches, which is 0.76 millimeters. If the plug is wet with gas, you are flooding.
It should be dry and light brown or tan with a clean end. If it is black and oily, you have an oil issue. Replace the plug if the electrode is worn or the ceramic is cracked.
Test the spark with the plug grounded. Reattach the plug wire. Rest the plug against a bare metal bolt on the engine. Pull the starter.
You should see a crisp blue spark. A weak orange or yellow spark points to a failing ignition coil. You can test the coil's resistance with a multimeter.
Most owners just replace the coil when the spark is weak.
Now check the fuel itself. Gas older than 30 days with ethanol will break down and separate. Even with the fuel valve on, the carburetor can be full of varnish. Turn the fuel valve off.
Open the drain screw on the carburetor bowl. Catch the fuel. If it smells sour or looks brown, completely drain the tank and start fresh.
Clear the carburetor jet. A tiny blocked jet is the number one no-start cause on this generator. Remove the float bowl. Unscrew the main jet.
Spray carburetor cleaner through it. Hold it up to light and confirm you can see through the tiny opening. If not, soak it overnight in cleaner.
Check the spark arrestor. This little screen sits at the exhaust outlet. If it is clogged with soot, the engine can't breathe and won't start. Remove it.
Clean it with a wire brush. Or just buy a replacement. It is a five-dollar part and causes strange symptoms.
Once fuel and spark are both verified, the engine should fire. If it still won't after all that, you might have a ring or valve issue. That is rare.
More often, the culprit was something simple you overlooked.
Starts Then Stalls: Low-Oil Sensor, Fuel Flow, and CO Shutdown
This one is frustrating because the generator fires right up, then dies fifteen seconds later. You try again. Same thing.
It feels like a fuel problem, and often it is. But there are two safety sensors that can mimic a fuel issue exactly.
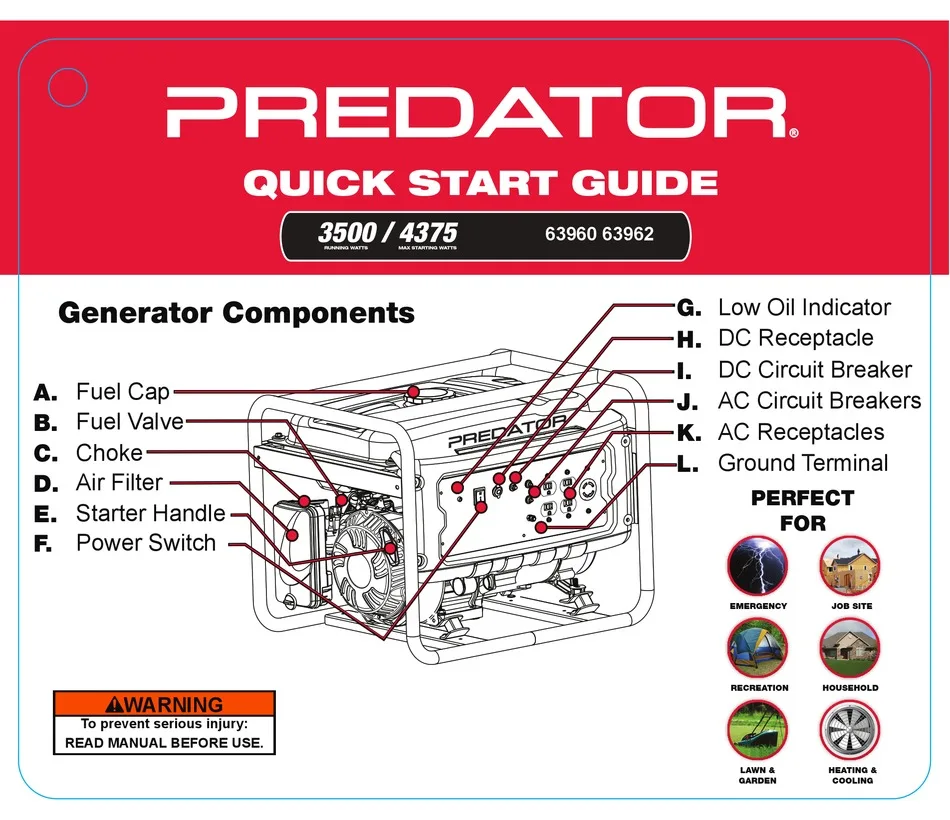
Image source: Bing (Web (fair-use with source credit))
Check the low-oil sensor first. The Predator 3500 will start for a few seconds, then the sensor cuts the ignition if oil level is below the safe mark. That is by design. If you just added oil but the sensor is still triggered, your sensor may be stuck.
Or the oil level is marginally low. Use a flat surface. Check the oil with the dipstick resting on the threads, not screwed in.
If it is at the low mark, add a few ounces.
Test the sensor itself. Unplug the oil level switch. It sits on the side of the engine crankcase. With the sensor unplugged, the engine should stay running.
If it does, the sensor is at fault. A replacement is cheap and plugs straight in. If the engine still stalls, the issue isn't oil.
Look at the fuel cap vent. A blocked fuel tank vent creates a vacuum as fuel flows out. The carburetor runs dry after a few seconds, and the engine dies. Open the fuel cap and listen for a hiss.
If you hear one, clean the vent hole in the cap with a small wire. Or replace the cap.
Inspect the fuel filter and lines. A restricted fuel filter can pass enough gas to start, then choke off the supply as the engine demands more. Pull the fuel line at the carburetor inlet. Turn the valve on.
Watch the flow. It should be steady and consistent. If it dribbles or stops, back-flush the filter or replace it.
The CO sensor has the same symptom. The carbon monoxide shutdown sensor triggers when it detects exhaust gas in the area. It kills the engine as a safety response. If you are testing inside a garage or near a wall, the sensor will keep shutting you down.
Move the generator into open air and retry. Some sensors are mounted on the control panel. A direct wind gust carrying exhaust back toward the unit can falsely trigger them.
Make sure you are using the right fuel switch position. On dual-fuel models, the switch needs to be in the gasoline position for gasoline and the LPG position for propane. If it is halfway, the engine will start and stall immediately. Click it all the way into place.
Working through these checks in order locates the culprit quickly. Most owners find it is the fuel cap or a marginal oil level.
Engine Runs But Outlets Are Dead: Breaker, Inverter, and Wiring Checks
Your Predator 3500 is humming along nicely. The engine sounds perfect. But nothing happens when you plug in a device.
The outlets are dead. That points to the electrical side of the generator, not the engine.
Start with the obvious reset. The control panel has a circuit breaker, usually a push-button type. Press it firmly. Sometimes it trips without a loud pop, and the button barely moves.
Push until you feel a click. Then test an outlet with a small lamp or a known working tool.
Check the GFCI outlet if your model has one. The Predator 3500 includes a ground-fault circuit interrupter on one of the 120V outlets. If it has tripped, press the reset button on the outlet face. If the outlet won't reset, you may have a ground fault somewhere in your cord or connected device.
Test voltage at the outlets. Grab your multimeter and set it to AC volts. Insert the probes into the hot and neutral slots of a 120V outlet. You should see 120 to 125 volts with no load.
If you see zero volts, the inverter board isn't generating AC power.
What if you see voltage but it is way low? A reading of 40 to 60 volts usually means the inverter board has failed partially. This is the most expensive fix on the Predator 3500. It is also the one owners report least often.
The inverter board converts the DC power from the generator's alternator into clean AC power.
Listen for the fan. The inverter is cooled by a small fan inside the housing. If the fan is silent or makes grinding noise, the inverter may be overheating and shutting down. Let the generator cool for 30 minutes.
Then restart it with a lighter load.
Test with a known working device. Sometimes the issue is your extension cord or RV cord. Plug a lamp directly into the generator's outlet. If the lamp works, your cord is the problem.
Cords get crushed. Internal wires break. Connectors corrode.
If you have done all of this and the outlets are still dead, the inverter board replacement is the next step. Harbor Freight sells the board as a service part. It is about a one-hour swap with basic tools.
Overload Light Flashing or Error Codes: Decoding the Blinks
The Predator 3500 flashes an overload light when it is unhappy. That light is your best friend. It tells you exactly where to look, if you know the language.
One flash with a solid engine. The overload light gives a single blink every few seconds. This usually means the generator is near its rated capacity but not over. Check what you have plugged in.
A refrigerator startup surge plus an air conditioner can push a 3500-watt unit right to the edge.
Rapid flashing overload light. The generator is in full overload protection mode. It has shut down the inverter to protect itself. Unplug everything.
Let the generator run for two minutes at idle. Then press the reset button on the control panel. If the overload light goes out, one of your loads was too big.
The overload light stays on even with nothing plugged in. This is the tricky one. It means the generator thinks it is still overloaded with zero load. That points to a short circuit in the inverter board or a failed capacitor.
Unplug all devices. Turn the generator off. Restart it.
If the light remains, you are looking at an inverter board issue.
What about the check engine light? Some Predator 3500 models have a check engine indicator, not just an overload light. That light usually points to a sensor failure or speed issue. The generator's engine speed should be steady around 3600 RPM under load.
If the governor is off, the check engine light may come on.
Use the error code sequence if you have the remote start panel. On the panel near the start button, you may see a sequence of blinks when turning the key to the run position. Count the blinks and note the pause between them. The owner's manual has a chart that maps each code to a specific fault.
Don't confuse overload with low oil. The low oil light is separate and usually labeled on the panel. If the low oil light is on, the sensor is triggered. If the overload light is on, it is about electrical output.
Mixing them up sends you down the wrong path.
Test with a load bank or a heavy appliance. After clearing the overload, test with a 1500-watt space heater. That is a steady load that won't surge. If the generator handles that fine, your issue is surge load related.
You may need to stagger startup of high-draw devices.
One more thing. The overload light can flash during parallel operation if the two generators aren't properly synced. If you are running two Predator 3500 units in parallel and get the overload light, recheck the parallel kit connections.
The Carburetor Cure: Fixing Ethanol Gum, Clogged Jets, and Float Problems
We have talked about the carburetor in earlier sections. Now let's get specific. The carburetor on the Predator 3500 is the single most common failure point.
It is not a bad design. It is the fuel we put in it.
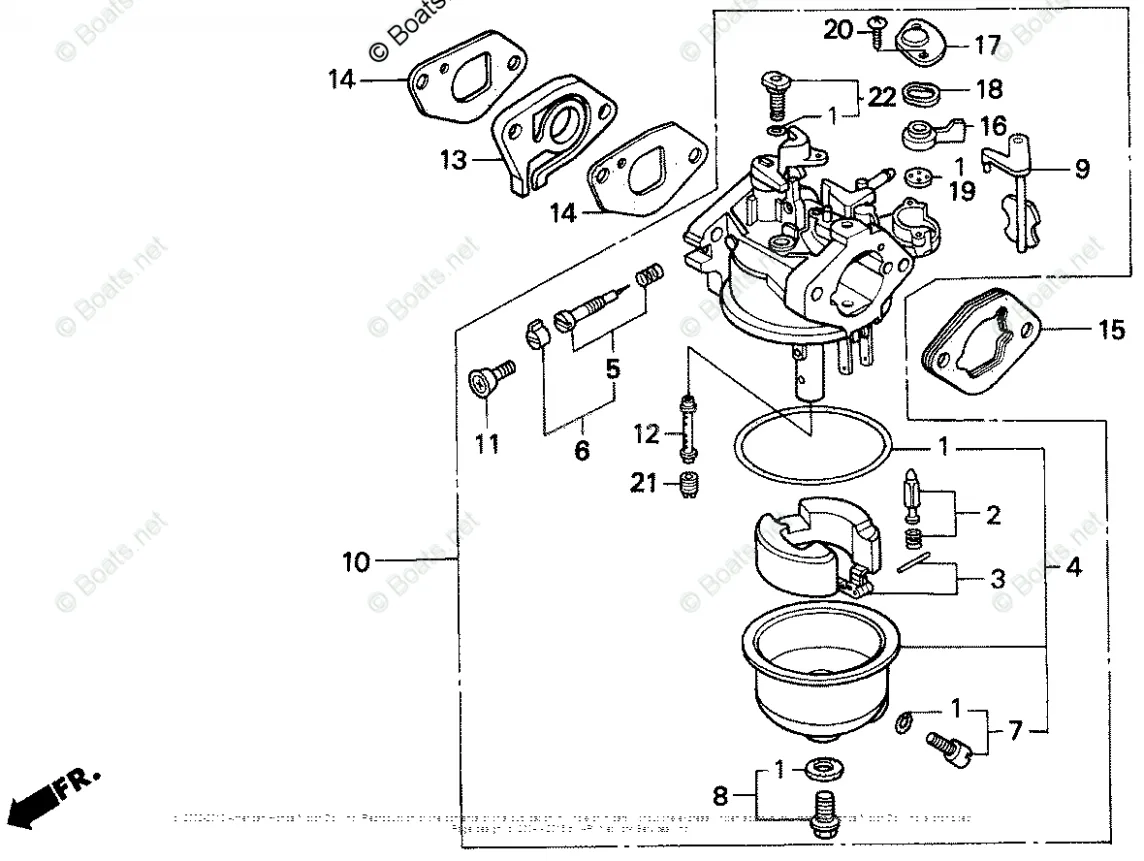
Image source: Bing (Web (fair-use with source credit))
Ethanol gasoline is the real enemy. Gasoline with 10 percent ethanol absorbs moisture from the air. Over time, that water separates and settles in the carburetor bowl. The ethanol also leaves a sticky varnish on everything it touches.
That varnish plugs the tiny jets and passageways.
Symptoms of a dirty carburetor. The generator starts with choke then dies when you open the choke. It runs rough at low speed but smooths out at full throttle. It surges while idling.
These are classic signs that the carburetor needs a cleaning.
Remove the carburetor completely. It is faster and more thorough than trying to clean it on the engine. Disconnect the fuel line. Remove the two bolts holding the carburetor to the intake manifold.
Slide it off. The air filter housing comes off first.
Disassemble the carburetor. Remove the float bowl. You will see the float and the needle valve. Push the float pin out and remove the float.
The main jet is usually a brass screw in the center of the bowl. Unscrew it with a flathead screwdriver.
Clean every passage. Use carburetor cleaner spray and compressed air. Spray through the main jet hole and watch for cleaner to come out the other side. Do the same for the idle jet, the emulsion tube, and the port where the fuel inlet connects.
If you can't see light through the jet, it is still blocked.
Check the float height. The plastic or brass float controls the fuel level in the bowl. If it is bent or stuck, the bowl either floods or runs dry. The float should sit parallel to the gasket surface when the needle is closed.
No special tool needed. Just eyeball it.
Replace the gaskets. The paper gaskets between the bowl and the carb body are one-time-use. If they are torn or hard, buy a carburetor rebuild kit. The kit includes a gasket, float bowl gasket, and sometimes a new needle.
It costs about $15.
Reinstall and test. Bolt the carburetor back on. Reconnect the fuel line. Turn the fuel valve to on.
Wait 30 seconds for the bowl to fill. Apply the choke. Pull the starter.
Listen for a steady idle. Let it run for five minutes to burn off any cleaner residue.
Prevent the next clog. The only real answer is ethanol-free gasoline or fuel stabilizer. If you only run the generator once a month, drain the carburetor bowl after each use. That single step prevents 90 percent of carburetor problems.
Don't Let It Happen Again: Fuel Storage, Oil Changes, and Maintenance Routine
You fixed the generator. You are back in business. Now let's keep it that way.
The Predator 3500 is a reliable machine when you follow a simple maintenance schedule.
Drain the carburetor bowl after every use. This is the one habit that saves the most headaches. There is a drain screw on the bottom of the bowl. Turn it a quarter turn and let the fuel drip out.
Close it when the flow stops. This prevents ethanol varnish from forming while the generator sits.
Use stabilized fuel. If you keep gasoline in the tank for more than two weeks, add a fuel stabilizer. STA-BIL or a similar product works well. Even better is ethanol-free gasoline from a station that sells it.
Ethanol-free fuel can sit for six months without issue.
Change the oil on schedule. The first oil change comes at 20 hours. Then every 100 hours after that. Use SAE 10W-30 or 5W-30 in cold weather.
The 212cc engine holds 15.3 ounces. Check the oil level before every use. Low oil triggers the shutdown sensor and leaves you stranded.
Replace the air filter once a year. A dirty air filter chokes the engine and makes it run rich. That leads to carbon buildup on the spark plug and in the combustion chamber. The filter is a standard foam or paper element.
Clean it with soapy water and re-oil it if it is a foam type.
Run the generator monthly. Even if you don't need power, run the generator for 20 minutes under a load. Plug in a space heater or a few work lights. This keeps the seals lubricated, the battery charged, and the fuel system active.
A generator that sits for six months is a generator that won't start.
Store it in a dry place. Moisture is the enemy of the inverter board and the winding insulation. If you store the generator in a damp shed or outside under a tarp, condensation builds up inside. A dry garage or covered area extends the life significantly.
Check the battery charge regularly. The Predator 3500 has a small battery that drains when the generator is not running. If you store it for months, trickle charge the battery or start the generator monthly. A dead battery kills the electric start.
The recoil starter is harder on a cold engine.
Service the spark arrestor every 50 hours. The screen in the exhaust muffler catches carbon particles. It clogs slowly, and you don't notice until the engine starts losing power. Remove it.
Brush it clean. Reinstall it. If it is damaged, buy a replacement for a few dollars.
Inspect the fuel lines. The rubber lines from the tank to the carburetor can crack over time. Check them once a year. A cracked fuel line leaks air into the system and makes the engine run lean.
Replace with the correct diameter line from a small engine shop.
Frequently Asked Questions
Why does my Predator 3500 start then die after a few seconds?
This is almost always the low oil sensor or a fuel flow restriction. Check the oil level first. If it is fine, unplug the oil sensor.
If the engine stays running, replace the sensor. If it still dies, inspect the fuel cap vent and the fuel filter.
How do I reset the Predator 3500 after an overload?
Press the overload reset button on the control panel. Unplug all devices from the generator. Let the engine run for two minutes at no load.
Then slowly add your devices back. Start with the largest load first to avoid tripping the overload again.
Can I run my Predator 3500 on propane only?
Yes. The dual-fuel model runs on propane or gasoline. Turn the fuel selector switch to the LPG position.
Connect a propane tank with the supplied regulator. The generator will start and run on propane with slightly less runtime compared to gasoline.
What type of oil does the Predator 3500 take?
The engine uses SAE 10W-30 for most temperatures. Use 5W-30 if you are running the generator in cold weather below 32 degrees Fahrenheit. The total oil capacity is 15.3 ounces.
The manual specifies a high-detergent oil rated for small engines.
Why is my overload light flashing when nothing is plugged in?
A flashing overload light with no load means a short circuit in the inverter board or a failed internal capacitor. Turn the generator off. Wait one minute.
Restart it. If the light stays on, the inverter board likely needs replacement.
How often should I change the oil in my Predator 3500?
Change the oil after the first 20 hours of use. Then change it every 100 hours or once a year, whichever comes first. Regular oil changes prevent sludge buildup and keep the low oil sensor from triggering falsely.

Similar Posts