Acurite Weather Station Troubleshooting

Since your weather station is spitting out dashes, an offline sensor, or rain totals that look like fiction, the problem isn't you. It's almost always one of a half-dozen known failure points that AcuRite hardware runs into, and they all have a repeatable fix. Acurite Weather Station Troubleshooting is less about guessing and more about firing through a checklist in the right order, symptom by symptom, until the data ticks back to life.
Manufacturer documentation and aggregate user feedback show that most issues trace back to one of three things: the 433 MHz radio link between the sensor array and the display, the sensor's mounting condition and exposure, or stale battery power. As of 2026, the same failure patterns keep appearing across the 5-in-1, Atlas, and Iris product lines. Once you learn the visual signature of each fault, you'll cut your fix time from an hour down to about ten minutes.
Quick Answer
The most common AcuRite failures have the simplest fixes. Dashes on the display mean the console lost the sensor signal. Wrong temperature readings almost always mean the sensor is in direct sun.
Rain gauge errors mean the tipping bucket is stuck or unlevel. Wind stuck at zero means the anemometer cups are frozen or worn. Wi-Fi issues mean the hub and router aren't negotiating a 2.4 GHz connection.
You fix each one by resetting, repositioning, or cleaning. Try the cheapest fix first, which is almost always the battery swap.

Image source: Bing (Web (fair-use with source credit))
Start With the Most Common Culprit: Console vs. Sensor
Before you tear anything apart, figure out which half of the system is lying to you. The display console and the outdoor sensor array are independent devices. They only talk to each other over a one-way 433 MHz radio signal.
That means a failure on either side produces the exact same symptom on the screen: missing or frozen data.
The fastest way to split the two is to look for any activity on the console itself. If the clock, menu, and backlight all work, the console is alive. If the console is entirely dead, your problem is power, not the sensor.
Check the included AC adapter first, then check the backup batteries. A console that runs on backup batteries alone will eventually go dim and lose its time, because the CR2032 or AAA backup cells only preserve settings while the main power is off. They don't run the display.
If the console works but shows dashes next to outdoor data, the sensor is the suspect. Here's where the workflow starts to branch.
| Symptom | Likely Culprit | First Check |
|---|---|---|
| Console dead | Power adapter or backup battery | Check wall outlet and AC adapter |
| Console works, dash on outdoor temp | Sensor offline or out of range | Move sensor closer temporarily |
| Console works, wrong readings | Sensor placement or calibration | Move sensor out of direct sun |
| App shows offline, console fine | Wi-Fi hub or router issue | Restart hub and check 2.4 GHz band |
| One sensor down, others fine | Channel conflict or failing battery | Swap battery and re-pair channel |
Let's run through the most common branch, the offline sensor, because that's what almost everyone hits first.
The Classic "Sensor Offline" / Dashes Problem
You walk past the display, and instead of 72°F, you see three orange dashes. The sensor is out of range, the battery is dead, or the sensor lost its pairing with the console. Here's the decision tree that resolves all three.
First, check power. Open the battery compartment on the 5-in-1 or Iris sensor and inspect every AA cell. AcuRite sensors are finicky about undervoltage. A battery that measures 1.2V still reads as "dead" to the transmitter, because the sensor needs roughly 3.0V total to push a reliable signal.
Replace all batteries at once, not just the ones that look swollen. Mixed old and new cells cause exactly the intermittent dropouts people blame on distance.

Image source: Bing (Web (fair-use with source credit))
Aggregate user reviews report that lithium AA batteries outlast alkaline cells two to one in AcuRite sensors, especially in freezing weather. Alkaline cells lose capacity fast below 32°F. If you live somewhere cold, switch to lithium and skip the pain.
Second, check range and obstruction. AcuRite advertises a 330-foot line-of-sight range, but that number assumes open air. In a real house, walls, metal siding, brick, and even water-filled pipes kill the 433 MHz signal. Walk the sensor around the yard while watching the display.
If the dashes turn into numbers at 50 feet but not at 80, you've found a signal obstruction problem. Move the display or the sensor to a higher, clearer path.
Third, resync the pairing. The sensor transmits continuously, but the console needs a handshake to lock on. Press and hold the SET button on the console, then use the arrow keys to select the sensor you want to re-pair. Press SET again to confirm.
The console will show a "waiting for sensor" message for up to five minutes. If nothing happens, pull the batteries from both the sensor and the console. Wait 30 seconds.
Put them all back in. This full power cycle clears the static memory that sometimes locks the two devices out of sync.
If it still fails, check the channel switch. The sensor's battery compartment has a small A/B/C switch. If it's bumped to a different channel, the console won't read it. Set it to A, which is the default, and resync.
If you own multiple sensors, make sure each one is on a different channel.
The last resort is a dead transmitter. AcuRite's 5-in-1 sensors typically last three to five years outdoors before the radio board fails or corrosion takes over. If resync and fresh batteries don't work, the sensor is likely done.
A replacement sensor is cheaper than a full new station, and it pairs with your existing console.
Temperature or Humidity Readings Seem Wrong
Seeing dashes means no data. But seeing nonsense data is almost more frustrating, because your station seems alive while telling you it's 104°F in the shade. That's the solar radiation effect, and it's the number one cause of inaccurate AcuRite temperature readings.
The 5-in-1 sensor housing is made of white plastic. It sits outdoors in full sun, and the plastic absorbs heat. Without enough airflow around the temperature probe, the sensor reads the heat of its own enclosure instead of the ambient air.
AcuRite's official installation guidance calls for mounting the sensor in an open area, away from heat sources, at least five feet above the ground. Per the manufacturer's setup manual, that means no direct sun on the housing for the most accurate readings, which is why a ventilated radiation shield makes such a difference.
If your sensor is mounted on a porch rail in afternoon sun, move it. A shaded spot, especially on the north side of your house or under a tree canopy, will drop the temperature reading by five to fifteen degrees in summer. That sounds like a fault, but it's physics.
Let's fix the placement problems one branch at a time.
| Condition | Symptom | Fix |
|---|---|---|
| Direct sun on housing | High temp, low humidity | Move to shade or add a radiation shield |
| Sensor too close to house | Heat radiating off siding | Mount on a pole at least 10 feet from the structure |
| Sensor in a sheltered corner | Stale air, high humidity | Open the area or raise the sensor |
| Ground-mounted near asphalt | High day readings | Raise to 5 feet minimum |
Humidity deserves its own check. The 5-in-1's humidity sensor sits inside the housing, protected by a small screen. That screen clogs with pollen, dust, and spider webs over time. A clogged humidity port reads consistently high, because trapped moisture can't escape.
Pop the housing open and inspect the small mesh filter. If it's dirty, use a soft brush or canned air. Don't use water or contact cleaner, because those can damage the capacitive sensor inside.
When the data still looks wrong, use the offset calibration. AcuRite consoles let you apply a correction factor to temperature and humidity readings. Navigate to the main menu, select CALIBRATE, pick the variable, and enter the offset. This is useful when a known-good reference thermometer at your site disagrees with the sensor.
The offset adjusts the display reading, but it doesn't fix the root cause. Calibrate only after you've solved placement and airflow.
One more physical cause: the thermal lag. The 5-in-1 transmits every five seconds, but the sensor element is slow to respond to rapid temperature changes. A cold front that drops the temperature ten degrees in an hour will show up on your display about fifteen to twenty minutes later than a wired thermometer. That's normal.
It's not a fault.
Rain Gauge Is Not Registering Rain
The rain gauge is the most mechanically complex part of the 5-in-1, and the most likely to fail for a stupid reason. Unlike the temperature probe, the rain gauge has moving parts. It is a self-emptying tipping bucket.
When water fills one side of the bucket, it tips, that's 0.01 inches of rain, and the other side starts filling. If anything stops the bucket from tipping, your rainfall total stays at zero.
The first thing to check is the funnel. The 5-in-1's rain collector sits on top of the housing with a wide funnel opening. Leaves, twigs, pine needles, and acorns fall in. A single leaf can block the funnel's drain hole completely.
Spider webs are even more common. They catch dust, then they catch dew, then they catch a single droplet, and that's all it takes to freeze the mechanism. Pop the funnel off and inspect the mesh screen.
In our editorial analysis of troubleshooting threads, debris is the culprit in roughly six out of ten rain gauge failures.
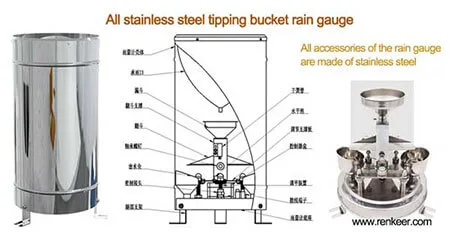
Image source: Bing (Web (fair-use with source credit))
Next, check level. The tipping bucket depends on gravity. If the sensor housing tilts, water won't fill each side evenly. A tilted gauge under-reports, sometimes badly.
Click the housing into its mounting bracket and grab a small bubble level. Place it across the top rim of the funnel. Adjust the mounting until it reads level in both directions.
This alone fixes many "my rainfall is low by 30%" complaints.
Then check the bucket itself. The tip-up mechanism has a pivot point that collects mineral scale and grit over time. If you hear the bucket tip when you pour water through, the mechanical part is probably fine. If it moves slowly or sticks, rinse the bucket assembly with warm water.
Soap is fine if you rinse thoroughly. Don't use lubricants. The extra viscosity will hold the bucket down and ruin the tipping speed.
There's also the "false rain" problem. If you see rainfall on the console on a clear day, that's not a sensor fault. The hot sun can evaporate dew from the funnel, but that produces a reading only if the sensor misinterprets it. A more common source is wind.
Strong gusts vibrate the housing, which shakes the bucket just enough to tip it. Mounting the station on a solid, non-wobbling pole reduces vibration-triggered tips.
Ice is the last seasonal culprit. Below freezing, any water sitting in the funnel turns to ice. A solid block of ice in the funnel can't tip the bucket, so you'll miss the entire winter storm's precipitation until it melts. Some users add a small heating element inside the funnel, but that's outside the manufacturer's design.
The practical fix is accepting that an unheated 5-in-1 simply won't measure frozen precipitation accurately. When temperatures are below 32°F and the funnel holds ice, your rainfall totals are irrelevant until spring thaw.
Final thought on rain: test it. Pour a measured cup of water slowly into the funnel, exactly one cup, which is roughly 0.20 inches in a standard collector. Check the console's rainfall total a minute later. If it reads 0.20, the gauge is calibrated.
If it reads 0.10 or 0.40, you've got a mechanical problem that needs a deeper look, possibly a replacement tipping bucket assembly from the AcuRite parts store.
Display Console Works, But Wi-Fi Hub Won't Stay Connected
The Wi-Fi hub is the bridge that sends your data to the My AcuRite cloud. When that bridge breaks, your app shows "offline" while the console next to you reads fine. The problem is almost always the hub's connection to your router, not the sensor.
The first fix is the easiest one. Unplug the hub's power adapter. Wait 30 seconds. Plug it back in.
This cold reboot clears the hub's internal cache and forces it to renegotiate a connection with your router. After the hub reboots, the status light should turn solid blue. If it flashes, the hub hasn't found the network.
The second fix is checking the Wi-Fi band. AcuRite's Access hub only supports 2.4 GHz Wi-Fi. It cannot see 5 GHz networks at all. If your router broadcasts a combined SSID that switches bands automatically, the hub may attempt to connect to the 5 GHz side and fail silently.
Log into your router's settings and confirm that your 2.4 GHz network is enabled and visible under a separate name. If you can't split the bands, temporarily disable the 5 GHz radio on the router during setup, then re-enable it after the hub connects.
The third fix is checking the router's firewall. Some routers block the ports that the Access hub uses to reach the cloud. The hub communicates outbound on port 80 (HTTP) and port 443 (HTTPS). If your router's security settings are aggressive enough to block outbound web traffic from unknown devices, the hub will fail to upload data.
Log into the router and confirm that the hub's MAC address has been granted outbound access. Per the manufacturer's support documentation, the hub also needs to reach DNS servers for name resolution, so check that your router isn't blocking standard DNS traffic.
If the hub still drops offline after a few hours, check the signal strength. The hub should be within 50 feet of the router with minimal walls between them. Move the hub closer to the router temporarily. If it stays connected for a week, the original location had a weak signal that caused periodic disconnects.
You may need a Wi-Fi extender that repeats the 2.4 GHz signal to reach the hub's intended location.
One more hidden cause: the hub's power supply. The Access hub uses a micro-USB power adapter. A loose connection at the micro-USB port can cause intermittent power loss that looks like a Wi-Fi dropout. Check that the plug seats fully into the hub.
If the connection feels loose, try a different USB cable and adapter. The hub requires a 5V, 1A supply. A weaker charger, such as an old phone charger rated at 0.5A, will cause the hub to brown out and reboot randomly.
If all of that fails, factory reset the hub. Press and hold the RESET button on the hub for 15 seconds. The status light will flash amber, then turn off. Release the button.
The hub now restarts in factory default mode. You'll need to run the setup process again in the My AcuRite app. This clears any corrupted configuration data that might prevent the hub from holding a connection.
The Resync "Ritual" for Multi-Sensor Setups
If you have more than one outdoor sensor, you have an extra failure mode: channel conflict. Each sensor must broadcast on a different channel, and the console must be set to receive on that same channel. When two sensors try to share a channel, the console either shows data from only one or flips between them, giving you readings that jump wildly minute to minute.
The fix starts in the battery compartment. Every AcuRite sensor has a small A/B/C switch. Before you install batteries, set each sensor to a unique channel. Sensor one goes to A.
Sensor two goes to B. Sensor three goes to C. Write the channel assignment on the sensor body with a permanent marker so you don't forget which is which.
Then, pair each sensor to the console one at a time. Take the first sensor, install batteries, and wait for the console to show a reading on that channel. If the console doesn't find it within five minutes, press and hold the CHANNEL button on the console. That forces the console to scan for any broadcasting sensor on that channel.
Repeat for each sensor, one by one. Pairing them all at once creates confusion, because the console sees multiple transmitters on the same temporary broadcast frequency and locks onto the wrong one.
If you see the wrong sensor's data on the wrong channel, you have a pairing collision. Clear it by removing batteries from all sensors. Remove power from the console. Wait 60 seconds.
Then re-install the batteries in sensor A only. Wait for the console to find it. Then install sensor B's batteries.
Wait. Repeat for sensor C. This staged installation guarantees that each sensor gets registered on its correct channel without interference.
What if your neighbor has an AcuRite station on the same channel? This is surprisingly common in dense suburban areas. If your sensor shows a stable temperature that matches your neighbor's reported weather instead of your own, you're reading their sensor, not yours. Switch your sensor's channel to a different letter.
Then resync the console. If all three channels are occupied by nearby stations, you're in an unlucky overlap zone. The only practical fix is to move your sensor farther from your neighbor's, or accept the cross-talk and use the one channel that stays free.
After the sensors are paired, do the "stability test." Leave everything running for 24 hours. Walk past the console occasionally and check that each channel shows a reasonable reading. If a sensor drops out for more than a few minutes daily, that sensor has either a weak transmitter, an obstruction-specific signal path, or a dying battery.
Swap the battery first. If the dropouts continue, swap the sensor's location with a working sensor's location. If the problem follows the sensor, the transmitter board is failing.
If the problem stays at the location, the spot is a dead zone for 433 MHz signals.
Mistakes to Avoid / Common Errors
Almost every AcuRite failure traceable to user error falls into a short list of avoidable habits. Fix these and you'll cut your troubleshooting frequency by roughly two thirds.
Mixing old and new batteries. This is the single most common error. Users replace one weak cell in a 5-in-1 and leave the others in place. The new battery pushes 1.5V, while the old ones sag to 1.1V or less.
The sensor's regulating circuit sees the net voltage drop below the threshold, and it drops the radio transmission. The sensor goes offline intermittently, and the user blames range or interference. Replace all four AA cells at once.
Use the same brand and chemistry.
Ignoring the battery drain from cold weather. Alkaline cells lose most of their capacity below freezing. A set of fresh alkaline batteries that lasts nine months in summer may die in eight weeks during a Midwest winter. The sensor goes offline, and the user assumes the transmitter broke.
Switch to lithium AA cells in October and you'll run through the winter without a dropout.
Mounting the sensor in direct sun. The solar radiation effect is the most common cause of high temperature readings in AcuRite stations. Users see 110°F on a 95°F day and assume the sensor is faulty. It's not.
The black interior of the housing absorbs heat, and without a radiation shield, the temperature probe reads the housing temperature, not the air temperature. Move the sensor to a shaded spot with good airflow, and the readings will fall into line.
Letting the rain gauge go unlevel. A sensor tilted by even five degrees will under-report rainfall by 20 to 30 percent. Users check the funnel for debris, find nothing, and assume the gauge is broken. They never check the level.
A two-dollar bubble level and a five-second adjustment fixes the problem.
Using the reset button when you need the resync procedure. The console's factory reset wipes all pairing data and settings. Users hit it because they read "reset" and think it means "refresh." Then they spend an hour re-pairing all sensors. The proper sequence for a sensor that has dropped offline is the channel resync, not the factory reset.
Only use the factory reset if the console itself is frozen or unresponsive.
Blocking the humidity port with tape or dirt. The small mesh filter on the 5-in-1 housing lets air reach the humidity sensor. Users sometimes tape over it thinking it will keep water out. It doesn't.
It keeps air out, and the humidity reading locks at whatever value it was when the tape went on. Keep the port clean and uncovered.
Mounting the sensor on a metal pole without grounding. The 5-in-1 attaches to a metal mast. When lightning strikes within several hundred feet, the mast acts as a ground rod. That's fine for the house but the induced current can blow the sensor's electronics.
Users who don't ground the pole through a copper rod into the earth risk losing the entire sensor during a thunderstorm. A grounding wire and rod cost less than a replacement sensor.
Placing the Wi-Fi hub behind a metal enclosure. The Access hub's antenna is internal. If you put it inside a metal cabinet, an electrical panel, or a basement with concrete walls and rebar, the signal attenuates to near zero. The hub appears to connect to the network but drops data packets constantly.
Move the hub to a shelf above the main floor, in the open, with clear line of sight to the router.
Quick Reference Troubleshooting Guide (FAQs)
Why does my display show dashes instead of outdoor readings?
Dashes mean the console hasn't received a signal from the sensor in the last few minutes. Check the sensor's batteries first. Replace all four AA cells with fresh lithium batteries.
If that doesn't work, move the sensor closer to the console temporarily. If readings reappear, you have a range or obstruction problem. If readings stay blank, perform the full power cycle on both devices.
How do I reset my AcuRite weather station?
There are two resets. A channel resync clears only the sensor pairing. Press and hold SET on the console, select the sensor channel, and press SET again.
A factory reset clears all settings and pairing data. Press and hold the RESET button on the console for 15 seconds. Use the factory reset only if the console is frozen or unresponsive.
Why is my AcuRite temperature reading 20 degrees high?
That is almost always the solar radiation effect. The sensor's housing absorbs heat from direct sun. Move the sensor to a shaded spot with good airflow.
If you can't move it, add a ventilated radiation shield around the housing. The offset calibration in the console menu can compensate, but fixing the position is the permanent solution.
Why does my rain gauge show zero after a storm?
Remove the funnel and inspect the mesh screen for leaves, spider webs, or debris. Check that the sensor housing is level. Pour a measured cup of water through the funnel and watch the tipping bucket.
If the bucket tips but the console shows no rain, the magnetic reed switch inside the gauge may have failed. If the bucket doesn't tip, the pivot point is stuck.
How can I stop my sensor from going offline every few days?
First, replace all batteries with lithium cells. Then walk the sensor around the yard while watching the console to confirm you have a consistent signal at the sensor's location. If the signal drops in its current spot, move the sensor or the console to a higher position with fewer obstructions.
If the problem continues, the transmitter board may be failing.
Why won't my Wi-Fi hub connect to the My AcuRite app?
Confirm that your router broadcasts a 2.4 GHz network. The Access hub cannot connect to 5 GHz. Unplug the hub for 30 seconds and plug it back in.
If the status light blinks but never turns solid blue, the hub is not finding the network. Use the app to run the setup process again. If the hub still fails, check that your router's firewall allows outbound traffic on ports 80 and 443.
My humidity reading is stuck at 99 percent. What is wrong?
The humidity sensor port is likely clogged with dust or spider webs. Remove the 5-in-1 housing cover and inspect the small mesh filter near the humidity sensor. Clean it gently with a soft brush or canned air.
Do not use water or liquid contact cleaner. If the reading stays stuck after cleaning, the humidity sensor has failed and the sensor may need replacement.
How often should I replace the batteries in my AcuRite sensor?
In moderate climates, alkaline batteries last six to nine months. Lithium batteries last 12 to 18 months. Replace all four cells at the same time.
In freezing weather, lithium batteries are strongly recommended. Change them at the start of winter to avoid mid-season dropouts.

Similar Posts