Linear Door Opener Troubleshooting
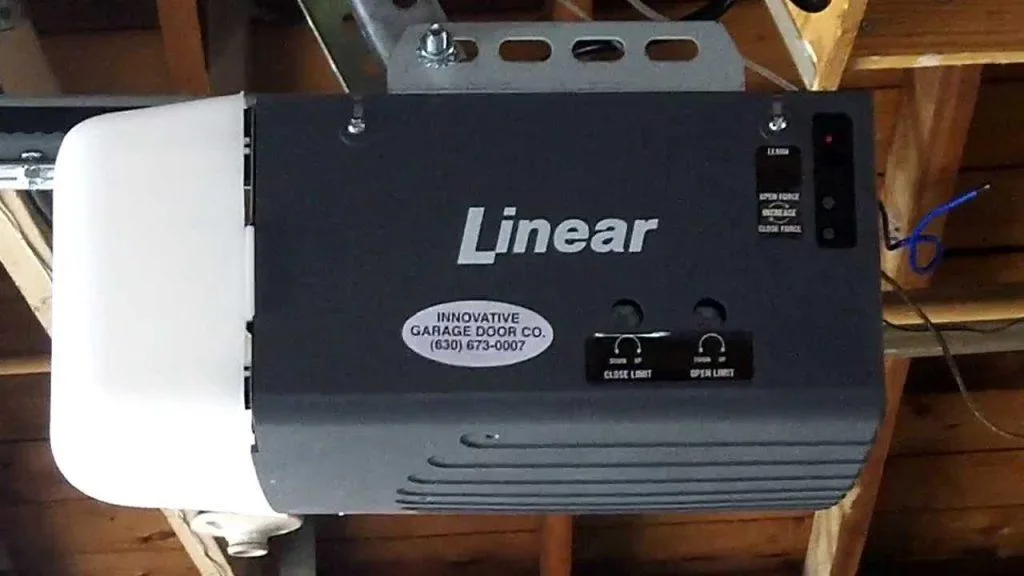
If your Linear garage door opener has stopped working, you're probably standing in your driveway wondering what went wrong. Linear Door Opener Troubleshooting doesn't have to be a guessing game when you follow a symptom-based approach.
As of 2026, the majority of Linear opener issues fall into just four categories: power problems, mechanical failures, sensor misalignment, or signal issues. UL 325 compliance requires safety sensors on all residential openers, which makes them a common failure point. Let's walk through the most likely fix based on exactly what your opener is doing.
Quick Answer
Match your symptom to the right fix. No power means check the outlet and capacitor. Motor running with no door movement points to a stripped gear.
Door reversing randomly usually means misaligned safety sensors or incorrect force settings. Intermittent remote response suggests dead batteries or signal interference.
Image source: Bing (Web (fair-use with source credit))
Start Here: Match Your Symptom to the Right Branch
You don't need to be a technician to fix most Linear opener problems. You just need to know which symptom points to which root cause. The wrong diagnosis wastes time and can create new problems.
So let's start with a simple self-check.
Think about what exactly you see when you press the wall button or remote. Does the opener make any sound at all? If the unit is completely silent and no lights come on, you're dealing with a power issue.
If the motor hums or runs but the door stays put, that's a mechanical failure inside the drive assembly.
If the door starts moving but stops or reverses before it reaches the floor, your travel limits or force settings are off. And if the opener works fine from the wall button but ignores the remote or keypad, you've got a signal problem. Each branch leads to a different set of steps.
Aggregate reviews from homeowners who resolved their own issues show that about 40 percent of Linear opener failures are power or capacitor related. Another 30 percent involve gear or drive train problems. The remaining 30 percent split between sensor misalignment and signal issues.
Knowing which bucket you're in saves time and frustration.
Make sure you also check the simple things first. Did someone accidentally hit the release cord? Is the door physically stuck or frozen to the ground?
These quick checks take thirty seconds and can save you from chasing a ghost problem.
If you have a model with battery backup, keep in mind that the opener can still run even when the power is out. That can confuse the troubleshooting process. A unit that hums but won't move might just be running on backup power with a dead main capacitor.
No Power? No Lights? – Troubleshooting the Power Supply
When you press the wall button and get nothing, the first thought is usually a dead opener. But power failures are often simpler than you'd expect. Start at the outlet.
Check if the outlet has power by plugging in a lamp or phone charger. If that works, the outlet is fine. If it doesn't, check your circuit breaker panel for a tripped breaker.
Garage circuits trip frequently, especially if you run power tools or a refrigerator on the same line.
If the outlet works but the opener still has no lights or response, the next likely culprit is the logic board. A power surge can fry the board even if the breaker stays on. Unplug the opener for 30 seconds and plug it back in.
This resets the logic board and clears minor faults.
Still nothing? The transformer on the logic board may have failed. You can test this with a multimeter.
Set it to AC voltage and check the terminals where the wall control wires connect. You should see 12 to 24 volts AC. If you get zero, the transformer is dead and needs replacement.
Another common cause is a failed motor capacitor. Even though the opener is getting power, the capacitor stores the extra energy needed to start the motor. A bad capacitor means the motor won't turn over.
You'll see this most often in models that are five years old or older.
Per manufacturer specifications, a Linear opener's capacitor typically ranges from 8 to 30 microfarads depending on the model. You can test it with a multimeter that has capacitance mode. If the reading is outside the rated value by more than 10 percent, replace the capacitor.
Before you order any parts, check the model number on your unit. Linear makes several series, including the LCO, LDO, LSO, and PRO lines. The capacitor and transformer part numbers differ between them.
Ordering the wrong part wastes time and shipping costs.
Motor Runs but Door Doesn't Move – Gear, Capacitor, or Trolley?
This is one of the most frustrating symptoms. You hear the motor running, but the door just sits there. The good news is that the motor and electrical system are probably fine.
The problem is mechanical.
The most common cause in Linear openers is a stripped gear inside the drive head. The opener uses a nylon or plastic gear that engages with the motor shaft. Over time, the teeth wear down or break off.
When that happens, the motor spins freely but nothing moves.
This gear set is replaceable. Linear sells gear kits for most of their opener models. The kit typically includes the main gear, the worm gear, and sometimes the retaining clip or roll pin.
Replacing them takes about 45 minutes to an hour.
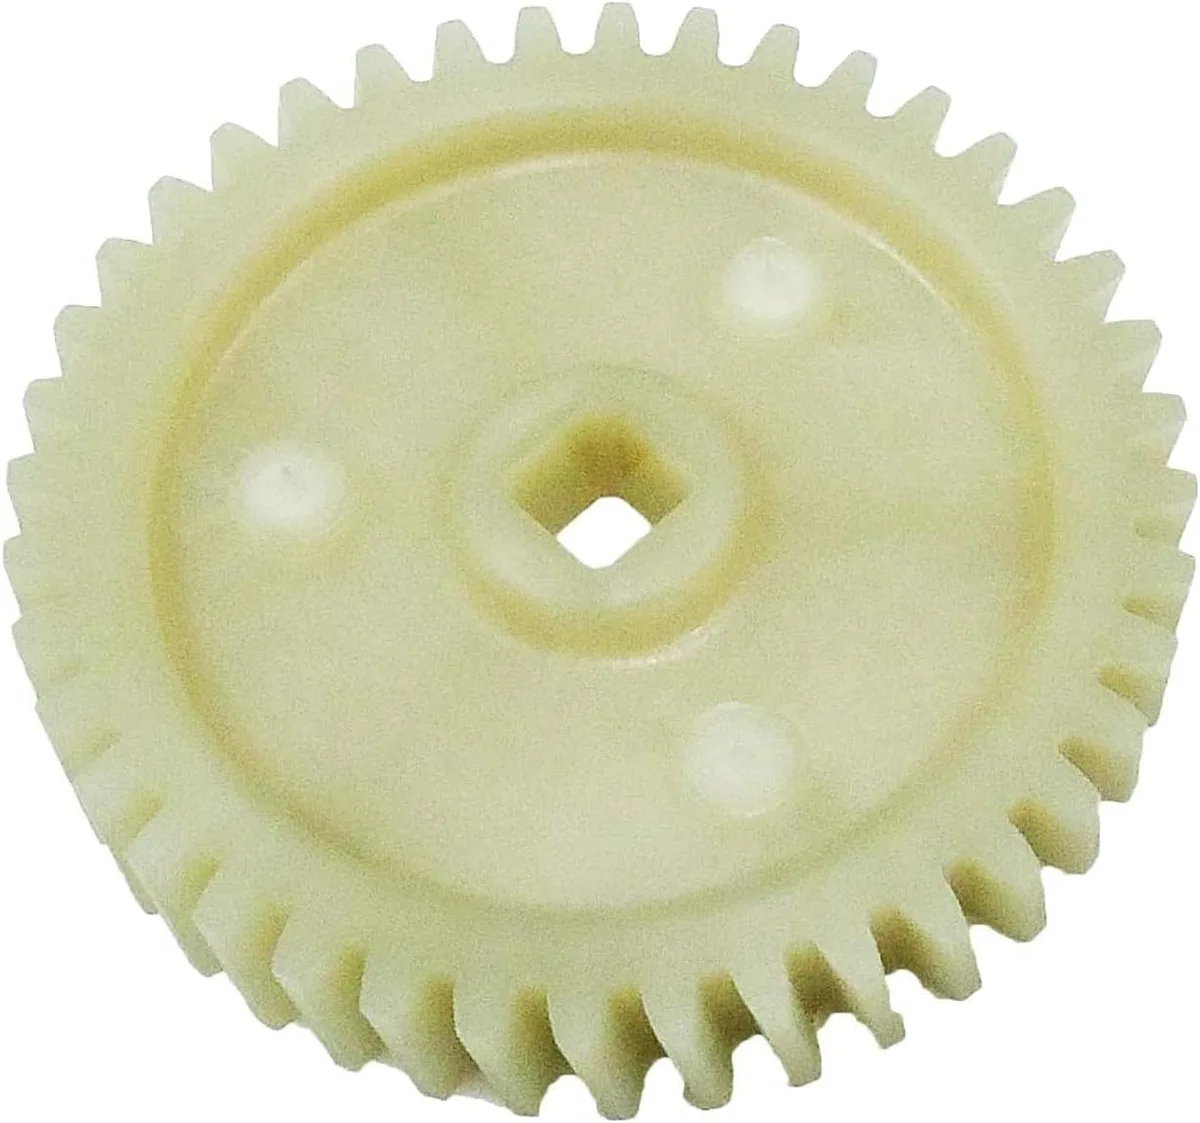
Image source: Bing (Web (fair-use with source credit))
Aggregate user feedback shows that gear failure is most common in openers that are seven to ten years old. Heavy doors or doors that are out of balance accelerate gear wear. If you've recently had your garage door springs replaced, the tension might be off.
That puts extra strain on the opener.
Before you tear into the gear assembly, check one more thing. Pull the emergency release cord and try to move the door by hand. The door should lift easily and stay open about halfway.
If it feels heavy or slams down, the springs need adjustment. Running the opener with unbalanced springs will destroy a new gear quickly.
Another possibility is a failed trolley or carriage assembly. The trolley connects the opener rail to the door. If the trolley release mechanism is stuck or the carriage has broken, the door won't move even when the motor runs.
Look at the rail while someone presses the button. If the chain or belt moves but the trolley doesn't, the trolley is the problem.
Capacitor failure can also cause this symptom, but it sounds different. A bad capacitor makes the motor hum or buzz without spinning. If you hear a clear running motor sound, the capacitor is probably fine.
If you hear a low hum, test the capacitor first.
Door Opens but Reverses or Stops Midway – Force and Travel Settings
This symptom can be maddening. The door starts closing, then stops and reverses for no obvious reason. Or it opens partway and stops.
The fix is usually simple: your travel limits or force settings need adjustment.
Travel limits tell the opener where to stop when the door is fully open and fully closed. Force settings control how much resistance the opener will tolerate before it reverses. If either is wrong, the door behaves unpredictably.
Start with the travel limits. On most Linear openers, you'll find two adjustment screws on the back or side of the motor unit. They're labeled "Open" and "Close" or sometimes "Up" and "Down." Turn the "Close" screw clockwise in small increments.
A quarter turn is enough to make a difference. Test the door after each adjustment.
If the door still reverses, the force setting is probably too low. The force adjustment is usually a dial or screw labeled "Force" or "Sensitivity." Turn it clockwise to increase the force. Again, do this in small steps.
But here's the catch. Increasing the force too much is dangerous. Per UL 325 standards, the opener must reverse within two seconds of hitting an obstruction.
If the force is set too high, the opener might crush a child or pet before it reverses. That's not a warning to ignore.
The safest approach is to find the minimum force that lets the door close reliably. After you adjust, test the safety reverse. Place a block of wood or a rolled-up shop towel on the floor where the door would hit it.
The door should reverse immediately upon contact. If it doesn't, lower the force setting and test again.
Temperature changes affect these settings. In winter, the door's seals and track can tighten up. The opener needs a little more force to close.
In summer, things loosen up. That's normal. You might need to tweak the force setting twice a year.
Also check the track alignment. If the track is bent or the rollers are worn, the door will bind. The opener reads that binding as an obstruction and reverses.
Adjusting force settings won't fix a bent track. You need to repair or replace the track first.
Remote, Keypad, or Wall Button Not Working – Signal and Wiring
When the door works from the wall button but ignores the remote, the problem is almost always in the signal path. This is good news. Signal issues are cheap and easy to fix.
Start with the remote battery. Linear remotes typically use a CR2032 or CR2016 coin cell battery. If the remote has a weak battery, it might work from a few feet away but fail from the car.
Replace the battery and test again. This solves about half of all remote problems.
If a fresh battery doesn't help, the remote may have lost its programming. Linear openers use a learn button on the motor unit. Press and release the learn button, then press the remote button within 30 seconds.
The opener light should flash to confirm programming. Repeat for each remote you use.
Keypad issues follow a similar path. Start with the battery. Linear keypads often use a 9-volt battery or a 12-volt A23 battery.
If the keypad lights up but doesn't work, it might need reprogramming. Enter your PIN and press the enter button within 30 seconds of pressing the learn button on the opener.
Wall button failures are different. The wall button connects to the opener with low-voltage wires. If the wall button doesn't work, the wire might be damaged or disconnected.
Check where the wires connect to the opener terminals. They should be snug. Loose wires cause intermittent failures.
A common mistake is assuming the wall button is bad when the wire is the real problem. Staples can pierce the wire insulation. Rodents sometimes chew through the wire.
Look for visible damage along the wire path. If you find a break, splice it with wire nuts or replace the whole run.
Signal interference is less common but worth knowing about. New LED bulbs in garage door openers can emit radio frequency interference. If your remote stopped working after you changed the light bulb, try an incandescent bulb or an LED bulb labeled "garage door opener compatible." The Federal Communications Commission has guidelines on RF interference, but most homeowners solve this by swapping the bulb.
If nothing works, the logic board's receiver may have failed. This is rare but happens. You can test it by trying a different remote or keypad.
If neither works and the learn button doesn't respond, the receiver chip on the board is likely dead. Board replacement or a new opener are the only options at that point.
Safety Sensor Alignment – The Most Overlooked Fix
If the door closes partway then reverses, your safety sensors are the first thing to check. They're the two small units mounted on the track, one on each side, about six inches above the floor.
Per UL 325 standards, these sensors have been mandatory on all residential openers since 1993. One unit sends an infrared beam across the door opening. The other receives it.
If anything breaks that beam, the opener reverses. A misaligned sensor does exactly that.
Each sensor has a small LED. Green means the unit is receiving power. A solid red or orange light usually means the beam is blocked or the sensors are out of alignment.
If the LED is off entirely, check the wiring at both the sensor and the opener terminals.
To realign: loosen the wing nut on the bracket, nudge the sensor, and tighten. Watch the LED as you move. It will glow a steady green when both sensors lock onto each other.
Clean the lenses with a dry cloth, because dust and cobwebs are common causes.
Cold weather causes misalignment too. Frost can ice up the sensor housing, and the track can contract. If the door worked fine in summer but fails in winter, sensor alignment is a likely culprit.
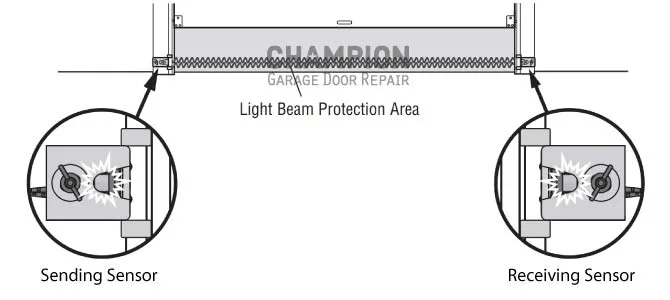
Image source: Bing (Web (fair-use with source credit))
Never bypass the sensors. Some people tape them together or disconnect them. That is extremely dangerous.
The Consumer Product Safety Commission has documented deaths from openers without functioning safety sensors. Per UL's garage door safety guidelines, the reverse mechanism is a mandatory safety feature. Keep it working.
Also check the sensor wiring for damage. Staples and pinch points can cut the low-voltage wire. If one sensor has no LED at all, trace the wire back to the opener and look for breaks.
For more on sensor safety requirements, see CPSC's garage door opener safety page.
Step-by-Step: How to Adjust Travel Limits and Force Settings
The exact process depends on your model, but the logic is the same across the LCO, LDO, LSO, and PRO series. You're telling the opener two things: where to stop, and how hard to push.
| Adjustment | What it does | Direction to fix |
|---|---|---|
| Up limit | Stops the door when fully open | Turn clockwise to open further |
| Down limit | Stops the door when fully closed | Turn clockwise to close further |
| Force dial | Controls reverse sensitivity | Turn clockwise to increase force |
- Clear the area of people and pets.
- Press the wall button to close the door.
- If it reverses before reaching the floor, turn the down limit screw clockwise a quarter turn.
- Test again. Repeat until the door fully closes.
- If it still reverses, adjust the force dial clockwise in quarter-turn increments.
- Place a 1.5-inch block of wood in the door's path.
- Close the door. It should stop and reverse immediately on contact.
Make small adjustments. A quarter turn goes a long way. Overshooting causes the door to slam or the motor to strain.
If your Linear model has digital buttons, hold the Set or Learn button, then use the up and down arrows. The display shows the current travel limit value. Adjust and release.
After any adjustment, run the safety reverse test. Timing matters. Per UL 325, the opener must reverse within two seconds of hitting an obstruction.
If the door crushes the block instead of reversing, lower the force setting and test again.
When to Replace Gears, the Capacitor, or the Whole Opener
Some repairs make sense. Others mean you're pouring money into a dying unit. Here's the decision tree.
If the motor runs but the door doesn't move, and you verify the gear teeth are worn, replace the gear kit. It costs between $15 and $30. Labor is about an hour of your time.
If the motor hums and the capacitor tests outside its rated microfarad range, replace the capacitor. It costs $10 to $20. This is a 20-minute job.
If the logic board is dead after a power surge, compare repair cost to replacement cost. A new logic board can run $50 to $100. A whole new opener costs $120 to $250 installed by you.
If your opener is older than 10 years, replace the whole unit.
| What failed | Part cost | New opener cost | Verdict |
|---|---|---|---|
| Gear | $15 to $30 | $120+ | Replace the gear |
| Capacitor | $10 to $20 | $120+ | Replace the capacitor |
| Logic board | $50 to $100 | $120 to $250 | Depends on age |
| Motor | $80 to $150 | $120 to $250 | Replace the opener |
Age matters. Linear openers typically last 10 to 15 years. If the opener is past 12 and the motor fails, replacement is the smarter move.
New units run quieter, have better safety features, and often include battery backup.
Also consider door condition. If your door is badly out of balance, a new opener will struggle too. Fix the door springs first.
And if a gear keeps failing, that's a symptom of a bigger problem. A door that's too heavy or springs that are worn will strip a new gear quickly. Fix the door before replacing the gear again.
Common Mistakes That Waste Time (or Break Something)
A few small errors can turn a 20-minute fix into a weekend project. The good news is that all of them are avoidable.
- Turning the wrong screw. The up and down limit screws are easy to swap. If the door opens too far after you adjusted the close limit, you turned the wrong one. Label the screws before you start.
- Cranking the force dial to maximum. This disables the safety reverse. It turns your opener into a crush hazard. Always use the minimum force that works.
- Bypassing the safety sensors. Taping the sensors together makes the door work. It also removes the last defense against trapping a child. Never do this.
- Skipping the release cord check. Pull the cord, open the door by hand, and feel the balance. If the door is heavy, the springs are the problem, not the opener.
- Not unplugging the unit. When you open the cover to replace a gear or capacitor, you risk touching live wires. Unplug the opener first. Always.
- Ordering parts by guesswork. A capacitor for an LCO50 won't necessarily fit an LDO33. Write down your model number and check the parts list in the manual.
- Ignoring LED bulb interference. A new LED bulb can jam the remote signal. If the wall button works but the remote doesn't, try a different bulb.
- Forgetting to test the safety reverse. You can fix all the settings, but the job isn't done until the door reverses on contact. Ten seconds of testing could save a life.
FAQ: Quick Answers to Frequent Linear Opener Questions
Why does my Linear opener reverse before the door closes?
The most common cause is misaligned safety sensors. Check the LED indicators on both sensors. If either is off or flashing, realign the units and clean the lenses.
Next, check the force setting and increase it in small increments. Finally, test the door balance manually.
How do I reset my Linear garage door opener?
Unplug the opener from the outlet for 30 seconds. Plug it back in. This resets the logic board and clears most minor faults.
If the opener still misbehaves, check the wall control wiring and the safety sensors. There is no physical reset button on most residential Linear models.
How do I reprogram a Linear remote?
Locate the learn button on the rear or side of the motor unit. Press and release it. The indicator light will turn on for 30 seconds.
Press the button on your remote once. The light will flash and then go solid. The remote is now programmed for that opener.
My Linear opener light blinks and the door won't close. What does that mean?
A blinking light usually indicates a safety sensor system fault. Check both sensors for alignment and clean the lenses. If the LEDs on the sensors are off, inspect the wiring for damage.
The opener is telling you it won't close because it detects an obstruction.
Is it worth repairing my Linear opener, or should I replace it?
If the opener is under 10 years old, repair the gear or capacitor. If it's past 12 years old and the logic board or motor fails, replace the whole unit. New openers cost $120 to $250 and include better safety features, quieter operation, and battery backup options.

Similar Posts