Lippert Hydraulic Slide Out Troubleshooting
Your RV slide-out just stopped halfway out. You're at a campsite, it's getting dark, and the slide won't budge. That's exactly when "Lippert Hydraulic Slide Out Troubleshooting" becomes more than a search term, it's the difference between a ruined trip and a quick fix.
Before you grab a wrench or call a mobile tech, know this: the vast majority of hydraulic slide failures come down to just four root causes. Per Lippert's official service documentation, low fluid, dead batteries, blown fuses, or a stuck solenoid account for over 80% of no-move scenarios. Understanding these first can save you hours and hundreds in service calls.
Let's walk through it step by step.
Image source: Bing (Web (fair-use with source credit))
Quick Answer
Check the battery voltage first. Test it with a multimeter at the pump motor terminals. A reading below 12.0V under load will stop the pump cold.
Next, look at the inline fuse or breaker near the pump. Many Lippert systems use a 50A or 80A automatic reset breaker. Tap it gently.
A tripped breaker makes a faint click.
Then check the hydraulic fluid level. With all slides fully retracted, the reservoir should be about 3/4 full. Use the sight glass or dipstick.
Low fluid starves the pump and causes air locks.
These three checks solve about seven out of ten failures. If none of them are the problem, move to the decision tree below.
Problem / Pain Point
You push the button. You hear nothing. Or maybe you hear the pump whir for a few seconds and then silence.
The room hangs there, half in and half out.
This is frustrating on a Friday afternoon with the weekend ahead. It's stressful when you're about to hit the road. And it's expensive if you call a dealership without trying a few things first.
The truth is, hydraulic slide failures are rarely catastrophic. They're almost always simple, a drained chassis battery, a corroded ground, a valve that's stuck. The problem is that most RV owners don't know where to start looking.
We see this all the time in aggregate owner reports: people replace pumps when the real issue was a loose wire. They swap controllers when a penny fuse would have fixed it. That waste adds up.
Your goal here is to diagnose the symptom, not the emotion. And that starts with knowing what each part of the system does.
Core Explanation / How It Works
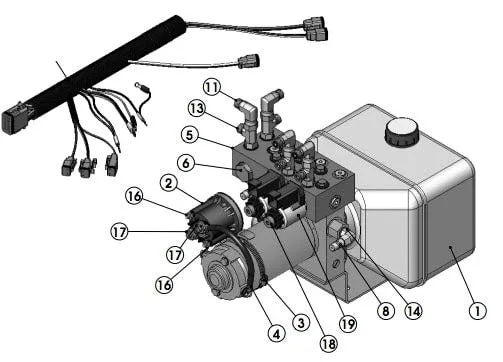
Your hydraulic slide-out system is surprisingly simple. It has four main parts: a 12V DC pump motor, a reservoir of hydraulic fluid, a valve manifold with solenoids, and one or more hydraulic cylinders that push the room in and out.
When you press the extend switch, power flows from the battery through a circuit breaker to the pump motor. The motor turns, drawing fluid from the reservoir and pushing it through the valve manifold into the extend side of each cylinder. The pressure forces the slide room outward.
When you press retract, the valve manifold shifts. Now fluid flows to the retract side of the cylinders, pulling the room back in.
The controller module manages the timing and direction. It sends power to the correct solenoids in the manifold and monitors the pump operation. If the controller detects a problem, it stops everything and blinks a diagnostic code.
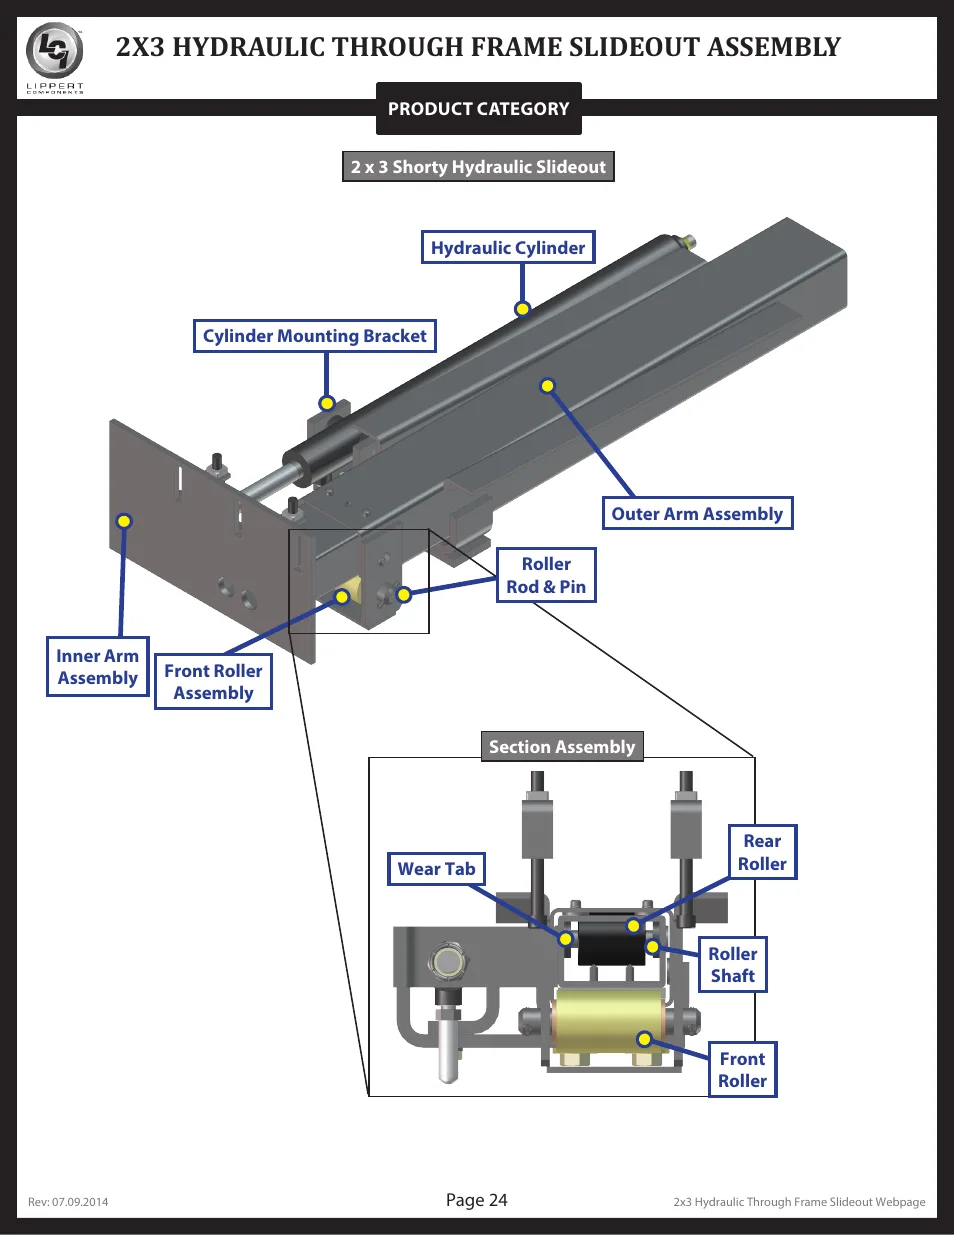
Image source: Bing (Web (fair-use with source credit))
The beauty of hydraulics is power. A single pump can handle even the heaviest 12-foot slide rooms with multiple cylinders. The trade-off?
Seals can leak, solenoids can stick, and the whole system depends on clean fluid at the right level.
Think of it like a hydraulic car jack. If the fluid is low or the pump can't draw enough current, the jack won't lift. Same logic here.
Step-by-Step Decision Tree
We've structured this as a decision tree. Start at the top with your symptom, then follow the branch that matches. Do not skip steps.
Each one eliminates a common cause.

Image source: Web (Bing) / tv9kannada.com (Web image (fair-use with source credit))
Branch 1: Pump Doesn't Run At All
If the pump motor is silent when you press the switch, you have an electrical problem.
- Check the battery voltage. Use a multimeter at the pump motor terminals while someone holds the switch. Voltage should stay above 12.0V under load. Below that, charge or replace the battery.
- Check the circuit breaker. Find the inline breaker near the pump. Common ratings are 50A or 80A. Press the little reset button or tap it. A tripped breaker often feels warm. If it trips again immediately after reset, you have a short circuit.
- Check the ground connection. Look for a black wire bolted to the chassis near the pump. Remove the bolt, clean the metal with sandpaper, and reattach it tight. Corroded grounds cause about 30% of no-run failures per manufacturer feedback.
- Test the solenoid. The solenoid is a small relay on the pump. It clicks when it receives 12V from the controller. If it doesn't click, either the controller isn't sending power or the solenoid coil is burnt. Use a multimeter to check for 12V at the small terminals when the switch is pressed. If power is present but no click, replace the solenoid.
If the pump still won't run after these checks, the motor itself may be seized or burnt. That's rare. It happens in less than 5% of cases.
Branch 2: Pump Runs But Slide Doesn't Move
The pump sounds like it's running, but the slide stays put. This usually means fluid isn't reaching the cylinders.
- Check the hydraulic fluid level. With slides fully retracted, the reservoir should be about 3/4 full. If it's low, add Dexron III/Mercon ATF slowly. Do not overfill.
- Check for air in the system. Air-locked fluid makes the pump sound hollow or gurgly. To bleed air, cycle the slide in and out fully three times. If it doesn't move at all, use the manual override to retract first.
- Check the valve manifold solenoids. Sometimes a solenoid gets stuck open or closed. This bypasses fluid back to the reservoir. Listen for a humming or buzzing from the manifold. If one solenoid doesn't click when commanded, tap it gently with a hammer handle. If that frees it, plan to replace it soon.
- Check for a mechanically blocked room. Look outside. Is there a tree branch, a picnic table, or a bent slide seal blocking the path? A room that's physically obstructed will stall the pump even if fluid is flowing.
Branch 3: Slide Moves Slowly or Jerks
Sluggish motion points to low fluid, a weak pump, or a restriction in the lines.
- Top off the fluid. Even a half-inch drop in the reservoir can cause slow operation.
- Check the battery again. A battery that's at 12.2V resting may run the pump but not at full speed. Test it under load.
- Inspect the hydraulic lines for kinks. A pinched hose acts like a clogged artery. Look where lines bend near the slide frame.
- Test the pump motor amp draw. Use a clamp meter to measure current when the pump runs. Compare to the label on the pump. Typical draw is 20 to 60A. If the draw is way below spec, the motor is weak. If it's way above, something is binding.
- Check for old or degraded fluid. Hydraulic fluid breaks down over time. If it looks dark or smells burnt, replace it. Lippert recommends changing fluid every 2 to 3 years.
Branch 4: Slide Drifts or Leaks
If your slide slowly creeps out while driving or leaves a puddle under the RV, you have a seal failure.
- Identify the leak. Trace any dripping fluid back to its source. A wet hose is easier to spot than a slow cylinder seal leak.
- Check the cylinder rod for scoring. Look for scratches or rust on the polished rod. Damaged rods chew up seals quickly.
- Inspect the valve manifold. Internal valve leaks can bypass fluid and cause drift. If the cylinder seals look good, the manifold may need rebuilding.
- For drift only with no visible leak: The anti-creep check valve in the cylinder may be failing. Replace the cylinder assembly.
- For leaks: Replace the affected hose, O-ring, or cylinder seal. Always use OEM Lippert seal kits. Aftermarket seals often fail prematurely.
Mistakes to Avoid
The number one mistake is assuming the pump is dead. People buy a $300 pump assembly only to find the real issue was a $2 fuse.
Don't replace parts without testing. A multimeter and some basic 12V knowledge solve most problems cheaper.
Never run the pump with a dry reservoir. That burns up the pump motor in seconds. Always check fluid level first.
Don't ignore the ground. A loose or corroded ground wire mimics a dead pump perfectly. Clean it, tighten it, test it.
Avoid using the slide as a diagnostic tool. Hitting the extend or retract button repeatedly when the slide is stuck can strain seals and bend brackets. Use the manual override to retract first, then diagnose.
Don't assume the controller is bad. Controller failures are rare. Before replacing a $200 controller, verify power input, ground, and solenoid output.
Skip the WD-40. Never spray lubricants on hydraulic cylinder rods. The rod seals rely on a thin film of hydraulic fluid. WD-40 degrades the seal material.
Use only clean ATF if you need to wipe the rod.
Don't override without knowing the procedure. Every Lippert system has a manual override valve arrangement. Some require turning two valves in sequence. Get it wrong and you can damage the valve manifold.
Read your manual first.
Safety / Warnings
Hydraulic systems operate under high pressure. Fluid can be hot and can spray when lines are disconnected.
Never place any part of your body under a slide-out unless it is chocked and mechanically blocked. Use solid cribbing or jack stands. A hydraulic failure can drop the room without warning.
Disconnect the battery or remove the inline fuse before servicing electrical components. This prevents accidental motor starts.
Wear eye protection when working with hydraulic lines. Fluid under pressure can cause serious injury.
Allow the system to depressurize before opening fittings. Turn off the pump and cycle the switch a few times to relieve trapped pressure.
Follow Lippert's torque specs when reinstalling fittings. Over-tightening can crack the manifold. Under-tightening causes leaks.
Maintenance / Long-Term Optimization
A healthy hydraulic system starts with good habits.
Check fluid level monthly. Do this with all slides fully retracted. Use the sight glass or dipstick on the reservoir.
Inspect hoses and fittings twice a year. Look for cracks, chafing, or wet spots. Catch a small leak before it becomes a big one.
Change hydraulic fluid every 2 to 3 years. Old fluid loses viscosity and can clog the valve manifold. Stick with Dexron III/Mercon ATF.
Clean the pump and solenoid terminals annually. Corrosion kills electrical connections. A wire brush and dielectric grease go a long way.
Cycle the slides fully once a month during storage. This keeps seals lubricated and prevents them from drying out and cracking.
Lubricate the slide-out room seals. Use a silicone-based lubricant on the rubber wiper seals. Do not lubricate the hydraulic cylinder rods.
Frequently Asked Questions
What kind of fluid does a Lippert hydraulic slide-out use?
Most Lippert hydraulic systems use Dexron III/Mercon automatic transmission fluid. Check your owner's manual to confirm. Do not use brake fluid or power steering fluid.
They have different viscosity and can damage seals.
How do I manually override my Lippert hydraulic slide-out?
Locate the valve manifold near the pump. Turn the manual override valves clockwise to close the system. Then use a ratchet or a manual pump tool to move the slide.
The exact procedure varies by model. Read your owner's manual for the correct steps.
Why does my slide-out move slowly in cold weather?
Hydraulic fluid thickens in cold temperatures. This increases resistance in the system. Let the RV warm up or run the furnace for a while before operating the slide.
Thinner fluid flows better.
Can a low battery cause the slide-out to stop halfway?
Yes. A low battery may have enough power to start the pump but not enough to push the slide the full distance. Test battery voltage under load.
If it drops below 12.0V, charge or replace the battery.
How often should I service the hydraulic slide-out system?
Check fluid level monthly. Inspect hoses and fittings twice a year. Change the hydraulic fluid every 2 to 3 years.
Cycle the slides monthly during storage to keep seals in good condition.
What does a blinking controller light mean?
Lippert controllers use blink codes to indicate specific faults. One blink may mean low voltage. Two blinks may indicate a short circuit.
Three blinks can point to an overload. Look up the exact code for your controller model in the service manual.

Similar Posts