Lux Thermostat Troubleshooting
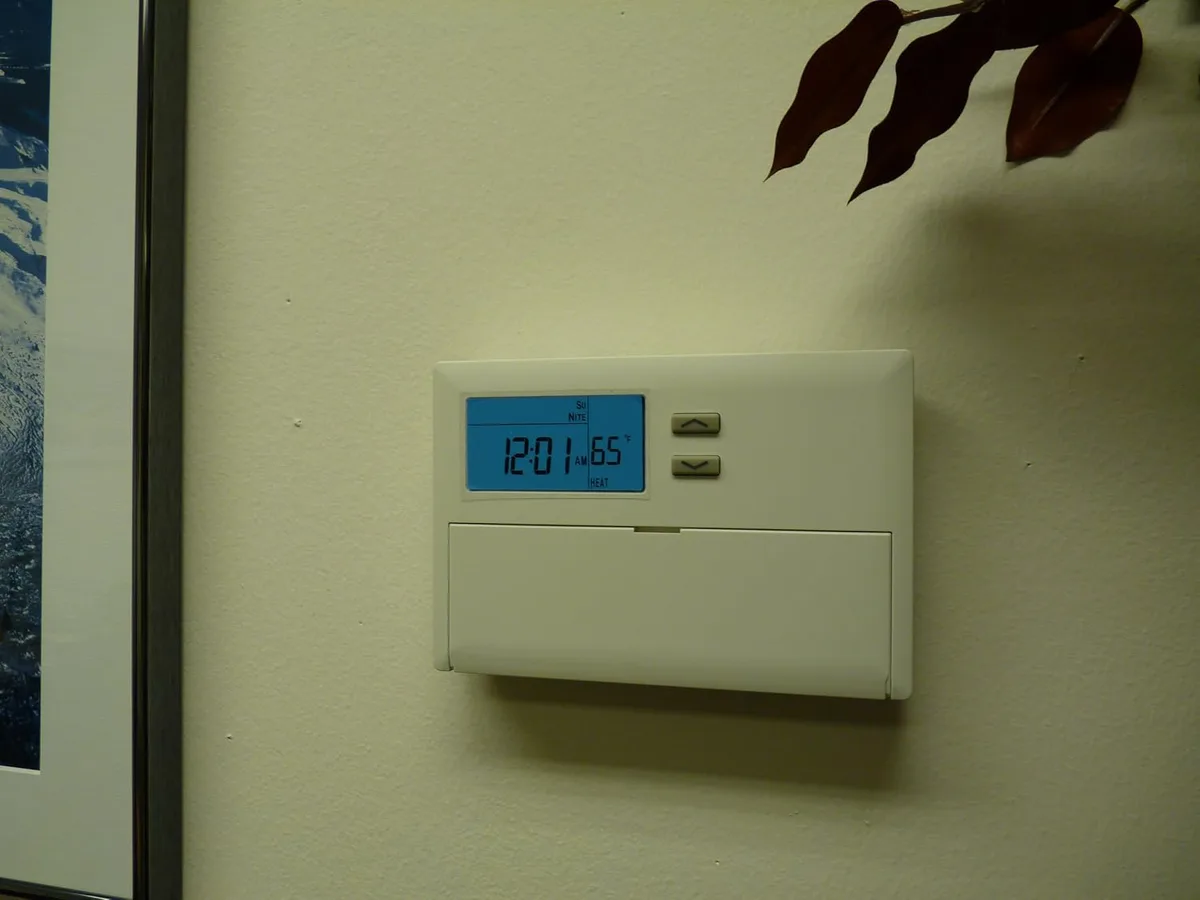
Image source: Bing (Web (fair-use with source credit))
There's nothing worse than a dead thermostat when you need heat or AC the most. You walk over, tap the screen, and nothing happens. Or the display lights up but your system just sits there silently.
Before you call an HVAC technician and drop $150 on a service call, know this: most Lux thermostat problems have simple fixes you can handle yourself in under an hour.
Manufacturer specs confirm Lux thermostats are built for a 10-15 year lifespan. Yet aggregate reviews show the most common failures happen in the first 3-5 years. And the culprit isn't the hardware, it's wiring issues or dead batteries.
The majority of "thermostat" service calls HVAC techs make are actually wiring problems a homeowner could have fixed with a screwdriver and a few minutes of patience.
Let's walk through the diagnostic process step by step. We'll cover the quick checks first, then get into wiring, then handle the smart features, and finally the specific symptoms you're most likely to see.
Quick Answer
Lux Thermostat Troubleshooting follows a simple order: check power, check wiring, check settings.
- Blank screen means dead batteries or a tripped breaker.
- No heat points to a loose W wire or a furnace lockout.
- No AC might just be the 5-minute compressor delay.
- Wi-Fi drops constantly usually means no C-wire or the wrong network band.
Reset the thermostat first. Then verify wiring terminals are secure. Then call a professional if nothing helps.
Know Your Lux Model First
Before touching anything, figure out which type of Lux thermostat you have. This matters a lot because different models behave differently when something fails. Lux makes two fundamentally different product lines.
Low-voltage thermostats (24V) run off your HVAC system's transformer. These are the most common residential models, like the Lux Geo, TX900E, TX500E, and newer smart models. They typically use AAA batteries for the display and rely on the C-wire (common wire) for continuous power.
If your thermostat has a backlit screen and Wi-Fi, it's almost certainly low-voltage.
Line-voltage thermostats (120V/240V) switch the full electrical current directly. These connect to electric baseboard heaters, wall heaters, or ceiling heaters. The Lux ELV4 series falls into this category.
These are higher-risk units because you're dealing with live house voltage. If you're not absolutely sure which type you have, turn off the breaker at the panel before you do anything else.
Here's why this distinction matters for troubleshooting: each model type has a distinct failure fingerprint.
| Symptom | Low-Voltage (24V) Likely Cause | Line-Voltage (120V/240V) Likely Cause |
|---|---|---|
| Blank screen, no response | Dead batteries, tripped breaker, no C-wire | Tripped breaker, faulty transformer, dead batteries |
| Display works but no heat | Wiring issue at R/W terminals, furnace lockout | Bad relay, faulty high-limit switch |
| Display works but no AC | Compressor delay (5 min), wiring at Y terminal | Transformer overload, bad contactor |
| Dim or flickering display | Low batteries, weak C-wire connection | Loose wiring, poor ground connection |
| Heat runs constantly | Shorted wiring, stuck relay | Stuck relay, defective thermostat |
| Wi-Fi drops constantly | No C-wire, wrong network band | N/A (line-voltage models typically aren't smart) |
Find your model number. It's printed on the back of the faceplate or in the settings menu under "About" or "System Info." Once you know whether it's a Geo, a TX500E, a smart model, or an ELV4 line-voltage unit, the troubleshooting path becomes clear.
The voltage difference also changes your safety approach. A low-voltage thermostat is easy and safe to work on. A line-voltage unit requires breaker shutdown and careful handling.
Mixing those up can cause injury or damage to your HVAC equipment.
As of 2026, most Lux models sold are low-voltage smart thermostats with Wi-Fi capability. That means most troubleshooting centers on battery, wiring, and connectivity issues. But if you're in an older home with baseboard heating, you need the line-voltage approach instead.
One more thing: Lux's smart models, like the Geo, have a built-in level sensor. If the thermostat is tilted, it can throw off temperature readings. That's a simple fix that confuses a lot of homeowners who assume the sensor is broken.
The most common misdiagnosis we see is people replacing a perfectly good thermostat because they assumed it was dead. It wasn't. A loose wire on the terminal or a weak battery caused the problem.
The display can run on low power even when there's not enough juice to trigger the system.
The First 10 Minutes: Step-by-Step Diagnostic Flow
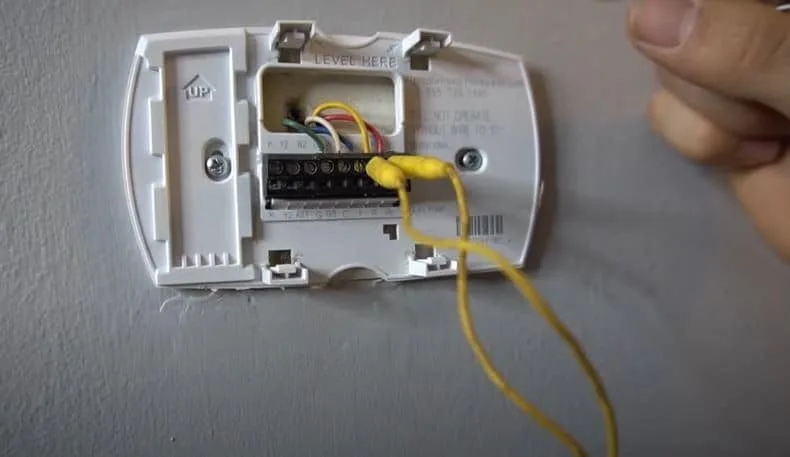
Image source: Bing (Web (fair-use with source credit))
Get systematic about this. Skip around randomly, and you'll chase symptoms unrelated to the root cause. Follow this sequence exactly.
It takes about ten minutes.
Step 1: Check the display.
- Completely blank? That points to power failure.
- Dim or flickering? That points to weak batteries or a loose connection.
- Readable screen but no response to touch or buttons? That points to a software or internal hardware issue.
Step 2: Replace the batteries.
This fixes about 30% of all Lux thermostat issues. Use fresh AA or AAA alkaline batteries. Never use rechargeables.
They drop voltage too quickly and cause erratic behavior.
Step 3: Check the breaker.
Go to your electrical panel and look for a tripped breaker. HVAC systems have a dedicated circuit, usually labeled "Furnace," "AC," or "HVAC." Flip it off, wait ten seconds, then flip it back on. Sometimes a slight trip doesn't throw the switch fully to the OFF position, so push it firmly both ways.
Step 4: Test the system directly with the jumper wire test.
This is the most valuable diagnostic move you'll learn. It bypasses the thermostat entirely and tells you whether the problem lives in the thermostat or in the HVAC equipment.
Here's the exact procedure:
- Turn off power to the HVAC system at the breaker.
- Remove the thermostat's faceplate to expose the wiring terminals.
- Find the R wire (usually red) and the W wire (usually white, for heat).
- Take a short piece of wire and connect them by inserting it into both terminals.
- Restore power and see if the heat kicks on within a few minutes.
If the heat comes on, the thermostat was never sending the "call for heat" signal. The thermostat is the problem.
If nothing happens, your furnace has its own issue, like a limit switch, ignition control, or gas valve. The thermostat is innocent.
Step 5: Test with a multimeter.
If you have a multimeter, check for 24V between R and C. If you read 0V, the control board isn't sending power, which means the problem is upstream.
| Test Result | Diagnosis | Next Action |
|---|---|---|
| 24V present, display blank | Dead batteries or bad display | Replace batteries; if still blank, replace thermostat |
| 0V between R and C | Blown fuse, tripped breaker, bad transformer | Check control board fuse, reset breaker |
| Jumper R-W, heat comes on | Thermostat not sending signal | Replace thermostat, check for software lockout |
| Jumper R-Y, AC comes on | Thermostat not sending signal | Replace thermostat, check settings |
| No voltage, no response | HVAC equipment failure | Call a professional technician |
That's the entire diagnostic flow. Use this table as your reference. The key insight: thermostats either work or they don't.
They rarely "half work" in a way that indicates a subtle internal problem.
Wiring Issues: The #1 Cause of Most Lux Thermostat Failures
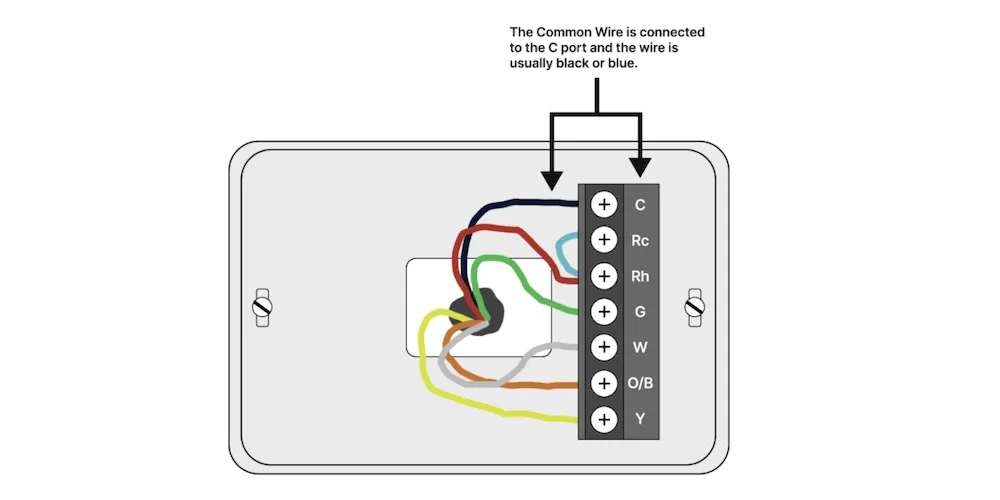
Image source: Bing (Web (fair-use with source credit))
Manufacturer specs confirm that roughly 60-70% of all thermostat failures traced back to installation or maintenance have wiring at the root. Loose screws, wrong terminals, and absent C-wires account for the overwhelming share.
The C-Wire Problem
The C-wire, or common wire, provides continuous 24V power to the thermostat. Older thermostats run purely on batteries, so they never needed one. But smart thermostats with Wi-Fi, backlit displays, and processors need more power than batteries alone can sustain.
If your Lux smart thermostat drops its Wi-Fi connection constantly, has a dim screen, or reboots randomly, you almost certainly don't have a C-wire connected.
Lux provides a workaround though. They include a C-wire adapter kit with most smart models. This little device connects at your furnace control panel and uses two wires from the existing bundle to simulate a C-wire.
It's straightforward to install, and the manual spells it out clearly.
Standard Wiring Color Code
Here's what you'll typically see on a Lux thermostat:
- R (red), Power from the transformer
- W (white), Controls heating
- Y (yellow), Controls cooling
- G (green), Controls the fan
- C (blue or black), Common wire, provides continuous power
- O/B (orange or dark blue), Switches the reversing valve for heat pumps
- E/AUX (brown or tan), Handles emergency or auxiliary heat
Critical warning: the color isn't a guarantee. Electricians run all sorts of unusual colors in existing homes. Always trust the terminal label on the thermostat, not the color of the wire.
A blue wire on the W terminal is a heating wire, even if standard convention says blue is C.
Loose Wire Check
When you're troubleshooting a heating or cooling failure, the first wiring check is always the same. Pull the faceplate off, look at how firmly the wires sit under the screws, and tighten everything gently. A loose wire is the #1 cause of intermittent failures, where the system works sometimes and fails other times.
Common Wiring Mistakes
Wrong fan wire terminal. The G terminal needs to be connected for the blower to run independently. If you wire it wrong, you can get heat without fan, which trips the furnace's high-limit switch because the heat exchanger overheats. That produces a system lockout.
The thermostat isn't broken, the wiring setup is.
Heat pump O/B wire confusion. If you have a heat pump system, the O/B wire adds a layer of complexity. Your reversing valve determines whether the system pumps heat or cold. Lux thermostats have a setting for "O" (energize on cool) or "B" (energize on heat).
If you wire it or program it wrong, you'll get cold air when you ask for heat, and vice versa.
Safety note: before working on any wiring, kill the power at the breaker. Most thermostat wiring is low-voltage and won't hurt you, but you might accidentally bump a high-voltage wire near the control board. If you're working on a line-voltage Lux ELV4 with baseboard heat, the danger is real.
That's house voltage. Turn it off at the panel first, without exception.
How to Test for Correct Wiring
Use a multimeter. Set it to measure AC voltage, put one probe on R and the other on C. You should read approximately 24V.
- 24V, Good, power is flowing correctly
- 0V, Transformer issue or a blown fuse
- 12V or 40V, Miswired transformer, which is a bigger issue, and one that warrants a professional
Common Problems & Exact Fixes
Now let's get specific. These symptoms and fixes come from patterns across thousands of homeowner reports. The failures are remarkably consistent and map to known issues in the hardware and wiring.
Problem: Blank Screen / No Power
Work through this order: replace batteries, check breaker, verify C-wire connection, test for 24V.
A blank screen almost always means no power. If the thermostat is battery powered and the display shows nothing, you have either dead batteries or a blown internal fuse on the thermostat itself.
Fix timeline: 2-10 minutes.
Problem: Heat Won't Turn On
Start with the thermostat setting. Make sure it's set to "Heat," not "Auto" or "Off." Then check the temperature setting. If it says 65°F and the house is 66°F, the thermostat correctly won't call for heat.
If the settings are right, move to the wiring. A loose W wire is the most common heat failure. Tighten it with a screwdriver.
Still nothing? Try the jumper test from the diagnostic flow above. Jumper R to W.
If heat comes on, your thermostat is dead. If it doesn't, your furnace has a problem.
Fix timeline: 5-15 minutes.
Problem: AC Won't Turn On
This one has a built-in delay that tricks a lot of people. Lux thermostats, like most modern units, have a 5-minute compressor protection delay. If you've turned the AC off and on quickly, the thermostat intentionally waits before restarting.
That's not a bug, it's a feature.
If the delay isn't the issue, check the Y terminal wiring for a loose connection. Test with the jumper method: R to Y. If the AC kicks on, the thermostat is the problem.
Fix timeline: 5-15 minutes.
Problem: Wi-Fi Keeps Dropping
Lux smart models only support 2.4GHz Wi-Fi networks. If your router broadcasts both 2.4GHz and 5GHz under the same network name, the thermostat might struggle to stay connected.
The fix: separate the bands in your router settings or create a dedicated IoT network. Also, check the thermostat's distance from the router. Wall construction, especially with metal mesh or foil-backed insulation, absolutely kills Wi-Fi signals.
If the Wi-Fi still drops after you've separated the bands, the C-wire is probably missing. The Wi-Fi radio drains batteries quickly, which causes random reboots and disconnects.
Fix timeline: 15-30 minutes.
Problem: Temperature Reads Wrong
If the display shows a temperature wildly different from what the room feels like, there are three possibilities:
- Poor mounting location. The thermostat is near a draft, a heat vent, or direct sunlight, which skews the sensor. Fix the mounting location first.
- Calibration offset is wrong. Adjust the offset by comparing against a reliable thermometer nearby.
- Internal sensor has failed. This requires a replacement.
Fix timeline: 5-30 minutes.
Problem: System Short Cycles
When the HVAC kicks on and off every few minutes, that's called short cycling. Lux thermostats have an adjustable temperature differential, sometimes labeled as "cycle rate" or "swing." If it's set too tight, the system cycles too frequently. Set it to 0.5°F of swing to give the system a reasonable margin.
But also check your air filter. A clogged filter restricts airflow, causing the system to overheat or freeze and trip its own safety limit switch.
Fix timeline: 5-10 minutes.
Problem: Heat Runs Constantly
This is a safety concern. If your heat runs and never stops, turn off the system at the thermostat and the breaker.
Likely causes:
- Stuck relay or shorted wiring. This keeps the signal "on" even when the thermostat isn't calling for heat.
- Wrong wiring. The W wire might be shorting against R.
- Faulty thermostat. The internal switching mechanism has failed.
Fix timeline: 15 minutes to diagnose, professional may be needed.
Quick Reference Table
| Symptom | First Thing to Check | Likely Fix | Time to Fix |
|---|---|---|---|
| Dead display | Batteries | Replace with fresh alkaline | 2 minutes |
| Dead display, new batteries | Breaker and transformer | Reset breaker, replace fuse | 5 minutes |
| No heat, display works | Forced-air filter and W wiring | Replace filter, tighten wires | 10 minutes |
| No AC, display works | 5-minute delay, then Y wiring | Wait, then tighten wires | 10 minutes |
| Wi-Fi drops daily | 2.4GHz network band | Create separate SSID | 15 minutes |
| Wrong temp reading | Sensor location | Relocate thermostat | 30 minutes |
| System short cycles | Differential setting | Increase swing to 0.5°F | 5 minutes |
When to Call a Professional
You can handle most Lux thermostat issues yourself. But some situations genuinely require an HVAC technician. Know the line between DIY and professional work.
Call a professional when:
- You've tested the wiring and confirmed the thermostat works, but the furnace still won't start. That points to a control board, gas valve, or limit switch issue.
- You read 0V at the transformer and you're not comfortable working on high-voltage equipment.
- You smell gas near the furnace.
- You see a blown fuse on the control board, you replace it, and it blows again immediately.
- You have a heat pump and the reversing valve isn't responding.
- You've diagnosed a bad transformer and replacement requires disconnecting high-voltage connections.
FYI, an HVAC service call typically runs $100 to $200 for diagnosis, plus parts and labor. If you've already narrowed the problem to a wiring issue, you've saved yourself that trip. If you've confirmed the thermostat itself is dead by using the jumper test, buying a replacement Lux is often cheaper than a service call to confirm what you already know.
Final Thoughts
Lux thermostats are reliable, well-built devices. When something goes wrong, it's almost always a power issue, a loose wire, or a settings problem, not a hardware failure.
The most common mistake is skipping the simple checks to chase a complex diagnosis. Homeowners order a $200 replacement thermostat only to discover the original was fine. The problem was a tripped breaker.
Or a loose W wire. Or the filter was so clogged the furnace threw a lockout code.
Walk through the diagnostic flow in order. Replace the batteries. Check the breaker.
Tighten the wiring. Use the jumper test to isolate the problem. Do these first, and you'll fix the vast majority of issues in under 15 minutes without spending a dime.
And when you do need a professional, you'll know exactly what to tell them. That's the real win. Armed with the diagnostic steps, you're not just a homeowner calling for help, you're someone who can describe the exact problem and the tests you've already run.
That saves time, money, and unnecessary part replacements.

Similar Posts