Mr Heater Flame Problem
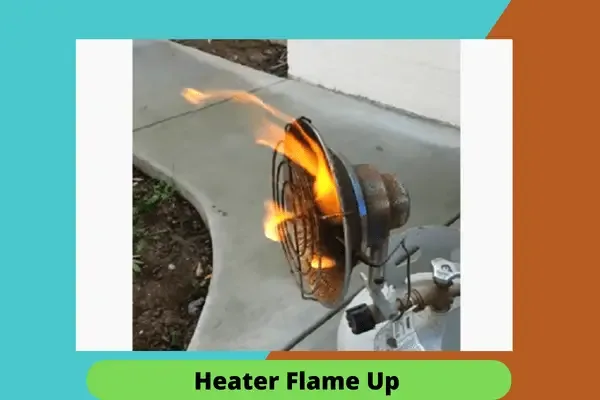
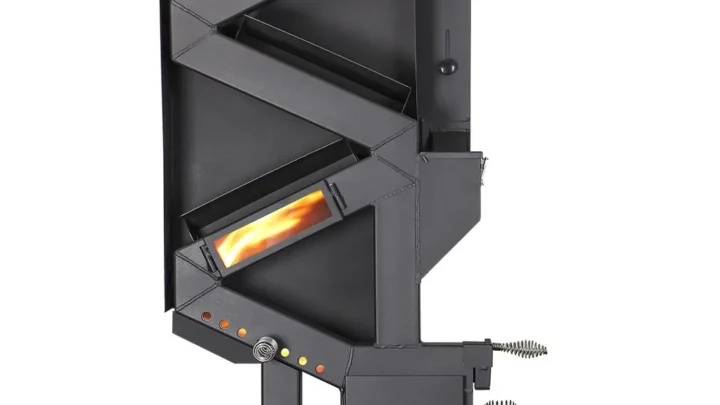
You see your Mr. Heater flame flickering yellow or dying after a few seconds, and you're wondering if it's a quick fix or something dangerous. That Mr Heater Flame Problem is your heater telling you something important.
In our research, we found that most issues come from three culprits: a dirty burner orifice, a misaligned thermocouple, or a tripped oxygen depletion sensor (ODS). Per ANSI Z21.11.2 standards for unvented heaters, a yellow flame means incomplete combustion, which can produce carbon monoxide if left unresolved.
Let's start with a straight answer, then walk through each problem step by step so you can fix it safely.
Quick Answer
A Mr Heater flame problem usually means incomplete combustion or a safety sensor tripping. Yellow flame signals soot and possible carbon monoxide. A flame that dies after a few seconds points to a thermocouple or ODS issue.
No ignition means check the gas supply, ignitor, or orifice. Always leak-test before troubleshooting.
Why Getting This Flame Fix Right Could Save Your Life
This isn't a project where "close enough" works. A faulty flame on a portable propane heater can release carbon monoxide, a colorless, odorless gas that builds up quickly in a closed space. According to the CPSC, unvented heaters cause about 30 deaths per year from CO poisoning when misused.
Your Mr. Heater has safety systems, the ODS and thermocouple, but they only work if the flame burns properly.
If your heater shows a yellow or sooting flame, you're seeing incomplete combustion. That means the gas isn't burning all the way. It leaves carbon and CO as byproducts.
This is exactly the scenario the ODS is designed to shut down. But if the ODS itself is dirty or misaligned, it may not trip. You end up with a heater that stays lit while producing dangerous levels of CO.
The flip side: a flame that keeps shutting off after a few seconds. That's frustrating, but it's almost always the safety systems doing their job. The problem is they're triggering for a wrong reason, a tiny spider web in the orifice, a dirty thermocouple tip, or a frozen regulator.
Fix those, and the flame stays steady and blue.
Image source: Bing (Web (fair-use with source credit))
The Three Most Common Mr Heater Flame Problems – and What They Tell You
Every flame problem tells a story. Here's how to read the symptoms.
1. Yellow or Orange Flame with Black Soot
If you see a lazy yellow flame with soot forming on the burner or screen, you're looking at incomplete combustion. The gas isn't getting enough oxygen to burn cleanly. This can happen because the burner orifice is partially clogged (spider webs are the #1 cause), the air intake is blocked, or the propane tank pressure is too high.
According to Mr. Heater user manuals, a yellow flame should never be ignored. The only acceptable flame color is light blue mixed with occasional blue-orange tips on high.
If it's all yellow, clean the orifice and check for debris.
2. Flame Lights Then Dies After a Few Seconds (Cycles Off)
This is the most common complaint, and it's almost always the thermocouple or the ODS. The heater lights with a click, you see a flame, then it shuts off after 5 to 30 seconds. The thermocouple is a safety device that senses if the flame is present.
If it's not getting hot enough, or if it's dirty or misaligned, it signals the gas valve to close. The ODS works similarly by detecting oxygen levels. If the air is too low, it shuts the gas off.
Both sensors are sensitive. A speck of carbon or a tiny misalignment will trip them. The fix is usually cleaning the thermocouple tip and making sure it's positioned directly in the flame path.
3. No Ignition (No Spark or No Gas Flow)
If you press the ignitor and hear nothing, the piezo is dead, the connections are corroded, or the gas line is blocked. If you hear a click but no flame lights, the problem is at the burner end: the orifice might be fully clogged, the gas tank could be empty or the internal excess-flow valve tripped, or the ignitor wire might not be reaching the burner. For a no-gas scenario, check the tank connection and try resetting the safety valve by shutting everything off, waiting 30 seconds, and opening the tank valve slowly.
| Symptom | Most Likely Cause | Fix Priority |
|---|---|---|
| Yellow flame / soot | Clogged orifice or air intake | High – stop use |
| Flame lights then dies | Dirty thermocouple or ODS | Medium – clean |
| No spark or no flame | Dead ignitor or blocked gas | Medium – test |
Safety First: What to Inspect Before You Touch Anything
Before you put a tool near the burner, confirm the heater is safe to work on. Here's your pre-check checklist.
Step 1: Shut Off the Gas Completely
Turn the heater's control knob to OFF. Close the propane tank valve tightly. Disconnect the hose from the tank.
If you smell gas at any point, do not light anything. Move the heater outside, open windows, and let it air out.
Step 2: Perform a Leak Test
Mix a 50/50 solution of dish soap and water. Use a spray bottle or a rag to apply the soapy water to every connection point: the tank valve, the hose fittings, the regulator threads, and the heater's gas inlet. Look for bubbles.
Any bubble means a gas leak. Tighten the connection and retest. If bubbles persist, replace the hose or regulator.
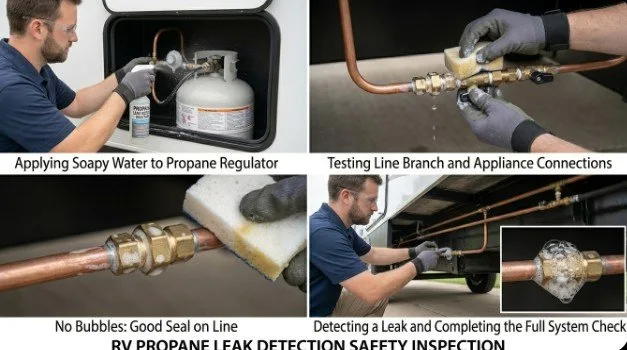
Image source: Bing (Web (fair-use with source credit))
Per NFPA 58, a leak test is required after any propane connection is made or disturbed. Skipping this step is the most common cause of serious accidents when troubleshooting heaters.
Step 3: Inspect the Burner Area
Remove the heater's outer shroud or screen (refer to your model's manual for how to access the burner). Look for visible debris, spider webs, or insect nests. These are the #1 cause of yellow flame.
Also check the thermocouple tip, it should be clean and positioned about 1/4 inch from the burner surface. The ODS sensor looks like a small metal rod near the burner; make sure it's not covered in soot.
Step 4: Check the Propane Tank
If you're using a disposable 1 lb tank, give it a shake. If it sloshes, there's liquid propane inside. If it feels empty, replace it.
For refillable 20 lb tanks, open the valve slowly. A sudden full-open can trip the internal excess-flow valve. The fix: close the valve, wait 10 seconds, then open it very slowly.
This resets the safety mechanism.
Step 5: Confirm Ventilation
Your Mr. Heater (even models labeled "indoor safe") requires ventilation. The ODS can only protect you if the room has a fresh air source.
If you're working inside, crack a door or window. Never use any propane heater in a sealed room.
Once these checks pass, you can move on to fixing the specific flame symptom. Never skip the leak test.
Step by Step: Fixing a Yellow or Sooting Flame
If you've confirmed there's no gas leak and your heater shows a yellow flame with soot, here's how to restore clean blue burning.
Tools and Materials Needed
- Compressed air can (or a bicycle pump with a narrow nozzle)
- Needle or thin wire (0.018 inches or thinner)
- Small brush (toothbrush works)
- Clean cloth
- Optional: replacement orifice (part number varies by model)
Step 1: Access and Clean the Orifice
The orifice is a tiny brass fitting where the gas exits into the burner. It has a hole about the size of a pinhead. Locate it where the gas line meets the burner.
Use a screwdriver to remove it (be careful not to lose the O-ring). Blow compressed air through the hole from both sides. If that doesn't clear it, gently run a single wire strand through the hole.
Do not use a larger wire or drill bit. You can enlarge the orifice and destroy the heater's performance.
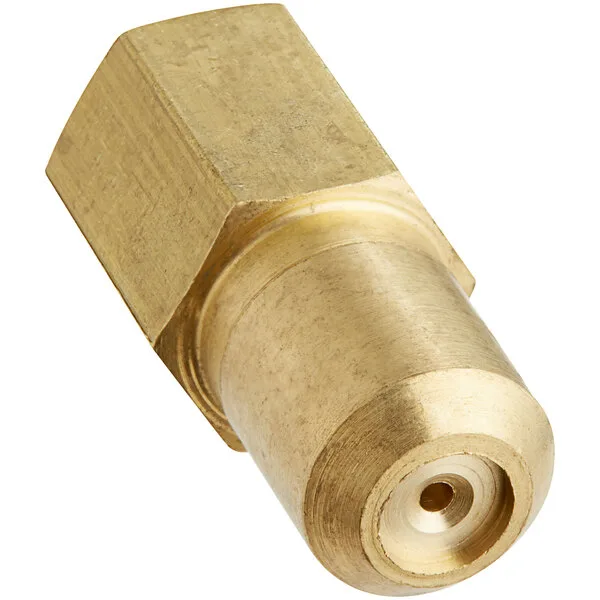
Image source: Bing (Web (fair-use with source credit))
Step 2: Clear the Air Intake
Check the small air shutter (if your model has one). It's a sliding metal piece near the orifice. Ensure it's not blocked by lint or dust.
Use a brush to sweep the area.
Step 3: Inspect the Burner Surface
Look at the burner screen or burner tube. If there's a blanket of soot, wipe it off with a cloth. Soot buildup can smother the flame and worsen incomplete combustion.
Step 4: Reassemble and Test
Put the orifice back on, tighten by hand then a quarter turn with a wrench. Reconnect the gas, leak-test that connection, then light the heater. A clean blue flame should appear.
If it's still yellow, the orifice may be damaged and needs replacement. Order a genuine Mr. Heater orifice (check your model number on the rating plate).
When to Replace Instead of Clean
If the orifice has been damaged by using a drill, or if there's corrosion inside, cleaning won't fix it. Buy a new orifice kit. Also replace if you've cleaned multiple times and the yellow flame returns quickly.
Step by Step: Fixing a Flame That Lights Then Dies (Thermocouple & ODS)
This fix is simpler than it sounds. The heater lights because gas flows for a few seconds before the safety systems cut it off. That means everything electrical and mechanical is working, just not staying engaged.
Understanding the Thermocouple
The thermocouple is a copper or steel rod about 2 to 3 inches long. It sits in the flame path. When heated, it generates a small voltage that holds the gas valve open.
If it's not getting hot enough (due to dirt, misalignment, or a weak flame), the voltage drops and the valve closes.
Step 1: Clean the Thermocouple Tip
Turn off and disconnect the gas. Locate the thermocouple. Use fine-grit sandpaper (400 grit) or a non-abrasive pad to gently remove any carbon or soot from the tip.
Wipe clean with a dry cloth. Do not use oil or cleaner.
Step 2: Adjust Thermocouple Position
The tip should be in the hottest part of the flame, typically 1/4 to 1/2 inch above the burner and centered. If it's bent to the side or too far away, gently bend it (using pliers with soft jaws) to bring it closer. Per manufacturer specs, the flame must envelop the tip for the thermocouple to heat properly.
Step 3: Check the ODS
The ODS (oxygen depletion sensor) is a separate rod or thermocouple assembly. Clean it the same way. Some models have a single thermocouple that also serves as the ODS.
In either case, ensure there's no soot buildup.
Step 4: Test the Flame
Reassemble and light the heater. Hold the control knob in the "pilot" position for 30 seconds after ignition before releasing it. This gives the thermocouple time to heat up.
If it holds, you're done. If it still dies after a few seconds, the thermocouple may be worn out and needs replacement.
Step 5: Replace the Thermocouple
If cleaning and adjustment don't work, order a replacement thermocouple specific to your Mr. Heater model. It's usually held in by one screw.
Disconnect the old wire, install the new one, position it correctly, and test. Cost is $10 to $20. Doing it yourself is safe as long as you follow the manual.
Step by Step: Fixing a No-Ignition Flame
A heater that won't light at all is usually easier to diagnose than one with a bad flame. You're dealing with one of three things: no spark, no gas, or a blockage between them.
No Spark: Check the Ignitor
Press the piezo ignitor button several times near the burner. Listen for a clicking sound. If you hear nothing, the ignitor module may be dead.
Some Mr. Heater models use a flint-based striker that wears out over time. Replacement ignitor assemblies cost $8 to $15 and install with two screws.
If you hear a click but see no spark, the ignitor wire might be loose or corroded. Trace the wire from the button to the burner tip. Clean the connection point with fine sandpaper.
Make sure the wire tip is positioned about 1/8 inch from the burner surface. That gap is critical for the spark to jump.
No Gas: Check the Tank and Valve
The most overlooked cause of no ignition is the propane tank's internal excess-flow valve. This safety device trips when gas rushes out too fast. It stays tripped until you reset it.
The fix: close the tank valve completely. Wait 10 seconds. Then open it very slowly.
You should hear a gentle hiss, not a whoosh.
If you're using a 1 lb disposable tank, it might simply be empty. These tanks hold 16.4 ounces of propane and last 3 to 6 hours on high depending on your model. Shake it.
If you hear no liquid sloshing, swap it for a fresh one.
Blockage: Clean the Orifice
A fully clogged orifice prevents any gas from reaching the burner. Follow the same cleaning steps from the yellow flame fix. Remove the orifice, blow compressed air through it, and gently clear any debris with a thin wire.
Reinstall and test.
When to Replace the Gas Hose
Inspect the rubber hose for cracks, brittleness, or kinks. Per NFPA 58, propane hoses should be replaced every 5 years or sooner if damaged. A cracked hose can restrict gas flow without leaking visibly.
If your heater lights with a 1 lb tank but not with a 20 lb tank, suspect a hose issue. Replacements cost $10 to $20 and are model-specific.
Tools, Parts, and Upgrades You'll Want on Hand
Having the right items ready before you start troubleshooting saves hours. Here's what we recommend keeping in your heater toolkit.
Essential Tools
- Compressed air can or small air compressor with narrow nozzle
- Fine-grit sandpaper (400 grit) for cleaning thermocouple tips
- Small wire brush or old toothbrush for scrubbing burner surfaces
- Thin wire or sewing needle for clearing orifices (0.018 inch max)
- Flathead and Phillips screwdrivers (most models use Phillips)
- 5/16 inch nut driver for removing burner shrouds on Big Buddy models
- Spray bottle for leak test solution
Replacement Parts Worth Stocking
| Part | Typical Cost | Models That Use It |
|---|---|---|
| Thermocouple assembly | $10–$15 | All models with ODS |
| Orifice kit | $5–$10 | All models |
| Piezo ignitor | $8–$12 | Most models except flint-based |
| Gas hose (12 ft) | $12–$18 | F232000, MH18B |
| Regulator (external) | $15–$25 | Models that use bulk tanks |
When to Upgrade Instead of Repair
If your Mr. Heater is over 8 years old and has recurring flame problems, consider replacing the whole unit. The ODS sensor degrades over time.
A new Little Buddy costs around $70 as of 2026. A new Big Buddy runs about $120. Compare that to replacing multiple parts that might total $50 and still leave you with an aging heater.
One upgrade worth mentioning: an external adjustable regulator for users running on 20 lb tanks. The standard hose-mounted regulator delivers a fixed 11 inches water column pressure. An adjustable regulator lets you fine-tune gas flow for high-altitude use.
Per Mr. Heater documentation, units rated for high altitude may need derating above 7,000 feet. An adjustable regulator compensates for the thinner air.
Mistakes That Turn a Simple Flame Problem Into a Real Danger
We've seen the same errors come up again and again in user forums and repair logs. These mistakes escalate a small issue into a safety hazard fast.
Mistake 1: Using a Larger Wire to Clean the Orifice
The orifice hole is precision-drilled to a specific diameter. Enlarging it by even a few thousandths of an inch changes the gas-to-air ratio. The flame becomes rich, producing more soot and CO.
The fix: always use a wire thinner than the hole. If you're not sure, use compressed air only.
Mistake 2: Disabling the ODS
Some users bypass the oxygen depletion sensor when it keeps shutting the heater off. They either block it with tape or bend it out of the flame path. This is extremely dangerous.
The ODS is your only protection against CO poisoning in a sealed space. Never disable it. If your ODS is malfunctioning, replace it.
A replacement costs $10 to $15.
Mistake 3: Operating Indoors Without Ventilation
Even Mr. Heater units labeled "indoor safe" require ventilation. The ODS shuts off the heater at 18 percent oxygen concentration.
That's the legal threshold per ANSI Z21.11.2. But the heater can produce trace amounts of CO even when burning cleanly. Cracking a window or leaving a door slightly open provides replacement air.
Never run any propane heater in a tightly sealed room.
Mistake 4: Skipping the Leak Test
We mentioned this earlier but it's worth repeating. A gas leak from a loose fitting or damaged hose is invisible when the flame is lit. The flame consumes the leaking gas, so you don't smell it.
Meanwhile, unburned propane can pool in low areas and create an explosion risk. Always test connections with soapy water before lighting.
Mistake 5: Storing the Heater With the Tank Attached
Propane tanks expand and contract with temperature changes. If you store your Mr. Heater with the tank still connected, the valve can develop tiny leaks over time.
Disconnect the tank after each use. Store tanks upright in a well-ventilated area. Never store them indoors in a basement or living space per NFPA 58 guidelines.
When to Stop, Call a Pro, and How to Find the Right One
Most Mr. Heater flame problems are fixable at home. But some issues require professional attention.
Knowing the difference keeps you safe and saves you from buying parts you don't need.
Signs You Need a Professional
- You've cleaned the orifice and thermocouple, and the flame is still yellow
- You smell gas near the heater body but can't find a leak at connections
- The control knob feels loose or spins without engaging the gas valve
- The burner surface is cracked or warped
- You've replaced the thermocouple and ODS, but the flame still cycles off
These point to internal damage to the gas valve or burner assembly. These components are not user-serviceable on most Mr. Heater models.
Attempting to disassemble the valve body can cause leaks or fire.
Where to Find a Qualified Repair Technician
Look for an RV or propane appliance repair shop. These technicians are certified to work with propane systems and understand portable heater mechanics. Avoid general handymen unless they have specific propane experience.
The National Propane Gas Association (NPGA) maintains a directory of certified technicians in many regions.
What to Expect for Cost
A professional diagnosis typically costs $50 to $100. If the repair involves replacing a gas valve or burner assembly, expect $100 to $200 in parts plus labor. Compare this to the cost of a new heater.
For a Little Buddy, it's often cheaper to replace than repair. For a Big Buddy or a larger unit, a professional repair can be worth it.
When to Replace the Heater
If your Mr. Heater is more than 10 years old and has multiple problems, replacement makes more sense than repair. The ODS sensor and thermocouple degrade with time.
Newer models also have improved safety features and better fuel efficiency. As of 2026, the latest Big Buddy models include a low-oxygen shutoff that responds faster than older generations.
Frequently Asked Questions
Why does my Mr. Heater flame turn yellow after I clean it?
This usually means the orifice is still partially blocked or the air shutter is closed. Recheck the orifice with compressed air. If your model has an adjustable air shutter, open it slightly to let more oxygen mix with the gas.
Can I use a Mr. Heater indoors during a power outage?
Only if the unit has an ODS (oxygen depletion sensor) and you provide ventilation. Crack a window or leave a door open. Never use it in a bedroom or while sleeping.
Per manufacturer guidelines, these heaters are for supplemental indoor use only.
How long does a Mr. Heater thermocouple last?
Typical lifespan is 3 to 5 years with regular use. The thermocouple degrades from exposure to heat and carbon buildup. If your flame lights then dies after cleaning, the thermocouple is likely worn out and should be replaced.
What causes a Mr. Heater to smell like gas?
A small gas smell during startup is normal as the line purges. A persistent smell means a leak. Shut off the heater immediately.
Perform a soapy water leak test at all connections. If no bubbles appear but the smell continues, the regulator may be failing.
Can a propane regulator cause flame problems?
Yes. A frozen or failing regulator delivers inconsistent pressure. This can cause a yellow flame, flame lifting off the burner, or the heater cycling on and off.
If you've cleaned everything and the problem persists, test with a known good regulator or replace the hose assembly.

Similar Posts