Rohl Faucet Repair Troubleshooting
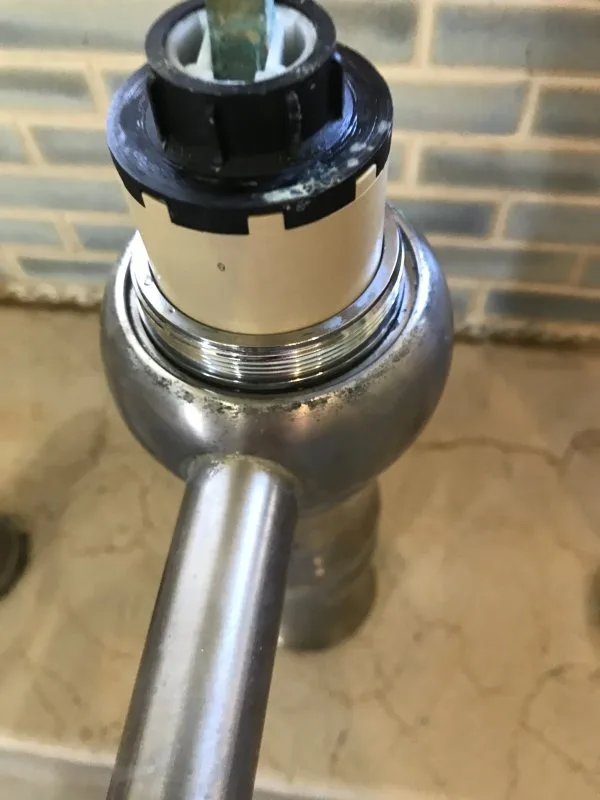
If your Rohl faucet is dripping, sticking, or running weak, Rohl Faucet Repair Troubleshooting does not have to mean calling a plumber. Most problems trace back to one of five components: the cartridge, O-rings, aerator, diverter, or set screw. With the right diagnosis, you can fix it yourself in under an hour.
Per manufacturer specifications, Rohl's ceramic disc cartridges are rated for over 500,000 on-off cycles. That is far longer than compression stems. But mineral scale, debris, or worn seals still cause issues over time.
The most common fix is a simple cartridge swap or aerator cleaning. Let us walk through the diagnostic tree so you know exactly where to start.
Image source: Bing (Web (fair-use with source credit))
Quick Answer
Diagnose your Rohl faucet by symptom. A spout drip usually means a bad cartridge. A handle leak points to worn O-rings.
Low flow often comes from a clogged aerator or diverter. A stuck handle signals scale buildup or a stripped set screw. Replace the cartridge or clean the aerator first.
Those fix most issues.
Is Your Rohl Faucet Dripping, Sticking, or Running Weak?
Look at what your faucet is actually doing. The symptom tells you which branch to follow. Rohl faucets share the same basic anatomy across lines like Perrin & Rowe, Shaws, and Country.
But the repair path changes based on where the trouble shows up.
| Symptom | Most Likely Cause | Repair Branch |
|---|---|---|
| Drip from spout (constant or intermittent) | Worn cartridge, debris in valve seat, or bad O-ring | Branch 1: Cartridge vs. O-Ring vs. Valve Seat |
| Leak at handle base or around escutcheon | Loose set screw, worn handle O-ring, or loose spout nut | Branch 2: Escutcheon and Spout Nut Fix |
| Low water pressure, weak stream, or sputtering | Clogged aerator, blocked diverter, or kinked supply line | Branch 3: Aerator, Diverter, and Supply Lines |
| Handle hard to turn, wobbly, or stuck | Stripped set screw, mineral scale on cartridge, or binding stem | Branch 4: Set Screw, Scale, and Cartridge Binding |
| Sprayer head won't retract or dock | Worn diverter O-rings, hose weight jammed, or debris in hose | Branch 5: Diverter, Hose Weight, and O-Rings |
Notice one thing. Hot and cold water both coming out weak points to a supply issue or aerator. Only hot or only cold weak points to a cartridge or valve issue.
Drips that happen right after you shut off the faucet usually mean a worn cartridge seat or debris stuck under the disc.
Around 70% of Rohl faucet repairs start with a leak at the spout. That makes Branch 1 the most common path. But do not skip the prep steps in the next section.
Skipping the shutoff or using the wrong tool turns a quick fix into a flood.
Before You Touch a Wrench: Water Shutoff, Faucet ID, and Tool Prep
You cannot troubleshoot a Rohl faucet with the water still running. Start by shutting off the water supply under the sink. If your sink lacks shutoff valves, shut off the main house valve.
Open the faucet handle to drain any remaining water from the lines.
Next, identify your faucet model. Rohl produces several lines with different cartridge designs. Perrin & Rowe two-handle faucets use compression stems.
Single-handle kitchen models use a ceramic disc cartridge. Shaws bridge faucets use a specific quarter-turn cartridge. Look for a model number on the box, the original manual, or stamped on the brass body under the handle.
You can also check diagrams on the Rohl official website.
Gather these tools and materials before you start.
| Tool or Material | Purpose |
|---|---|
| Adjustable wrench or basin wrench | Loosening spout nut and supply line nuts |
| Allen wrench set (1.5mm, 2mm, 3/32″) | Removing set screws in handle |
| Flathead screwdriver | Prying off trim caps or escutcheon |
| Cartridge puller or pliers | Extracting stuck cartridge |
| Silicone plumber's grease | Lubricating O-rings and seals |
| Thread seal tape (Teflon tape) | Sealing supply line connections |
| Vinegar or descaling solution | Cleaning mineral buildup from aerator and cartridge |
| Small bowl or towel | Catching residual water when removing cartridge |
Do not use petroleum-based lubricants on O-rings. Silicone grease only. Petroleum jelly degrades rubber and causes leaks within months.
Take a photo of the handle and trim before disassembly. That photo saves you time during reinstallation. It shows you the orientation of the set screw and the order of washers or spacers.
The manufacturer's warranty covers cartridge defects for five years from purchase date. If your faucet is under warranty, contact Rohl support for a free replacement cartridge. You will need the model number and proof of purchase.
Drip from Spout? Branch 1: Cartridge vs. O-Ring vs. Valve Seat
A drip from the spout is the most common Rohl faucet issue. The fix depends on whether the drip happens constantly or only after use. It also depends on whether you have a single-handle or two-handle faucet.
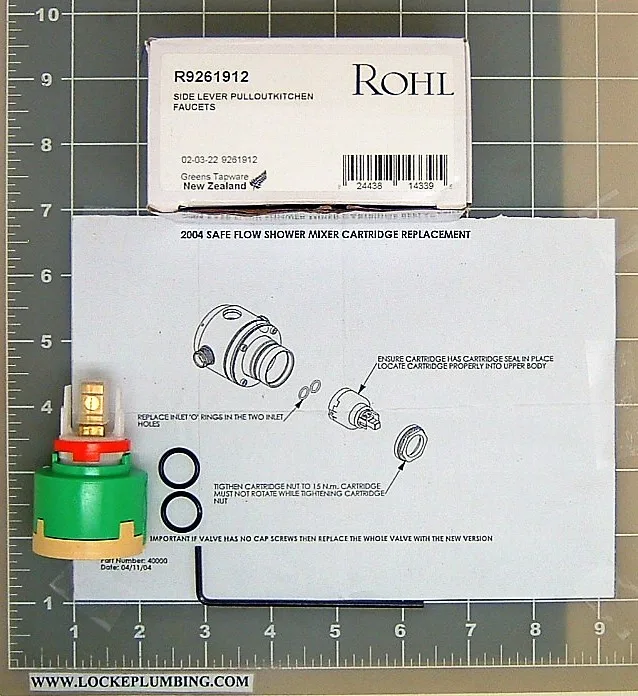
Image source: Bing (Web (fair-use with source credit))
If the drip is constant, even when the handle is fully closed: The problem is almost certainly the cartridge. For single-handle kitchen faucets, that means the ceramic disc cartridge. For two-handle Perrin & Rowe models, it means the compression stem.
Turn off the water, remove the handle, and extract the cartridge. Inspect the rubber seals at the bottom. If they are flattened, cracked, or uneven, replace the cartridge.
If the drip only happens right after you turn off the faucet: Debris is likely stuck under the ceramic disc. A small grain of sand or mineral scale prevents the disc from sealing completely. Remove the cartridge, rinse both ceramic discs with water, and gently scrub with a soft toothbrush.
Reinstall and test. If the drip returns, replace the cartridge.
If the drip is intermittent and gets worse with hot water: The hot water side of the cartridge may be failing. Replace the cartridge entirely. Rohl does not sell separate hot and cold cartridges.
The unit is a single assembly.
If you have a two-handle faucet with a drip on only one side: Replace the compression stem on that side. The stem includes the washer and seat. Do not try to just replace the washer.
Rohl stems are designed as a sealed unit.
If the drip comes from the spout base, not the spout opening: That is a spout O-ring issue, not a cartridge issue. Tighten the spout retaining nut with a basin wrench. If that does not stop the leak, remove the spout and replace the two O-rings.
Apply silicone grease before reassembly.
A note about valve seats. Older Rohl compression faucets have a brass seat inside the valve body. If the seat becomes pitted or corroded, a new stem will still drip.
Use a seat wrench to remove the old seat and install a new one. This is rare on modern ceramic disc models but common on Perrin & Rowe models from before 2015.
Leak at Handle or Base? Branch 2: Escutcheon and Spout Nut Fix
Water pooling around the handle base or dripping down the escutcheon plate is a separate problem from a spout drip. This usually means a failed O-ring under the handle trim or a loose spout nut.
If water leaks from around the handle base when the faucet is running: The O-ring between the handle and the valve body is worn. Remove the handle by loosening the set screw. Pull the handle straight off.
You will see an O-ring seated in a groove. Pry it out with a small screwdriver. Take it to a hardware store to match the size or order a Rohl O-ring kit.
Install the new O-ring with silicone grease. Reattach the handle and tighten the set screw.
If water leaks from the base of the spout where it meets the sink deck: The spout retaining nut is loose. Look under the sink at the base of the spout. You will see a large brass nut.
Tighten it clockwise with a basin wrench. Do not overtighten. Brass threads strip easily.
Hand tight plus a quarter turn is enough.
If water leaks from the escutcheon plate on a wall-mount shower or tub faucet: The escutcheon gasket is compressed or missing. Remove the escutcheon plate, clean the wall surface, and apply a thin bead of silicone caulk around the back edge of the plate. Press it back into place and wipe away excess caulk.
Do not rely on plumber's putty for wall escutcheons. It can stain stone or tile.
If you see water dripping from the handle even when the faucet is off: That usually points back to a worn cartridge, not an O-ring. Go back to Branch 1 first. A bad cartridge can let water seep up around the stem and out the handle opening.
A common mistake here: using plumber's putty on plastic or brass threads. Putty is for flat sealing surfaces like sink strainers, not for O-ring grooves or threaded connections. If you used putty, clean it off completely.
Use silicone grease for O-rings and thread seal tape for supply connections.
Low Water Pressure or Weak Flow? Branch 3: Aerator, Diverter, and Supply Lines
A weak stream from your Rohl faucet is frustrating but usually easy to fix. The cause is almost always upstream of the cartridge. Start with the simplest check first: the aerator.
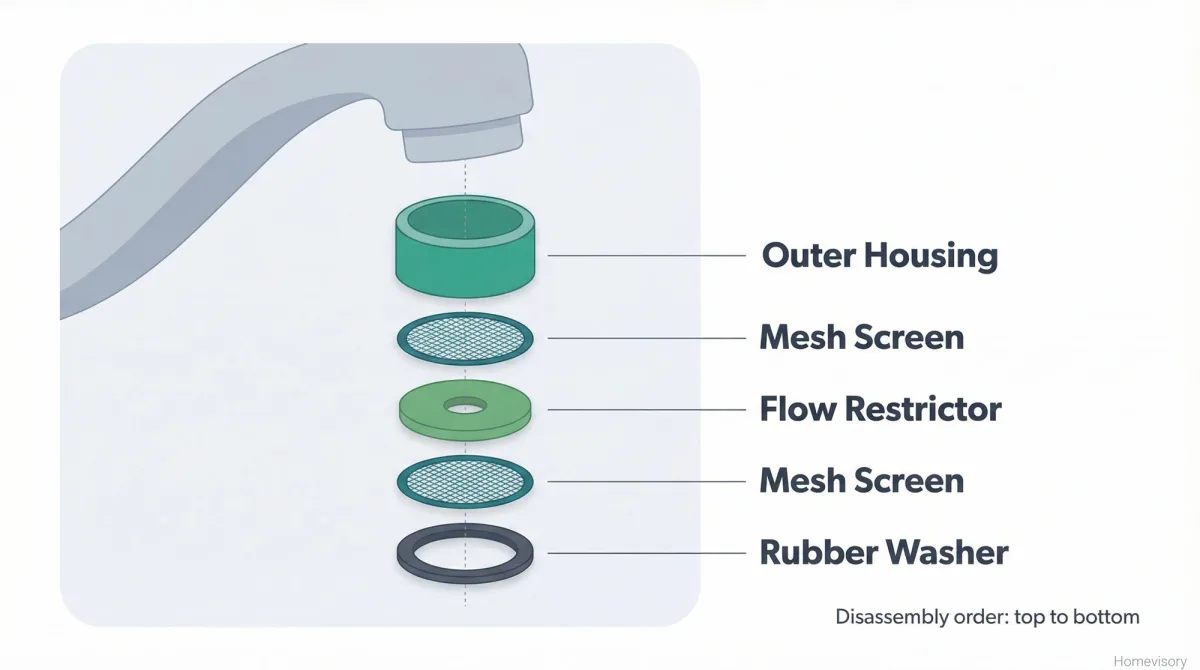
Image source: Bing (Web (fair-use with source credit))
Step 1: Clean the aerator. Unscrew the aerator from the end of the spout. Rohl aerators are typically hand-tight. If it is stuck, wrap the aerator with a cloth and use pliers gently.
Disassemble the aerator. You will find a mesh screen, a flow restrictor disc, and a rubber washer. Rinse each piece under running water.
If you see white or green scale, soak the parts in vinegar for 20 minutes. Scrub with a toothbrush, rinse, and reassemble. Screw the aerator back on by hand.
Turn on the water and check the flow.
If flow is still weak after cleaning the aerator: Move to the diverter. Kitchen pull-down sprayers and side-spray models have a diverter valve inside the faucet body. The diverter directs water between the spout and the sprayer.
If it gets stuck in the sprayer position, flow from the spout drops. Remove the sprayer hose from the faucet body. Pull the diverter cartridge out.
Clean any debris from the diverter chamber. Reinstall the diverter or replace it if the O-rings are worn.
If flow is weak only from the sprayer: The sprayer head itself may have a clogged screen. Unscrew the sprayer head. Rinse or soak the screen.
Also check the sprayer hose for kinks. Pull the hose out fully to inspect it. A kinked hose reduces flow to a trickle.
If flow is weak from both spout and sprayer: The issue is in the supply lines or shutoff valves. Check the shutoff valves under the sink. Turn them fully counterclockwise.
If they are old, they may not open completely. Replace them if necessary. Check the braided supply lines for kinks or crimps.
Straighten or replace them. If braided lines are old (over 10 years), consider replacing them proactively.
If only hot water is weak: The hot water supply line or shutoff valve may have scale buildup. Rohl faucets are rated for water pressure between 30 and 80 PSI. If your home has hard water, mineral deposits can clog the hot supply line over time.
Shut off the hot water supply, disconnect the line, and hold it over a bucket. Turn the hot water on briefly at the shutoff. If little water comes out, the line is clogged.
Replace the supply line.
If only cold water is weak: Same process, but inspect the cold supply line. Also check if your cold water shutoff valve is partially closed by accident. This happens more often than you think.
A quick test: remove the supply line from the faucet inlet. Point it into a bucket. Open the shutoff fully.
If you get strong flow, the line and valve are fine. The problem is inside the faucet body or cartridge. Go back to Branch 1.
Handle Stuck, Wobbly, or Hard to Turn? Branch 4: Set Screw, Scale, and Cartridge Binding
A handle that resists turning or feels loose on the stem is a symptom of three possible causes. Each has a different fix. Start with the easiest check first.
If the handle is loose or wobbly: The set screw is stripped or loose. Rohl faucets use small hex set screws (1.5mm, 2mm, or 3/32″ depending on the model). Locate the screw on the side or back of the handle.
Sometimes it is hidden under a small chrome or plastic cap. Pry the cap off gently with a flathead screwdriver. Tighten the set screw with the correct Allen wrench.
Do not overtighten. Brass threads strip easily. If the screw spins freely with no resistance, the threads are stripped.
Replace the set screw with a new one from a hardware store. If the screw hole in the handle is stripped, you need a new handle.
If the handle is stuck and will not turn: Mineral scale has bonded the cartridge stem to the handle splines. Do not force it. Forcing can snap the cartridge stem or crack the valve body.
Spray penetrating oil (like WD-40) around the base of the handle where it meets the escutcheon. Wait 10 minutes. Tap the handle lightly with a rubber mallet to break the bond.
If it still will not budge, apply heat from a hair dryer for 30 seconds. The metal expands slightly and breaks the seal. Once the handle comes off, clean the splines with a wire brush.
If the handle turns but feels gritty or rough: Debris or scale has entered the cartridge chamber. Remove the cartridge and inspect the valve body bore. You will see white or green mineral deposits.
Clean the bore with a vinegar-soaked cloth or a fine abrasive pad. Do not use sandpaper. It scratches the brass and causes future leaks.
Rinse thoroughly before installing the new cartridge.
If the handle is hard to turn in only one direction (hot or cold): The cartridge is failing on one side. Replace the cartridge entirely. Rohl single-handle cartridges control both hot and cold flow through two ceramic discs.
If one disc is damaged, the other will fail soon after.
A quick diagnostic trick. Turn off the water supply. Remove the handle and escutcheon.
Try turning the cartridge stem by hand with pliers. If it turns smoothly without the handle, the cartridge is fine. The problem is in the handle splines or set screw.
If it still resists, the cartridge is seized.
Sprayer Head Not Retracting or Docking? Branch 5: Diverter, Hose Weight, and O-Rings
A pull-down sprayer that hangs loose or refuses to retract is one of the most annoying kitchen faucet problems. It is also one of the easiest to fix. The issue is almost never the sprayer head itself.
If the sprayer head will not retract back into the spout: The hose weight is stuck or the hose is kinked. The weight slides along the hose under the sink. It pulls the sprayer back down when you release it.
If the weight gets jammed against a supply line or the garbage disposal, the sprayer stays extended. Reach under the sink. Find the weight on the sprayer hose.
Make sure it moves freely along the full length of the hose. Clear any obstructions. Pull the hose out fully and let it retract to check for kinks.
If the sprayer retracts slowly or drags: The hose weight may be too light. Rohl uses a standard weight, but some homeowners add a second weight for heavy spray heads. If yours is dragging, check if the weight has shifted out of position.
Slide it back toward the sprayer end of the hose. About 6 to 8 inches from the sprayer connection is the sweet spot.
If the sprayer head will not dock securely (magnet or latch): The docking mechanism has debris or wear. For magnetic docking models, clean both the magnet in the spout and the metal ring on the sprayer head. A thin layer of soap scum or mineral scale can weaken the magnetic hold.
Wipe both surfaces with a vinegar-dampened cloth. For latch-style docking, check if the spring-loaded latch is stuck. Spray it with penetrating oil and work it loose.
If water leaks from the sprayer hose connection under the sink: The O-ring at the hose connection is worn. Disconnect the hose from the faucet body. You will see a small rubber O-ring.
Replace it and apply silicone grease. Tighten the connection by hand plus a quarter turn with pliers.
If the sprayer has weak flow or sputters: The diverter valve inside the faucet body is stuck or clogged. This was covered in Branch 3. But it is worth repeating because diverter issues often get misdiagnosed as sprayer head problems.
Remove the diverter, clean the chamber, and test flow before reassembling.
A useful tip. Before you buy a replacement sprayer head, test the hose itself. Disconnect the sprayer head from the hose.
Turn on the water. If strong flow comes from the bare hose, the sprayer head is fine. If flow is weak, the diverter or supply lines are the real problem.
Common Mistakes That Turn a Quick Fix Into a Bigger Mess
Some mistakes turn a 20 minute repair into a two hour headache. Here are the ones we see most often.
Forcing a stuck cartridge. If the cartridge will not come out after gentle wiggling, do not pry it with a screwdriver against the brass valve body. You will scratch the bore and cause a leak that no new cartridge can fix. Use a cartridge puller tool.
They cost about $10 and fit most Rohl models. If you do not have one, thread a screw into the cartridge head and pull straight up with pliers.
Using the wrong lubricant. Petroleum jelly, cooking oil, and WD-40 all degrade rubber O-rings over time. Use only 100% silicone plumber's grease. A small tube costs $5 and lasts years.
One application on each O-ring during installation prevents leaks for the life of the part.
Overtightening brass connections. Brass is soft. A brass supply nut only needs to be snug plus a quarter turn. If you crank it with a wrench, you risk stripping the threads or cracking the valve body.
Hand tight is often enough. Use thread seal tape on the supply line threads, not brute force.
Mixing up hot and cold supply lines. On most Rohl kitchen faucets, the hot water supply connects to the left inlet and cold to the right. If you swap them, the handle turns the wrong direction. You will get cold water when you lift the handle toward you.
Not a disaster, but annoying. Label the lines before you disconnect them.
Skipping the aerator check. Many people replace the cartridge, the diverter, and the supply lines before checking the aerator. A clogged aerator mimics every other symptom. Unscrew it first.
It takes 10 seconds. If it is clean, move on. If it is dirty, you just saved an hour.
Buying generic cartridges. Rohl cartridges look similar to other brands like Riobel or Watermark. They are not interchangeable. A generic cartridge that almost fits will leak within weeks.
Order the OEM part from an authorized Rohl dealer or directly from the manufacturer. The part number is stamped on the side of the original cartridge.
When to Call a Pro vs. DIY the Whole Thing
Most Rohl faucet repairs are straightforward DIY jobs. But some situations call for a licensed plumber. Here is how to decide.
DIY confidently if: You have a steady hand, basic tools, and the symptom matches one of the branches above. Cartridge replacement, aerator cleaning, O-ring swaps, and set screw tightening are all beginner-friendly tasks. The average homeowner can complete them in 30 to 45 minutes.
You do not need special skills, just patience and the correct part.
Call a pro if: The leak is inside the wall. If you have a Rohl shower valve or tub filler and water is leaking behind tile or drywall, do not cut into the wall yourself. A plumber can access the valve body through the trim plate or an access panel.
They also have the tools to test water pressure and diagnose hidden leaks.
Call a pro if: The valve body is cracked. Cracked brass is rare on Rohl faucets but happens, especially in areas with freezing temperatures. A cracked valve body requires cutting out the old fitting and soldering or pressing in a new one.
That is not a DIY repair unless you have soldering experience.
Call a pro if: You have tried the correct fix and the leak persists. If you replaced the cartridge and the faucet still drips, the valve seat may be damaged. Seat replacement requires a seat wrench and sometimes a valve body removal.
A plumber can do this in 20 minutes. You might struggle for two hours and still have a leak.
Call a pro if: Your home has hard water that has never been treated. Continuous hard water causes scale buildup inside the valve body itself. A plumber can flush the system and install a whole-house water softener or point-of-use filter.
That prevents future cartridge failures and extends the life of all your fixtures.
Call a pro if: The faucet is under a manufacturer's warranty but the repair requires disassembly that voids the warranty. Check Rohl's warranty terms. Some repairs must be performed by a licensed plumber to remain valid.
If in doubt, ask Rohl customer service before you start.
A final note. The cost of a plumber for a simple cartridge swap ranges from $150 to $300 depending on your area. An OEM Rohl cartridge costs $25 to $45.
If you have basic tools and a free Saturday morning, the DIY route saves real money. But if you are unsure, paying a pro once is cheaper than paying for flood damage later.
Frequently Asked Questions
How do I find the right replacement cartridge for my Rohl faucet?
Look for the model number stamped on the brass body under the handle. You can also remove the old cartridge and read the part number printed on its side. Match that number with Rohl's parts diagram on their official site.
Using the wrong cartridge causes leaks.
Can I fix a Rohl faucet leak without replacing the cartridge?
Yes, in some cases. If the leak is from the spout base, tightening the spout nut or replacing O-rings may work. If the leak is a slow drip right after use, cleaning debris from the ceramic disc might fix it.
But a constant drip usually means the cartridge is worn and needs replacement.
Why is my Rohl faucet handle hard to turn?
Mineral scale buildup on the cartridge stem is the most common cause. The second cause is a corroded set screw that binds the handle splines. The third is a failing cartridge.
Try penetrating oil and a rubber mallet first. If that does not help, replace the cartridge.
What tools do I need for Rohl faucet repair?
You need an adjustable wrench, a set of small Allen wrenches (1.5mm, 2mm, 3/32″), a flathead screwdriver, silicone plumber's grease, thread seal tape, and a cartridge puller. Most of these tools cost under $20 total.
Is it worth fixing an old Rohl faucet or should I replace it?
Rohl faucets are made of solid brass and are designed to be repaired. A $30 cartridge restores full function. That is almost always worth it.
Only consider replacement if the valve body is cracked or the finish is badly damaged.
How often should I clean my Rohl faucet aerator?
Clean the aerator every 6 to 12 months if you have hard water. In areas with soft water, once every two years is fine. A quick vinegar soak prevents scale buildup and maintains full flow.

Similar Posts