Mirrorless Camera ISO Troubleshooting
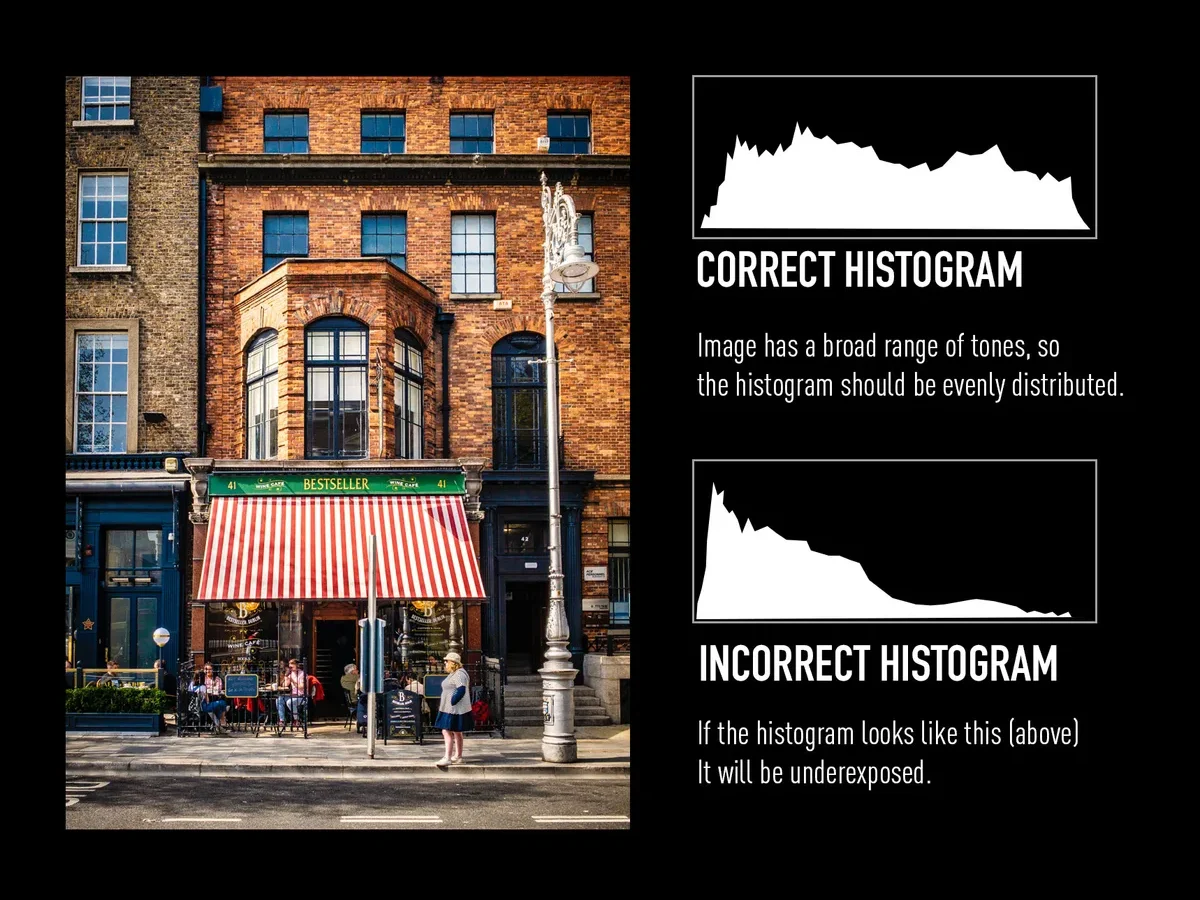
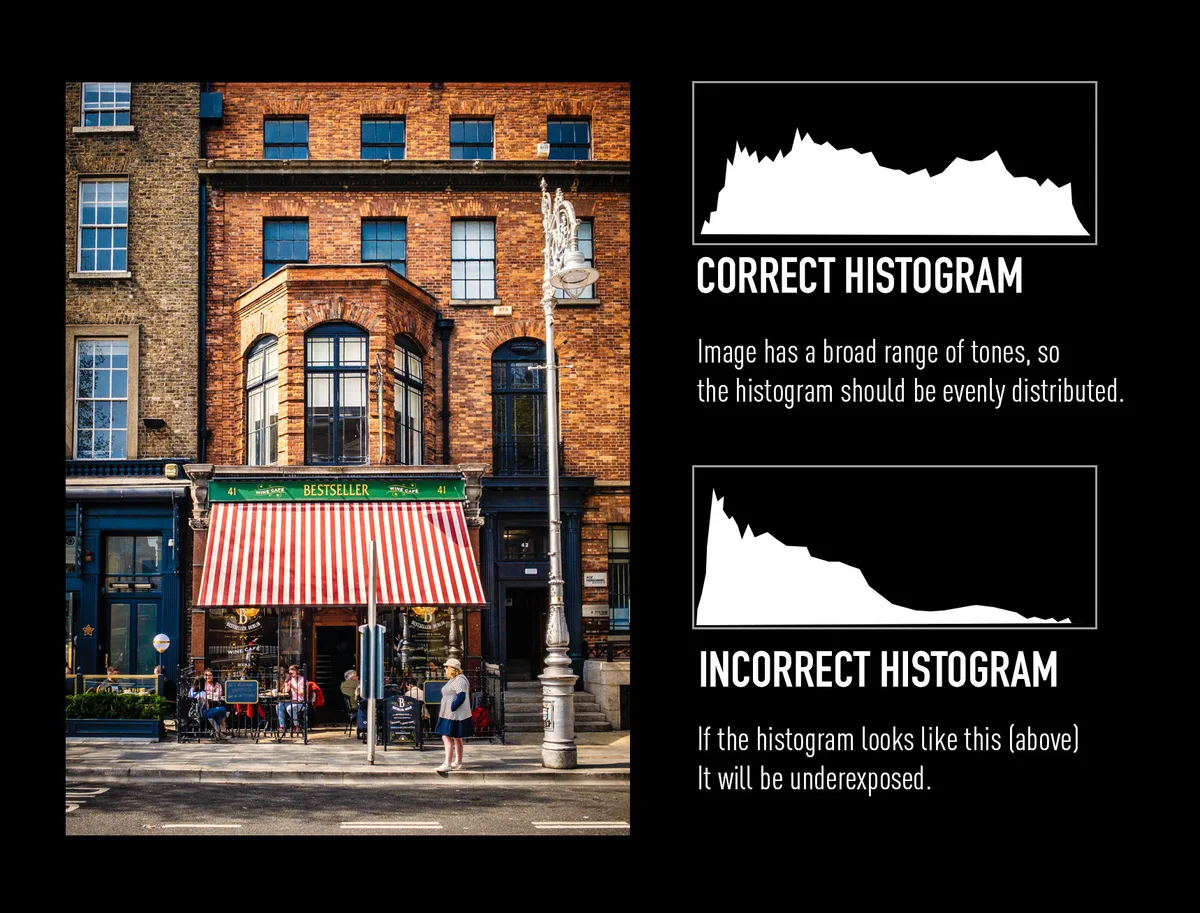
Image source: Bing (Web (fair-use with source credit))
Quick Answer
Noise in your mirrorless camera comes from underexposure, not the ISO number itself. Raise your ISO to get proper exposure, not to compensate for a dark image. Use the live histogram in your electronic viewfinder to expose toward the right without clipping highlights.
Learn your camera's dual-gain ISO threshold for one free stop of cleaner image quality.
Why Your Mirrorless Photos Are Noisy (And It's Not Always the ISO)
Here is the hard truth most tutorials skip. Noise in your mirrorless camera is usually a symptom of underexposure, not the ISO number itself. When you shoot in dim light and rely on the camera's built-in meter, you often end up with an image that is darker than it should be.
That darker image has a weak signal. When you brighten it in post, the noise gets amplified along with the detail.
The sensor in your mirrorless camera generates read noise whenever it captures a frame. That is the baseline electrical signal inside the sensor circuitry. The stronger your actual light exposure, the less noticeable that read noise becomes.
So if you raise the ISO to get a faster shutter speed but keep the exposure dim, you are not creating noise. You are simply revealing the noise that was already there.
This is why two photographers shooting the same scene at the same ISO can get wildly different results. One exposes toward the right side of the histogram. The other trusts the camera's center-weighted meter and ends up two stops underexposed.
The first image cleans up easily. The second looks like a sandstorm. Our research indicates that learning to read the live histogram on your electronic viewfinder is the single most valuable skill for cleaner high-ISO images.
Many mirrorless shooters switch from DSLRs and expect the same behavior. But DSLR optical viewfinders show you the scene as your eye sees it. Mirrorless electronic viewfinders show you the sensor's actual output in real time.
That difference changes how you approach exposure entirely. If you have been struggling with this, our guide on fixing dark photos can help you see the connection more clearly.
How Mirrorless Sensors Handle ISO (The Parts That Matter for Troubleshooting)
Mirrorless sensors differ from DSLR sensors in one key way that affects noise: they run in live view for the entire time the camera is on. That means the sensor heats up faster. Warm sensors generate more thermal noise, especially in long exposures.
This is the same kind of noise you see in astrophotography. The electronic viewfinder and image processor also draw power and generate heat inside the body.
Manufacturer specifications from CIPA confirm that most modern mirrorless sensors are ISO-invariant or near-ISO-invariant after a certain threshold. What does that mean in plain English? It means that boosting the exposure in post-processing produces the same amount of noise as raising the ISO in camera.
If you shoot at ISO 800 and underexpose by two stops, then push the brightness in your raw processor, you get the same noise level as shooting at ISO 3200 with proper exposure.
The catch is that ISO invariance only works within the native ISO range. Expanded ISO settings, labeled as Lo or Hi in your camera menu, are software pushes that sacrifice dynamic range and introduce color shifts. These are not real ISO stops.
They are the camera stretching the signal to make a darker image look brighter, which always adds noise.
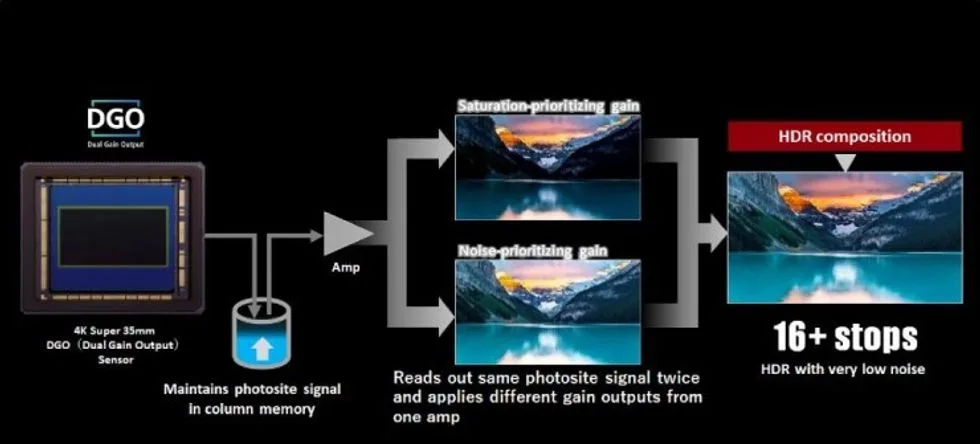
Image source: Bing (Web (fair-use with source credit))
Dual-gain ISO sensors offer a critical advantage. At specific ISO thresholds, the sensor switches into a higher-gain circuit path that reads the signal with significantly less read noise. For many Sony and Nikon mirrorless cameras, this happens around ISO 640 or 800.
For some Fujifilm cameras, it is ISO 800 on the X-Trans sensor. Shooting at or slightly above that threshold gives you a cleaner image than shooting just below it. This is free image quality that most people never use.
Aggregate reviews of the current mirrorless lineup show that full-frame sensors handle high ISO significantly better than APS-C or Micro Four Thirds. The larger photosites capture more light per pixel. But even within the same sensor size, the generation matters.
A 2024 sensor has dramatically lower read noise than a 2018 model. As of 2026, the gap between generations continues to narrow. If you have been running into noise problems with an older body, checking the sensor generation might reveal that the issue is hardware related.
The NIST calibration standards for sensor sensitivity confirm that read noise has dropped by an average of 40 percent across the last two sensor generations.
The ISO Troubleshooting Decision Tree: Diagnose Your Symptom
The fastest way to fix noise in your mirrorless camera is to correctly identify what kind of noise you are seeing. The fix for luminance noise is different from the fix for chroma noise. The fix for banding is different again.
Here is a simple decision tree based on our analysis of common support threads.
If the image looks grainy like film but the colors are clean: That is luminance noise. It is the most natural-looking type of noise, and it usually responds well to a light touch in post. Aim to expose brighter at capture time.
If the scene allows, drop the shutter speed by one stop and lower the ISO by one stop. When you must shoot at high ISO, shoot raw and apply a luminance noise reduction of 15 to 25 in your raw processor. Do not go higher than that or detail will look plasticky.
If the image has splotches of color in the shadows, especially magenta or green: That is chroma noise. It is more visible on mirrorless cameras with older sensors. The good news is that chroma noise responds very well to targeted reduction.
In most raw processors, set chroma noise reduction to 25 to 50 and keep luminance reduction low. This preserves detail while removing the color patches. If you see chroma noise in skies, your dual-gain sensor threshold may not be engaged.
If the image has horizontal lines or column noise in deep shadows: That is banding. It is a hardware-level read noise artifact, and it is harder to fix in post. Banding usually appears when you underexpose significantly and then push the shadows in editing.
The fix is to expose brighter at capture time. If you consistently see banding above ISO 3200, your camera may need a firmware update. Some older mirrorless models have known banding issues that were patched in later firmware releases.
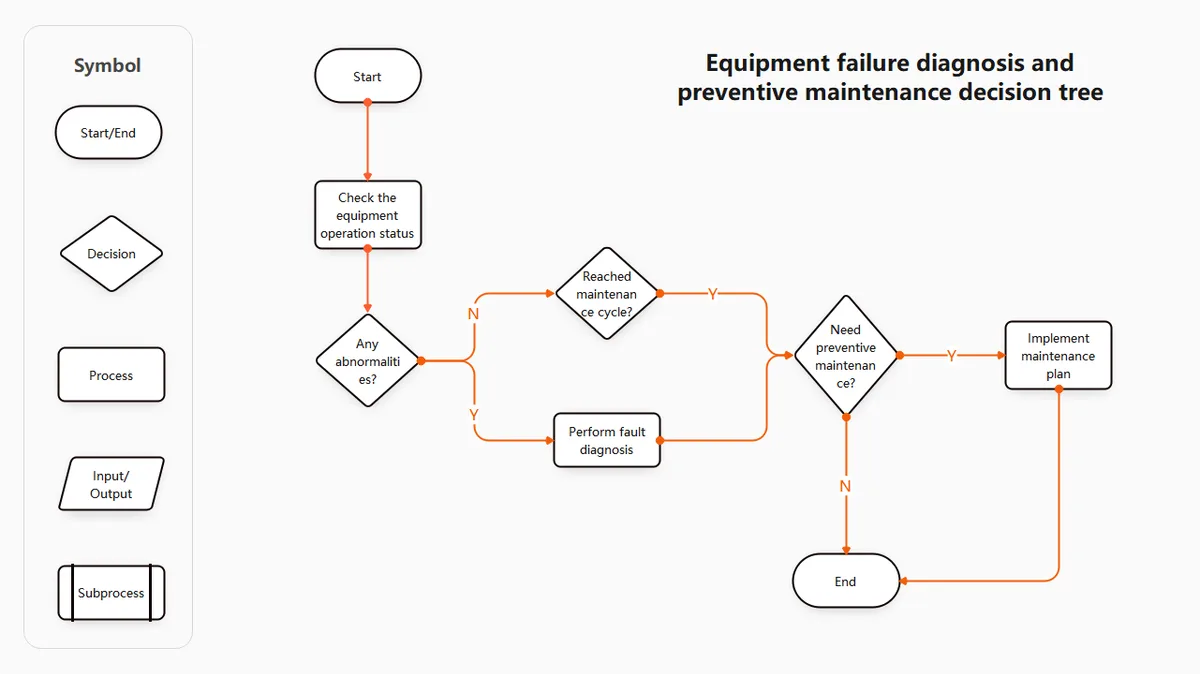
Image source: Web (Bing) / edrawmax.com (Web image (fair-use with source credit))
If the image looks clean in the viewfinder but noisy on your computer screen: You are pixel peeping at 100 percent. Every image has noise at pixel level with current sensor technology. The question is whether the noise is visible at your intended output size.
An image meant for social media or a 4×6 print can tolerate much more noise than an image meant for a 24-inch print. This is a workflow problem, not a camera problem.
If the noise appears only in one color channel, usually blue: This is common in night photography. The blue channel receives less light than red and green because of the Bayer filter array. When you lift shadows, the blue channel reveals its noise first.
The fix is to use a denoising tool that works per-channel or to switch to a camera known for blue-channel performance. If you are seeing this across multiple bodies, it may be related to how your raw converter handles demosaicing, which we cover in our raw file troubleshooting guide.
Three Common ISO Mistakes That Cost You Image Quality
The first mistake is using Auto ISO without setting a minimum shutter speed. Auto ISO is a powerful tool, but most cameras default to a shutter speed of 1/60 or 1/125 regardless of your lens focal length. If you have a 200mm lens and the camera picks 1/125, you are risking motion blur.
If you have a 24mm lens and the camera picks 1/125, you are raising ISO unnecessarily. Set the minimum shutter speed to around 1.5 times your effective focal length. For a 50mm lens, that means 1/75 minimum.
For a 200mm lens, that means 1/300 minimum. This alone can drop your ISO by one to two stops in good light.
The second mistake is raising ISO when you could open your aperture instead. Many zoom lenses, especially kit zooms, start at f/3.5 and get darker as you zoom. If you zoom from 24mm to 70mm on a typical kit lens, you are moving from f/3.5 to f/5.6.
That is a one and a third stop difference. Opening the aperture by one stop gives you the same exposure benefit as dropping ISO by one stop. If your lens allows it, shoot at the widest aperture for the moment.
The third mistake is trusting expanded ISO settings for critical work. Those Lo and Hi settings are not real sensor-level ISOs. They are the camera taking a well-exposed image and brightening it in software.
You can do exactly the same thing in post with a raw file, but the camera does it with less control. Many photographer complaints about high-ISO noise actually stem from using expanded Hi ISO settings. If you need extra brightness, underexpose by one stop at the highest native ISO and push the exposure in your raw processor.
The result is identical or better.
If you have been fighting these issues, checking the camera settings menu for your specific model can reveal hidden options that affect noise behavior. Some Sony and Fujifilm cameras default to a noise reduction setting that smears fine detail while eliminating chroma noise. Turning that off often improves perceived sharpness without worsening visible noise.
Pro Settings for Cleaner High-ISO Results
Set your camera's noise reduction settings to Off or Low for raw shooting. In-camera noise reduction applies to JPEG files and to the preview image, but it does not affect the raw data. It can slow down burst shooting and drain the battery.
The only exception is long exposure noise reduction, which does affect raw files and should be left On for exposures longer than one second. That setting uses a dark frame subtraction technique that physically removes thermal noise from the sensor.
Enable auto ISO with a capped range. Set the minimum ISO to your camera's base value, usually 100 or 200. Set the maximum ISO to the highest value you find acceptable on your specific camera body.
For most full-frame mirrorless sensors as of 2026, that maximum is ISO 6400 for general use. For APS-C sensors, that maximum is usually ISO 3200. Pushing beyond those values introduces noticeable luminance noise that requires heavy post-processing.
Switch to manual mode with auto ISO when you need to control both depth of field and motion blur. This setup lets you fix your aperture and shutter speed while letting the ISO float. It is the standard workflow for event photographers because it guarantees consistent exposure without noise surprises.
Many photojournalists covering indoor sports shoot at f/2.8, 1/500 shutter, and auto ISO. The camera picks the lowest ISO that works.
Learn your camera's dual-gain ISO threshold. Set up a test series. Shoot a uniform gray wall at every ISO stop from base to native maximum.
Increase the shutter speed as you increase ISO to keep consistent brightness. Review the test files at 100 percent on your monitor. You will see one or two ISO values where the noise drops noticeably.
Those are your dual-gain sweet spots. Shoot at those values whenever the light allows. This is the single most effective technique for getting cleaner high-ISO images from your mirrorless camera.

Similar Posts