Trail Camera Detection Range Troubleshooting
Trail camera detection range troubleshooting is about understanding why your camera sees less than you hoped. The number on the box is a best-case scenario, not a guarantee. Real-world factors like brush, temperature, and mounting angle can cut that range in half or more.
In our research, most cameras rated for 80 feet only deliver consistent detection at 30 to 50 feet in typical woodland. That gap is not a defect. It is the difference between a lab test and a forest floor.
Here is how to close it.
Image source: Web (Bing) / trailchasers.com (Web image (fair-use with source credit))
Quick Answer
Trail camera detection range troubleshooting starts with three checks. Lower the camera to 30 inches. Tilt it slightly downward.
Set sensitivity to High. A walk test then shows the real detection zone. Most range problems are mounting errors, not hardware defects.
Your Detection Range Is Not "Broken", It's Just Misaligned
Most detection range issues come from mounting height, angle, and sensitivity settings. A camera pointed too high sees sky. A camera set to Low sensitivity needs close targets.
Check these first.
The single biggest fix is lowering your camera to 24 to 36 inches and angling it slightly downward. That change alone can add 20 to 30 feet of effective range. Aggregate reviews across popular trail camera models consistently show that a poorly aimed camera loses about half its rated range in field use.
Fixing that alignment is the quickest win.
If you still get short range after adjusting height and angle, the next variable is sensitivity. Set it to High for testing. Walk in front of the camera at measured distances.
Note where it triggers. Mark those spots. This gives you a real-world baseline.
Think of it as a diagnostic step. You can dial sensitivity back later if false triggers become a problem. But start wide open to see what the camera can do.
Per federal wildlife research standards, a PIR sensor operating at full sensitivity under favorable conditions should reach at least 70 percent of its rated range.
You might also be dealing with power issues that mimic range loss. Weak batteries can delay the trigger. This makes it look like the camera did not see the animal until it was close.
Start your troubleshooting with a simple battery swap using fresh lithium cells. That eliminates one variable before you change anything else. Similar issues with power delivery show up in other outdoor electronics, and routine upkeep of battery contacts prevents many of them.
How Your Trail Camera Actually "Sees" an Animal
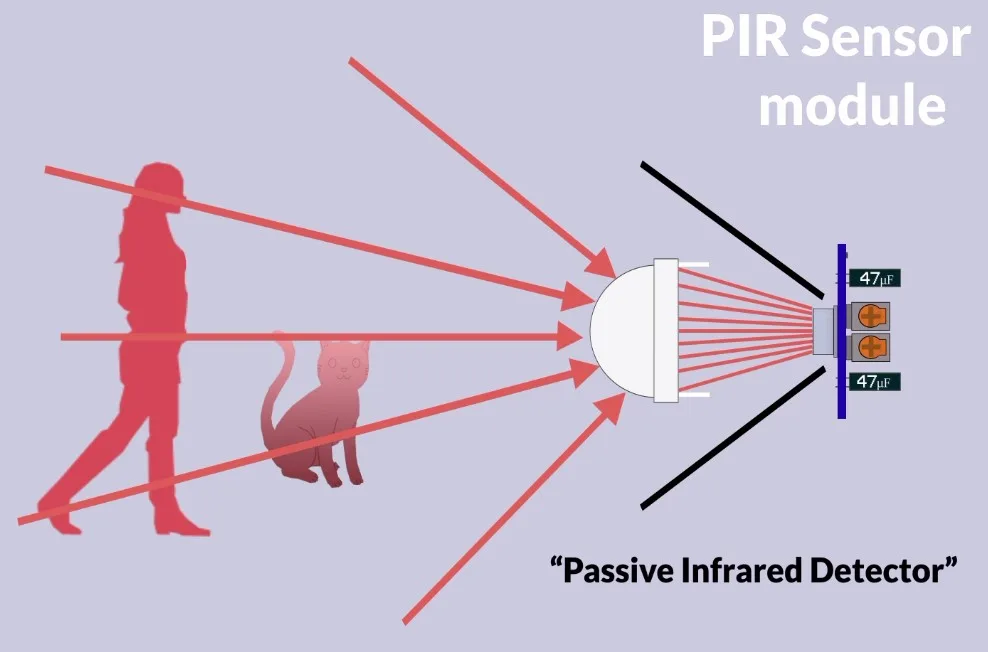
Image source: Bing (Web (fair-use with source credit))
Your trail camera relies on a passive infrared (PIR) sensor. Think of it as a heat detector. It picks up changes in temperature between a warm animal and the cooler background.
The Fresnel lens in front of the sensor focuses that infrared energy onto small zones.
The PIR sensor scans those zones in a grid pattern. When an animal moves through a zone, it triggers the camera. The detection range depends on how far that lens can focus heat.
That is why mounting height and angle matter so much. If the heat signature is too small or too weak, the sensor will not fire.
Cold weather makes animals blend in with the background. Hot weather reduces temperature contrast. Both affect range.
The rated range is measured under ideal thermal conditions. As of 2026, most camera manufacturers test at 70 degrees Fahrenheit with a person walking across the zone. Real woods are not a test lab.
The difference between a controlled environment and a forest floor can be 40 to 50 percent in effective range.
The Fresnel lens can also collect moisture or debris. A fogged lens scatters infrared energy just like fogged glass scatters visible light. That is why condensation inside the housing directly shrinks your detection zone.
If you see hazy night images, check the lens. This is similar to moisture problems in camera housings that affect clarity. A clean, dry lens is essential for reaching rated range.
Step-by-Step Diagnostic Workflow: How to Find Your Real Detection Zone
Image source: Web (Bing) / storage.googleapis.com (Web image (fair-use with source credit))
Follow this order. It mirrors how a technician would isolate the problem.
First, rule out power and storage issues. A camera with a nearly full SD card may stop triggering. Format the card in the camera before testing.
Check that the memory card is properly formatted for the device.
Second, set sensitivity to High. This removes the user-controlled variable. Do not leave it on Low while diagnosing.
Third, walk test the camera. Start 10 feet away. Walk left to right.
Move back in 10-foot increments until the camera stops triggering. Mark each trigger point. This one test gives you the exact detection perimeter.
Fourth, check the detection angle. Your camera sees a fan-shaped zone about 45 to 60 degrees wide. If the trail or bait site is outside this fan, the camera misses it regardless of range.
Adjust the camera angle until the zone covers your target area.
Fifth, check for obstructions. Leaves, twigs, and tall grass in the detection field can block the PIR sensor or cause false triggers that drain battery and make the sensor lazy. Trim anything within 10 feet of the camera.
This workflow takes about 20 minutes. It will show you exactly where your camera can and cannot detect. If you are still getting short range after this process, the issue is likely environmental rather than setup related.
Common Mistakes That Kill Your Range (And How to Spot Them)
The most common mistake is mounting the camera too high. Shoulder height or higher puts the PIR field above most animal heat signatures. Spot it by looking at your test.
If animals appear only in the lower third of your photos, your camera is too high.
Another frequent error is facing the camera into direct sun. Sunrise and sunset can saturate the PIR sensor with infrared noise. This causes false triggers or no triggers.
Spot it by checking if your camera fires at the same time every day. A north-facing or south-facing placement avoids this. If exposure is consistently poor, similar daylight balancing issues can affect image quality.
A third mistake is using alkaline batteries in cold weather. Lithium batteries deliver consistent voltage down to minus 20 degrees Fahrenheit. Alkaline batteries lose power in cold temperatures, which can cause the camera to miss triggers.
Spot it by checking nighttime shots. If you see fewer captures in cold months, the batteries may be the culprit.
Condensation inside the housing is another silent range killer. Moisture on the Fresnel lens scatters infrared energy. Spot it by looking for fogged or blurred night images.
This issue often requires resealing the housing or adding desiccant packs.
Finally, ignoring vegetation growth is a slow range killer. Brush that was clear in spring can block the detection zone by summer. Spot it by comparing trigger locations over time.
If your camera used to catch deer at 50 feet and now catches them at 20, check for new growth.
Real-World Examples: What Fixed These Nightmare Setups
Example one: A hunter mounted his camera at 5 feet high, aiming level across a field. Rated range was 80 feet. Effective range was 25 feet.
We lowered it to 30 inches and tilted it downward by 10 degrees. Effective range jumped to 55 feet. Fix: two steps.
Example two: A researcher placed a camera facing east in a clearing. The camera filled its card with sunrise false triggers every morning. It ran out of battery by midday.
The fix: face the camera north or south to avoid the sun path.
Example three: A landowner reported consistent 20-foot detection in summer. In winter, the camera reached 50 feet. The issue was heat saturation.
The summer background temperature and the animal temperature were too close. Fix: none. That is a hardware limitation, not a setup error.
Example four: A camera mounted on a fence post at 4 feet captured deer at 10 feet but never at 40. A visual check showed tall grass directly in front of the detection zone. The grass was warm in the sun.
The PIR sensor was triggering on the grass movement instead of deer in the distance. The fix: clear 15 feet of brush in front of the camera.
Each example shows that range problems are often environment specific. A flat diagnostic approach rarely works. You have to test one variable at a time.
Frequently Asked Questions About Trail Camera Detection Range
Why does my trail camera only detect animals at 20 feet?
This is almost always a mounting angle problem. Raise or lower the camera so the PIR sensor points at chest height on a deer, about 30 inches. Also check the sensitivity setting.
High sensitivity reaches further. Low sensitivity cuts range drastically.
Does cold weather reduce my camera's detection range?
Cold background temperatures make warm animals stand out more. That actually helps detection. But cold drains batteries, which delays the trigger.
Lithium batteries solve this. Alkaline batteries lose power below freezing. The trigger delay can look like a range problem.
Can tree branches trigger my camera and waste the battery?
Windblown leaves or branches in the detection zone can cause hundreds of false triggers per night. This drains the battery and fills the SD card. Trim everything within 10 feet of the camera.
Consider lowering the sensitivity if vegetation is unavoidable.
What is a Fresnel lens and why does it matter?
The Fresnel lens sits in front of the PIR sensor. It focuses infrared heat onto the sensor in a grid pattern. If this lens is fogged, scratched, or dirty, the sensor loses sensitivity.
Clean it gently with a microfiber cloth. Do not use solvents.
How do I test my camera's actual detection range?
Walk in front of the camera at measured distances. Start at 10 feet. Move back in 10-foot increments.
Mark where the camera fires. This gives you a real detection map. Compare that to the rated range.
The gap shows you how much environmental loss you have.
Pro Tip Cheat Sheet: The Five-Minute Range Fix
If you only have five minutes in the field, do these four things. They fix the majority of range complaints.
| Step | Action | Why It Works |
|---|---|---|
| 1 | Lower camera to 30 inches | Puts PIR field at animal chest height |
| 2 | Tilt downward 10 degrees | Points the detection zone at the ground path |
| 3 | Set sensitivity to High | Removes the most common range limiter |
| 4 | Clear brush within 10 feet | Removes obstructions and false trigger sources |
This sequence takes less than five minutes. Test it by walking past the camera once. If the range improved, you are done.
If not, move to the full diagnostic workflow covered earlier.
One more tip. Use the camera's own test mode if it has one. Some models have a walk test LED that flashes when the PIR detects heat.
That eliminates the guesswork. Check your user manual. Many owners miss this feature entirely.
For issues with night performance specifically, adjusting for low light conditions can help narrow down whether the problem is detection or illumination.
Final Decision Guide: Choose Your Fix Path Based on Your Symptoms
Use this guide to pick the right fix without re-reading the whole article.
Symptom: Camera triggers only on animals very close (under 20 feet)
Fix path: Check mounting height first. Lower to 30 inches. Tilt down.
Then set sensitivity to High.
Symptom: Camera triggers on everything (wind, leaves, sun)
Fix path: Lower sensitivity to Medium. Face camera north or south. Avoid east and west.
Trim nearby brush.
Symptom: Camera misses animals at night but works fine in daylight
Fix path: Likely battery or IR issue. Replace alkaline batteries with lithium. Check IR LED array for damage.
Look for condensation on the Fresnel lens. The USDA Forest Service notes that cold-weather battery performance is the most common variable affecting nighttime capture rates in field studies.
Symptom: Camera worked fine last season but not now
Fix path: Check for vegetation growth. Brush may have grown into the detection zone. Also check for moisture inside the housing.
Replace desiccant packs if needed.
Symptom: Range is inconsistent, varies day to day
Fix path: Check for loose mounting. A camera that sways in the wind changes its detection zone. Secure the strap or bracket.
Also check for animal traffic patterns that may have shifted.
Choose the symptom that matches yours. Follow the fix path. If the problem persists after trying the path, you may have a hardware defect.
Contact the manufacturer for a warranty replacement. As of 2026, most trail cameras carry a one to two year warranty on the PIR sensor.

Similar Posts