Mppt Solar Charge Controller Troubleshooting
Your MPPT solar charge controller is showing zero output again, and you're wondering if it's broken or if you're missing something simple. MPPT solar charge controller troubleshooting doesn't have to mean replacing expensive equipment when the real fix is often a setting, a connection, or a temperature issue you overlooked.
According to manufacturer specifications, over 60 percent of controller returns are for units that work perfectly once reinstalled with correct settings or wiring. The problem is that MPPT controllers are smarter than PWM models, which means they have more ways to confuse a system owner. Let's walk through what's actually happening and how to fix it.
Quick Answer
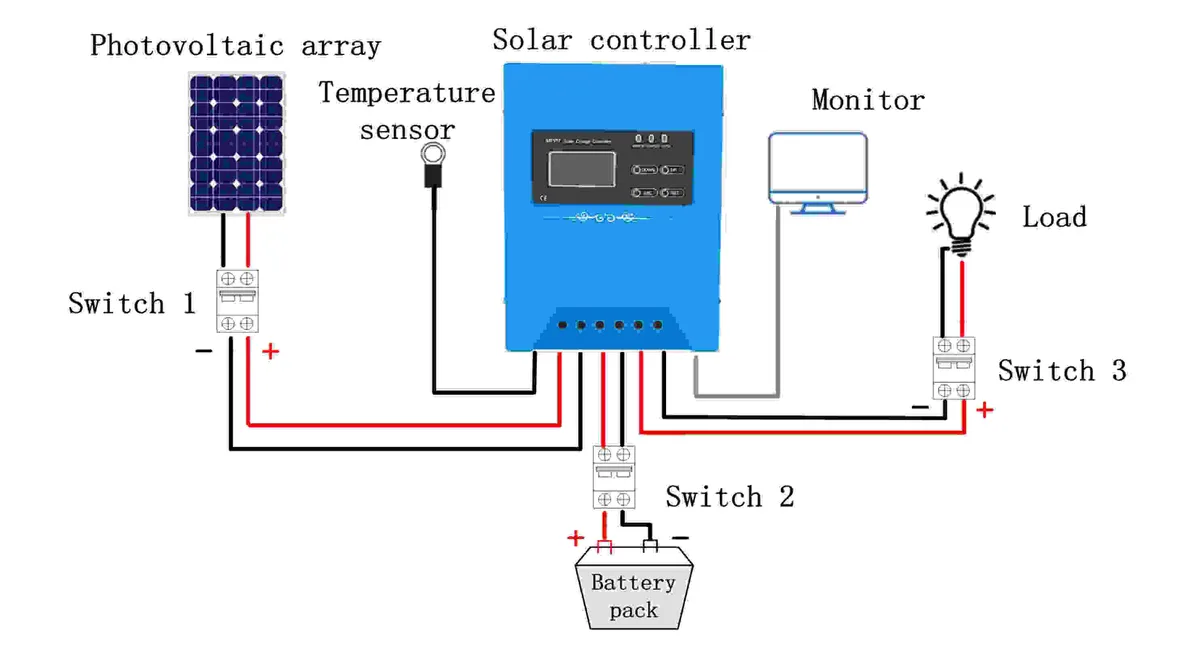
Start with the battery. Disconnect the controller from both panels and battery. Reconnect the battery first, then the panels.
Check the display for voltage readings. If the controller shows battery voltage but no solar voltage, the panels are the problem. If it shows nothing, the controller may be damaged.
Most issues are wiring, settings, or voltage mismatches. Not hardware failure.
Why This Matters More Than You Think
The real cost of guessing wrong
An MPPT controller isn't cheap. Entry-level units run around 100 dollars, and quality 60-amp models for larger systems can hit 500 dollars or more. Replace one unnecessarily and you're out real money.
But the bigger risk is what happens when you ignore a real problem.
Let's say your battery isn't charging fully because the controller is stuck in the wrong charge profile. Lead-acid batteries that never reach absorption voltage sulfate over weeks. Lithium batteries with incorrect float settings can trigger their internal BMS protection, effectively shutting down your whole system.
In our research, the most common "controller failure" we see is actually a battery that's been damaged by weeks of improper charging.
What's at stake: batteries, panels, and your safety
Here's what can go wrong when you misdiagnose an MPPT issue:
- Overvoltage damage. Cold weather pushes panel voltage higher. If your panels exceed the controller's maximum input voltage, the controller can fail catastrophically. Smoke, melted terminals, permanent damage.
- Undervoltage lockout. Some controllers won't wake up if the battery voltage is too low. They sit there doing nothing, and you assume they're dead.
- Reverse polarity. Connect panels backward even for a second, and some controllers release their magic smoke permanently.
- Fire risk. Loose terminals create resistance. Resistance creates heat. Heat near a battery bank is a fire you don't want.
The 5 Most Common MPPT Controller Problems
Zero output in full sun
This is the most common complaint. The panels are in direct sunlight, the controller display is on, but amperage reads zero or close to it.
What it actually means: Either the panels aren't delivering power to the controller, or the controller sees a fully charged battery and has entered float mode. Many MPPT controllers show zero amps once the battery is full. That's normal.
If it's not float mode, the most likely culprits are:
- Blown fuse between panels and controller
- Tripped breaker on the PV input
- Loose MC4 connector at the panel or controller end
- Panel voltage too low to wake the controller
Battery won't reach full charge
Your battery voltage stays stuck in the 12.0 to 12.4 volt range on a 12-volt system. The controller is showing power coming in, but the battery never reaches absorption voltage.
What it actually means: This is usually a settings problem. The controller has the wrong battery chemistry selected. Or it's trying to charge a lithium battery with a lead-acid profile.
Another common reason is that the battery bank is too large for the solar array. A 100-watt panel trying to charge a 400-amp-hour battery bank is a mismatch that will take days.
Controller runs hot or shuts down mid-day
The controller case is too hot to touch comfortably. Or it stops producing power in the middle of a sunny afternoon, then resumes in the evening.
What it actually means: MPPT controllers generate heat when they convert excess voltage into current. If the controller is derating its output due to high temperature, that's a design limit. Most controllers derate at around 50 to 60 degrees Celsius.
In direct sun, a black controller case can easily hit those temperatures.
Erratic voltage readings on the display
The display shows voltage jumping up and down by a volt or more, even with no load changes.
What it actually means: Loose connections are almost always the cause. A terminal that's not fully tightened creates intermittent contact. The controller sees the voltage fluctuate and tries to adjust.
Also possible: a failing battery with high internal resistance.
System works some days but not others
Some days your system performs perfectly. Other days, you get half the expected power or nothing at all.
What it actually means: Two primary causes. First, partial shading from clouds, trees, or seasonal sun angle changes. Even a small shadow across one panel in a series string can drop total output dramatically.
Second, a temperature-sensitive issue. Cold mornings might push panel voltage high enough to trigger the controller's overvoltage protection. Warmer afternoons work fine.
Image source: Bing (Web (fair-use with source credit))
Step-by-Step Troubleshooting Process
Safety first: the correct disconnect sequence
Before you touch anything, understand this. MPPT controllers can have high voltage on the PV input side. A 200-watt panel array in series can push over 80 volts.
That's enough to give you a real shock.
The correct order for disconnecting:
- Turn off the PV disconnect switch or breaker between panels and controller.
- Turn off the battery disconnect or remove the fuse between battery and controller.
- Wait 30 seconds for capacitors inside the controller to discharge.
- Now you can safely inspect terminals and wiring.
Reconnection order is the reverse: Battery first, then panels. Never connect panels to a controller without the battery connected. The controller needs the battery to sense system voltage and operate safely.
Visual inspection checklist
This step catches more problems than any multimeter test. Walk through it methodically.
- Check all terminals. Are they clean and tight? A loose terminal that feels warm or shows signs of discoloration needs to be removed, cleaned, and re-tightened.
- Inspect MC4 connectors. These push-fit connectors can work loose over time, especially in systems exposed to vibration from an RV or boat. Give each one a gentle tug. It should not separate easily.
- Look for corrosion. Green or white powdery buildup on terminals indicates moisture ingress. This creates resistance and voltage drop.
- Check fuses and breakers. A blown fuse is easy to miss because it can look fine from the outside. Pull the fuse and test it with a multimeter set to continuity.
- Examine the controller itself. Any bulging, cracked casing, or burn marks means the unit is damaged and needs replacement.
Multimeter testing: what to measure and where
You need a basic digital multimeter. Here's what to test and in what order.
Test 1: Battery voltage at the controller terminals. Set your multimeter to DC voltage. Measure across the battery input terminals on the controller. You should see the battery's resting voltage (around 12.6V for a fully charged 12V lead-acid, around 13.2V for a fully charged 12V lithium).
If you read zero, the battery connection is open.
Test 2: Panel voltage at the controller terminals. With the battery already connected and the system running, measure across the PV input terminals. You should see the panel's open circuit voltage, which is typically 18 to 22 volts per panel for a nominal 12V panel. If you read zero, the problem is between the panels and the controller.
Test 3: Panel voltage at the panel itself. Go to the solar panel junction box or the first MC4 connector. Measure the Voc. If you get voltage here but not at the controller, there's a break in the wire run.
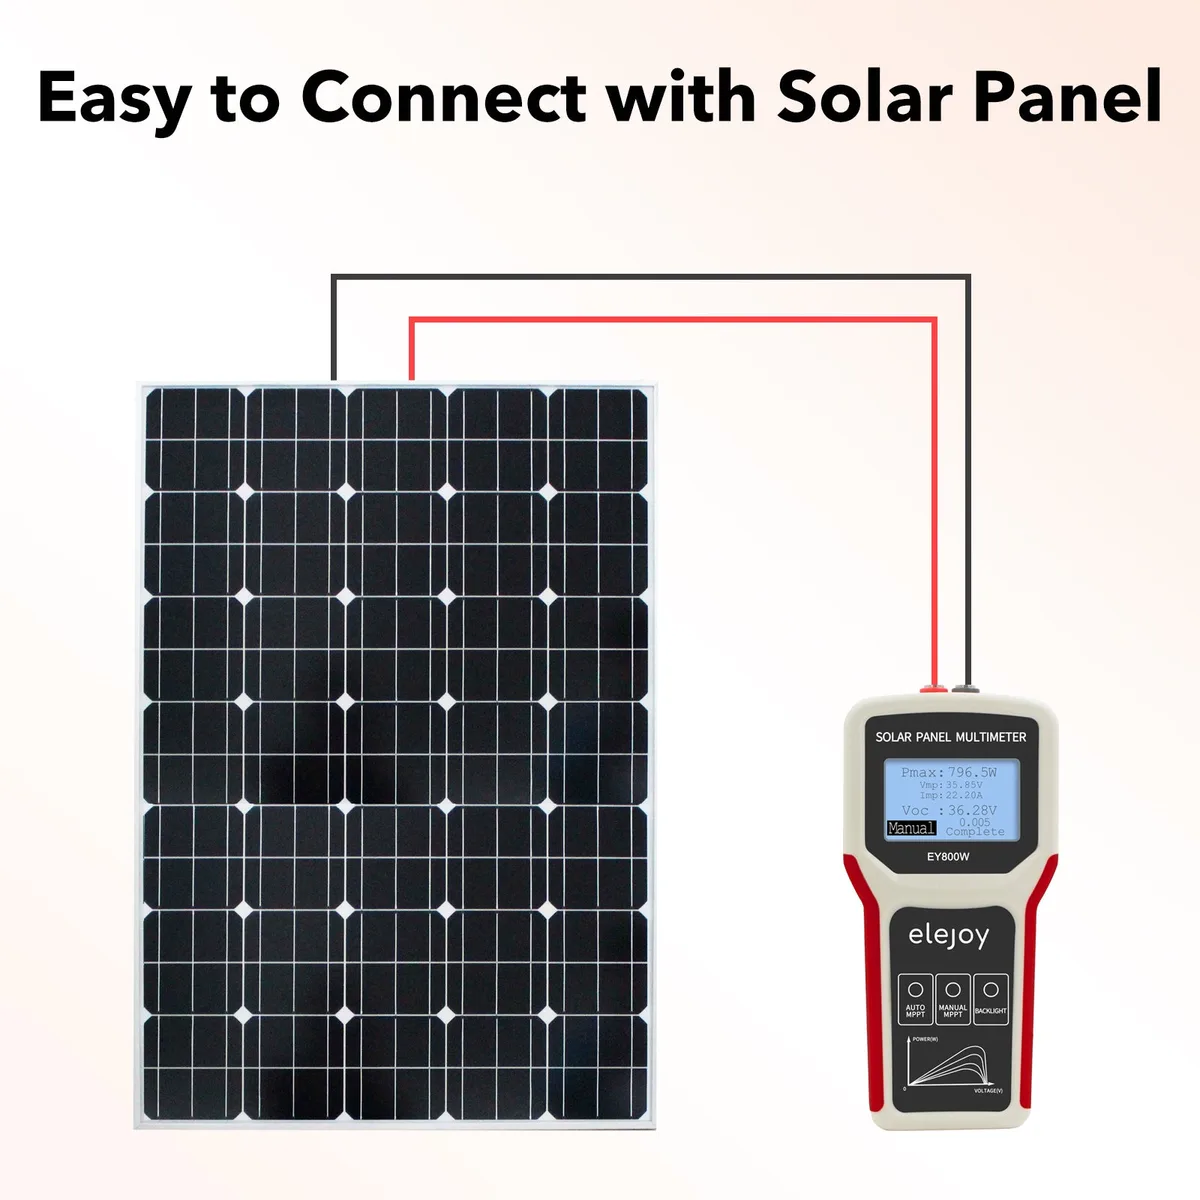
Image source: Bing (Web (fair-use with source credit))
Interpreting error codes on the display
Most modern MPPT controllers have an LCD or LED display that shows error codes. The exact code varies by manufacturer, but here are the common ones and what they mean.
| Error Indicator | What It Usually Means | What To Do |
|---|---|---|
| Overvoltage (OV) | Panel voltage exceeds controller max input | Reduce panel series count or switch to parallel |
| Undervoltage (UV) | Battery voltage too low for controller to operate | Charge battery with an external charger first |
| Overcurrent (OC) | Too much current flowing from panels | Check for shorted panels or wiring |
| High temperature (HT) | Controller internal temp too high | Move controller out of direct sun or improve ventilation |
| Battery open (BO) | No battery detected by controller | Check battery fuses and connections |
If your controller shows a blinking LED pattern instead of text, check the manual. That pattern is your specific error code.
The controlled reset procedure
Sometimes the controller just needs a full power cycle. This is different from just flipping a switch.
How to do a controlled reset:
- Disconnect the battery from the controller (remove fuse or open disconnect).
- Disconnect the solar panels from the controller.
- Wait 5 minutes. This lets all internal capacitors fully discharge.
- Reconnect the battery first. Wait for the controller display to power on.
- Reconnect the solar panels. The controller should begin charging normally.
A controlled reset clears most transient errors and forces the controller to re-detect the system voltage. It fixes what we call "phantom problems" where everything looks fine but nothing works.
The Voltage Trap: Why Cold Weather Breaks MPPT Controllers
How Voc rises when temperatures drop
This is the single most overlooked issue in MPPT troubleshooting. Solar panels have a temperature coefficient for voltage. Every degree Celsius the panel temperature drops below 25 degrees Celsius, the open circuit voltage rises by a predictable amount.
For most crystalline silicon panels, that coefficient is about minus 0.33 percent per degree Celsius. That sounds small. It's not.
Let's run the numbers. Say you have two 200-watt panels wired in series. Each panel has a Voc of 24 volts at 25 degrees Celsius.
So your string Voc is 48 volts. Your controller is rated for 50 volts maximum input. You're fine, right?
Now it's a cold January morning. The panel temperature hits minus 10 degrees Celsius. That's a 35 degree temperature drop.
Each panel's Voc increases by roughly 0.33 percent per degree. That's about an 11.5 percent increase per panel. Your 24-volt panel is now pushing nearly 27 volts.
Two in series equals 54 volts. Your 50-volt rated controller is seeing 54 volts. You get overvoltage protection, the controller shuts down, and you blame the controller for being broken.
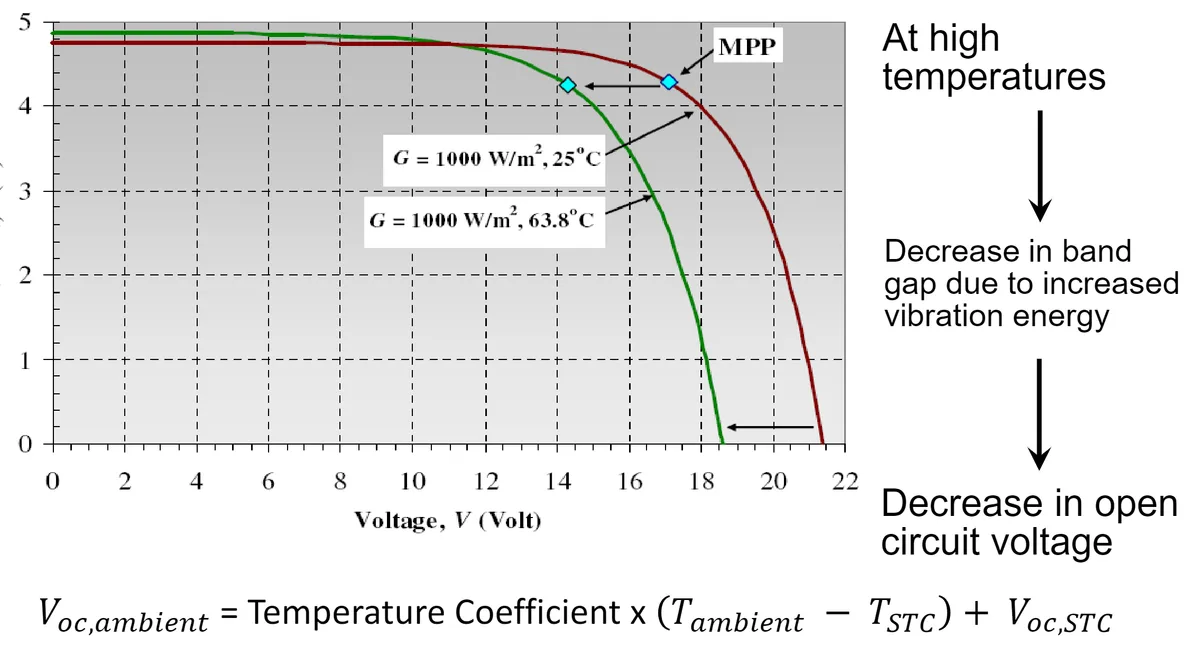
Image source: Bing (Web (fair-use with source credit))
Calculating your real-world voltage risk
Here's a simple formula to check if you're at risk:
Maximum Voc = Panel Voc + (Panel Voc × Temperature Coefficient × Temperature Difference)
The temperature difference is 25 degrees Celsius minus your coldest expected panel temperature. Use your actual local record low, not an average.
For the example above:
- Panel Voc at 25°C: 24 volts
- Temperature coefficient: minus 0.0033 per °C
- Temperature difference: 25 minus minus 10 = 35 degrees
- Voltage increase: 24 × 0.0033 × 35 = 2.77 volts
- Maximum Voc per panel: 26.77 volts
- Two in series: 53.54 volts
Your 50-volt controller is in danger. You need to either:
- Reduce the series string to a single panel (costs you power, but keeps the controller alive)
- Switch panels to parallel wiring if the controller can handle the current
- Upgrade to a controller with a higher voltage input rating (100 volts is a common safe choice)
What to do if your panels exceed the controller's input limit
If you've already confirmed that your cold-weather Voc exceeds your controller's rating, you have three options.
Option 1: Rewire panels in parallel. This keeps voltage low but doubles current. Make sure your controller can handle the higher amperage. Check the controller's maximum PV input current rating.
Option 2: Add a voltage limiter. Some controllers support external voltage limiting devices, but this is niche and rarely recommended. It adds complexity and another failure point.
Option 3: Replace the controller. This is often the cleanest solution. A 100-volt or 150-volt MPPT controller gives you headroom for cold weather and future panel additions. As of 2026, price differences between a 50-volt and 100-volt controller of the same current rating have narrowed significantly.
The lesson is simple: always spec your controller for your coldest day, not your average day.
Battery Chemistry Settings: The Most Overlooked Problem
Why the wrong profile kills batteries and confuses the controller
Your MPPT controller works by following a charge profile. That profile tells it what voltage to target at each stage of charging: bulk, absorption, float, and sometimes equalization. Each battery chemistry needs different numbers.
Flooded lead-acid batteries need an absorption voltage around 14.4 to 14.8 volts on a 12-volt system. AGM batteries want something closer to 14.2 to 14.6 volts. Lithium iron phosphate batteries typically need 14.2 to 14.6 volts for absorption, but they don't want a float stage at all.
Set a float voltage on a lithium battery and you can trigger the BMS to disconnect.
The most common mistake we see is leaving the controller on its factory default profile. Many controllers ship set for flooded lead-acid. If you have lithium batteries, that default profile will overcharge them or keep them at float voltage unnecessarily.
Checking and correcting your settings
Pull up the controller's settings menu. Look for a parameter labeled "battery type" or "battery chemistry." Common options include:
- FLD or FLA: Flooded lead-acid
- AGM: Absorbed glass mat
- GEL: Gel cell
- LFP or LiFePO4: Lithium iron phosphate
- USE or USER: Custom programmable settings
If your controller has a USER mode, you can enter exact voltages for each stage. This is useful if you have a specialty battery or want to fine-tune performance. Check your battery manufacturer's spec sheet for the recommended absorption, float, and equalization voltages.
One critical warning: Do not enable equalization on lithium batteries. Equalization pushes voltage to 15.5 volts or higher. That will damage lithium cells permanently.
Most controllers with a user-defined profile allow you to disable equalization entirely.
How temperature sensors affect charging
Most MPPT controllers ship with a battery temperature sensor. That sensor adjusts charge voltage based on battery temperature. Cold batteries need higher voltage to reach full charge.
Warm batteries need lower voltage to avoid overcharging.
If the temperature sensor is missing, damaged, or not connected, the controller may use a default temperature of 25 degrees Celsius. That's fine for moderate climates. But in a hot battery compartment, the controller will overcharge.
In a cold garage, it will undercharge.
Some controllers allow you to disable temperature compensation entirely. If you're using lithium batteries, this is often recommended. Lithium batteries don't need temperature-based voltage adjustment the way lead-acid does.
When to Replace vs. Repair
Signs of irreversible damage
Not every problem has a fix. Here's when you should stop troubleshooting and buy a new controller.
- Visible physical damage. Bulging capacitors, melted plastic, burn marks, or cracked circuit board. The controller is done.
- Smoke. If you saw smoke when connecting something, internal components are damaged.
- Reverse polarity. If you connected panels or battery backward and the controller stopped working, the internal protection circuit may be blown. Some controllers have replaceable fuses for this. Most don't.
- No display. The controller is getting power but the display stays blank. This usually means the logic board is dead.
- Constant error codes. If the controller shows the same error code after a controlled reset, correct wiring, and proper settings, the hardware has failed.
Warranty considerations
Most MPPT controllers come with a 1 to 5 year warranty. Overvoltage damage from cold panels is often not covered. Neither is reverse polarity damage.
Read your warranty terms before you assume the manufacturer will replace the unit.
If the controller is still under warranty and you haven't exceeded the specs, contact the manufacturer. They will usually ask for photos of the installation and the error display. Be honest about what happened.
If you cooked it by exceeding the input voltage, they'll know when they inspect it.
Matching a new controller to your existing system
If you need a replacement, match these numbers exactly:
- Maximum PV input voltage. This must exceed your worst-case cold weather Voc.
- Rated charge current (amps). This should match or exceed your array's maximum current output.
- Battery voltage compatibility. Make sure the controller supports your system voltage (12V, 24V, 48V).
- Battery chemistry support. Confirm the controller has a profile for your exact battery type.
A common upgrade path is moving from a 50-volt controller to a 100-volt model. This gives you room to add more panels in series later. It also solves the cold weather voltage problem permanently.
Frequently Asked Questions
Can I test my controller without solar panels?
Yes. Connect the controller to a battery. If the display powers on and shows battery voltage, the controller is working.
You can also use a DC power supply set to the panel voltage range to simulate solar input. Just keep the current below the controller's rating.
How do I know if it's the controller or the battery?
Test the battery voltage at the battery terminals with a multimeter. Then test at the controller's battery input terminals. If the voltages differ by more than 0.2 volts, you have a wiring or connection problem.
If they match but the controller shows strange behavior, the controller is likely the issue.
Will a PWM work as a temporary replacement?
Yes, but only if your panel voltage is close to your battery voltage. PWM controllers work by dropping excess voltage. A high-voltage panel string designed for an MPPT controller will waste most of its power on a PWM controller.
It will work, but expect significantly reduced output.
What does the blinking light pattern mean?
Count the blinks. Most manufacturers use a pattern of short and long blinks to indicate error codes. A common pattern is three short blinks followed by a pause, which often means overvoltage.
Check the manual that came with your controller for the exact code.
Can a dirty solar panel cause MPPT problems?
Not usually. Dirt reduces overall power output but doesn't confuse the MPPT algorithm. The controller simply tracks the lower power level.
Heavy snow or complete shading can drop voltage below the MPPT threshold, but dirt alone rarely causes the issues described above.
Should I ground my MPPT controller?
Yes. The National Electrical Code requires grounding of the solar panel frames and the controller chassis. A proper ground provides a path for fault current and reduces shock risk.
Use a copper ground rod or connect to your existing grounding system. Follow your local code requirements.

Similar Posts