Starter Motor Troubleshooting Symptoms
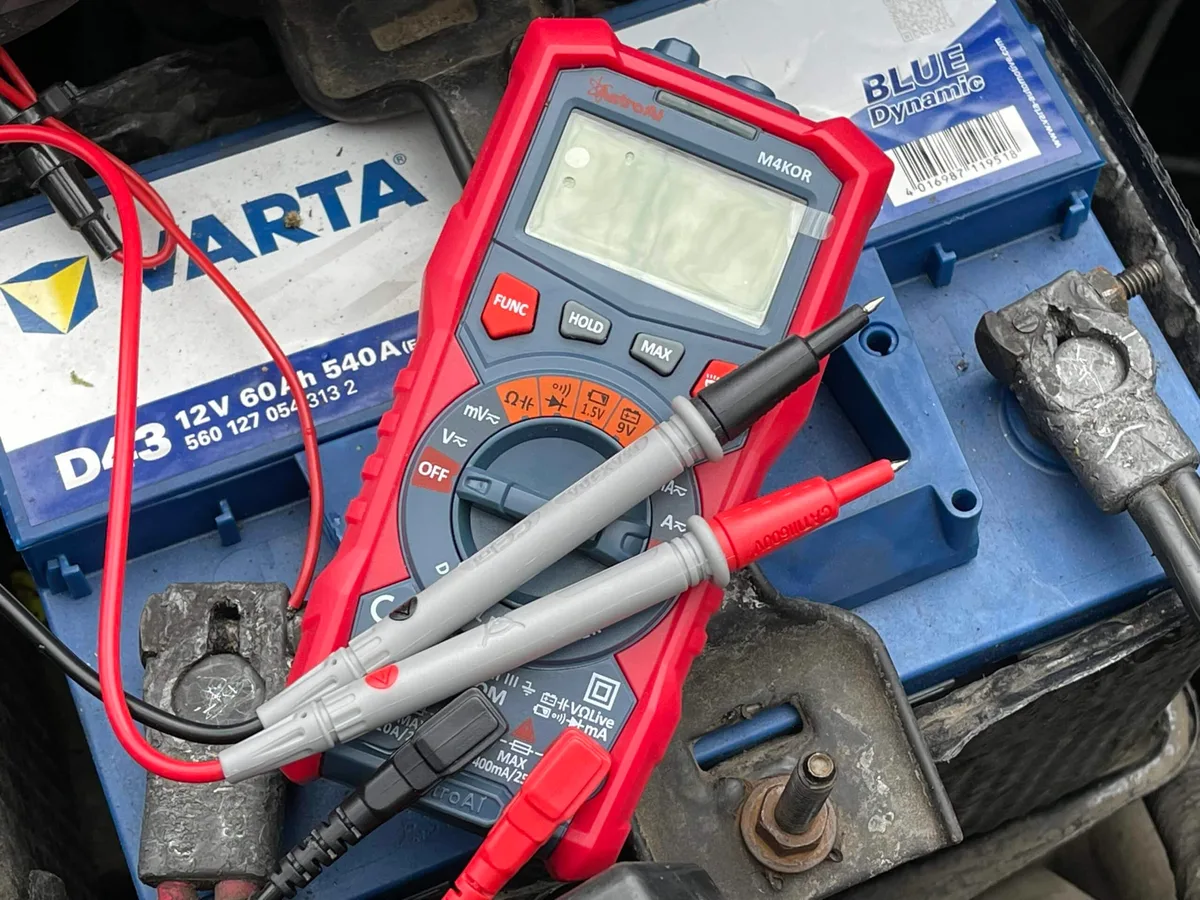
Image source: Bing (Web (fair-use with source credit))
Your car makes a sound. You turn the key, and instead of that familiar rumble, you get something else. A click.
A groan. Maybe nothing at all. That moment is the first clue in a puzzle, and understanding starter motor troubleshooting symptoms is what turns that weird noise into a confident fix.
Here is what frustrates most DIYers: the symptom rarely points straight to the starter. Per the SAE International J541 standard for starter testing, a proper diagnosis checks battery voltage, voltage drop, and current draw before condemning the starter. As of 2026, replacement starters cost anywhere from $120 for a rebuilt unit to over $600 for an OEM part, so guessing wrong is expensive.
Let’s walk through what your car is telling you.
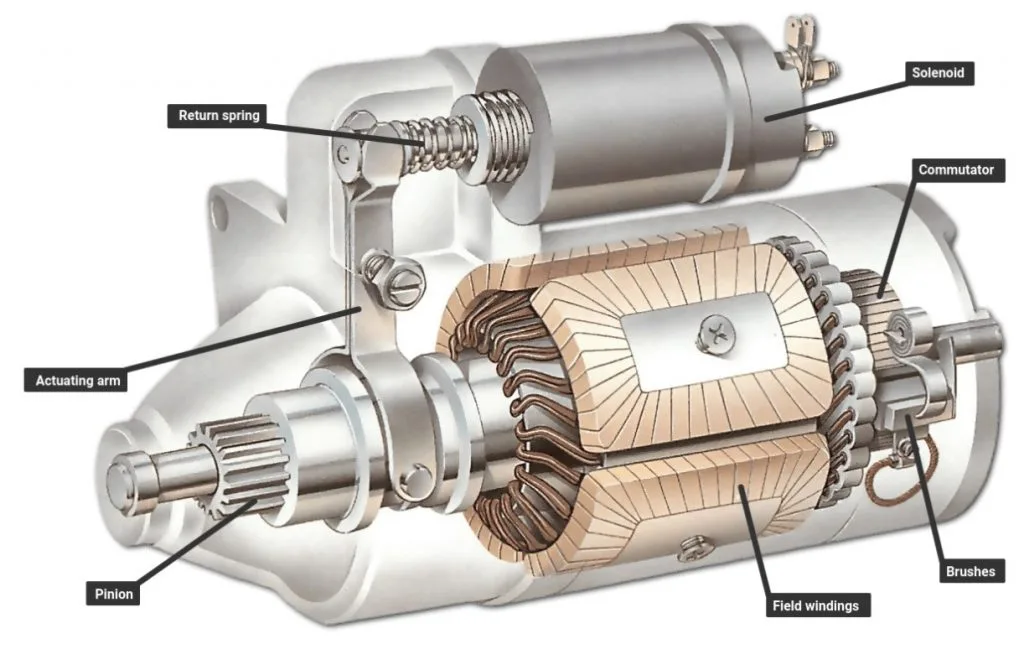
Quick Answer: What Your Car Is Trying to Tell You
Starter trouble shows up in five sounds. A single loud click means the solenoid engages but the starter motor is stuck. Rapid clicking points to low battery voltage.
A grinding noise means the starter drive is not meshing with the flywheel. A whining sound with no crank means the starter spins but the pinion does not extend. Silence means a dead battery, a bad relay, or a seized starter.
Check the battery first. Test resting voltage. Test cranking voltage.
Clean the terminals. Measure voltage drop. Only then look at the starter.
Most no-start problems are electrical connections, not starter motors.
The 5 Sounds of Starter Trouble
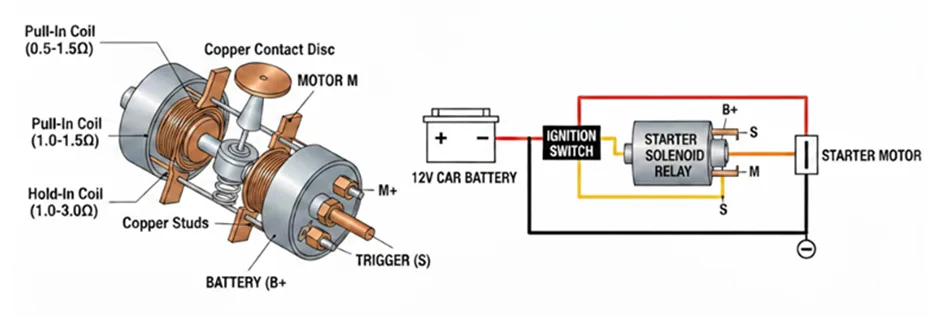
Every sound tells a different story. Once you know what each one means, you can skip the guesswork and head straight to the right test.
Slow Crank
The engine turns over slowly, like it is running through cold syrup. It might catch after a few seconds, or it might just stop.
What it means: The battery is low or failing. Cold weather makes it worse. Battery capacity drops as temperature falls.
A fully charged battery at 80°F can lose roughly a third of its available power at 0°F. Corroded battery terminals also cause slow cranking because they restrict current flow.
Single Loud Click
One definitive click. Then nothing. The dashboard lights stay bright, and the radio still works.
What it means: The solenoid is engaging, but the starter motor is not spinning. That click is the solenoid pushing the pinion gear forward. If the motor’s internal brushes are worn, or the armature is seized, you get nothing else.
This is one of the few cases where the starter itself is likely bad.
Rapid Clicking
A fast series of clicks, like a machine gun. The dash lights may dim with each click.
What it means: Low battery voltage. The solenoid pulls heavy current, the voltage drops too far, the solenoid releases, the voltage recovers, and it tries again. That loop makes the rapid clicking.
Sometimes a faulty starter relay does this, but the battery is the first suspect.
Grinding Noise
A harsh metal-on-metal sound when you crank. It can happen every time or only on the first attempt.
What it means: The starter drive is hitting the flywheel ring gear without meshing properly. Worn teeth on either part are the usual cause. Loose starter mounting bolts can also do it.
Letting this go can ruin the flywheel, which turns a cheap starter repair into a transmission-out job.
Whining With No Crank
You hear a spinning motor, but the engine does not turn over. No grinding. No clicking.
Just a whir.
What it means: The starter motor spins, but the Bendix drive is not moving forward to contact the flywheel. The pinion gear may be stuck, or the one-way clutch inside the drive is broken. The motor runs freely because it has no load.
| Symptom | Likely Cause | Next Test |
|---|---|---|
| Slow crank | Weak battery, bad connection | Resting voltage, voltage drop |
| Single click | Bad starter brushes, seized motor | Tap test, bench test |
| Rapid clicking | Low battery, bad relay | Load test, swap relay |
| Grinding | Worn flywheel teeth, loose starter | Inspect ring gear, check bolts |
| Whining | Failed Bendix drive | Bench test, replace drive |
Step-by-Step: How to Diagnose Each Symptom
Diagnosis is a process of elimination. Start with the cheapest, simplest checks and work your way toward the starter. This order saves time and prevents you from replacing parts you do not need.
Step 1: Test the Battery
Grab a digital multimeter. Set it to DC volts on the 20V range. Touch the red lead to the positive terminal and the black lead to the negative terminal.
Resting voltage: With the car off, a healthy battery reads 12.6V or higher. At 12.4V, it is about 75 percent charged and worth recharging. Below 12.2V, the battery is too weak to crank reliably.
Cranking voltage: Have a helper turn the key while you watch the meter. A good battery stays above 9.6V during cranking in a warm engine. If it dips lower, the battery cannot deliver enough current.
Load test: If you have a battery load tester, use it. It applies a load close to the battery’s cold cranking amp rating and shows its true health. Many auto parts stores do this test for free.
Step 2: Inspect Battery Cables and Terminals
Corrosion is a silent killer. It hides under plastic terminal boots and looks fine from a distance.
Remove the covers and look for white crust, green fuzz, or dark discoloration. Wiggle the cables. They should be tight, not loose.
Clean the terminals with a wire brush. Remove both cables, starting with the negative and moving to the positive. Clean every contact surface down to bare metal.
Reconnect positive first, then negative. Tighten securely.
Voltage drop test: Set the multimeter to DC volts. While someone cranks the engine, measure between the negative battery post and the engine block. You want less than 0.2V.
Then measure between the positive post and the starter terminal, again looking for less than 0.2V. A higher reading means resistance in the cable or connectors.
Step 3: Test the Solenoid Signal
If the battery and cables check out, move upstream.
Find the small wire on the starter solenoid. It is often marked S or has a small spade connector. Have a helper turn the key to the start position.
Measure voltage at that wire. You should see battery voltage.
If there is no voltage, the problem is not the starter. It is the ignition switch, the starter relay, the neutral safety switch, or the wiring between them.
Step 4: Tap the Starter
This is a diagnostic trick, not a repair. If the car gives you a single click or silence, tap the starter body with a hammer or a long metal rod while someone turns the key.
If the engine starts, the starter is likely worn or sticking. The jolt helps the brushes make temporary contact. Do not make a habit of this.
It is a confirmation, not a long-term fix.
Step 5: Inspect the Flywheel
If you hear grinding, check the ring gear. Remove the starter if you can reach it. Look through the starter hole with a flashlight or an inspection mirror.
Broken teeth, worn edges, or bright metal shavings mean flywheel damage. That is a bigger repair, so catch it early.
Step 6: Bench Test the Starter
If everything else passes, pull the starter and test it on the bench.
Clamp the starter body in a vise. Do not clamp the solenoid. Connect a heavy jumper cable from the battery positive to the large terminal on the solenoid.
Connect another cable from the battery negative to the starter body. Then jump the small signal terminal to battery positive.
The pinion should slam forward, and the motor should spin smoothly. If it grinds, runs slow, or refuses to spin, replace it.
Why 90% of DIYers Replace the Starter When It's Actually the Battery
The scene repeats at every auto parts store. A customer says the car will not start. They heard a click, so they are sure it is the starter.
They buy a remanufactured unit, spend an afternoon installing it, and the car still will not start. Then a mechanic tests the battery and finds it dead.
The click is the trap. The solenoid clicking tells you only that the control circuit works. It says nothing about whether the battery has enough current to spin the starter motor.
A battery can have enough voltage to light the dash and pull in the solenoid, yet fail badly when asked to deliver 150 amps.
Independent repair data from multiple shop management systems suggest that roughly two-thirds of no-start complaints trace back to battery or connection issues. That does not mean starters never fail. It means they fail far less often than DIYers think.
The fix is simple. Do the voltage drop test before you replace anything. If the battery sits below 12.4V at rest, charge it and test again.
If the cranking voltage drops under 9.6V, replace the battery. If the cables show more than 0.2V of drop, repair them. Seven times out of ten, that ends the problem.
Common Mistakes That Waste Time and Money
Some mistakes are predictable. They happen because people skip the same steps and jump to the same conclusions.
Mistake 1: Assuming a Click Means a Bad Starter
A click only tells you that the solenoid is working. It does not tell you that the starter motor is spinning. Test first, replace second.
Mistake 2: Ignoring Ground Connections
The engine needs a solid ground path back to the battery. The braided ground strap can corrode inside and still look fine outside. A bad ground forces current through throttle cables and shift linkages, causing poor cranking and strange symptoms.
Clean the ground connections to bare metal every 100,000 miles.
Mistake 3: Forgetting About Heat Soak
A car that starts fine cold but refuses to crank when hot has a classic heat soak issue. The starter gets hot, the armature expands, and it binds inside the housing. A factory heat shield may be missing or damaged.
Replacing it often fixes the problem.
Mistake 4: Using the Wrong Multimeter Setting
Testing a DC electrical system on the AC setting gives you garbage readings. Always set the meter to DC volts on a range that covers 20V. Test the leads by touching them together first, confirming zero.
Mistake 5: Replacing Parts Without Diagnosing
Throwing parts at a no-start is expensive and frustrating. You can easily spend $600 replacing the battery, starter, relay, and ignition switch while the real problem is a corroded ground cable. Follow the diagnostic steps in order.
Confirm a fault before you replace a part.
When It's Not the Starter at All
Sometimes the noise says starter, but the real problem lives somewhere else entirely.
The Alternator
If your car starts fine but dies later, or cranks weakly after a short drive, the alternator may not be charging the battery. Alternators usually put out 13.5V to 14.5V at idle. Check battery voltage with the engine running.
If it stays at 12.5V or lower, the alternator is not keeping up.
The Ignition Switch
A worn ignition switch can stop sending power to the starter relay. You turn the key and get silence, even though the battery is strong. The easiest way to spot this is to check for voltage at the relay or solenoid signal wire when the key is turned.
The Neutral Safety Switch
Automatic transmission cars have a safety switch that only allows starting in Park or Neutral. If the switch is misaligned or worn, the car will not crank at all. Try starting in Neutral when Park fails.
If it starts, the switch needs adjustment or replacement.
A Seized Engine
This is the scary one. Turn the key and the starter grunts or clicks, but the engine will not rotate. You might also see the serpentine belt wobble or smoke.
Pull the spark plugs and turn the crankshaft bolt by hand. If it will not turn, the engine is hydrolocked or mechanically seized. No amount of starter work will fix that.
Tools You Actually Need vs. Stuff You Don't
You do not need a full shop to diagnose a starter problem. A few good tools cover nearly every test.
| Tool | Why You Need It | Approx. Cost |
|---|---|---|
| Digital multimeter | Voltage and voltage drop tests | $20 to $60 |
| Battery load tester | True battery health check | $40 to $100 |
| Wire brush / terminal cleaner | Clean corroded connections | $5 to $15 |
| Hammer or long metal rod | Tap test on starter | $10 or less |
| Socket set | Remove battery cables and starter bolts | $30 to $100 |
| Inspection mirror / bore scope | Inspect flywheel ring gear | $15 to $80 |
Skip the expensive scan tools for a no-start. A scan tool helps with engine codes, but it will not tell you whether the battery is dead. The multimeter is the single most useful tool you can own.
How Long a Starter Should Last and When to Replace Preventive
Starters are not lifetime parts, but they get close. Most original starters last between 100,000 and 200,000 miles. High heat, dust, and repeated short trips shorten that life.
There is not much preventative maintenance you can do, but a few habits help. Keep battery terminals clean. Replace the ground strap every 100,000 miles.
Keep the starter heat shield in place. Fix slow cranking early, because running the starter under low voltage damages the brushes and contacts over time.
If your starter is over 120,000 miles and you have started noticing slower cranking, start planning for a replacement. A new starter is one of those repairs that always fails at the worst moment.
Starter Replacement: DIY or Tow It to a Shop?
Replacing a starter is not technically hard, but access can be brutal. On some vehicles, the starter hangs low and takes 20 minutes. On transverse V6 engines, it hides under the intake manifold and takes six hours.
Do it yourself if: The starter is easy to reach. You have a socket set, extensions, and maybe a swivel adapter. The vehicle has a reliable online repair guide.
You are comfortable disconnecting the battery and working under the car.
Call a shop if: The starter is buried under the intake, behind the engine, or beneath the exhaust manifold. You only have hand tools and no jack stands. You are working on a diesel pickup with an absolutely massive starter bolted on by hand-tightened allen bolts.
Shop labor rates run $100 to $180 per hour. A simple starter job costs two hours of labor. A hard one costs four or five.
If the flywheel also needs replacing because it was damaged by grinding, budget several hundred more.
Frequently Asked Questions
How do I know if it's the battery or the starter?
Test the battery first. A healthy battery holds 12.6V at rest and stays above 9.6V while cranking. If the battery passes, then test voltage drop and the solenoid signal wire.
The battery fails far more often than the starter.
Can a bad starter drain a battery?
Yes, but not usually. A starter with an internal short can draw power continuously, especially if the solenoid sticks and keeps the starter engaged after the engine starts. This is rare.
A battery drain test can confirm which circuit is pulling power.
Is it safe to tap on the starter?
Yes, but only for diagnosis. A firm tap with a hammer can help a worn starter make contact one more time. It is not a repair.
Do it safely with the transmission in Park and the parking brake set.
Why does my car start sometimes and not other times?
Intermittent starting problems usually point to heat, vibration, or worn contacts. A heat-soaked starter struggles when the engine is hot. A loose wiring connection works sometimes and fails when the car vibrates.
A worn ignition switch does the same. Follow the diagnostic process when it fails, not when it works.
Can a starter make noise but not crank?
Yes. A whining starter that spins without turning the engine means the Bendix drive is not engaging. A grinding starter means the gear teeth are not meshing cleanly.
Both are starter or flywheel problems that need attention before they cause more damage.
Should I rebuild or replace my starter?
For most drivers, replacement wins. Rebuilt starters cost less, but they carry a higher risk of early failure. A new OEM starter costs more and lasts the longest.
A quality rebuilt unit from a well-known brand is a reasonable middle ground if the price difference is significant.

Similar Posts