VIOFO A229 Pro How to Install
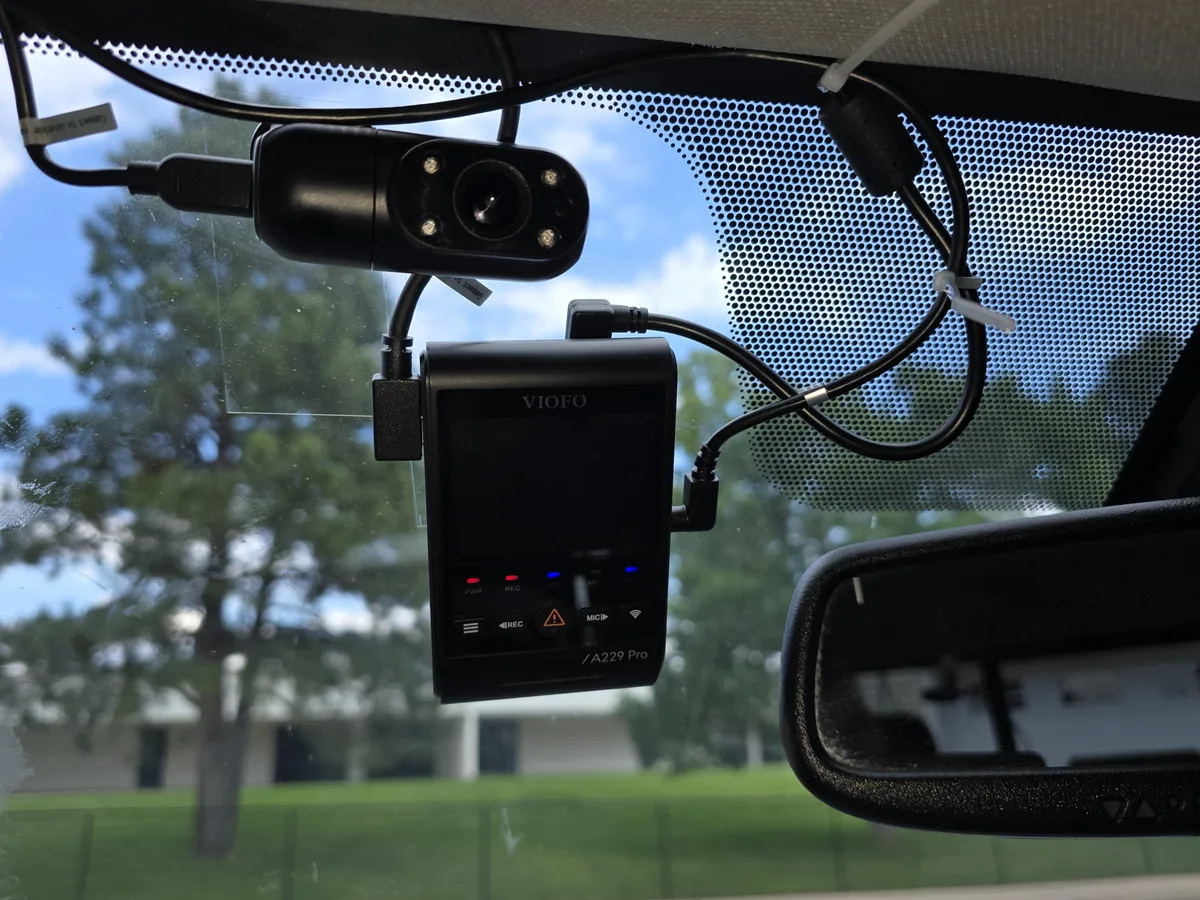
Installing a 3-channel dashcam like the VIOFO A229 Pro can feel intimidating when you first unbox it. Three cameras, a bundle of cables, and a hardwire kit that looks like it belongs under the hood of a race car. But the VIOFO A229 Pro how to install process is straightforward once you break it into manageable steps.
Per manufacturer specifications, the A229 Pro records 4K HDR on the front channel and 2K on the rear. It's one of the most capable dashcams on the market as of 2026. The three-channel setup covers the road ahead, the cabin, and what's behind you.
But all that hardware is useless if the installation is sloppy or unsafe. Let's walk through exactly what you'll need and how to get it done right.
Quick Answer
Install the VIOFO A229 Pro in five steps. Mount the front camera behind the rearview mirror. Route the cable along the headliner and A-pillar.
Install the rear and interior cameras. Connect the hardwire kit for parking mode. Configure the settings through the app.
Image source: Web (Bing) / tundras.com (Web image (fair-use with source credit))
What You'll Need Before You Start
Gathering the right tools ahead of time saves you from running back and forth mid-install.
| Item | Purpose |
|---|---|
| Plastic trim removal tools | Pry panels without scratching or breaking clips |
| Flathead screwdriver or fuse puller | Remove and install fuses in the fuse box |
| Microfiber cloth and isopropyl alcohol (70%+) | Clean the windshield for adhesive mounting |
| Zip ties or adhesive cable clips | Secure loose wire along the trim |
| VIOFO HK4 Hardwire Kit | Enable 24/7 parking mode with voltage cutoff |
| microSD card (U3 or V30, 128GB to 512GB) | Store continuous recording footage |
Picking the wrong memory card is a common mistake. Cheap cards overheat and corrupt. Use a high-endurance card designed for continuous recording.
Dashcams write data constantly, and a failed card means lost footage.
Power source options
You have two choices. The simplest is plugging the included USB-C power adapter into your cigarette lighter socket. It works instantly, but the port stays live only while the car runs.
If you want 24/7 parking mode, you need the hardwire kit. That ties the dashcam directly to your vehicle's fuse box with a voltage cutoff that protects your car battery from draining.
DIY vs. professional install
If you're comfortable popping off trim panels and working near a fuse box, you can handle this yourself in about 45 to 90 minutes. A professional installation typically runs $100 to $200 and includes a warranty on the work. For most people, DIY is the way to go.
Just take your time and follow the path below.
How to Mount the Front Camera (Without Messing It Up)
The front camera is the anchor of the whole system. Get this wrong, and your footage is blocked, shaky, or useless for reading license plates.
Finding the sweet spot
Mount the camera directly behind the rearview mirror, on the passenger side of the mirror stem. That puts it in the center of the windshield at the highest point possible without blocking your view. Check your local laws.
In the US, the NHTSA recommends keeping the windshield clear within the area swept by the wipers. Most states have a 3-inch rule that limits how far the camera can hang down from the top edge.
Cleaning the windshield
The 3M VHB adhesive on the GPS mount will not stick to a dirty surface. Clean the glass with isopropyl alcohol and a microfiber cloth. Wipe in a circular motion, then let it dry completely for two to three minutes.
In humid climates, use a hairdryer on low heat to evaporate any moisture.
Attaching the mount and camera
Peel the adhesive backing and press the GPS mount firmly against the glass. Hold it in place for 30 to 60 seconds. The adhesive needs pressure to bond.
Wait at least 30 minutes before hanging the camera on it. Rushing can cause the mount to slide down the windshield on a hot day. Once the adhesive cures, slide the camera onto the mount until it clicks.
Tighten the small screw on the side to lock it in place.
Routing the Cables: A-Pillar, Headliner, and Door Sills
This is where most people get stuck. The cable from the front camera needs to travel to the rear of the car. The path goes through tight spaces.
The key is knowing where to tuck and where to avoid.
The safest path for side curtain airbags
This is the single most important rule. Never route the cable across or in front of a side curtain airbag. These airbags deploy downward from the headliner along the A-pillar.
A cable in their path can become a projectile. The correct path is to run the cable along the top edge of the windshield. Tuck it into the headliner gap.
Then route it down the A-pillar. Use trim tools to gently pry the A-pillar panel away from the body just enough to slide the cable behind it. Feed the cable along the factory wiring harness, which is already routed safely behind the airbag.
Using trim tools without breaking clips
Plastic clips break easily in older cars where the plastic has become brittle. Insert the trim tool between the panel and the body, not between the panel and the glass. Pry gently.
If it resists, check for a hidden screw or bolt. Work slowly along the edge, popping clips one at a time. A broken clip means a rattling panel and a trip to the auto parts store.
Tucking the cable along the headliner and door sills
Once past the A-pillar, push the cable into the gap between the headliner and the roof. It should slide in easily. If the gap is tight, use the trim tool to widen it slightly.
Run the cable down the rubber door seal on the driver's or passenger's side. The seal lifts up easily and snaps back over the cable. Continue along the floor sill trim until you reach the rear of the vehicle.
How to Install the Rear and Interior Cameras
The rear camera gives you coverage behind the car. The interior camera monitors the cabin. Both need their own cable runs from the front unit.
Routing the rear cable through the rubber boot
In a sedan, the rear camera cable travels from the front, down the side sill, and up the C-pillar to the rear window. The toughest part is the rubber boot that connects the car body to the trunk lid. This boot protects the wiring harness and needs to remain watertight.
Use a small flathead screwdriver or trim tool to gently pry the boot loose from the body. Feed the cable through the boot. Push the boot back into place.
For hatchbacks and SUVs, the cable runs along the headliner and through a similar boot near the top hinge. Take your time here. Ripping the boot or leaving a gap causes water leaks.
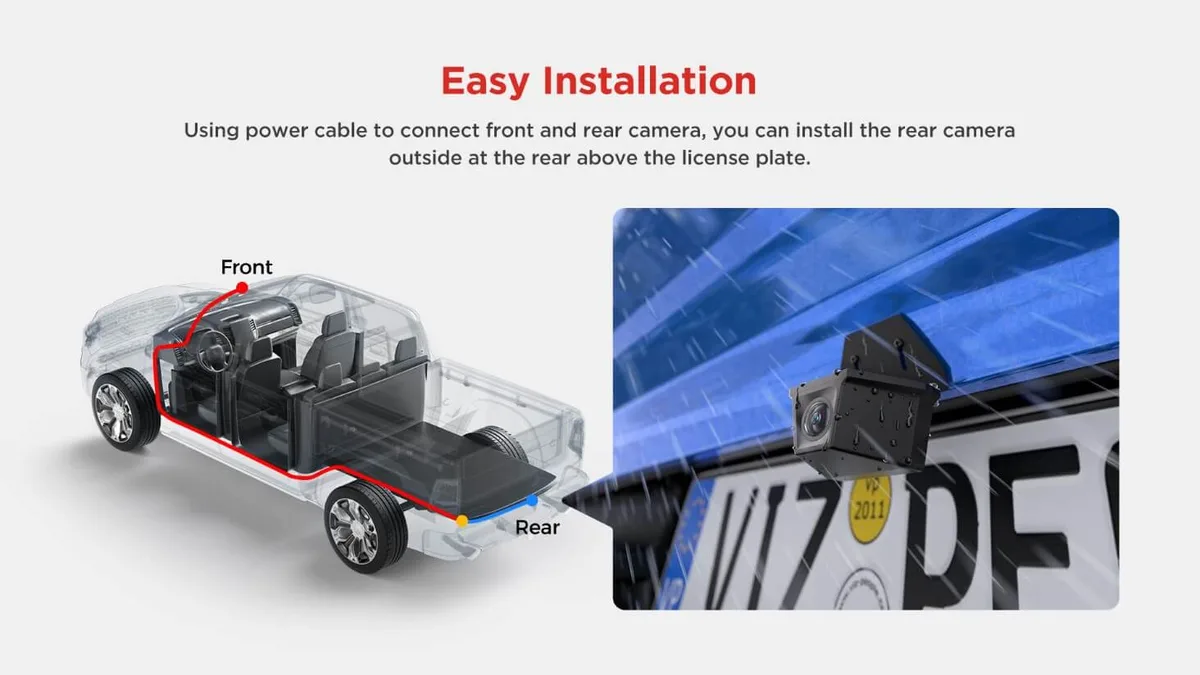
Image source: Web (Bing) / dashcam-shop.com (Web image (fair-use with source credit))
Mounting the rear camera on glass or trim
The rear camera mount works the same way as the front. Clean the glass or trim surface with isopropyl alcohol. Press the adhesive mount firmly and hold for 30 seconds.
The rear camera cable plugs into the camera body, so make sure the connector is fully seated before you mount it. If you're mounting on a rear window with defroster lines, avoid placing the adhesive directly over the lines. The adhesive can pull the defroster grid off the glass if you ever remove the mount.
Positioning the interior camera for cabin coverage
The interior camera clips onto the same mount as the front camera or mounts separately depending on your setup. Position it so it captures the entire cabin. This includes the driver and passenger seats.
Avoid pointing it directly at the rearview mirror. That can cause glare and wash out the image. The wide 150-degree field of view doesn't need much adjustment.
A slight downward tilt is usually enough to cover the front seats without cutting off the rear passengers.
Hardwiring the A229 Pro for Parking Mode
Hardwiring gives you 24/7 parking mode without draining your car battery. The VIOFO HK4 Hardwire Kit handles the voltage cutoff automatically.
Fuse tap basics: constant vs. switched power
Your fuse box has two types of circuits. Constant power fuses stay live even when the engine is off. Switched power fuses only work when the ignition is on.
For parking mode, you need to tap one of each. The constant power keeps the camera alive while parked. The switched power tells the camera when the car is running so it can switch between parking and normal recording modes.
The HK4 kit comes with three fuse taps. Check your vehicle's fuse box diagram to find the right size. Mini, micro, and low-profile mini are the most common in cars built after 2010.
ATO fuses are larger and found in older vehicles.
Finding the right fuse in your vehicle's box
Open the fuse box under the dashboard or glove box. Your owner's manual has a diagram showing which fuse controls what. Look for a switched circuit like the cigarette lighter, power windows, or radio.
These are easy to identify and typically have lower amperage ratings. For the constant power, pick a circuit that stays live. The interior dome light or door lock system works well.
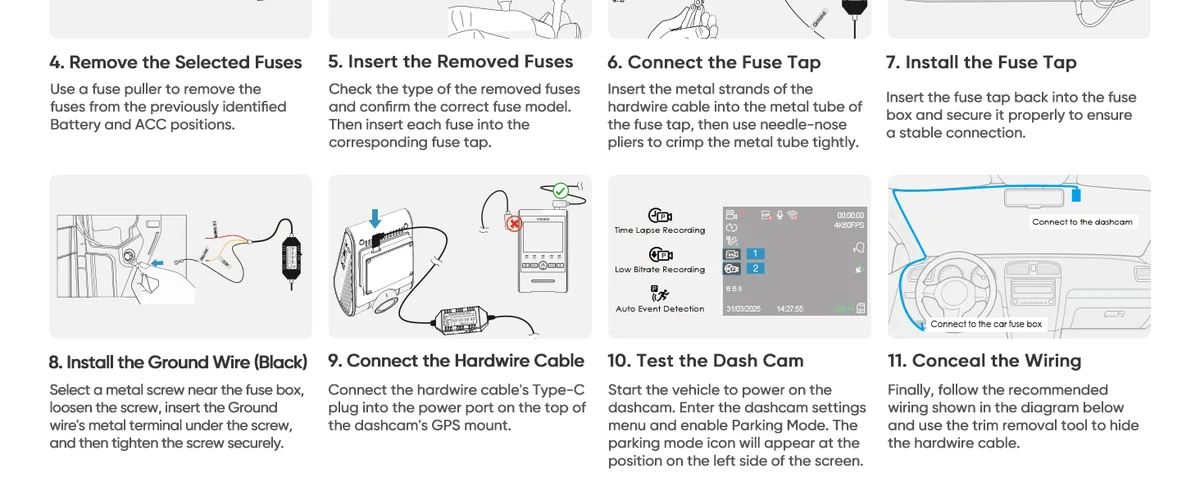
Image source: Bing (Web (fair-use with source credit))
Pull the chosen fuse with the fuse puller tool. Insert it into the lower slot of the fuse tap. Plug the fuse tap into the empty slot in the fuse box.
The orientation matters. The wire should point away from the metal contacts. If you plug it in backward, the fuse tap won't protect the circuit.
Setting the voltage cutoff to save your battery
The HK4 kit has a small switch with four voltage settings. 11.8V, 12.0V, 12.2V, and 12.4V. Set it based on your car battery type. For a standard lead-acid battery, 12.0V or 12.2V is safe.
For an AGM battery, 12.2V is better. Never go below 11.8V unless you're fine with a dead battery after a long weekend. The higher the voltage cutoff, the shorter your parking mode runtime.
But your battery stays safe.
Connect the ground wire to a metal bolt on the chassis. Scrape away any paint or rust for a clean connection. Plug the hardwire kit into the dashcam's USB-C port.
Test everything by turning the ignition on and off. The camera should start recording when the car starts. It should switch to parking mode after a few seconds of being off.
First-Time Setup: App, Angles, and Firmware
Once the hardware is installed, dial in the settings. The VIOFO App is available for iOS and Android and connects via Wi-Fi.
Connecting to the VIOFO App and adjusting settings
Turn on the dashcam. Press the Wi-Fi button on the camera. The camera creates its own network.
Open your phone's Wi-Fi settings and connect to the VIOFO network. The default password is 1234567890. Open the app and you'll see a live feed from all three cameras.
From here you can adjust the resolution, bitrate, loop recording length, and G-sensor sensitivity. The default settings are fine for most people. Lower the G-sensor sensitivity if you're getting too many false event locks from rough roads.
Leveling the front, rear, and interior camera views
The app shows you the live view. Adjust each camera angle without running back and forth. For the front camera, the horizon should be level.
The road should fill the bottom third of the frame. The rear camera should show the road behind you with minimal sky. The interior camera should cover the cabin without cutting off the top of passengers' heads.
Tighten the locking screw on the front mount after adjusting. The rear camera mount is fixed. Adjust the ball joint on the camera body itself.
Formatting the SD card and updating firmware
Format the microSD card in the camera itself. Not in your computer. The camera uses a specific file system format that prevents corruption.
Go to Settings and select Format SD Card. It takes about 30 seconds.
Check the VIOFO website for firmware updates before you finish. As of 2026, the latest firmware is version 1.4. Download it to your computer.
Copy the file to the SD card. Insert the card into the camera. The camera will detect the update and prompt you to install it.
Never interrupt a firmware update. A power loss during flashing can brick the camera.
Common Mistakes to Avoid on Your First Install
Even experienced installers make these errors. Knowing them ahead of time saves you from pulling the trim off twice.
Cable routing that blocks the airbag
Never run the cable across the front of the A-pillar airbag. A single loop of cable in the wrong spot can turn into a dangerous projectile during deployment. Route the cable behind the airbag, along the factory wiring.
Mounting too low or too high on the windshield
Too low and the camera blocks your view of the road. Too high and the windshield tint strip cuts off the top of the frame. The tint strip is usually about 4 to 6 inches from the top of the glass.
Aim for the bottom edge of that strip. The camera's lens should sit just below it.
Using the wrong fuse or forgetting the voltage cutoff
Plugging a 15A dashcam into a 30A fuse slot is fine. But plugging a 30A fuse into a 15A slot is a fire risk. Always match the fuse amperage rating to the slot you're using.
Never skip the voltage cutoff switch. Setting it to 12.0V or 12.2V is the difference between starting your car in the morning and calling for a jump start.
Frequently Asked Questions
How long does the installation take?
Plan for 45 to 90 minutes on your first attempt. The cable routing takes the longest. After you've done it once, you can finish in under 30 minutes.
Can I use the cigarette lighter instead of hardwiring?
Yes, but you lose parking mode. The cigarette lighter socket only works when the ignition is on. If you don't need 24/7 recording, the lighter adapter is a fine choice for a simpler install.
Will the adhesive mount hold in hot weather?
The 3M VHB adhesive is rated for temperatures up to 200°F. It holds well in most climates. Clean the surface thoroughly and press firmly for 60 seconds.
Let it cure for 30 minutes before attaching the camera.
What SD card should I use?
Use a U3 or V30 rated card from a reputable brand. High-endurance cards designed for dashcams are best. Avoid cheap generic cards.
They overheat and corrupt quickly.
Do I need to update the firmware?
Yes. Check the VIOFO website every few months. Firmware updates fix bugs, improve stability, and sometimes add new features.
The app can also notify you when a new version is available.
Can I install the rear camera on the license plate?
The A229 Pro rear camera is designed for interior mounting on the rear window. License plate mounts are available for some models, but they require a different cable and mounting bracket. Stick with the intended installation for the best results.

Similar Posts