DSLR Camera Blurry Photos Troubleshooting

The moment you press the shutter and see a soft, smeary mess on your screen, you know something is wrong. DSLR camera blurry photos troubleshooting is the exact rabbit hole you are about to dive into, and the good news is that most causes are straightforward to identify and fix. You do not need to be a technician or spend money on repairs.
Manufacturer specifications indicate that the reciprocal rule (shutter speed should be at least 1 divided by your focal length) is the minimum standard for handheld sharpness. If you remember nothing else, start there. Let us walk through the most common culprits in a logical order so you can diagnose the problem in under five minutes.
Image source: Web (Bing) / colorexpertsbd.com (Web image (fair-use with source credit))
Quick Answer
Blurry DSLR photos come from three main causes: camera shake, subject motion, or missed focus. Check your shutter speed first. If it is slower than 1/60 second, camera shake is likely.
Use a faster shutter speed or a tripod. If that does not work, test your autofocus calibration or clean the lens.
Why Your DSLR Photos Are Blurry – Start Here
Before you change any settings, look at the blur itself. Is the whole image uniformly soft, or is only part of it out of focus? That single observation narrows your list of possible causes by half.
Uniform blur across the entire frame usually points to camera shake, a slow shutter speed, or a dirty lens. Partial blur where one area is sharp and another is soft points to a focus problem. A missed autofocus point or a front/back focus issue is the likely suspect.
Take a test shot of a static subject in good light. Use a tripod if you have one. Set your camera to aperture priority at f/8 and ISO 400.
If the tripod shot is sharp, the problem was handheld technique. If it is still blurry, move to the next section.
Is It Whole-Image Blur or Just Part of It?
This is your first fork in the diagnostic tree. If the entire photo is blurry edge to edge, you are dealing with one of three things: camera shake, subject motion, or a lens that is not sharp wide open.
If only part of the image is blurry, the focus is off. The sharp part tells you where the camera actually focused. Look at the active focus point in your camera's playback view.
Many DSLRs show a red square or brackets over the point that locked focus. If that square is not on your intended subject, there is your answer.
For whole-image blur, check your shutter speed. A good rule for a 50mm lens on a full frame body is to use at least 1/50 second handheld. On an APS-C sensor, that becomes 1/80 second due to the crop factor.
If you are slower than that, camera shake is the culprit.
Is It Camera Shake or Subject Motion?
These two look very similar at first glance, but they have opposite fixes. Camera shake makes the entire photo blurry in one direction, like a gentle smear. Subject motion leaves stationary objects sharp while the moving part is blurred.

Image source: Bing (Web (fair-use with source credit))
Check the edges of a building or a tree in the background. If they are sharp but your running dog is blurry, you need a faster shutter speed. 1/250 second is a baseline for slow walking. 1/500 second or faster for sports. If the background is also soft, increase your shutter speed anyway, but also consider using image stabilization or a tripod.
If you are shooting handheld at 1/30 second and the whole frame is soft, you have camera shake. Switch to shutter priority and set 1/125 second. Bump ISO to 800 or 1600 if needed.
A noisy but sharp photo is always better than a clean blurry one. For more detailed control, check our guide on adjusting shutter speed for your specific situation.
Is It a Focus Problem? (Front/Back Focus, Missed AF)
When you nail the exposure but the eyes of your portrait subject are soft while the ears are sharp, your autofocus is off. This is called front or back focus. It happens because the phase-detect autofocus sensor in the mirror box and the imaging sensor are not perfectly aligned.
It is common on DSLRs and can be corrected.
First, check your AF point selection. If the camera is in auto area AF, it might choose the wrong point. Switch to single-point AF and place that point directly over your subject.
That alone solves many missed focus issues.
If you still get consistent front or back focus, your camera has a built-in AF microadjustment feature. Most mid range to pro DSLRs from Canon and Nikon include this. You can dial in a correction of plus or minus 20 units.
Do this on a tripod with a focus chart or a ruler at a 45 degree angle. Take test shots, adjust, and repeat until the sharpest point falls exactly where you want it.
The same principle applies whether you are shooting on land or in challenging conditions like underwater environments. Setting the correct focus method early can save you from countless retakes.
Could Your Lens or Sensor Be Dirty?
A dirty front element scatters light and reduces contrast, giving the appearance of softness. A smudge or fingerprint can create a hazy look that mimics blur. Check your lens with a bright light.
Hold it at an angle so you can see any oily residue or dust.
Use a blower to remove loose dust first. Then use a microfiber cloth with a drop of lens cleaning fluid. Wipe in a spiral from the center outward.
Do not press hard. If the rear element is dirty, that is more critical because it is closer to the sensor.
Sensor dust shows up as dark spots in the same position on every image, not as overall blur. It is annoying but not the cause of soft focus. Clean the sensor only with a purpose made swab and solution, or have a professional do it.
Poking around with canned air can damage the shutter. For routine maintenance, proper storage practices can prevent dust from getting inside in the first place.
Common Mistakes That Make Blurry Photos Worse
Even experienced shooters trip over the same handful of errors. Knowing them saves you time.
Shooting wide open all the time. A lens at its maximum aperture (f/1.8, f/2.8) is almost always softer than stopped down a little. The sharpest aperture is usually around f/5.6 to f/8. If you are getting consistently soft images at f/1.4, stop down and try again.
Using too slow a shutter speed for the subject. Many people rely on image stabilization for everything. Stabilization only cancels camera shake, not subject motion. A person standing still at 1/30s might be fine.
A walking person needs at least 1/125s.
Ignoring the diopter adjustment on the viewfinder. That tiny wheel beside the viewfinder is meant to correct your eyesight. If it is off, the scene may look sharp to your eye but the autofocus never gets a good lock. Adjust it until the numbers and grid lines are crisply visible.
Forgetting to check the focus mode. Switch from AF-S to AF-C when shooting moving subjects. Single shot autofocus locks once, then stops. Continuous autofocus keeps tracking.
A common workflow for sports shooters is to use back-button focus with AF-C enabled.
Not cleaning the rear element of the lens. The front element gets all the attention, but the rear element is closer to the sensor. A smudge there has a bigger impact on sharpness. Check it with a light and clean it the same way you clean the front.
Pro Tip: How to Calibrate Your Autofocus (Step by Step)
Front and back focus is the most common hardware issue that causes consistently blurry photos. The fix is AF microadjustment, and it is easier than you think.
What you need: A tripod, a ruler or focus chart, good lighting, and a remote shutter release (or the self-timer). If your camera does not have microadjustment, check the manual. Most mid range and above models from Canon, Nikon, and Sony include it.
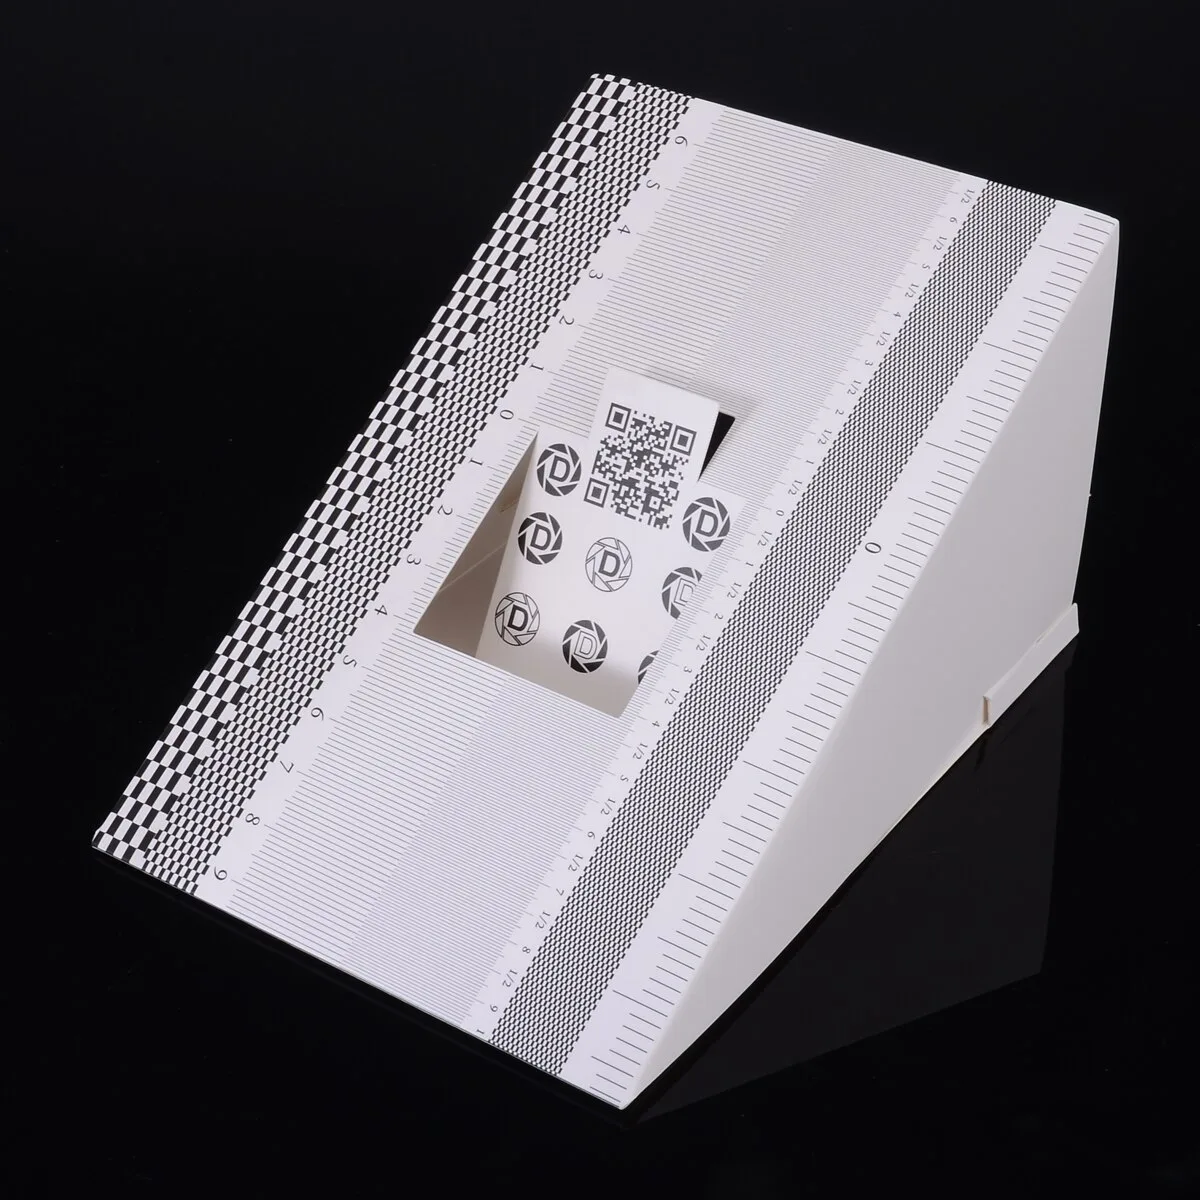
Image source: Web (Bing) / uk.vicedeal.com (Web image (fair-use with source credit))
Step 1: Set up the chart. Place your focus target at a 45 degree angle to the lens. A ruler angled the same way works fine. The distance should be typical for your shooting (about 10 to 15 feet for a portrait lens).
Step 2: Use a tripod and live view. Switch to live view and zoom in 5x or 10x on the target. Manually focus until it is perfectly sharp. This gives you the reference image.
Take a photo.
Step 3: Switch to phase detect autofocus. Without moving the camera, switch the lens to autofocus and take a shot using the viewfinder. Compare the two images on your computer. If the autofocus image is sharper in front of or behind the target, you have front/back focus.
Step 4: Apply microadjustment. Go to the AF microadjustment menu. Start with a value of +5 or -5 depending on the direction. Take another test shot.
Repeat until the autofocus image matches the live view reference. The typical adjustment range is plus or minus 20 units.
Step 5: Test at different distances. Some lenses drift more at close range than at infinity. If your lens has a different behavior, you may need to calibrate at two distances. Many modern DSLRs allow separate values for wide and tele ends on zoom lenses.
This process works for any interchangeable lens system. The same principle applies even when you are working in tricky conditions, like adjusting for underwater housing refraction. A properly calibrated lens delivers sharp results across the frame.
For housing specific issues, see our guide on testing underwater camera housing.
Frequently Asked Questions About Blurry DSLR Photos
Why are my photos blurry even when I use a tripod?
If a tripod shot is still blurry, the most common cause is mirror slap. The mirror flipping up before the shot vibrates the camera body. Use mirror lock up mode or electronic first curtain shutter.
Also check that the tripod head is tight and the legs are stable.
Can a broken lens cause blurry photos?
Yes. A lens that has been dropped or knocked can have a decentered element or a damaged autofocus motor. Test the lens on a different camera body.
If the same softness appears, the lens needs repair. Rent or borrow a known good lens to confirm the body is fine.
How do I know if it is motion blur or camera shake?
Look at the background. Camera shake blurs everything equally. Subject motion leaves the background sharp while the moving part is soft.
If you see a trail in the direction of movement, that is subject motion. Increase shutter speed accordingly.
Does image stabilization fix blurry photos?
Only if the blur is from camera shake. Image stabilization (IS or VR) does nothing for subject motion. It also cannot compensate for very slow shutter speeds like 1 second handheld.
For extreme low light, use a tripod or raise ISO instead.
What shutter speed should I use for sharp handheld photos?
A good starting point is the reciprocal of your focal length. For a 50mm lens on full frame, use 1/50s or faster. On APS-C, divide the focal length by 1.5 first (so 50mm becomes 75mm, use 1/80s).
For telephoto lenses, go faster. Practice bracing your elbows against your chest and exhaling slowly when pressing the shutter.
Can a dirty sensor cause blurry photos?
A dirty sensor creates dark spots or smudges in the same location on every image. It does not cause overall softness or lack of focus. If you see spots, clean the sensor carefully.
Use a sensor swab and solution designed for your camera model. If unsure, have a professional do it. For more camera issues, see our general troubleshooting guide.

Similar Posts