Genie Model 2128 Troubleshooting
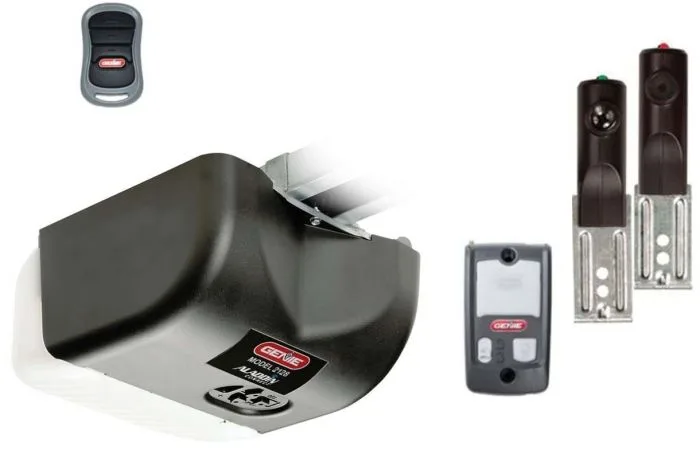
If your Genie Model 2128 garage door opener has stopped working the way it should, you’re not alone. This is one of the most common screw-drive openers on the market, and after a few years, issues like the door reversing for no reason, blinking lights, or a remote that won’t talk to the motor become frustratingly familiar. Genie Model 2128 troubleshooting doesn’t have to mean calling a repair tech and spending a couple hundred bucks.
Most problems can be diagnosed and fixed in under 30 minutes with nothing more than a stepladder and a screwdriver.
Per UL 325 safety standards, every residential garage door opener sold in the U.S. must include safety sensors and automatic reversal features. The Genie 2128 meets those requirements, but those same safety systems are often the culprit behind phantom problems. Let’s walk through what’s actually happening and how to get your door back on track.
Image source: Bing (Web (fair-use with source credit))
Quick Answer
Genie Model 2128 troubleshooting follows a symptom-based decision tree. If the door won’t move, check power and the wall button first. If it reverses after hitting the floor, your travel limits are off. Blinking lights point to safety sensor misalignment.
In most cases, cleaning sensors or adjusting the dials on the motor head solves the problem without replacing any parts.
Problem / Pain Point
The Frustration: When Your Genie 2128 Won’t Cooperate
You hit the remote, and nothing happens. Or the door creaks open six inches and stops like it hit an invisible wall. Maybe it closes all the way, then immediately reverses back up.
These are the moments that make you want to throw the remote across the garage.
The Genie 2128 is a workhorse. It uses a screw drive system that’s tough and reliable, but it has quirks that other openers don’t. The screw drive requires periodic lubrication.
The limit and force adjustments are analog dials, not digital menus. And the safety sensors are sensitive to even a tiny misalignment.
What makes this model tricky is that multiple symptoms can share the same root cause. A door that reverses on the way down could be a limit issue, a sensor problem, or even a dirty screw rail. Without a systematic approach, you end up guessing and wasting time.
Common Symptoms You Might Be Seeing Right Now
Based on aggregate user feedback and technician reports, these are the most frequent complaints with the Genie 2128:
- Door won’t open or close at all (no movement, no sound from motor)
- Door opens but won’t close (remote or wall button does nothing)
- Door starts closing but reverses partway or after hitting the floor
- Door opens partway and stops
- Remote works but wall button doesn’t, or the other way around
- Motor runs but door doesn’t move (grinding or clicking noise)
- Lights on motor head blink in a pattern (usually 2, 5, or 10 times)
- Door jerks or shakes during travel
Each of these symptoms points to a different branch on the decision tree. The next sections walk you through the exact steps to match your symptom to the fix. No guesswork.
Core Explanation / How It Works
How the Genie 2128 Screw Drive System Actually Works
The Genie 2128 uses a threaded steel rod called a screw drive. When the motor turns, it rotates the rod, and a trolley with internal threads rides along the rod to push or pull the door open and closed. No belt to snap.
No chain to stretch. Just metal on metal.
But here’s the catch: that metal-on-metal action needs grease. The manufacturer specifies a lithium-based grease applied to the screw rail at least once a year. If the screw dries out, the trolley binds, the motor struggles, and the door moves slowly or jerks.
Many “motor failed” calls turn out to be nothing more than a dry screw.
The motor itself is a 1/2 horsepower DC unit with soft start and stop. That means it ramps up and down gently to reduce wear on the door panels. It’s quiet for a screw drive, but not silent.
What the Lights on the Motor Head Are Telling You
The Genie 2128 has two LED lights on the motor head: a steady or blinking green light and a red light on the safety sensors. The motor head also has a round learn button and a small LED next to it.
Here’s the blink code cheat sheet per the Genie service manual:
- Blinking 5 times: Safety sensors are misaligned or blocked. Most common issue.
- Blinking 2 times: Motor overheat or voltage problem. Let it cool for 15 minutes.
- Blinking 10 times: Wall control or remote signal interference.
- Solid light, no response: Power issue or dead logic board.
If the lights are off entirely, the opener isn’t getting power. Check the outlet, the circuit breaker, and the GFCI receptacle if your garage has one.
Understanding the Limit and Force Dials
Open the light cover on the motor head. You’ll see two plastic dials with a screwdriver slot. The outer dial (marked “Close”) controls where the door stops when closing.
The inner dial (marked “Open”) controls where it stops when opening.
Next to those are two smaller force adjustment screws. One controls how much force the opener uses to close the door. The other controls force during opening.
Turn them clockwise to increase force, counterclockwise to decrease.
Manufacturer specifications indicate that factory settings are at the midpoint (3-4 on a 0-9 scale). Many homeowners crank them up thinking “more power” is better. That actually forces the door into the floor and can damage panels or warp the track.
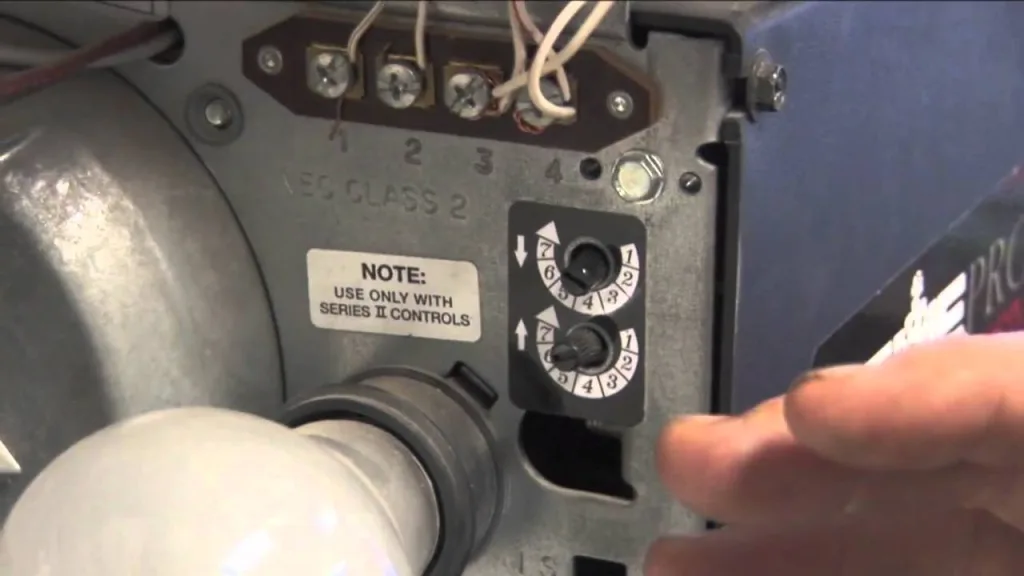
Image source: Bing (Web (fair-use with source credit))
Step-by-Step Process / How to Guide
Step 1: Identify Your Symptom (Use the Decision Tree)
Before you touch anything, watch the door’s behavior. Does it move at all? Does it stop in the same spot every time?
Does the motor hum but the door stays put? Write down the exact symptom. This determines which branch of the decision tree to follow.
If the door is stuck and you can’t move it manually, pull the emergency release cord (red handle hanging from the rail). This disconnects the trolley so you can open or close the door by hand. If the door still won’t move, the problem is in the door or track, not the opener.
Call a technician for door balance and track alignment.
Step 2: Check Power and the Wall Button
Check that the motor head has power. The easiest way? Press the wall button.
If the light on the motor head comes on but nothing moves, you’ve got power. If the light stays off, the opener isn’t getting electricity.
Unplug the opener for 30 seconds, then plug it back in. This resets the logic board after a power surge or flicker.
If the wall button has a lock button (a small toggle switch), make sure it’s not set to “Lock” or “Vacation Lock”. That disables the remotes and the wall button except for a single press to close. It’s easy to accidentally bump it.
Step 3: Align and Clean the Safety Sensors
The GenieSafe™ safety sensors are the two small units mounted on each side of the garage door track, about 6 inches off the floor. One sends an invisible infrared beam. The other receives it.
If anything blocks the beam, the opener refuses to close.
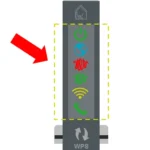
Walk to each sensor. Look at the indicator lights: one sensor has a green light, the other has a red light. The green light should be steady.
The red light should be steady. If the red light is blinking or off, the sensors are misaligned or dirty.
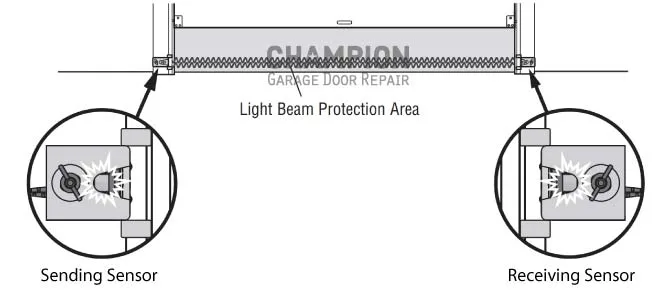
Image source: Bing (Web (fair-use with source credit))
Loosen the wing nut on the sensor bracket. Tilt the sensor slightly until the red light goes steady. Tighten the nut.
That’s usually all it takes.
If the lights are still off, clean the lens with a dry cloth. Paint drips, spiderwebs, and dust are common offenders.
Step 4: Reset the Travel Limits and Force Settings
If the door opens too far (hits the stop bolt and jerks) or closes too far (crunches into the floor), it’s time to adjust the limit dials.
Turn the “Close” dial clockwise to make the door stop sooner (higher off the floor). Turn it counterclockwise to let it go lower. A single full turn of the dial equals about 2 inches of travel.
Adjust the “Open” dial similarly for the open position.
After adjusting limits, check the force settings. If the door reverses after hitting the floor without an obstruction, the close force is too low. Turn the force adjustment screw clockwise one full turn.
If the door smashes into the floor and the motor keeps running, the force is too high. Turn it back counterclockwise.
Per UL 325 standards, the force must be low enough that the door reverses when it meets a 1.5-inch block on the floor. Test with a block of wood after each adjustment.
Step 5: Clear Memory and Reprogram Your Remotes
A remote that works sometimes but not others often means memory corruption. Clear the opener’s memory by pressing and holding the round learn button on the motor head for 10 seconds until the LED blinks and stops. All remotes are now forgotten.
To reprogram, press the learn button once. The LED will start blinking. Within 30 seconds, press the button on your remote twice (once to transmit, once to confirm a pairing signal).
The LED will turn solid, then turn off. Test the remote.
If the remote still doesn’t work, replace the battery. The Genie G3T-BX remote uses a CR2032 coin cell.
Step 6: Inspect the Release Cord and Trolley
Sometimes the release cord gets pulled accidentally. The trolley disconnects from the screw drive, and the opener runs but the door doesn’t move.
Pull the cord toward the door to reconnect the trolley. You’ll hear it click back onto the screw. Operate the wall button to confirm the door moves with the opener.
Decision Tree / Workflow
The Genie 2128 Decision Tree: Match Your Symptom to the Fix
This is the quickest way to a fix. Find your symptom below, and follow that branch.
Branch A: Door Won’t Move At All
Check: Power to the motor head. Is the LED on? If no LED, test the outlet with a lamp.
If the outlet is dead, check the breaker and GFCI.
If power is fine: the wall button may be shorted. Unplug the wall button by disconnecting the two wires from the back. If the opener suddenly works (the door can be operated with the remote), replace the wall button.
If nothing still happens: the logic board may be fried. Unplug the opener, wait 5 minutes, plug it back in. If still dead, you likely need a new logic board (about $60 from Genie parts) or a whole new opener.
Branch B: Door Opens But Won’t Close
Check: Safety sensors. Are both indicator lights steady? If the red light is off or blinking, realign the sensors (Step 3).
If sensors are fine: check the wall button for a lock feature. If the lock switch is on, turn it off.
If still won’t close: the close limit may be set too high (door stops before hitting the floor). Adjust the “Close” limit dial clockwise 1, 2 turns. Test again.
Branch C: Door Reverses Immediately After Hitting the Floor
Check: Close limit setting. The door is likely hitting the floor too hard. Turn the “Close” limit dial counterclockwise 1 turn to stop sooner.
Also check: Close force. If the force is too low, the opener reverses thinking it hit an obstruction. Turn the close force screw clockwise half a turn.
Test with a 1.5-inch block. If the door reverses on the block, you’re compliant with UL 325.
Branch D: Door Opens Partway and Stops
Check: Open limit. The open limit dial may be set too low. Turn the “Open” dial counterclockwise to let the door travel further up.
Also check: The screw rail for debris or lack of lubrication. A dry screw can cause binding that triggers the force sensor. Lubricate the screw with Genie screw drive lubricant or a white lithium grease.
Branch E: Remote Works, But Wall Button Doesn’t (or Vice Versa)
Remote works, wall doesn’t: Likely a broken wire or a bad wall button. Disconnect the wall button wires from the motor head. If the door operates with the remote, the wall button is defective.
Replace it.
Wall works, remote doesn’t: Clear memory and reprogram remote (Step 5). If still no luck, replace the remote battery. If multiple remotes are dead, the radio receiver on the logic board may have failed.
Branch F: Grinding Noises or Jerky Movement
Check: Screw drive lubrication. If the screw is dry, the trolley binds and the motor strains. Apply lubricant to the entire length of the screw.
Check: The trolley itself. Remove the light cover and inspect the trolley for worn or broken teeth. If the trolley is damaged, it will skip on the screw, causing grinding and erratic movement.
If lubrication and trolley are fine: the motor bearings may be worn after years of use. The unit may need replacement.
Mistakes to Avoid / Common Errors
The Adjustments Most People Screw Up (And How to Fix Them)
The most common mistake is cranking the force adjustment screws to the maximum setting. People think more power fixes everything. It doesn’t.
It masks underlying problems and can snap cables or bend tracks.
Another frequent error: adjusting the close limit so the door stops an inch above the floor. The door won’t close fully, and the opener thinks it’s stuck. Set the limit so the door rests flat on the floor without crushing the rubber seal.
Why Bypassing Safety Sensors Is Never the Answer
We see it in online forums and hear it from DIYers: “Just disconnect the sensors.” Don’t. Per UL 325, safety sensors are mandatory. Bypassing them removes the obstruction detection system.
If a child or pet gets caught under the door, the opener won’t stop. It’s not worth the risk. If your sensors are faulty, replace them (about $20 for a pair).
Overtightening Limit Dials (A Surprisingly Common Problem)
The limit dials are plastic and can crack if forced. Turn them with a screwdriver, not pliers. If you strip the slot, the dial becomes unadjustable.
A complete turn equals about 2 inches of travel, so small adjustments are better.
Safety / Legal / Compliance / Warnings
When to Stop DIY and Call a Pro
Some repairs are beyond the average homeowner. If you’ve gone through the decision tree and still have issues, call a licensed garage door technician. Specifically, call if you see:
- Broken torsion springs (the long coiled springs above the door)
- Bent or damaged track sections
- An opener that shocks you when touched
- Smoke or burning smell from the motor head
- The door falls rapidly when released manually
Torsion springs are under extreme tension. Do not attempt to adjust or replace them yourself. Serious injury can result.
UL 325 Requirements You Should Know
UL 325 is the safety standard for residential garage door openers. It requires:
- Safety sensors that detect obstructions within 2 inches of the floor
- Automatic reversal within 2 seconds after contacting an obstruction
- A manual release cord that remains accessible
Your Genie 2128 was built to meet these standards. If you’ve modified it (e.g., removed sensors, altered force settings), you’ve voided compliance. Restore factory settings for safe operation.
Electrical Safety: Before You Touch Anything
Unplug the opener before working inside the motor head. The unit runs on household voltage (120V AC), and touching exposed terminals can cause shock. If your garage has a GFCI outlet, test it monthly.
A tripped GFCI is often mistaken for a dead opener.
Maintenance / Long-Term Optimization
Keeping the Screw Drive Running Smooth
The screw drive needs lubrication every 12 months. Use only Genie screw drive lubricant or a white lithium spray grease. Never use WD-40.
It dissolves existing grease and leaves the screw dry.
Apply a thin coat along the entire length of the screw. Run the door up and down a few times to distribute it. Wipe off excess to prevent dripping on your car.
How Often to Lubricate (and What Not to Use)
| Lubricant | Recommended? | Why |
|---|---|---|
| Genie screw drive lube | Yes | Formulated for the steel screw |
| White lithium grease | Yes | Safe for metal-on-metal |
| WD-40 | No | Displaces grease, causes binding |
| Silicone spray | No | Too thin, attracts dust |
Battery Backup and Wi-Fi Maintenance Tips
If your 2128 has battery backup, test it twice a year. Disconnect AC power and operate the door. If it doesn’t open, replace the battery (usually a 12V sealed lead-acid unit).
For the Wi-Fi model (Aladdin Connect), reset the network module if the app stops connecting. Unplug the opener for 30 seconds. Reconnect via the app using the QR code on the motor head.
Frequently Asked Questions
Why Is My Genie 2128 Light Blinking 5 Times?
Five blinks means the safety sensors are misaligned or blocked. Check both sensor lights. If the red light is off or blinking, realign the sensors.
Clean the lenses with a dry cloth. Test the door again.
How Do I Reset My Genie 2128 After a Power Outage?
Unplug the opener for 30 seconds, then plug it back in. This resets the logic board. If the door still won’t operate, check the wall button for a lock setting.
Sometimes a surge corrupts the remote memory, requiring reprogramming.
Can I Use a Chamberlain Remote With My Genie 2128?
No. Genie uses its own radio frequency (315 MHz or 390 MHz depending on model). Chamberlain and LiftMaster use 315 MHz but with different encryption.
Only Genie brand remotes are compatible. Look for the G3T or GIT series.
How Do I Know If the Logic Board Is Fried?
If the opener has no lights, no sound, and no response after checking power and resetting, the logic board is likely dead. Also look for a burning smell or visible burn marks on the board. Replacement boards are available from Genie parts.
What’s the Lifespan of a Genie 2128 Opener?
With regular lubrication and basic maintenance, the Genie 2128 lasts 10 to 15 years. The motor is durable, but plastic gears and the logic board are common failure points after a decade. If repairs exceed $100, consider replacing the whole unit.