Heatilator Gas Fireplace Troubleshooting
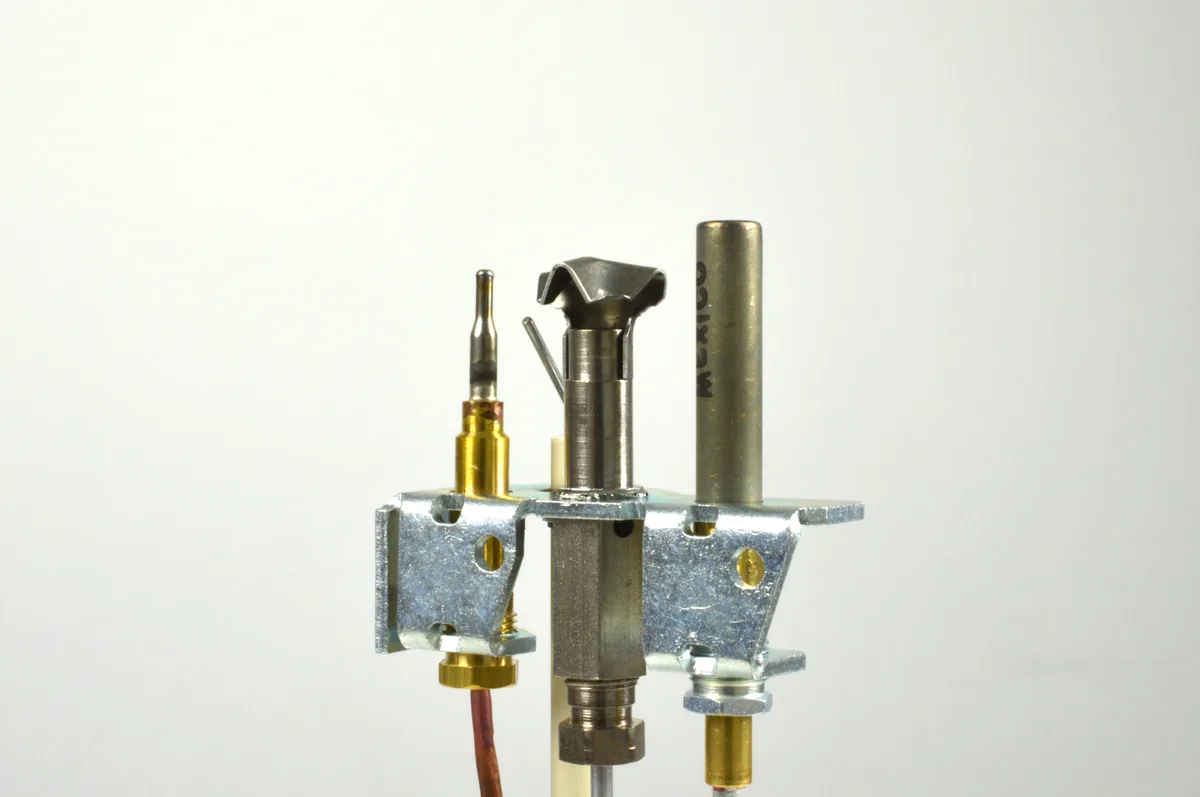
Your Heatilator gas fireplace troubleshooting starts with one thing you probably already feel: this thing should be working, and it's not. Whether the pilot light refuses to stay lit or the main burner simply won't fire, you're here because the heat isn't flowing. That's frustrating, especially in the middle of winter.
The good news is most common issues have a straightforward fix.
Industry data from the National Fire Protection Association points to improper maintenance as a leading factor in gas appliance malfunctions. For Heatilator units, thermocouple and thermopile failures account for a large portion of no-heat calls. We'll show you how to diagnose and safely fix these problems, starting with the most important rule: know when to step away.
Image source: Bing (Web (fair-use with source credit))
Quick Answer
The most common Heatilator gas fireplace troubleshooting steps start with the pilot assembly and the gas valve. Test the thermocouple and thermopile with a multimeter. A weak thermopile means the burner won't fire.
A weak thermocouple means the pilot won't stay lit. Remote issues usually need fresh batteries.
Before You Touch Anything: Safety First and the Gas Smell Rule
Stop before you grab a screwdriver. Gas is involved, so the first rule is safety. If you smell gas at any point, do not light anything.
Do not flip any switch. Do not use your phone inside the house. Leave immediately and call your gas company or a licensed technician from outside.
Even if you don't smell gas, take these precautions before you start working.
Three safety rules you follow every time
- Shut off the gas supply. The shut-off valve is usually a small lever on the gas line near the fireplace. Turn it so the handle is perpendicular to the pipe. That cuts the flow completely.
- Let the unit cool down. The glass on a Heatilator can reach over 400 degrees F. If the fireplace has been running, give it at least 30 minutes before you touch anything inside.
- Check your CO detector. Every home with a gas fireplace should have a working carbon monoxide detector within 15 feet of the unit. That's not a suggestion. The Consumer Product Safety Commission recommends one on every level of the home. If yours is missing batteries or expired, replace them before you go further.
If you follow these three steps, you've already eliminated the most serious hazards. You can now proceed safely.
The gas smell decision flow
This is the one fork in the road where there is no wrong answer if you choose safety.
- You smell gas. Leave the house. Do not operate any electrical device. Call the gas company or a pro from outside.
- You don't smell gas. Proceed with the checks below. You still need a CO detector working nearby.
Know Your System: Standing Pilot vs. Intermittent Pilot (IPI)
Before you dig into any fix, you need to know which type of ignition system your Heatilator uses. They behave differently, and the troubleshooting steps are not the same. Mixing them up wastes time and can cause you to replace parts you don't need.
Standing pilot
This is the older design. A small flame burns all the time, even when the main burner is off. You can see the flame through the glass or the access panel.
On a standing pilot system, the pilot flame heats a thermocouple, which sends a small electrical signal to keep the gas valve open.
- Pros: Simple, reliable, works without electricity. If the power goes out, the fireplace still runs.
- Cons: Burns gas 24/7 even when the fireplace is not heating. The thermocouple wears out after a few years.
- Common models: Most Heatilator units made before 2010 use a standing pilot.
Intermittent pilot (IPI)
On newer Heatilator models, the pilot flame only lights when you turn the fireplace on. It uses a spark igniter that fires for a few seconds, then shuts off. The flame stays on just long enough to light the main burner.
After you turn the fireplace off, the pilot goes out completely.
- Pros: More efficient because no gas is wasted on a continuous flame. Battery backup keeps the system running during a power outage.
- Cons: Requires batteries for the remote or thermostat. The control module can fail. More electronics means more points of potential failure.
- Common models: Most Heatilator units made after 2010 use IPI.
How to tell which system you have in 10 seconds
Open the lower louver or control door. Look at the valve assembly. If you see a small knob with the words PILOT / ON / OFF, you have a standing pilot.
If you see a black or gray box with a red or green LED light and no manual pilot knob, you have an IPI system.
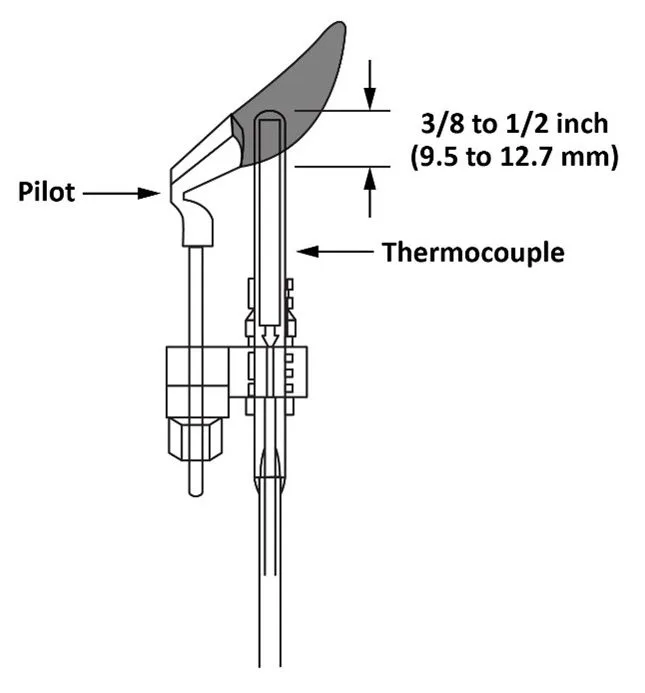
Image source: Bing (Web (fair-use with source credit))
Quick comparison table
| Feature | Standing Pilot | Intermittent Pilot (IPI) |
|---|---|---|
| Pilot flame | Always on | Only on when fireplace is active |
| Power source | Millivolt (self-powered) | Batteries or household power |
| Battery backup | Not needed | Needed for remote during power loss |
| Most common failure | Thermocouple wears out | Batteries die or control module fails |
| Best for | Off-grid or power-outage scenarios | Energy efficiency and convenience |
Your system determines which parts you need to test. A thermocouple failure is common on standing pilots. A dead battery or bad control module is common on IPI.
Keep that in mind as you read the next section.
The Top 5 Heatilator Problems (and How to Diagnose Each One)
These five scenarios cover most service calls on Heatilator gas fireplaces. We've ordered them by how often they happen. Start with your symptom, then follow the diagnostic steps.
Pilot Won't Light: No Spark or Click
If you press the pilot button or turn the switch and hear nothing, no spark, no click, the problem is usually electrical or gas-supply related.
The quick answer is check the gas valve and the batteries.
Is the gas valve open? Look at the shut-off lever. If it is parallel to the gas pipe, it's open. If it is perpendicular, turn it so it matches the pipe's direction. You may hear a slight hiss as gas flows.
Does your system use batteries? On an IPI system, the remote receiver and control module typically take four AA batteries. Replace them with fresh name-brand alkaline batteries. Don't use rechargeable batteries. They don't deliver the samevoltage consistently and can cause intermittent failures.
Is the igniter sparking? In a dark room, press the pilot control. Look for a small blue spark near the pilot hood. If you see no spark, use a fine-grit sandpaper to gently clean the electrode tip and the pilot hood where the spark jumps. Dirt and soot can insulate the spark gap.
If there is still no spark, the igniter module may have failed. That is a part best left to a technician unless you are comfortable with gas-valve electrical systems.
Pilot Lights But Won't Stay Lit
This is the single most common complaint with Heatilator gas fireplaces. You light the pilot, hold the control knob for 30 seconds, and then release it. The flame sputters and dies.
The quick answer is a failing thermocouple or a dirty pilot assembly.
Let's go step by step.
Measure the thermocouple voltage. This is the easiest test. Attach a multimeter to the thermocouple (we cover how in the next section). A good thermocouple should send 15 to 30 millivolts to the gas valve. If you read below 10 millivolts, the thermocouple needs to be replaced. They are cheap (roughly $10 to $20) and easy to swap.
Check the pilot flame. A properly adjusted pilot flame should be 1 to 2 inches tall with a hard blue cone at the base. If the flame is weak or yellow, the pilot orifice may be clogged. Use compressed air or a can of electronics cleaner to blow out the assembly. Do not poke the orifice with a needle. You can damage it.
Is the pilot hood clean? Rust, soot, and spider webs can lodge in the tiny burner port. Use a soft wire brush to clean the area around the pilot hood.
If everything tests good and the pilot still won't stay lit, the gas valve itself may be failing. That is a replacement job for a licensed pro. Don't try to rebuild a gas valve at home.
Main Burner Won't Fire (Pilot Is On)
This one confuses a lot of homeowners. The pilot flame is there, steady and blue, but when you turn the fireplace on, the main burner doesn't ignite. This points to the thermopile, not the thermocouple.
The quick answer is that the thermopile is not generating enough voltage to open the main gas valve.
Measure the thermopile voltage. A healthy thermopile made by Heatilator typically outputs 300 to 800 millivolts when the pilot is on. If you read 200 millivolts or less, the thermopile has degraded and should be replaced. Make sure you measure at the two terminal connections (typically labeled TP and TP-TH).
Is the pilot flame hitting the thermopile? The thermopile sits in the pilot flame. If the flame is too low or misaligned, it won't heat the thermopile enough. Adjust the pilot flame height by turning the pilot adjustment screw if your model has one.
Check the wall switch or remote. If the pilot is on and the thermopile reads fine but the burner still won't light, the problem may be a stuck or faulty switch. Bypass the switch by connecting the two wires together for a moment. If the burner lights, replace the switch.
Fireplace Turns Off Randomly After Running
This problem usually shows up after the fireplace has been on for 30 minutes or more. The flame shuts off, and the pilot stays lit or relights itself. This is often an overheating or draft issue.
The quick answer is a blocked vent or a dirty flame sensor.
Check the vent termination outside. Direct-vent Heatilator units pull air from outside and exhaust through a dedicated vent. If snow, debris, or a bird nest blocks the vent, the unit overheats and triggers a safety shutdown. Go outside and inspect the vent cap. Clear any obstruction.
Is the flame sensor covered in soot? On IPI systems, a flame sensor (different from a thermocouple) detects the burner flame. If it is coated with carbon buildup, it sends a weak signal and the control module shuts off the gas as a safety measure. Clean the flame sensor with a fine abrasive pad.
Is the fireplace too close to the thermostat? If the thermostat is in the same room, the temperature rise can cause the fireplace to cycle on and off rapidly. Moving the thermostat or using a remote with a local temperature sensor can fix this.
A high-temperature limit switch can also trip. This is a safety device that shuts off the gas if internal temperatures exceed a set point. If the switch is faulty, it turns off the burner even when temperatures are normal. A technician can test and replace it if needed.
Remote Control or Wall Switch Not Working
This one is typically a battery or wiring issue. The fireplace may function fine with the manual controls, but the remote or switch does nothing.
The quick answer is replace the batteries in the remote and the receiver.
Replace remote batteries first. Most remotes use two or three AAA or AA batteries. If you have a wall switch, check that the wires are securely attached to the switch terminals. Loose connections are common after years of heating and cooling cycles.
Resync the remote. After replacing batteries, you may need to sync the remote with the receiver. The procedure varies by model, but it usually involves pressing a reset button on the receiver while pressing a specific button on the remote. Check your owner's manual for the exact steps.
Check the receiver module. If the receiver's LED does not blink when you press the remote, the receiver board may be dead. Replace the receiver module, not the entire valve. They are available from Heatilator parts distributors for around $50 to $80.
How to Test a Thermocouple and Thermopile with a Multimeter
A multimeter is the single most useful diagnostic tool for gas fireplace troubleshooting. You don't need an expensive one. A basic digital multimeter that reads millivolts DC (200-millivolt range or higher) is all you need.
You can find one for $20 or $30.

Image source: Web (Bing) / pxhere.com (Web image (fair-use with source credit))
Testing a thermocouple (standing pilot systems)
The thermocouple is a small metal rod that sits in the pilot flame. It generates a tiny voltage when heated. That voltage holds the safety gas valve open.
Step 1, Locate the thermocouple. It connects to the gas valve with a single copper wire and a threaded nut. The tip of the thermocouple sits inside the pilot flame.
Step 2, Set the multimeter. Turn the dial to DC millivolts (mV). If your meter does not have an auto-range, select the 200-millivolt range.
Step 3, Connect the probes. Touch the red probe to the copper wire (the terminal nut on the valve). Touch the black probe to the metal body of the valve (ground). Be sure the connection is solid.
Step 4, Light the pilot. Hold the pilot control knob in the pilot position. The flame must be on for at least 30 seconds so the thermocouple heats up.
Step 5, Read the voltage. A healthy thermocouple reads 15 to 30 millivolts. If the reading is below 10 millivolts, replace the thermocouple. If it is between 10 and 15 millivolts, the thermocouple is weak and will likely fail soon.
Testing a thermopile (both standing pilot and IPI systems)
The thermopile is a bundle of multiple thermocouples. It generates a higher voltage, which powers the main burner gas valve. On standing pilot systems, the thermopile sits in the same pilot flame area.
Step 1, Locate the thermopile connections. You will see two wire leads coming from the thermopile to the gas valve. They are usually labeled TP and TP-TH (thermopile and thermopile-thermostat).
Step 2, Set the multimeter. Again, select DC millivolts. Use the 1000-millivolt (1-volt) range if available, since thermopile outputs are higher than thermocouple ones.
Step 3, Connect the probes. Clip the red probe to the TP terminal and the black probe to the TP-TH terminal. Do not disconnect the wires. Probe the terminals with the wires still attached.
Step 4, Light the pilot. Let the pilot run for 3 to 5 minutes. The thermopile needs time to heat up fully.
Step 5, Read the voltage. A good thermopile reads 300 to 800 millivolts. If you see 200 millivolts or less, the thermopile is not producing enough power. Replace it.
Voltage decision table
| Component | Expected Voltage | Action |
|---|---|---|
| Thermocouple | 15–30 mV | Good |
| Thermocouple | 10–15 mV | Weak — replace soon |
| Thermocouple | Below 10 mV | Replace now |
| Thermopile | 300–800 mV | Good |
| Thermopile | 200–299 mV | Marginal — may cause intermittent issues |
| Thermopile | Below 200 mV | Replace now |
Common mistake when testing
Do not measure these components without the pilot flame on. Cold components produce zero voltage, which misleads you into thinking they are dead when they are perfectly fine. Always test with the flame on for the specified time.
You now have the diagnostic foundation to handle most Heatilator issues. In the next sections, we cover the DIY mistakes that cost people time and money, the maintenance routine that prevents most failures, and when to call a professional.
Common DIY Mistakes That Can Make Things Worse (or Dangerous)
You have good intentions. You want to fix it yourself and save the service call fee. That is completely fair.
But we have seen the same handful of mistakes show up over and over in owner forums and service logs. These errors turn a forty-dollar thermocouple replacement into a five-hundred-dollar valve replacement. Worse, some of them create a genuine safety hazard.
Here are the mistakes to avoid.
Mistake one: turning the gas shut-off valve the wrong way
It sounds too simple to mention, but it is the most common first mistake. People see a lever and assume it works like a water valve. On a gas valve, when the lever is parallel to the pipe, gas flows.
When it is perpendicular, gas is shut off. We have talked to homeowners who cranked the lever the wrong direction and then called a technician because "the pilot won't light." The gas was off the whole time.
What to do instead: Before you do anything else, visually confirm the lever is parallel to the gas line. If you are not sure, look at the pipe direction and compare.
Mistake two: using the wrong replacement parts
Heatilator uses specific thermocouples and thermopiles for different model families. A universal thermocouple from a hardware store may physically fit, but the voltage output or thread pitch may be wrong. If the part does not match the factory spec, the pilot may still not stay lit, and now you have wasted time and money.
What to do instead: Look up your model number. It is stamped on a metal plate inside the control compartment, usually near the gas valve. Write it down.
Order parts specifically for that model from an authorized Heatilator distributor or directly from Hearth & Home Technologies. The extra five minutes of research saves you a return trip.
Mistake three: cleaning the pilot orifice with anything metal
A clogged pilot orifice is common, especially after a summer of inactivity. Spiders and dust love those tiny openings. We have heard too many stories of someone poking the orifice with a paperclip or pin, widening the hole, and ruining the flame pattern.
A damaged orifice cannot be repaired. You have to replace the entire pilot assembly.
What to do instead: Use compressed air or a can of electronics cleaner. If you must use a tool, use a soft nylon brush or a purpose-built orifice cleaning tool. Never insert a metal object into the opening.
Mistake four: ignoring the glass seal
When you remove the glass panel to access the pilot or logs, the gasket that seals the glass to the fireplace body can get damaged. If that gasket is torn or missing, the fireplace pulls excess air from the room instead of from the outside. That changes the combustion balance.
The flames turn yellow, soot builds up on the glass, and carbon monoxide levels can rise.
What to do instead: Inspect the gasket every time you remove the glass. If it shows cracks, compression marks that don't spring back, or missing chunks, replace the gasket before you fire the unit up. Heatilator sells replacement gasket kits by model.
Mistake five: adjusting the air shutter without understanding the effect
Some Heatilator models have an adjustable air shutter that controls the mix of combustion air and gas. If you adjust it to get a "prettier" flame, you can easily create a dangerous imbalance. Too much air makes the flame lift off the burner.
Too little air creates soot and carbon monoxide.
What to do instead: Leave the air shutter at the factory setting unless you have a combustion analyzer and know what you are doing. If you suspect the air shutter is out of adjustment, call a technician.
Mistake six: skipping the gas leak test after reassembly
You replaced a thermocouple or pilot assembly. You buttoned everything up. You turn the gas back on and light the pilot.
Everything looks fine. But you never checked for leaks at the connections you disturbed. Even a tiny leak at a threaded fitting is dangerous over time.
What to do instead: Mix a small amount of dish soap with water in a spray bottle. After you turn the gas on, spray the solution on every connection you touched. If bubbles appear, you have a leak.
Tighten the fitting (or call a pro) before you run the fireplace.
Routine Maintenance That Prevents Most Problems
Here is the honest truth about Heatilator gas fireplaces. They are not high-maintenance machines, but they do need annual attention. The number one reason service calls happen in January is that the fireplace sat untouched all summer, and something got dirty, blocked, or corroded.
You can prevent nearly every issue by following a 30-minute maintenance routine once a year. Do it in the fall, before the heating season starts.
The annual maintenance checklist
- Inspect and clean the glass. Remove the glass panel. Clean both sides with a non-abrasive glass cleaner and a soft cloth. Do not use ammonia-based cleaners on ceramic glass. They can cause micro-crazing over time.
- Vacuum the control compartment. Dust and pet hair accumulate around the pilot assembly, thermopile, and gas valve. Use a soft brush attachment. Blow out the pilot area with compressed air.
- Check the logs for soot or cracks. Remove each ceramic log (note the placement order). Wipe off any soot with a dry cloth. If any log is cracked or crumbling, replace it. Damaged logs can block the burner ports and cause improper combustion.
- Inspect the vent system. Go outside and look at the vent termination cap. Make sure no debris, animal nests, or vegetation is blocking it. Inside, shine a flashlight up the vent (if accessible) and look for obstructions.
- Test the thermopile and thermocouple. Even if everything is working, measure the voltage values. If they are marginal, replace them now rather than waiting for a mid-winter failure.
- Replace remote batteries. Install fresh batteries in both the remote and the receiver module. Old batteries can leak and corrode the contacts.
- Run the fireplace for 30 minutes. After you finish maintenance, turn the fireplace on and let it run. Watch the flame pattern. Look for soot on the glass. Make sure the pilot stays lit. If anything looks wrong, you caught it in the fall, not during a cold snap.
Seasonal tips
- Spring shutdown. After the last cold night, clean the glass and vacuum the compartment. Turn off the gas supply to the fireplace (perpendicular) if you will not use it for months. This prevents accidental ignitions and keeps dust out of the pilot assembly.
- Before a power outage. If you have an IPI system with battery backup, make sure the batteries are fresh before storm season. A dead remote battery means no heat during a blackout.
- After a storm. Check the outside vent cap. Snow or fallen leaves can block it. Also check the area around the fireplace for water intrusion if the roof or chimney chase had damage.
The Real Cost: When to Call a Professional vs. When to DIY
We have walked you through a lot of fixes that are safe and reasonable for a homeowner. But there is a line. Crossing it turns a simple repair into a liability.
The question is, where is that line?
Here is a good rule of thumb. If the repair involves anything inside the gas valve body, anything inside the vent system that requires disassembly, or any electrical component on the main control board, bring in a pro. If the repair is external, and you can see the part and reach it with basic tools, you can probably do it yourself.
DIY friendly jobs (cost range: $0 to $60)
- Replacing thermocouple ($10, $20)
- Replacing thermopile ($15, $30)
- Cleaning pilot assembly ($0, just your time)
- Replacing batteries in remote and receiver ($0, $10)
- Cleaning the glass and logs ($0)
- Reseating a loose wire connection ($0)
- Replacing the remote receiver module ($50, $80)
Professional territory (cost range: $150 to $600)
- Replacing the gas valve ($300, $600)
- Replacing the igniter module or control board ($200, $400)
- Replacing the pilot assembly complete ($200, $350)
- Any vent system repair or modification ($250, $800)
- Gas line leak repair (varies, usually $150, $400)
- Air shutter adjustment with combustion analysis ($150, $250)
- Annual professional inspection ($100, $200, recommended even if you DIY basic maintenance)
What a typical service call covers
When you call a certified technician, they will do a full system check that goes beyond what most homeowners can do. They have tools like manometers to measure gas pressure and combustion analyzers to check CO levels. They also carry parts for multiple model years.
A standard visit runs $100 to $200 for the diagnostic fee, plus parts and labor. Most jobs land between $200 and $400 total. That is not cheap, but it is far less expensive than emergency service on a holiday weekend or replacing a ruined gas valve.
Decision guide: call or fix it yourself
| Your symptoms | DIY? | Call a pro? |
|---|---|---|
| Pilot won't stay lit | Yes — replace thermocouple | If voltage test shows good but pilot still dies |
| Main burner won't fire | Yes — test thermopile first | If thermopile reads fine and burner still doesn't fire |
| No spark, no click | Yes — check batteries and clean electrode | If electrode is clean and batteries are fresh |
| Gas smell | No — leave the house | Immediately |
| Yellow flames, soot, or black glass | No — could be air shutter or vent blockage | Yes |
| Fireplace runs then shuts off | Yes — check vent cap and clean flame sensor | If both are fine |
Frequently Asked Questions About Heatilator Troubleshooting
How do I find my Heatilator model number?
Look inside the control compartment. The model number is stamped on a metal plate, usually near the gas valve or on the left wall of the firebox. Write it down before you order any parts.
The serial number is also there and helps identify the manufacturing year.
Why does my Heatilator pilot light but the main burner doesn't fire?
The most common cause is a weak thermopile. Measure the voltage at the TP and TP-TH terminals. If it reads below 200 millivolts after the pilot has been on for three minutes, replace the thermopile.
Another possibility is a faulty wall switch or remote.
Can I replace a thermocouple myself?
Yes, you can. Turn off the gas. Remove the old thermocouple by unscrewing the nut at the gas valve and pulling the tip out of the pilot bracket.
Install the new one in reverse order. Use a small wrench to tighten the nut snug, not hard. Light the pilot and test it.
How often should I service my Heatilator gas fireplace?
Once per year, before the heating season. Clean the glass, vacuum the control area, inspect the logs, and check the vent termination outside. Test the thermopile and thermocouple voltage.
Replace the remote batteries.
What does it mean if my fireplace flame is yellow instead of blue?
A yellow flame on a gas fireplace indicates incomplete combustion. Possible causes include a blocked vent, a dirty burner, a misaligned air shutter, or damaged logs. Do not run the fireplace until the issue is resolved.
Yellow flames produce more soot and carbon monoxide.
My Heatilator remote stopped working. What should I check first?
Replace the batteries in both the remote and the receiver module. If it still does not work, resync the remote by following the pairing instructions in your owner's manual. If that fails, the receiver module may need replacement.
Is it safe to run a Heatilator fireplace with a cracked glass panel?
No. Do not operate the fireplace until the glass is replaced. A crack can expand under heat, and the glass can shatter.
The glass also provides the seal that keeps combustion gases from entering your home. Order a replacement glass assembly from an authorized dealer.
How long do Heatilator parts typically last?
A thermocouple usually lasts 3 to 5 years. A thermopile lasts 5 to 7 years. The gas valve can last 15 to 20 years.
Control modules and remote receivers typically last 5 to 10 years. Regular cleaning extends the life of all these components.
Should I turn off the gas to my fireplace in the summer?
It is a good practice. Turning the gas supply off prevents accidental operation and keeps dust out of the pilot assembly during the months you are not using it. Just remember to turn it back on in the fall before you light the pilot.
What warranty does Heatilator offer on its gas fireplaces?
Heatilator provides a limited lifetime warranty on the firebox and heat exchanger for the original homeowner, and a 5-year warranty on most components like the gas valve, burner, and logs. The warranty is transferable but with reduced coverage. Check your owner's manual for the exact terms for your model.

Similar Posts