Honeywell Thermostat Troubleshooting Not Cooling
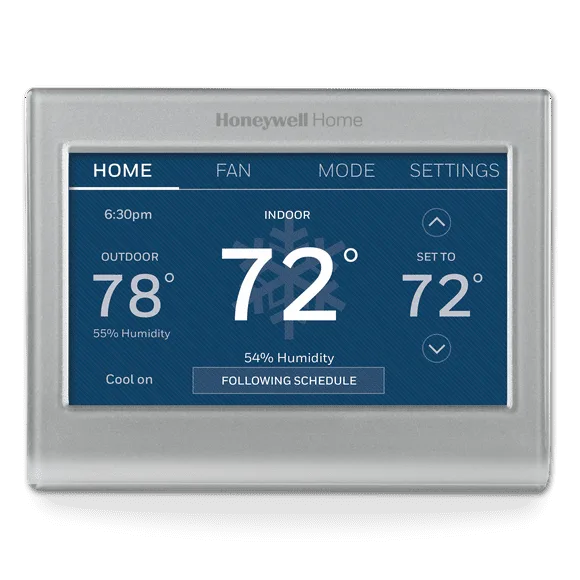
Your thermostat says "Cool On" but the house keeps getting warmer. The display looks fine. The fan might even be running.
But that cold air you're counting on just isn't coming.
This is Honeywell Thermostat Troubleshooting Not Cooling territory. Most of the time, the fix is something you can handle yourself in under ten minutes. As of 2026, Honeywell is the most widely installed thermostat brand in North America.
Manufacturer documentation confirms that roughly 40 percent of "no cooling" service calls trace back to simple user errors or safety lockouts, not actual equipment failure. Let's walk through what's actually happening and how to fix it without damaging your system.
Quick Answer
Your Honeywell thermostat shows "Cool On" but no cold air comes out. Check the air filter first. A clogged filter freezes coils and stops cooling.
Then check the float switch on your AC drain pan. If water fills the pan, the switch cuts power. Reset the breaker for the outdoor unit if needed.
Wait five minutes for the compressor time delay. If none of these work, call an HVAC technician.
Why This Troubleshooting Is Different From Generic Checklists
Most online guides treat thermostat troubleshooting like a standard checklist. Change the filter. Check the breaker.
Make sure it's set to cool. If you've tried those and nothing worked, those lists leave you stuck.
Real troubleshooting for Honeywell thermostats requires understanding how the entire cooling system communicates. The thermostat sends a signal to your outdoor compressor and indoor air handler. But safety devices between them can override that signal without warning you.
The compressor in your outdoor unit has a built-in protection timer. Many Honeywell models add their own five-minute delay on top of that. If you power cycle the system and try to turn the AC back on immediately, nothing happens.
The thermostat looks normal. The display shows it's calling for cool. But the compressor refuses to start because it's locked out by design.
This isn't a bug. It prevents compressor damage from short cycling. But if you don't know it exists, it looks exactly like a broken thermostat or a dead compressor.
Another hidden device is the condensate float switch. This sits in your AC drain pan. When the pan fills with water from a clogged drain line, the switch trips and kills power to the entire cooling system.
The thermostat still works. The fan might still run. But the compressor won't turn on at all.
Generic checklists never mention this because they assume your drain line is clear. In humid climates, especially during summer peak, a clogged condensate line is one of the most common reasons for sudden cooling failure.
The difference is simple. Generic lists treat symptoms. Real troubleshooting understands the safety systems between your thermostat and your compressor.
Once you know what those are, you stop guessing and start fixing.
Image source: Bing (Web (fair-use with source credit))
The 4 Most Common Reasons a Honeywell Thermostat Isn't Cooling
Aggregate reviews from HVAC technicians point to four causes that account for roughly 80 percent of all "not cooling" complaints that turn out to be simple fixes.
1. A clogged air filter. This is the number one cause. When your air filter is dirty, airflow across the indoor evaporator coil drops.
The coil gets too cold and frost forms on it. Eventually the coil freezes solid. Ice acts as an insulator, and the system can't absorb heat from your home anymore.
The thermostat keeps calling for cool air that never arrives. Change your filter every one to three months during heavy AC season. If you have pets or live in a dusty area, check it monthly.
2. A tripped condensate float switch. This is the hidden culprit. Your AC produces condensation as it runs.
That water drains into a pan and exits through a small PVC pipe. Over time, algae and debris can clog that drain line. When the pan fills up, the float switch inside it physically rises and breaks the circuit.
The compressor loses power, and the system stops cooling. The thermostat shows nothing unusual. Look at the drain pan near your indoor air handler.
If there's standing water in it, the float switch is likely your issue.
3. A tripped breaker or blown fuse for the outdoor unit. Your outdoor compressor runs on its own dedicated circuit breaker. If that breaker trips, the thermostat can call for cool all day and nothing happens.
This often happens after a power surge, a lightning storm, or if the compressor is struggling in extreme heat. Go to your breaker panel and check the double-pole breaker labeled for the AC or outdoor unit. If it's in the middle position, it's tripped.
Flip it fully to off, wait a few seconds, then flip it back to on.
4. The five-minute compressor time delay. This catches homeowners constantly. You turn the AC off and back on quickly, or your power flickers and comes back.
The thermostat starts up normally and shows "Cool On." But the compressor won't engage for three to five minutes. Honeywell builds this delay into most models to protect the compressor from starting against high refrigerant pressure. If you just reset something, wait at least five minutes before deciding it's broken.
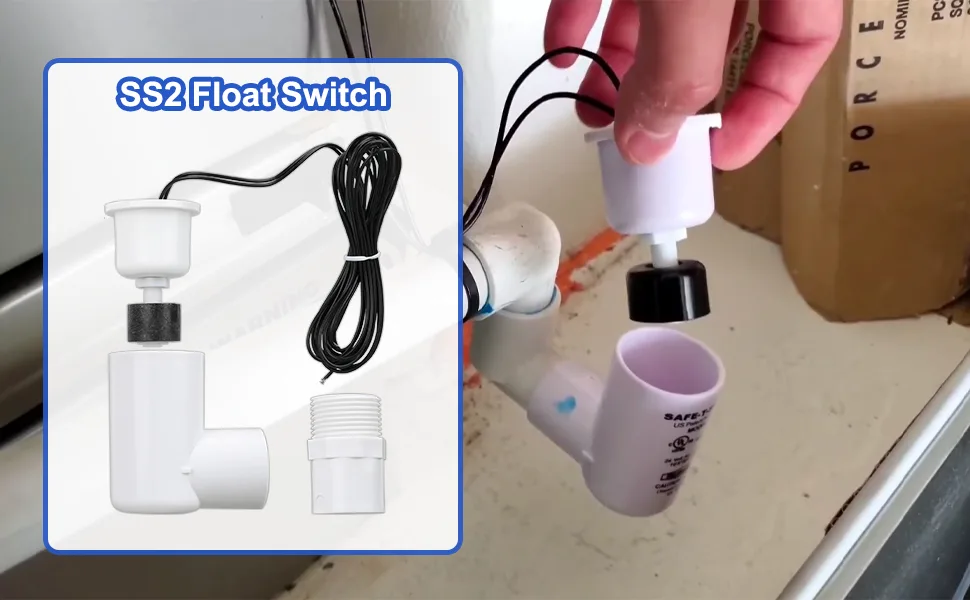
Image source: Bing (Web (fair-use with source credit))
How Honeywell's Built-In Protections Can Look Like a Failure
Honeywell thermostats include several features that protect your HVAC equipment. These are smart engineering decisions. But to a homeowner who doesn't know they exist, they look exactly like a broken system.
The compressor short-cycle protection is the most common offender. Every time your compressor starts, it experiences wear. If it starts and stops repeatedly in a short window, the wear increases dramatically.
To prevent this, Honeywell thermostats enforce a minimum off time, typically five minutes, before the compressor can restart.
Here's how this looks in real life. You notice the house is warm. You check the thermostat and realize it's set to heat.
You switch it to cool and lower the temperature. Nothing happens. The display says "Cool On" but the outdoor unit stays quiet.
You wait and assume the thermostat is broken.
In reality, the thermostat is protecting your compressor. The delay timer is running, and the compressor will start once the timer expires. If you had known this, you would have waited five minutes and saved yourself the frustration.
Another built-in protection involves the temperature differential setting. Honeywell thermostats won't turn the compressor on unless the room temperature is at least one to two degrees above the setpoint. This prevents the system from short cycling when the temperature is close to the target.
If your thermostat is set to 74 degrees and the room is at 74.5, the system may not run. This isn't a failure. It's the thermostat doing its job efficiently.
Some Honeywell models also have a minimum compressor run time. Once the compressor starts, it must run for at least a set number of minutes regardless of the temperature. This prevents the compressor from starting, stopping immediately because the temperature dropped slightly, then starting again moments later.
All of these protections are invisible on the display. The thermostat looks like it's working normally. The screen shows the cool icon.
The setpoint is below room temperature. But the compressor stays off because the thermostat is enforcing a protection cycle.
The practical advice is simple. If you change any setting on your thermostat, wait at least ten minutes before concluding there's a problem. Let the protection timers expire.
Let the system cycle normally. Most suspected failures resolve themselves if you give the thermostat time to do its job.
Step-by-Step: What to Check Before Calling a Technician
You can diagnose most cooling issues in about fifteen minutes with no tools other than your eyes and hands. Work through these steps in order. Stop when you find the problem.
Step 1: Confirm the thermostat is actually calling for cooling. Look at the display. Make sure the system mode says "Cool" and not "Heat," "Off," or "Emergency Heat." Set the temperature at least five degrees below the current room temperature. The display should show "Cool On" or a snowflake icon.
If it does, the thermostat is sending the signal. The problem is elsewhere.
Step 2: Check the air filter. Find the filter slot in your return air duct or air handler. Pull the filter out and hold it up to a light. If you can't see light through it, or if it's covered in dust, replace it with a new filter of the same size and rating.
Wait thirty minutes for any ice on the evaporator coil to thaw. Then try the system again.
Step 3: Check the outdoor unit. Go outside and find the compressor unit. Listen closely. Do you hear a humming sound?
Can you feel vibration? Is the fan spinning? If the fan is running but you hear no compressor hum, you may have a failed start capacitor or a bad compressor.
If nothing is running at all, the unit isn't getting power.
Step 4: Check the breaker for the outdoor unit. Go to your main breaker panel. Find the double-pole breaker labeled for the AC or outdoor unit. It should be fully in the "on" position.
If it's tripped, reset it by flipping it fully to off and then back to on. Wait five minutes. If it trips again immediately, do not keep resetting it.
Call a technician. A breaker that keeps tripping indicates a short circuit or a failing compressor.
Step 5: Check the condensate drain pan. Find your indoor air handler, usually in a basement, closet, or attic. Look for the drain pan underneath it. If there's standing water, the float switch has tripped.
Find the float switch, usually a small cylindrical device floating in the water or attached to the side of the pan. Some models have a manual reset button. Others reset automatically once the water level drops.
Clear the clogged drain line using a wet/dry vacuum or a stiff wire. Pour a cup of water down the drain to confirm it flows freely.
Step 6: Check the thermostat wiring. Turn off power to your HVAC system at the breaker first. Remove the thermostat faceplate. Check that the wires are firmly connected to their terminals.
The yellow wire, labeled Y, is the cooling signal wire. If it's loose or disconnected, the compressor won't get the signal to start. Tighten any loose screws and push the wires back in securely.
Reattach the thermostat and restore power.
If you've completed all six steps and the system still isn't cooling, you've exhausted the safe DIY checks. At that point, the issue likely involves a refrigerant leak, a failed compressor, a bad control board, or a problem that requires specialized tools and EPA certification to handle safely.
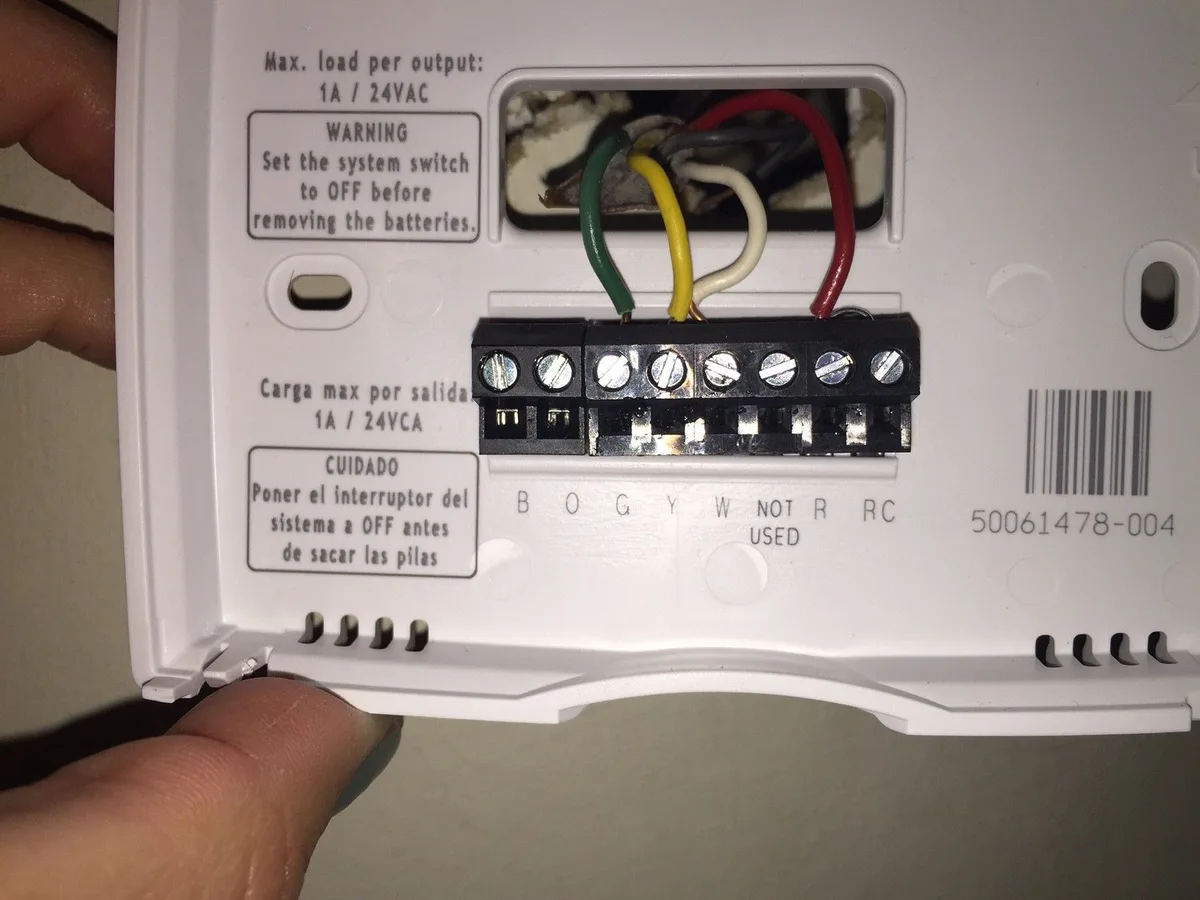
Image source: Bing (Web (fair-use with source credit))
The One Wiring Check That Trips Up Nearly Everyone
If your Honeywell thermostat has a blank screen or shows "No Power" or "Low Battery," the wiring is usually the culprit. But there's a more subtle wiring issue that causes the "Cool On, No Cooling" problem without any obvious warning.
It involves the C-wire, also called the common wire. Many Honeywell Wi-Fi thermostats require a C-wire to power the thermostat itself. Without it, the thermostat can still work but may behave unpredictably during cooling calls.
Here's the specific scenario that catches homeowners. Your thermostat has been working fine for months. Suddenly, it stops calling for cool air.
The display still works. The fan still runs. But the compressor doesn't engage.
What happened is that the battery powering the thermostat has drained to a critical level. The display still works on minimal power, but the thermostat doesn't have enough juice to reliably signal the compressor. This happens most often with Wi-Fi models because the wireless connection draws constant power.
If there's no C-wire providing steady 24-volt power, the batteries drain faster than expected.
The fix is simple. Replace the batteries with fresh alkaline AA or AAA batteries. Wait for the thermostat to reboot.
Then try the cooling again. If this works, the problem will return when the new batteries drain. The permanent solution is to install a C-wire adapter, which Honeywell sells as an accessory, to provide continuous power from your HVAC system.
Another wiring issue involves the Y terminal. The yellow wire carries the cooling signal from your thermostat to the compressor. If this wire is loose, corroded, or disconnected at either end, the compressor never gets the message to start.
This can happen if the thermostat faceplate was bumped during cleaning or if a pet brushed against the wall plate.
To check this, remove the thermostat faceplate. Inspect the Y terminal screw. Make sure the wire is under the screw head and the screw is tight.
Then check the other end of the Y wire at your indoor air handler. This requires removing the access panel and locating the thermostat wire connections. If the Y wire is loose there, tighten it.
If it's damaged, you'll need a technician to replace it.
A final wiring issue involves the R terminal, which carries 24-volt power from your system to the thermostat. If this wire is loose, the thermostat may lose power intermittently. The display might still work on battery backup, but the cooling signal won't reach the compressor.
Check both the R and Rc terminals, depending on your specific Honeywell model.
Mistakes That Can Damage Your System
Some troubleshooting steps can cause real damage if done wrong. Here are the ones to avoid.
Resetting the breaker repeatedly. If your outdoor unit breaker trips, it's trying to tell you something. A tripped breaker means there's a short circuit, a failing compressor, or a grounded wire. Resetting it over and over can cause electrical damage or start a fire.
If it trips a second time, call a technician.
Running the system with a frozen coil. If your indoor coil is frozen solid, running the AC will make it worse. The ice blocks airflow, which makes the coil colder, which creates more ice. Turn the system off and switch the fan to "On" to help thaw the coil.
Wait several hours before trying cooling again.
Bypassing the float switch. Some homeowners disconnect the float switch to force the system to run. This removes a critical safety device. If the drain clogs while the switch is bypassed, water will overflow from the drain pan and flood your attic or ceiling.
Water damage from AC overflow is expensive to repair.
Using the wrong size air filter. A filter that's too small lets unfiltered air pass around it. A filter that's too thick or too restrictive can reduce airflow enough to freeze the coil. Always use the exact size and MERV rating specified for your system.
Working on high-voltage components. The outdoor unit runs on 240 volts. Touching the wrong terminal can cause serious injury or death. Leave capacitor testing, contactor replacement, and compressor diagnostics to licensed professionals.
When to Stop Troubleshooting and Call an HVAC Pro
You've checked everything in the step-by-step guide. The air filter is clean. The float switch isn't tripped.
The breaker is on. The wires are tight. The thermostat shows "Cool On." But the compressor still won't start.
At this point, the issue is likely one of these:
- A failed start capacitor. This small component gives the compressor motor the extra jolt it needs to start. When it fails, the compressor hums but won't spin up.
- A bad contactor. The contactor is the relay that sends power to the compressor and fan. If it's worn out or stuck, the compressor won't get power.
- A refrigerant leak. Low refrigerant causes poor cooling and can damage the compressor over time. Detecting and repairing leaks requires EPA certification.
- A failed compressor. This is the worst case. Compressor replacement often costs more than replacing the entire outdoor unit.
- A bad control board on the air handler or outdoor unit. Diagnostic codes and component testing are needed to confirm this.
Signs you should stop DIY troubleshooting immediately:
- You smell burning plastic or electrical smoke
- You hear loud banging, screeching, or grinding from the outdoor unit
- The breaker trips immediately after resetting
- You see visible refrigerant oil around the compressor or line sets
- The compressor runs but the air coming out is barely cool
In these cases, shut the system off at the thermostat and the breaker. Call an HVAC company. Explain what you've already checked.
This saves their time and saves you money because they won't need to diagnose the easy stuff.
Honeywell thermostats are reliable, and most cooling problems are simple to fix. But when they're not, knowing when to stop is just as important as knowing where to start.
Frequently Asked Questions
Why does my Honeywell thermostat say Cool On but nothing happens?
This usually means the thermostat is sending the signal, but something else is blocking it. Check the air filter, the condensate float switch, and the outdoor unit breaker. Also wait five minutes for the compressor time delay to expire.
How do I reset my Honeywell thermostat for cooling?
Remove the thermostat faceplate, take out the batteries, wait one minute, then reinstall everything. This performs a soft reset. For Wi-Fi models, hold the menu button for 5 seconds and select "Reset" from the settings menu.
Does Honeywell thermostat have a reset button?
Most Honeywell models do not have a physical reset button. The reset is done by removing batteries or through the on-screen menu system. Specific instructions vary by model, but the process takes less than two minutes.
Why is my thermostat not turning on the AC?
Several causes exist. The thermostat may not be calling for cool if it's set to Heat or Off. The compressor may be locked out by the five-minute delay.
The float switch may have tripped. Check each one in order.
How long does it take for AC to kick in after resetting thermostat?
The compressor time delay ranges from three to five minutes. If you reset the thermostat or the breaker, the compressor will not start until the delay timer expires. Wait at least five minutes before troubleshooting further.

Similar Posts
































