How to Set Underwater Camera White Balance
That greenish-blue tint on every single photo. The coral that should be orange comes out brown. Your dive buddy's skin looks like a Smurf.
You've been there.
If you do not know how to set underwater camera white balance before you drop below the surface, your camera's auto white balance will fail you. It was designed for full-spectrum light on land. Water is a completely different animal.
Water absorbs color selectively. Red light disappears first. Then orange.
Then yellow. Per NOAA ocean optics research, red wavelengths drop to nearly zero at roughly 15 feet (4.5 meters) in clear tropical water. By 30 feet, you are shooting in a blue-green world.
Your camera needs a manual override to see what your eyes cannot. Let's fix that.
Quick Answer
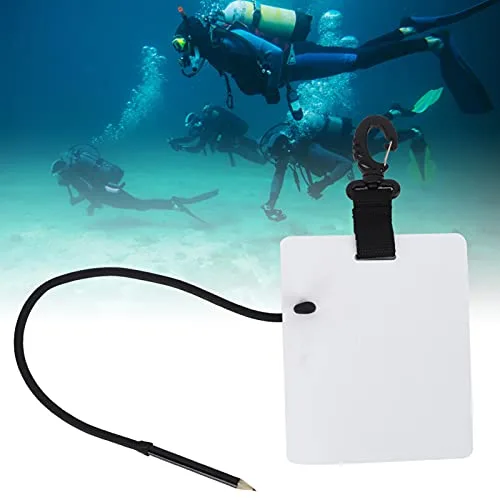
Place a white reference target at the same depth and light as your subject. Fill the frame with the target. Select the custom white balance option in your camera menu.
Confirm the reading. The camera stores that color reference for consistent shots.
Image source: Web (Bing) / bigamart.com (Web image (fair-use with source credit))
Why White Balance Falls Apart Underwater
Your camera's auto white balance guesses the color of the light in the scene. On land, that works fine. The sun delivers full-spectrum light.
The camera sees a white wall, knows it should be white, and adjusts everything else around it.
Underwater, the game changes completely.
Water acts as a physical color filter. It absorbs long wavelengths (red and orange) much faster than short wavelengths (blue and green). The deeper you go, the more red light gets stripped away.
Your camera sees a blue world and tries to add more blue to compensate. That makes the problem worse.
Here is what happens at different depths in clear water.
| Depth | Colors Absorbed | What the Camera Sees |
|---|---|---|
| Surface | None | Full natural color |
| 5–10 feet | Some red | Slightly cool, still usable |
| 10–20 feet | Most red, some orange | Noticeable blue-green cast |
| 20–40 feet | All red, most orange | Heavy blue-green cast |
| 40+ feet | Red, orange, yellow | Deep blue, almost monochrome |
The result is a strong color cast that your camera's auto white balance cannot fix. It does not have a reference point for what "white" should look like in that environment. Setting a custom white balance gives it that reference point.
This is not a camera quality issue. It is a physics issue. Even the most expensive underwater housing and camera body will produce blue images without a manual white balance adjustment.
Testing your equipment before each dive helps catch these issues early. The process is similar to how you would test any camera setup for challenging environments, from dim forests to bright snow fields.
Your White Balance Toolkit — What You'll Need
You do not need much gear to get accurate white balance underwater. But you do need the right tools. Here is what works.
A white reference target. This is the most important piece of gear. A white slate designed for underwater use is ideal. It is made of matte, non-absorbent material that does not change color when wet.
A standard white PVC cutting board works in a pinch. An 18 percent grey card also works, but it is harder to find a perfect "white" reference in the camera's menu. Manufacturer specifications indicate that the target should be large enough to fill the camera's frame from arm's length.
A 4×6 inch slate is usually sufficient.
Your camera's custom white balance menu. Every modern underwater camera has this feature. It is usually labeled "Custom WB," "Manual WB," or "PRE" (for preset). You need to know where this menu lives before you get in the water.
Fumbling with menu buttons while wearing dive gloves is frustrating. Practice on land first.
A dive slate or backup reference. If you drop your white slate, you need a backup. A piece of white dive slate or even a clean white plastic card works. Anything that is matte white and does not reflect shiny highlights will do.
Optional: a color correction filter. Some underwater photographers use a magenta or red filter on the lens or housing port. This filter physically adds red light back into the image before it reaches the sensor. It works well with custom white balance, but it is not a replacement for setting a proper reference.
We cover when to use filters later.
Image source: Web (Bing) / barberbazaar.com.au (Web image (fair-use with source credit))
Keep your white slate attached to your housing with a short lanyard. Dropping a reference target at 60 feet is a fast way to lose it. Saltwater can also corrode the housing buttons.
Rinsing and cleaning the housing after each dive extends the life of your equipment.
How to Set Custom White Balance Underwater (Step by Step)
This process works for most DSLR, mirrorless, and compact cameras that support custom white balance. Action cameras like GoPros have a different method, which we cover in the FAQ.
Step 1: Set your exposure first. Before you set white balance, get your aperture, shutter speed, and ISO where you want them. The white balance reference shot should be exposed correctly. If it is too dark or too bright, the camera may not read the color accurately.
Step 2: Position your white reference target. Hold the white slate at the same depth and distance as your subject. It should be in the same light. If you are shooting in open water, point the target toward the surface.
If you are using strobes, position the target so it receives the same strobe light as your subject.
Step 3: Fill the frame with the target. The white slate must fill the entire frame. No background, no shadows, no fingers. The camera needs to see only the white surface to measure the color temperature accurately.
Step 4: Navigate to the custom white balance menu. This step varies by camera brand. On most cameras, you press the WB button, scroll to the custom setting (often labeled "PRE" or "Custom"), and press the shutter button to take the reference shot. The camera will display "OK" or "Data Acquired" if it reads the reference correctly.
Step 5: Confirm and apply the setting. The camera stores the color temperature reading. You now have a custom white balance that is calibrated to that specific depth and light condition. Take a test shot of your subject to verify the colors look natural.
Step 6: Reset if you change depth. If you move 10 feet deeper or shallower, the color cast changes. You need to repeat the process. A custom white balance set at 20 feet will not work correctly at 40 feet.
Here is a quick reference table for the key steps.
| Step | Action | Key Detail |
|---|---|---|
| 1 | Set exposure | Correctly exposed reference |
| 2 | Position target | Same depth and light as subject |
| 3 | Fill the frame | No background, no shadows |
| 4 | Take reference shot | Camera stores the color data |
| 5 | Confirm and test | Check a test shot of your subject |
| 6 | Reset at new depth | Repeat for each major depth change |
The whole process takes about 30 to 60 seconds per depth. That is time well spent when you consider how much color correction you save in post-processing. Managing battery drain is also worth noting.
Live view eats power faster than normal shooting. Bring a spare battery for long dives.
The Visual Guide — What Correct White Balance Looks Like
This is where the visual side of the topic matters most. You need to know what "right" looks like underwater. It is different from what looks right on land.
A properly white-balanced underwater image has neutral whites. The white sand on the ocean floor should look white. Not blue.
Not green. The white parts of a clownfish should be white. The reds and oranges in coral should look warm and natural.
Here is what to look for in your test shots.
Neutral gray areas. Look at any gray or white areas in the frame. Reef, sand, or the bottom of a boat. If they look blue or green, your white balance is off.
If they look neutral, you are close.
Skin tones. Human skin is the most forgiving test. Your dive buddy's face should look natural. Not too blue.
Not too orange. Slightly warm is better than slightly cool for most underwater scenes.
Red and orange objects. If the coral is supposed to be orange and it comes out brown, you need more warmth. If the red fish is purple, you have lost the red channel. These are signs that your white balance is too cool.
Comparison to a known reference. If you have a white slate in one shot and not in another, compare the two. The shot with the slate should look noticeably more natural. That is the difference a custom white balance makes.
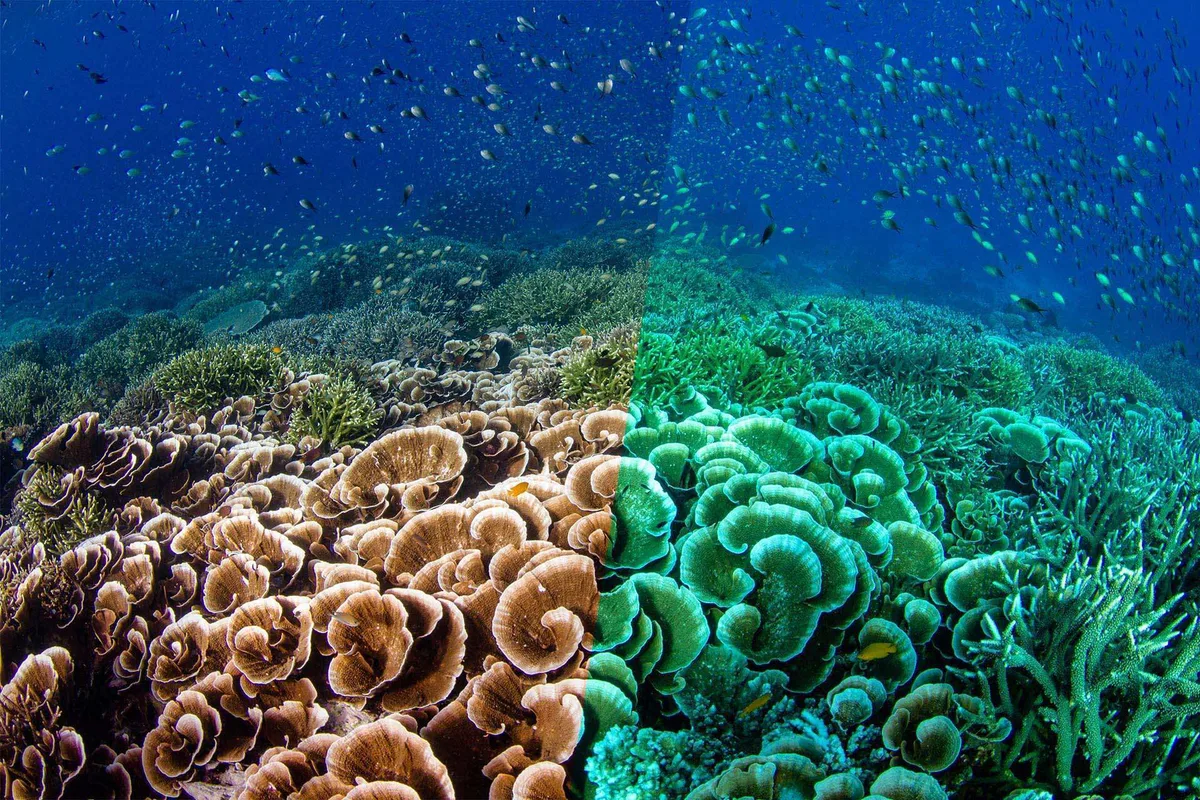
Image source: Bing (Web (fair-use with source credit))
If you are shooting in RAW format, you can adjust white balance in post-processing. But getting it right in the camera gives you a better starting point and saves editing time. It also means your JPEG images look good straight out of the camera.
That is useful for sharing on the boat or with dive buddies.
Common Mistakes That Ruin Underwater Color
Even experienced underwater photographers make these errors. Here are the most common ones and how to avoid them.
Using the reference target at the wrong depth. You hold the white slate at the surface and set the white balance. Then you descend to 30 feet and shoot. The white balance is wrong because the color cast changed during the descent.
Always set the white balance at the depth where you are shooting.
Letting shadows fall on the target. Your hand, your camera housing, or a nearby fish casts a shadow on the white slate. The camera reads the shadow as "dark gray" and adjusts the color balance incorrectly. Hold the target in open light.
Not filling the frame completely. You hold the white slate at arm's length and the background water shows up in the frame. The camera reads the blue water and the white slate together. It cannot tell which is the reference.
Fill the frame completely with the target.
Forgetting to reset after a depth change. You set a perfect white balance at 15 feet. Then you swim down to 40 feet to see a wreck. The color cast is completely different.
Your white balance is now wrong. Repeat the process at each major depth change.
Relying on auto white balance. Some cameras have an "Underwater" preset mode. These presets are a one-size-fits-all solution. They work for a specific average condition, but they cannot match a custom white balance for accuracy.
Aggregated user reviews of the Underwater preset mode across multiple camera brands show that it produces warm results in some conditions and cool results in others. You are better off with a custom setting.
Using the wrong reference material. A shiny white card reflects light and creates a hot spot. The camera reads that hot spot as pure white when it is actually overexposed. Use a matte, non-reflective target.
A glossy white slate is worse than no slate at all.
If your white balance is still off after following these steps, run a quick troubleshooting checklist. Check that the target is clean. Check that you are in the right menu.
Check that the target is filling the frame. These simple checks solve most issues.
When to Skip Custom White Balance
Custom white balance is not always the right move. Here is when you should skip it.
You are shooting with strobes as your primary light source. Strobes deliver full-spectrum light at close range. They restore red and orange to the scene. In that case, setting white balance for the ambient light can actually hurt.
The strobe-lit areas will look correct, but the background will shift. Set your white balance to a fixed Kelvin value around 5000K instead. That matches most strobe color temperatures.
You are shooting in extremely shallow water. At depths of 3 feet or less, there is very little color loss. Auto white balance often works well here. Custom white balance is overkill.
You plan to edit every shot in RAW later. RAW files store all sensor data. You can adjust white balance in post without quality loss. If you have the time and software, skip the in-camera custom WB and shoot RAW.
Just make sure you shoot a grey or white reference card at each depth so you have a target to match during editing.
Your camera lacks a custom white balance option. Some compact cameras and action cameras do not support custom WB. In that case, use the Underwater preset, or a color correction filter on the lens. For action cams like GoPro, many models let you lock the white balance to a fixed value using a third-party app or firmware hack.
You have very limited dive time. If you are on a deep wreck with a short bottom time, spend your seconds shooting subjects, not calibrating. A slightly blue image is better than missing the shot. Fix the color in post.
The key takeaway is simple. Custom white balance is a powerful tool. But it is not mandatory for every situation.
Match your method to your dive plan.
Frequently Asked Questions
Can I use a grey card instead of a white slate?
Yes. An 18 percent grey card works the same way. The camera reads the grey as a neutral reference and adjusts color accordingly.
The only catch is that grey cards can be harder for the camera to lock onto in low light. White is more forgiving.
Do I need to set white balance for every single dive?
Not necessarily. If you dive the same site at the same depth with similar water clarity, the color cast is consistent. Set it once and reuse the same setting.
Just confirm the color looks natural in a test shot at depth.
How does white balance work underwater video?
The same principle applies. Custom white balance works for video too. Most cameras let you lock white balance before recording.
The setting stays active for the entire clip. If you change depth mid-shot, the color shifts with it. Plan your depth carefully.
What Kelvin value should I start with if I am setting it manually?
Start at 5500K for shallow water (0-10 feet). Go to 6500K at 10-20 feet. Push to 7500K or higher at 20-40 feet.
These are starting points. Adjust based on your test shots. Keep a small dive slate with these values written down.
Can I fix white balance in post-processing if I shoot RAW?
Yes. RAW files let you adjust white balance non-destructively. Use the white balance eyedropper tool in Lightroom or Capture One.
Click on a neutral gray area in the image. The software corrects the color. This is a solid backup plan if you forget to set custom WB on a dive.

Similar Posts
































