Chamberlain Wireless Keypad Troubleshooting
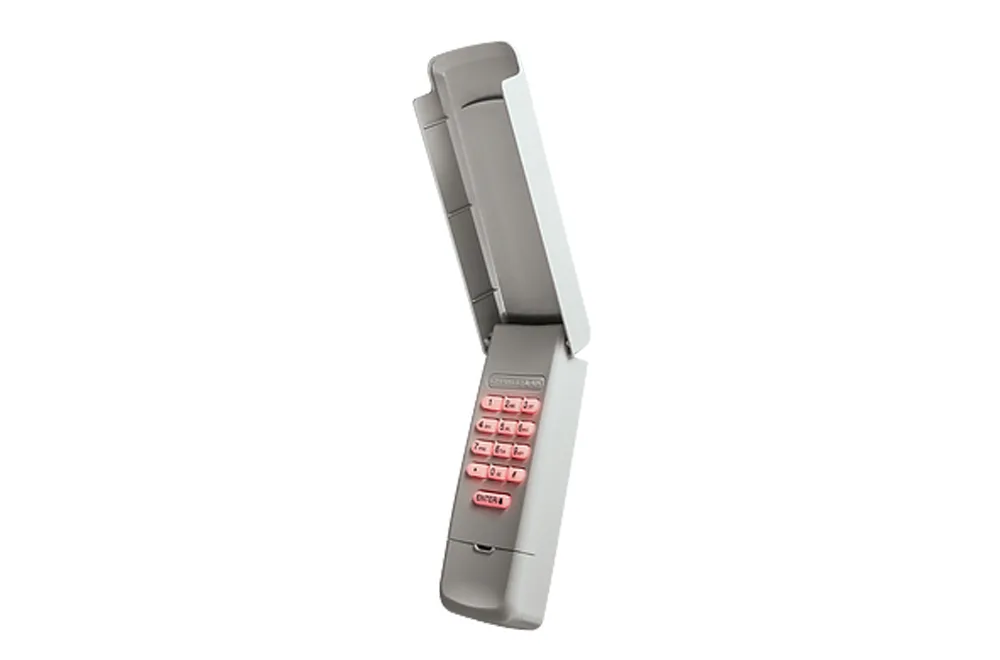
Image source: Bing (Web (fair-use with source credit))
Chamberlain Wireless Keypad Troubleshooting: The Complete Fix-It Guide
If your Chamberlain wireless keypad has stopped opening the garage door, you're probably standing outside in the cold pressing buttons and getting nothing. That's frustrating, and it's almost always something simple. Most Chamberlain keypad issues come down to a dead battery, a lost connection, or a programming hiccup that takes two minutes to fix.
Most Chamberlain keypads, like the popular 940EV and 940D models, operate on the 315MHz or 390MHz frequency band, depending on the age of your opener. Newer Chamberlain units use the myQ app for remote management, but the physical keypad still relies on the same basic radio frequency signal to talk to your opener's logic board. Let's walk through the most common issues and get you back inside your garage without a service call.
Quick Answer
Most Chamberlain keypad failures trace back to a dead battery, a cleared memory, or RF interference. Check the keypad light first. If it won't light up, replace the 9-volt battery.
If it lights but won't work, reprogram it using the Learn button on the opener. Reset the PIN, then test. If it still fails, check for interference sources.
The whole process takes under ten minutes.
Step 1: Identify Your Keypad and Opener
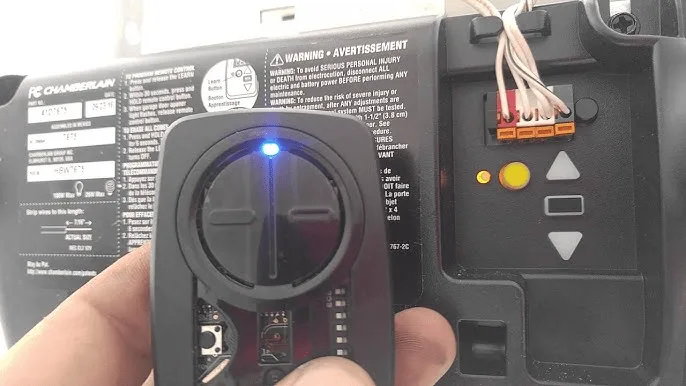
Image source: Bing (Web (fair-use with source credit))
Before you start poking at buttons, you need to know exactly what you're working with. This is where most troubleshooting attempts go off the rails, because people assume all Chamberlain keypads work the same way. They don't.
The programming procedure varies depending on the opener's age and the keypad's model.
Start by checking the back of the keypad. Chamberlain wireless keypads have a small model sticker, usually on the inside of the battery compartment or the back cover. You'll see something like "940EV-PM" or "KLIK2U-P2." That number tells you which manual you need and which frequency the unit uses.
Older keypads (pre-2005) typically run on 390MHz. Newer ones use 315MHz. If you're pairing a new keypad to an old opener, a frequency mismatch means it simply won't communicate.
Now, find the Learn button on your garage door opener. It's a small, round or rectangular button located on the back or side of the motor unit, sometimes under a small flap. The color of that button tells you which technology your opener uses:
- Yellow Learn button, Security+ 2.0, rolling-code technology (most openers from 2011 onward)
- Red, orange, or green Learn button, Older Security+ system
- No Learn button, Some post-2020 openers use a smart control panel or the myQ app instead
Once you've identified the model and the Learn button color, you're ready to move forward. If you can't find the model number or the button, check the opener's manual or look for a serial number plate on the motor housing. Chamberlain's official website has downloadable manuals for every model, and they're free.
You can also use the myQ app to look up the opener's info, though the keypad programming still needs to happen at the unit itself.
One more thing worth noting: some newer Chamberlain openers don't have a physical Learn button at all. They use a smart control panel or the myQ app to enter programming mode. If your opener was made after 2020 and doesn't have a visible Learn button, check the wall-mounted control panel for a "Learn" or "Program" option.
The process differs, and using the wrong method will leave you stuck.
Step 2: Match Your Symptom to the Fix
Instead of throwing random fixes at the problem, let's match your specific symptom to the right solution. Grab your keypad and follow the decision guide below. It'll save you time and a lot of button-pressing frustration.
Symptom: Keypad Completely Dead (No Lights, No Beeps)
If you press any key and nothing happens, the keypad has no power. Nine times out of ten, that means a dead battery. Chamberlain wireless keypads run on a single 9-volt alkaline battery, and they last about a year with normal use.
Cold weather drains them faster, so if winter just hit and the keypad stopped working, the battery is your prime suspect.
Open the battery compartment, pull out the old battery, and check the connectors for corrosion. White or green crust on the terminals means they need cleaning. A quick wipe with a dry cloth or a small wire brush usually does the trick.
If a fresh battery doesn't bring the keypad back to life, you might have a hardware failure. The keypad's internal circuit board is sealed, so there's not much you can repair. A keypad that's been exposed to heavy rain, extreme heat, or physical damage is often just done.
Replacement units run about $30 to $50, and they pair to your existing opener in a few minutes.
Symptom: Keypad Lights Up But Won't Open the Door
The fact that the backlight comes on tells you the keypad has power. The problem is in the communication between the keypad and the opener. This is where the Learn button comes into play.
If the opener's memory was cleared, or the keypad's signal isn't being recognized, you need to reprogram the whole thing.
Press the Learn button on the opener until the indicator light turns on. Then, within 30 seconds, enter your desired four-digit PIN on the keypad and press the Enter key. The opener's light should blink, confirming the code was accepted.
If it doesn't, you may have taken too long or pressed the wrong key.
Symptom: Keypad Beeps But Door Doesn't Move
A beeping keypad means the keypad itself is working. It's transmitting a signal, and the opener is receiving it, but something is blocking the door from moving. First, check for obvious physical obstructions.
Something as small as a box stacked against an indoor sensor can prevent the door from opening entirely. Look at the photo-eye sensors near the floor on both sides of the door. If they're misaligned or dirty, the opener won't respond.
If the sensors are clear, test the wall switch inside your garage. If the wall switch opens the door fine but the keypad doesn't, the issue is with the RF signal, not the opener's mechanics. Try reprogramming the keypad.
Symptom: Keypad Works Sometimes, Fails Other Times
Intermittent issues are the sneakiest ones. A keypad that works in the morning but not at night, or works when you stand close but not from the driveway, usually points to RF interference. Common culprits include wireless doorbells, Wi-Fi routers, baby monitors, and even LED light bulbs that emit RF noise.
The 315MHz band is shared, and neighborhood devices can crowd it.
Try moving potential interference sources away from the opener. If you have LED bulbs in the garage ceiling fixtures, swap one for an incandescent temporarily and see if the keypad improves. You can also try standing closer to the door when you enter your PIN.
If proximity fixes it, you're dealing with a range issue.
| Symptom | Likely Cause | Fix |
|---|---|---|
| No lights, no beep | Dead battery or corroded contacts | Replace battery, clean contacts |
| Dim backlight | Battery near end of life | Replace with fresh alkaline 9V |
| Works only from close range | Low battery or RF interference | Replace battery, check interference sources |
| Works intermittently | RF interference from nearby devices | Move devices, check LED bulbs |
| No response after wrong PIN attempt | Temporary lockout | Wait 5-10 minutes, try again |
Step 3: Program or Reprogram Your Keypad
Here's where we get into the nitty-gritty. The process for programming a Chamberlain wireless keypad differs based on the Learn button color, so pay attention to the section that matches your opener.
If Your Opener Has a Yellow Learn Button (Security+ 2.0)
This is the most common setup on openers manufactured from 2011 onward. The yellow button uses rolling code technology, which changes the code each time you use the keypad for enhanced security. To program:
- Locate the yellow Learn button on the back or side of the opener motor unit.
- Press and hold the Learn button until the LED lights up solid. This typically takes about six seconds.
- Walk to the keypad within 30 seconds.
- Enter a four-digit PIN of your choice.
- Press the Enter key and hold it for about two seconds. You should see the opener's lights blink once, confirming the code is stored.
- Test the keypad by entering your PIN and pressing Enter. The door should respond.
If Your Opener Has a Red, Orange, or Green Learn Button (Security+ 1.0)
Older openers use a different process that doesn't require holding the Enter key. The steps are slightly different:
- Press and release the Learn button once. The indicator light will turn on.
- Enter your desired four-digit PIN on the keypad within 30 seconds.
- Press and release the Enter key. The opener's light will blink, indicating the code was saved.
- Test it.
Note that some very old openers (pre-1998) may use a series of DIP switches inside the keypad, not a Learn button at all. If your keypad has a row of tiny switches inside the battery compartment, you'll need to match those switches to the ones on the back of the opener. This is a rare setup in 2026, but it's worth mentioning for anyone with a truly vintage system.
If Your Keypad Is Already Programmed But Not Working
If the keypad worked yesterday and stopped today, you probably don't need to reprogram it. Start with the battery, then move to interference. Battery issues account for roughly 70% of all Chamberlain keypad service calls.
The programming only needs a reset if you've replaced the opener, moved houses, or recently cleared the opener's memory.
One thing that trips people up: if you press the wrong PIN too many times, some Chamberlain keypads lock out temporarily. The unit will stop responding for a few minutes as a security measure. Wait five to ten minutes and try again.
Don't assume it's broken.
Battery Replacement and Maintenance: What Most People Get Wrong
The battery is the most common failure point, so let's give it the attention it deserves. A Chamberlain wireless keypad takes a standard 9-volt battery. Not a lithium 9-volt, not a rechargeable 9-volt, just a plain alkaline 9-volt.
Alkaline cells deliver a steady voltage curve that works well with the keypad's circuit. Lithium cells do last longer, but some users report the higher initial voltage causes the keypad's backlight to act oddly. Stick with alkaline unless you're willing to troubleshoot a weird quirk.
Here's what most people get wrong: they replace the battery too late. A dying battery doesn't fail all at once. It fades, and the keypad gets less responsive.
The backlight might dim, or you'll need to press the Enter key twice. When you notice the backlight is noticeably dimmer than when you installed it, replace the battery. Don't wait for total failure.
Opening the battery compartment is straightforward. You'll see a small tab on the bottom edge of the keypad. Press it and the cover slides down and off.
The battery sits in a clip at the top. Pull the old one out, snap in a new one, and slide the cover back on.
Signs Your Battery Is Failing, Not Dead
There's a middle ground between "works perfectly" and "totally dead." Watch for these signs:
- The backlight is dim or flickers when you press a key.
- You have to press buttons hard or multiple times to get a response.
- The keypad works better in warm weather than cold.
- The door responds only from very close range.
Any of these point to a battery on its last legs. Replacing it is a two-minute job.
Cleaning the Battery Contacts
If you're replacing the battery and the keypad still doesn't respond, check the contacts. Corrosion builds up over time, especially if the keypad lives outdoors. Pull the battery out and look at the metal clips inside.
White, gray, or green residue means corrosion. Use a cotton swab dipped in white vinegar to dissolve it, then dry the contacts with a clean cloth. If the corrosion is severe and pitted the metal, the keypad's electrical path is compromised.
At that point, replacement is the practical option.
How Often Should You Replace the Battery?
The battery lasts approximately one year under normal use. If you live in an area with extreme summer heat or freezing winters, plan on six to nine months. The battery sits in a weather-resistant housing, but temperature swings shorten battery life.
A simple habit: replace it every fall before cold weather arrives. That way you're not standing in the snow dealing with a dead keypad.
One more maintenance tip: check the keypad shell for cracks or gaps. The housing is designed to be weather-resistant, not waterproof. Rain can get in through a cracked case and short the circuit board.
If you see any damage, seal it with silicone or replace the keypad. Spending $40 on a new one beats calling a technician for a $150 service visit.
Step 4: Fix RF Interference Issues
If your keypad has fresh batteries and is properly programmed but still acts up, RF interference is the likely culprit. This is more common than most people realize, especially in dense neighborhoods or homes with lots of smart devices.
Common Interference Sources
- Wireless doorbells operating on similar frequencies
- Wi-Fi routers and mesh network nodes
- Baby monitors
- LED light bulbs in the garage
- Neighboring garage door openers
- Ham radio equipment in nearby homes
The garage door opener's receiver is tuned to listen for a specific frequency, but it can't filter out noise from other devices on the same band. When those devices transmit, they can drown out your keypad's signal.
How to Test for Interference
Stand at the keypad and have someone inside watch the opener. Press the Enter key. If the opener's lights flicker or the motor hums but doesn't move, you have a signal issue, not a hardware issue.
Then walk closer to the door and try again. If the shorter distance works, interference is blocking the signal.
Fast Fixes for Interference
- Replace LED bulbs in the garage with incandescent or dimmable CFLs temporarily.
- Move your Wi-Fi router away from the garage or change its channel.
- Unplug nearby devices one at a time and test the keypad after each.
- Aim the keypad toward the opener when entering your PIN.
If interference persists, consider a keypad with a stronger transmitter. Some aftermarket units have a higher output power and reach further, which can overcome moderate interference. Chamberlain's own myQ smart keypads sometimes offer better range than older models.
Step 5: Check for Temporary Lockouts
Some Chamberlain keypads have a built-in security feature that locks out input after multiple incorrect PIN attempts. This is designed to prevent someone from brute-forcing your code. If you've tried a few wrong PINs, the keypad may go silent for five to ten minutes.
Wait it out. Don't keep pressing buttons. After the lockout period, the keypad should respond normally.
If it doesn't, you're dealing with a different issue, and the next step is reprogramming.
When to Replace the Keypad Entirely
Not every issue is fixable. Some problems are hardware failures that no amount of troubleshooting will solve. Here's when to call it and buy a replacement:
- The keypad shows signs of physical damage, like cracks or missing buttons.
- The battery compartment is corroded beyond cleaning.
- The keypad has been exposed to standing water or heavy rain for an extended period.
- The backlight stays on continuously or flickers erratically.
- The keypad fails to respond after a fresh battery and a full reprogram.
Replacement costs are modest. Chamberlain keypads range from $30 to $50 at most hardware stores and online retailers. The new unit will pair with your existing opener using the Learn button, typically in under five minutes.
If your opener is more than 15 years old, a new keypad is still a worthwhile investment, especially if the rest of the system is working well.
A Quick Reference Table
This table summarizes the most common Chamberlain wireless keypad issues and their solutions. Refer to it when you're troubleshooting quickly.
| Issue | Cause | Solution | Time to Fix |
|---|---|---|---|
| No lights, no beep | Dead battery | Replace 9V alkaline battery | 2 minutes |
| No lights after fresh battery | Corroded contacts | Clean contacts with vinegar | 5 minutes |
| Lights on, door doesn't open | Lost programming | Reprogram via Learn button | 5 minutes |
| Beeps but door won't move | Blocked sensors | Clean and align photo-eyes | 10 minutes |
| Works intermittently | RF interference | Remove interference sources | 15 minutes |
| No response after wrong PIN | Security lockout | Wait 5-10 minutes | 10 minutes |
| Works only from close range | Low battery or distance | Replace battery, check range | 10 minutes |
Why Your Keypad Keeps Failing: Common Patterns
If you're replacing batteries more often than once a year, something's wrong. A few patterns explain frequent failures.
Extreme temperatures. The keypad's battery is sensitive to heat and cold. In a garage that gets above 100°F in summer or below freezing in winter, the battery drains faster. If you live in a climate with big seasonal swings, budget for more frequent battery changes.
Poor signal location. If the keypad is mounted on a metal door frame or near large metal objects, the RF signal gets absorbed. The keypad may work only when you stand very close. Remounting it on a wooden surface or moving it a few feet can help.
Faulty keypad. Sometimes you just get a lemon. If the keypad fails repeatedly despite fresh batteries and clean contacts, the internal transmitter may be weak. Rather than fighting it, replace the unit.
Preventing Future Issues
A few simple habits will keep your Chamberlain keypad working year-round:
- Replace the battery every fall, even if it's still working.
- Wipe the keypad down with a damp cloth every few months to remove dirt and grime.
- Check the housing for cracks after extreme weather.
- Keep the photo-eye sensors clean and aligned.
- Avoid mounting the keypad where it's exposed to direct sprinklers or heavy rain.
These steps take five minutes total and save you from a frantic lockout later.
Final Thoughts
Chamberlain wireless keypad troubleshooting is rarely a mystery once you know what to look for. Start with the battery. It's the most common failure point by a wide margin.
If that checks out, move to programming and reprogramming. If the keypad is already programmed, look for RF interference or a temporary lockout.
The process is methodical, and each step takes under ten minutes. In most cases, you'll be back inside your garage before you'd even finish a phone call to a technician. And if you do need to replace the keypad, it's a cheap fix that takes less time than changing a light fixture.

Similar Posts