How To Fix Shin Splints
Shin splints have a way of making every step feel like a punishment. You're not alone in wondering how to fix shin splints before they wreck your entire training plan. The short version is this: you can fix them, but only if you stop treating the symptom and start addressing the cause.
Per the American College of Sports Medicine guidelines, shin splints account for roughly 15% of all running injuries. The research consistently shows that rest alone rarely solves the problem. What actually works is a targeted sequence of load management, strength work, and gradual return.
Let's walk through exactly how to do that.
Quick Answer
Shin splints fix with load management and strength. Rest for 3 to 7 days. Strengthen your calves and hips.
Fix your running form. Return to running slowly. Ice helps but does not heal.
Address the root cause or they will return. That is the whole process in a nutshell.
Why Getting This Right Matters
Shin splints are not just annoying. They are a warning signal from your body that something in your training load or mechanics is out of balance. Ignore that signal and you risk turning a manageable overuse injury into a stress fracture.
A stress fracture means six to eight weeks of zero running. The difference between the two is often just a matter of training decisions made early.
The stakes matter because shin splints are incredibly common. According to research published in the Journal of Orthopaedic & Sports Physical Therapy, medial tibial stress syndrome affects anywhere from 4% to 35% of runners depending on the population. Military recruits see even higher rates.
Most cases resolve completely with the right approach. The wrong approach, which usually means too much rest and not enough strength work, leads to a 60% recurrence rate within two years.
Shin splints are not a single condition. The term covers several different problems happening in the same general area. The most common is medial tibial stress syndrome, which involves inflammation where the calf muscles attach to the shin bone.
You can also have anterior shin splints, which affect the tibialis anterior muscle along the front of the shin. Sometimes what feels like shin splints is actually a bone stress reaction or early compartment syndrome. Getting the diagnosis right matters because each requires a slightly different fix.
As of 2026, the sports medicine consensus has shifted away from passive treatments like ice and ultrasound toward active solutions like strength training and gait modification. The evidence base is clear that loading the tissue appropriately is what actually drives healing.
What Shin Splints Actually Are (And What They Aren't)
Image source: Bing (Web (fair-use with source credit))
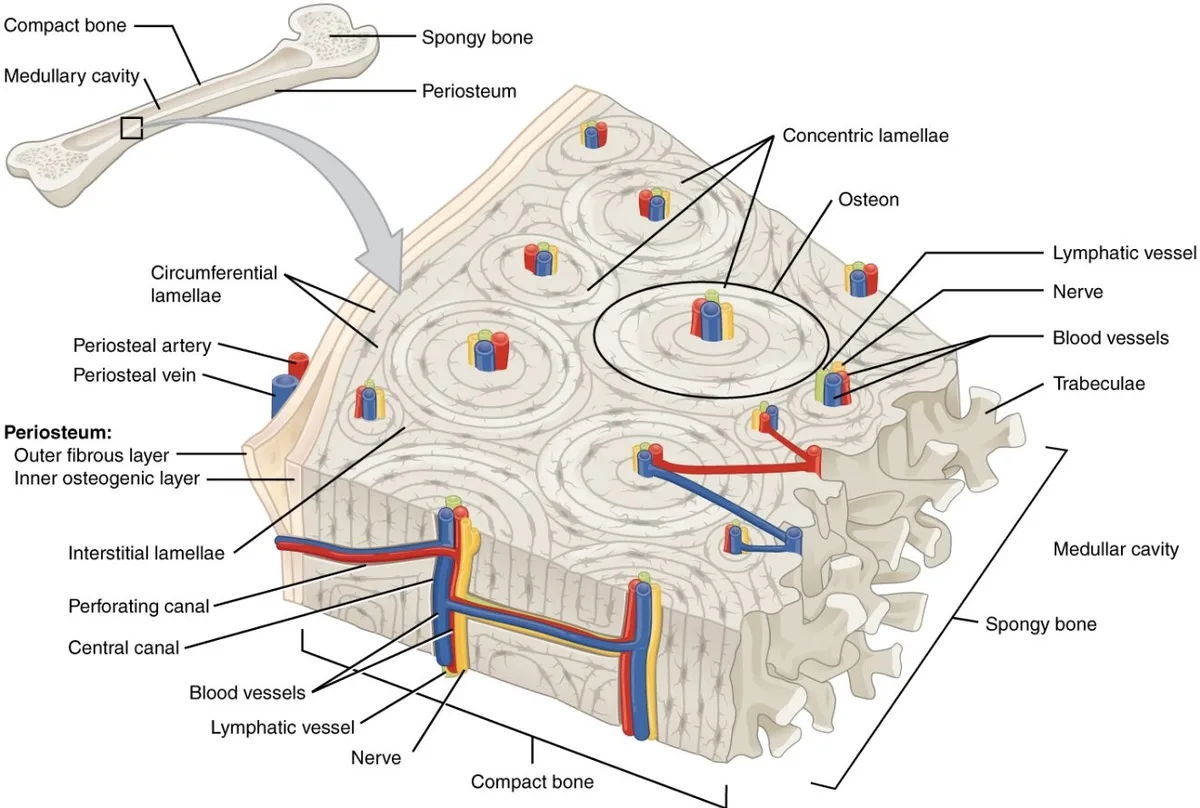
The anatomy matters because understanding what is happening helps you make smarter decisions. Your shin bone, the tibia, is covered by a thin layer of connective tissue called the periosteum. That layer is richly supplied with nerve endings.
When the muscles that attach to your tibia pull excessively on that periosteum, it becomes inflamed. That inflammation is what you feel as that dull, aching pain along the inside of your lower leg.
Shin splints are not a muscle strain. They are not a tear. They are not a bone break.
They are a traction injury to the periosteum caused by repetitive pulling forces. Your calf muscles attach to your shin bone like ropes tied to a post. When those ropes pull too hard and too often, the attachment point gets irritated.
The irritation is the pain.
What shin splints are not is also important. A stress fracture produces sharp, pinpoint pain on the bone when you press it. Shin splints produce a more diffuse ache that spreads along a larger area.
If you can find one specific spot on your shin that hurts when you push on it with one finger, that is more likely a stress fracture. If the pain covers a wider area, shin splints are more likely.
Compartment syndrome is another condition that gets confused with shin splints. It produces a tight, squeezing sensation that gets worse during exercise. It feels like your leg is going to burst.
It also involves numbness or tingling in the foot. That is not shin splints, and it requires medical evaluation rather than self-treatment.
The image above shows exactly where the periosteum sits on the tibia and how muscle attachments pull on it during running and jumping. Understanding that visual helps you grasp why certain exercises work and why others are a waste of time.
The Two-Minute Self-Check: Is It Shin Splints or Something Worse?
You need to know what you are dealing with before you start treating anything. This self-check takes about two minutes and requires no special equipment. It is based on the clinical guidelines used by sports medicine professionals.
First, press firmly along the inside edge of your shin bone with your thumb. Start at your ankle and work up toward your knee. If you feel a dull, aching pain that covers a stretch of about one to three inches, that points toward shin splints.
If you find one spot that hurts intensely when you press it with your fingertip, that points toward a stress fracture.
Second, hop on the affected leg. Jump up and down about three to five times on that leg only. If the pain during hopping is much worse than pain during walking, that is another red flag for a stress fracture.
Shin splints might hurt a little during hopping, but they usually do not cause you to stop. A stress fracture will often make you wince or stop hopping entirely.
Third, check for swelling. Gently compare your affected shin to your healthy shin. Look for visible swelling or feel for a warmer area.
Mild swelling can happen with shin splints. Moderate to significant swelling, especially if it is hot to the touch, suggests something more serious.
Fourth, note the timing of your pain. Shin splint pain typically starts during activity, gets worse as you continue, and may linger after you stop. Stress fracture pain often starts earlier in the activity and may even hurt at rest or at night.
If you wake up with shin pain, that is a strong sign you need medical imaging.
Here is a quick reference table for the difference:
| Symptom | Shin Splints | Stress Fracture |
|---|---|---|
| Pain type | Dull, diffuse ache | Sharp, pinpoint |
| Pain on hopping | Mild to moderate | Severe, stops hopping |
| Swelling | Mild if present | Moderate to significant |
| Night pain | Rare | Common |
| Pain with pressing | Spreads over area | One specific spot |
If your self-check suggests shin splints, proceed with the recovery plan below. If it suggests a stress fracture, stop running completely and see a sports medicine doctor. Do not try to run through a stress fracture.
It will not work and you will make it worse.
The Real Fix: Your Recovery Timeline in Three Phases
The fix for shin splints is not one thing. It is a sequence of three phases that build on each other. Skipping phases or rushing through them is why most people get stuck in a cycle of reinjury.
Phase One: Acute Management, Days 1 to 7
This phase is about reducing inflammation and letting the irritated periosteum settle down. Stop running entirely for the first three to seven days. That does not mean total rest.
You can still walk, cycle, or swim as long as those activities do not cause pain. Use the pain scale as your guide. If walking hurts, walk less or take an extra day off.
Ice can help during this phase. Apply ice to the painful area for 15 minutes at a time, three to four times per day. Do not ice immediately before activity.
Ice after activity or at the end of the day. Anti-inflammatory medication like ibuprofen can be used for pain relief. Do not take it before running.
Masking the pain will only let you do more damage.
This is also the time to stop the activity that caused the problem. If you increased your mileage too quickly, back it off. If you switched to running on concrete, find a softer surface.
If your shoes have more than 400 miles on them, replace them.
Phase Two: Strength and Loading, Weeks 2 to 4
Once the acute pain has settled and you can walk without pain, move into the strength phase. This phase is where most of the actual healing happens. The goal is to make the muscles and connective tissue stronger so they can handle the load of running.
The key exercises during this phase are eccentric calf raises. Stand on the edge of a step with your heels hanging off. Rise up onto your toes using both feet.
Lift your uninjured foot off the step and lower yourself slowly on your injured leg. The lowering phase should take about three seconds. Do three sets of 10 to 15 repetitions every other day.
You also need to strengthen your hips. Weak hips cause your knees to cave inward when you run, which puts more stress on your shins. Side-lying leg raises, clamshells, and glute bridges are simple and effective.
Do two sets of 15 on each side every day.
Phase Three: Return to Running, Weeks 4 to 6
This phase requires patience. Start with a walk-run program. Run for one minute, then walk for two minutes.
Repeat that cycle for a total of 10 minutes of running. Do this every other day for the first week. If you have no pain, increase to two minutes of running with one minute of walking in week two.
The rule is simple: do not increase your running volume by more than 10% per week. Do not increase both volume and intensity at the same time. If you add distance, keep the pace easy.
If you want to run faster, keep the distance short.
Pay attention to your cadence during this phase. A higher cadence, around 170 to 180 steps per minute, reduces the impact on your shins. You can check your cadence by running to a metronome or using a running watch that tracks it.
The Strength Work That Actually Stops Them Coming Back
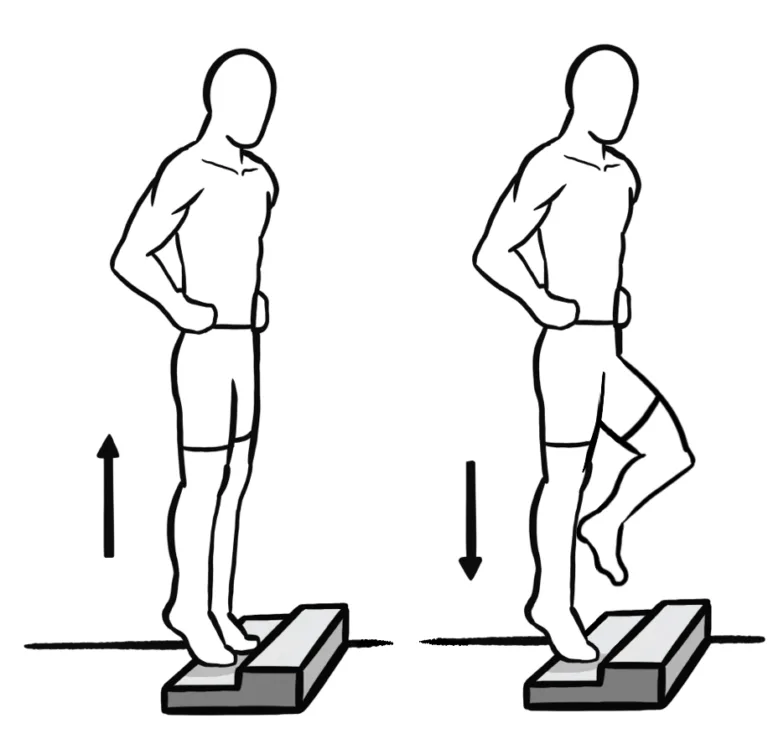
Image source: Bing (Web (fair-use with source credit))
The exercises above are good. If you want to permanently fix shin splints, you need to go a step further. The research is clear that strength training is the single most effective intervention for preventing recurrence.
It is not just calf strength that matters.
Calf strength is table stakes. You need strong calves to absorb the impact of each foot strike. The eccentric calf raise exercise described in Phase Two is the gold standard. Include straight-leg calf raises and bent-leg calf raises as well.
Straight-leg calf raises target the gastrocnemius. Bent-leg calf raises target the soleus. Both muscles attach to the shin bone, so both need to be strong.
Foot intrinsic strength matters more than most runners realize. The small muscles inside your foot control how your arch behaves when you land. A collapsing arch pulls on the tibialis posterior muscle, which attaches to your shin bone. That pulling force is a direct contributor to shin splints.
Towel scrunches, short foot exercises, and single-leg balance work all help strengthen those foot intrinsics.
Hip and glute strength is non-negotiable. This is the one that most runners skip. Weak hips allow your thigh to rotate inward and your knee to collapse inward during the stance phase of running. That chain of movement increases the load on your lower leg.
Clamshells, side-lying leg raises, and glute bridges are simple but effective. Do them every day. They take less than five minutes.
Here is a quick exercise routine that covers everything:
- Eccentric calf raises: 3 sets of 15, every other day
- Bent-knee calf raises: 3 sets of 15, every other day
- Short foot exercise: 2 sets of 10 holds of 5 seconds, daily
- Clamshells: 2 sets of 15 per side, daily
- Glute bridges: 2 sets of 15, daily
- Single-leg balance: 3 sets of 30 seconds per side, daily
This routine takes about 10 minutes. Do it consistently for at least four weeks before you start noticing a difference. Strength adaptations take time.
There are no shortcuts.
Mistakes That Keep You Stuck in the Cycle
Most people fail to fix shin splints because they make the same predictable errors. Avoid these and you will save yourself weeks of frustration.
Mistake one: only resting and doing nothing else. Rest reduces pain temporarily. It does not change the underlying weakness or mechanics that caused the problem. You stop running, the pain goes away, you start running again, the pain comes back.
That is the cycle. Breaking it requires strength work, not just time off.
Mistake two: returning to running too fast. Your shin might feel fine after a week of rest. That does not mean the tissue has healed enough to handle your previous training load. The periosteum takes longer to adapt than the pain takes to subside.
Follow the walk-run progression in Phase Three. Do not skip it.
Mistake three: ignoring your shoes. Running shoes lose their cushioning and support after 300 to 500 miles. Worn-out shoes increase the impact forces traveling through your lower leg. If you cannot remember when you bought your current shoes, it is time to replace them.
Mistake four: running the same route on hard surfaces every day. Concrete is about 10 times harder than asphalt. Asphalt is harder than trails. If every run is on concrete, you are giving your shins no break.
Mix in softer surfaces whenever possible.
Mistake five: only stretching and never strengthening. Stretching feels good. It does not build tissue tolerance. Shin splints are a loading problem, not a flexibility problem.
Strength training is what builds the capacity to handle impact. Stretching alone will not fix you.
When You Absolutely Need a Doctor
Most shin splints resolve with the approach outlined above. Some cases require medical attention. Here are the signs that you should stop self-treating and see a sports medicine doctor.
Pain that does not improve after two weeks of consistent rest and strength work is a red flag. Pain that gets worse as you continue your strengthening routine is another. Pain that wakes you up at night or hurts when you are just sitting on the couch requires evaluation.
If you have tried the walk-run progression and every attempt causes pain, do not push through it. You may have a stress fracture that requires imaging to diagnose. An X-ray will not show early stress fractures.
An MRI or bone scan is more sensitive. Your doctor can order the right test.
Swelling that does not go down with rest and ice is worth checking. So is redness or warmth in the area. Those signs point toward something other than simple shin splints.
If you develop numbness or tingling in your foot, or if your foot feels weak, see a doctor immediately. That suggests nerve involvement or compartment syndrome. Both require professional treatment.
Frequently Asked Questions
How long does it take to recover from shin splints?
Mild cases resolve in one to two weeks. Moderate cases take three to six weeks. Severe cases can take six to twelve weeks.
Full recovery depends on how consistently you do the strength work and how carefully you return to running.
Can I run with shin splints?
No. Running through shin splints makes them worse and increases your risk of a stress fracture. Take at least three to seven days off from running.
Use that time for strength work and low-impact cross training like cycling or swimming.
Do compression sleeves help shin splints?
Compression sleeves can reduce pain during walking and daily activities. They do not heal the underlying injury. Think of them as a temporary support, not a treatment.
Rely on strength work for the actual fix.
Should I ice my shins every day?
Ice for 15 minutes at a time, three to four times per day, during the acute phase. Ice after activity, not before. Once the initial pain settles, ice becomes less important than strength work.
Do not rely on ice as your primary treatment.
What is the best exercise for shin splints?
The eccentric calf raise is the single most effective exercise. It directly strengthens the muscles that pull on the shin bone. Combine it with hip strengthening and foot intrinsic work for the best results.
When can I go back to running after shin splints?
Start when you can walk without pain for 30 minutes. Begin with a walk-run program of one minute running and two minutes walking for a total of 10 minutes of running. Increase slowly.
If pain returns, back off and spend more time in the strength phase.

Similar Posts