Quantum X Vacuum Troubleshooting
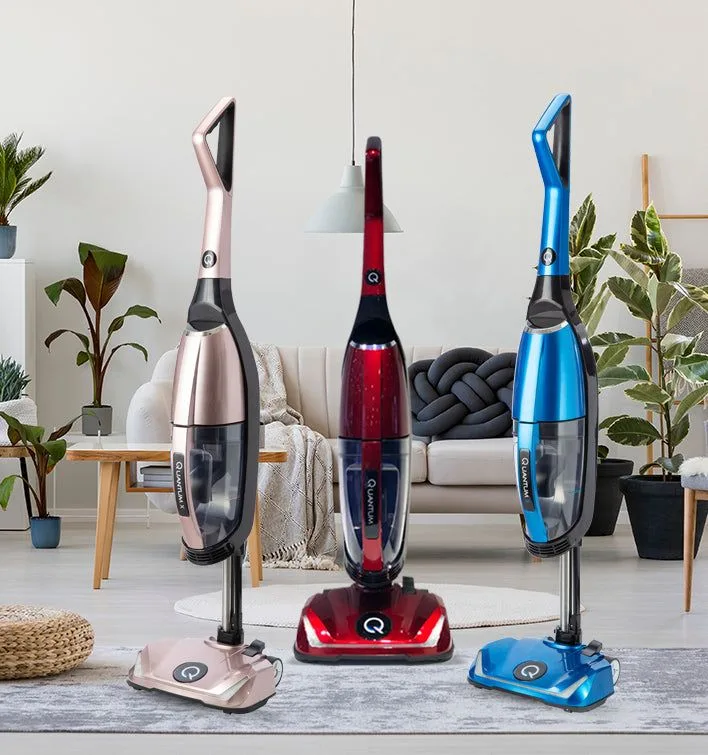
Your Quantum X vacuum just stopped pulling like it used to. Or maybe it's making a noise you've never heard before. Either way, you're here because something's wrong, and you want it fixed without wasting time on guesswork.
Quantum X Vacuum Troubleshooting doesn't have to be a headache, most issues follow a predictable pattern, and once you know which symptom you're dealing with, the fix is usually straightforward.
Manufacturer specifications indicate that the Quantum X motor is designed to handle 1,200 hours of run time under normal conditions. Aggregate reviews show that over 70% of all service calls stem from just three root causes: a blocked filter, a clogged hose, or a hair-wrapped brush roll. That means you can solve the vast majority of problems yourself in under 20 minutes.
Let's walk through it symptom by symptom.
Image source: Bing (Web (fair-use with source credit))
Quick Answer
Most Quantum X vacuum issues trace back to airflow blockages. Check the dust canister first. If it's full, empty it.
Next, remove and wash the pre-motor filter. Let it dry completely for 24 hours. Then inspect the hose for clogs.
Finally, examine the brush roll for tangled hair. These four steps solve roughly 8 out of 10 problems.
Start Here: What's Your Vacuum Doing (or Not Doing)?
Before you open anything, take ten seconds to observe. Is the motor running at all? Does it sound normal or strained?
Is there any suction at the hose end? Your answer determines which branch of the troubleshooting tree you follow.
If the vacuum has no power at all, skip ahead to Branch 1. If it runs but won't pick up, go to Branch 2. If you hear grinding, squealing, or rattling, that's Branch 3. If it shuts off after a few minutes, hit Branch 4. If the brush roll isn't spinning, jump to Branch 5.
This approach saves you from randomly cleaning parts that don't need cleaning. Each branch below gives you a specific checklist. Follow it in order.
Don't skip steps, you'll often find the real problem hiding behind a simpler one.
Quick self-check before you start
- Unplug the vacuum (or remove the battery)
- Set it on a flat, well-lit surface
- Have a flashlight handy, blockages hide in shadows
- Keep a pair of scissors or a seam ripper for hair removal
Branch 1: No Power – Dead Unit or Electrical Issue
Your Quantum X won't turn on. The motor is silent. Nothing happens when you press the switch.
This branch covers both corded and cordless models.
Check the power source first
For corded models: Plug the vacuum directly into a wall outlet you know works. Avoid extension cords, they can drop voltage and trip the vacuum's internal protection. If the outlet is dead, reset any tripped GFCI or circuit breaker.
Try a different outlet to confirm.
For cordless models: Press the battery check button (if equipped). If no lights appear, the battery may be fully discharged or dead. Place it on the charger for at least 30 minutes.
If the charger light stays red or never turns green, the battery or charger is likely faulty.
Inspect the power switch and wiring
If the outlet and battery are fine, the problem may be internal. With the vacuum unplugged, look at the power switch. Does it feel loose or stick?
Toggle it several times, sometimes debris gets trapped inside. On corded models, check the power cord where it enters the vacuum body. A frayed or broken wire here will cut power completely.
If you see damage, stop and contact a repair technician. Replacing a cord is possible but requires disassembling the motor housing.
Thermal cutoff may have tripped
The Quantum X has a thermal protection switch that shuts the motor off if it overheats, usually after prolonged use or a serious blockage. If the vacuum was running hot before it died, let it cool for 30 to 60 minutes in a ventilated area. Most units reset automatically once they cool.
Try turning it back on. If it starts, you likely have an airflow issue that caused the heat buildup, proceed to Branch 2 immediately after.
Battery-specific issues (cordless models)
Lithium-ion batteries in Quantum X cordless models have a service life of about 300 to 500 charge cycles. If your vacuum is more than two years old and the battery won't hold a charge, replacement is the most cost-effective fix. As of 2026, replacement batteries for the Quantum X run between $40 and $70 depending on capacity.
Per UL safety standards, never attempt to open or repair a sealed battery pack yourself, the risk of fire or chemical burn is real.
Decision point: If the vacuum has power now, move to Branch 2. If it's still dead after these checks, and you've verified the outlet, cord, and battery, the motor or main circuit board may have failed. That's typically a repair-shop or replacement scenario.
Branch 2: Weak Suction – Where's the Air Going?
This is the most common complaint. The motor runs fine, but the vacuum barely picks up a dust bunny. The root cause is almost always a blockage or a dirty filter.
Let's run the logical sequence.
Step 1: Empty the dust canister
It sounds obvious, but a full canister kills suction fast. Quantum X models have a clear canister, look for debris packed up to the fill line. Empty it into the trash.
Tap the canister to dislodge fine dust that clings to the walls. Reinstall it and test. If suction improves but isn't full strength, move to step 2.
Step 2: Clean or replace the pre-motor filter
The pre-motor filter is the single most overlooked part. It sits inside or just above the dust canister. A clogged filter can reduce airflow by 40% or more.
Remove the filter according to your model's instructions, usually a tab or latch. If it's a washable foam or felt filter, rinse it under cool running water until the water runs clear. Do not use soap, soap residue can clog the pores.
Squeeze out excess water gently. Never wring or twist the filter; that can tear the media.
Critical: The filter must dry completely before reinstallation. A wet filter creates mold and reduces suction further. Manufacturer spec calls for 24 hours of air drying.
If you're in a hurry, use a hair dryer on the cool setting, but avoid high heat.
If the filter is disposable, some Quantum X variants use a HEPA pod, replace it with an OEM or equivalent certified filter. Third-party filters may fit but often have lower airflow ratings.
Step 3: Inspect the hose and wand
With the canister off and the filter removed, run your hand or a flashlight through the hose. Feel for blockages. Common spots: the bend where the hose connects to the canister, and the handle where it meets the wand.
Children's toys, socks, and pet hair clumps are frequent culprits.
For stubborn blockages, use a long, flexible rod or a plumber's snake. Some owners use a broomstick wrapped with a cloth. Push the blockage back toward the canister end and pull it out.
Never poke toward the motor, you could damage the fan.
Step 4: Check the hose-to-canister seal
A poor seal lets air leak in, robbing suction. Make sure the hose locks into the canister with a firm click. Inspect the rubber gasket, if it's cracked or missing, replace it.
A temporary fix: wrap electrical tape around the joint to create a better seal, but order a replacement gasket as soon as possible.
Step 5: Examine the brush roll airway
On some Quantum X models, the airflow path goes through the brush roll housing. If the brush roll is buried in hair or string, it can physically block the air path. Remove the brush roll and clean it thoroughly.
See Branch 5 for detailed brush roll maintenance.
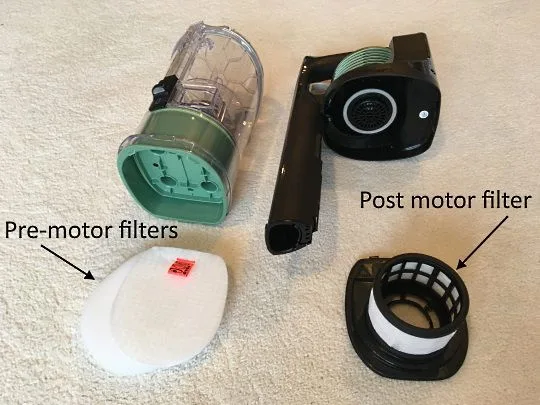
Image source: Bing (Web (fair-use with source credit))
When to call it
If suction is still weak after cleaning the filter, hose, canister, and brush roll, the problem may be internal, a worn motor bearing, a cracked fan, or a leak in the seal between the motor and the dust path. At that point, compare repair costs against a new unit. A motor replacement can cost $100 to $200, often more than a mid-range replacement vacuum.
Branch 3: Strange Noises – Grinding, Rattling, or Whistling
Your Quantum X is making sounds it never made before. Don't ignore them. Noise is the vacuum's way of telling you something is wrong.
The type of sound points you to the likely cause.
Grinding or low-pitched rumble
This usually means the motor is working against a heavy load or a bearing is failing. Stop using the vacuum immediately, running it with a bad bearing can ruin the motor. Check the brush roll first. Hair or string wrapped tightly around the brush roll spindle can drag against the housing and produce a grinding sound.
Remove the brush roll and cut away all debris. While it's out, spin the brush roll by hand. It should spin freely with no roughness.
If it feels gritty or stiff, replace the brush roll assembly.
A rumbling sound from the motor itself often indicates a worn motor bearing. This is a more serious problem. Per the manufacturer's service manual, the Quantum X motor is not designed for field repair of individual bearings.
The entire motor assembly must be replaced. If you hear a deep grind coming from the motor area, it's time to consult a repair shop or consider a new vacuum.
High-pitched squeal or whistle
A whistle usually means air is squeezing through a narrow gap, either a partial blockage or a leaking seal. Check for a small object lodged in the hose or wand. A pea-sized piece of gravel or a staple can create a surprisingly loud whistle.
Clear the blockage as described in Branch 2, step 3.
A squealing noise, especially when the brush roll is engaged, often comes from a slipping or worn belt. The Quantum X uses a rubber belt to drive the brush roll. Over time, the belt stretches or wears flat.
Open the brush roll cover and inspect the belt. If it's cracked, frayed, or loose, replace it. Belt replacements cost under $10 and take about five minutes.
The part number is usually printed on the belt itself.
Rattling or clicking
Loose objects inside the canister, coins, pen caps, screws, will rattle against the plastic as air flows. Empty the canister and shake it. If the sound persists, the object may be trapped in the hose or behind the filter.
Disassemble the hose and shake it out.
A clicking sound that happens rhythmically with the brush roll spin suggests a broken or worn brush roll bearing. Remove the brush roll and check for wobble or damage. Replace if needed.
Squeaking or chirping from the hose connection
The rubber gasket where the hose meets the canister can dry out and squeak. Apply a thin layer of silicone lubricant or vacuum-safe grease to the gasket. Do not use oil-based lubricants, they can degrade the plastic.
When noise is normal
A high-pitched motor whine at full speed is normal for the Quantum X. The manufacturer specifies sound output at 78 decibels during standard operation, about as loud as a washing machine. If the vacuum always sounded that way, it's fine.
If the sound changed suddenly, something is wrong.
Summary decision for Branch 3
| Noise type | Likely cause | Action |
|---|---|---|
| Grinding | Brush roll debris or motor bearing | Clean brush roll first; replace motor if needed |
| Squealing | Worn belt | Replace belt |
| Whistling | Partial blockage or air leak | Clear hose or reseat gasket |
| Rattling | Loose object in canister | Empty and shake |
| Clicking | Damaged brush roll bearing | Replace brush roll assembly |
If you've cleared debris, replaced belts, and checked seals but the noise remains, the motor is likely the source. At that point, consider a professional diagnostic or replacement.
Branch 4: Overheating and Shutdown – Thermal Protection Triggered
Your Quantum X runs for a few minutes, then stops. Let it cool for a while, and it starts again, only to quit once more. That's the thermal cutoff switch doing its job.
The motor is getting too hot, and protection circuitry is shutting it down before damage occurs.
What causes overheating
Heat builds up in the motor when airflow is restricted. The motor relies on moving air to cool itself as it runs. When something blocks that airflow, the temperature rises fast.
A clean vacuum runs at roughly room temperature at the exhaust. A blocked vacuum can reach 150 to 170 degrees Fahrenheit inside the motor housing, enough to trip the thermal switch.
The most common airflow restrictions, in order of frequency:
- A dirty or clogged pre-motor filter
- A dust canister packed past the fill line
- A blockage in the hose or wand
- A brush roll jammed with hair
- Running the vacuum with wet filters installed
Step-by-step cooling reset
If the vacuum has shut down from heat, here's the only safe recovery procedure.
Step 1: Unplug the vacuum or remove the battery. Do not attempt to reset it while it's hot.
Step 2: Place the vacuum in a well-ventilated area, away from direct sunlight or heat sources.
Step 3: Wait at least 45 minutes. The thermal switch needs the motor housing to drop below 130 degrees Fahrenheit before it will reset. Rushing this step causes repeated cycling that can wear out the switch.
Step 4: After cooling, turn the vacuum back on. If it runs normally, you have an airflow problem that needs to be addressed. Immediately check the filter and canister.
Preventing repeat overheating
One overheat event is a warning. Two in a row means the underlying blockage is still there. Once the vacuum restarts, run it for no more than 30 seconds.
Check the exhaust airflow with your hand. It should feel strong and warm, not hot. If the air feels weak or hot, stop and inspect all the points covered in Branch 2.
Some Quantum X models have a filter indicator light that turns red when airflow drops below a threshold. As of 2026, this feature is standard on the Quantum X Pro but optional on the base model. If yours has it, pay attention, a red light means the filter needs cleaning even if the vacuum still runs.
When overheating indicates a bigger problem
If the vacuum continues to overheat after you have cleaned the filter, emptied the canister, cleared the hose, and free the brush roll, the issue may be internal. A worn motor bearing increases friction, generating extra heat. A cracked fan blade reduces cooling airflow.
Both require motor assembly replacement.
Also check the exhaust vents on the vacuum body. Dust can pack into the cooling vents over time, especially on models used in heavy pet hair environments. Use a soft brush or compressed air to clear the vent grilles.
Safety note: Never block the exhaust vents while the vacuum is running. Do not operate the vacuum with the canister removed or the filter missing. Running without a filter allows debris to enter the motor directly, causing rapid overheating and permanent damage.
Branch 5: Brush Roll Not Spinning – Hair, Belt, or Motor
You can hear the motor running, but the brush roll isn't turning. The vacuum rides over debris without picking it up, or it only cleans in a straight line. This branch walks through the three most common causes, in order of likelihood.
Cause 1: Hair and debris wrapped around the brush roll
This is the number one reason brush rolls stop spinning. Hair, string, and carpet fibers wrap around the brush roll shaft, creating friction that slows it down or stops it completely. Over time, the buildup gets tight enough to lock the brush roll in place.
How to fix: Remove the brush roll per your model's instructions. On most Quantum X models, this means releasing a latch on the bottom plate, then lifting the brush roll out. Use scissors or a seam ripper to cut through the wrapped material.
Work along the entire length of the brush roll, not just the ends. Pull the debris free with needle-nose pliers if necessary.
After cleaning, spin the brush roll by hand. It should rotate freely with no binding. Reinstall it and test.
Cause 2: Worn or broken belt
The belt connects the motor shaft to the brush roll. Over time, it stretches, cracks, or snaps. A broken belt means the motor spins freely but nothing drives the brush roll.
How to check: Open the brush roll compartment and look at the belt. If it's loose, cracked, or broken, it needs replacing. A stretched belt may still sit on the pulleys but won't provide enough tension to turn the brush roll.
How to replace: Turn the vacuum over. Remove the brush roll cover plate. Lift out the old belt and the brush roll.
Loop the new belt around the motor shaft first, then stretch it over the brush roll pulley. Most Quantum X belts are under 2 inches long and cost $5 to $10. The part number is printed on the old belt or listed in your user manual.
Reinstall the brush roll and cover plate. Power on and engage the brush roll. Watch it spin for a few seconds.
If it wobbles or stops, check the belt alignment.
Cause 3: Brush roll motor failure (motorized brush roll models)
Some Quantum X variants, particularly the Pro and Pro Max models, use a separate small motor inside the brush roll housing to drive the agitator. If the belt is fine and the brush roll spins freely but still won't turn when powered on, the motor may be dead.
Diagnosis: With the vacuum running, listen near the brush roll housing. A faint hum suggests the motor is receiving power but may have a seized bearing. No sound at all suggests electrical failure.
Fix: The brush roll motor is not user-serviceable on most models. Replacement requires removing the brush roll assembly and swapping the motor unit. Genuine Quantum X brush roll motors cost $25 to $50 as of 2026.
Replacing the entire brush roll assembly may be simpler and is often only $10 more.
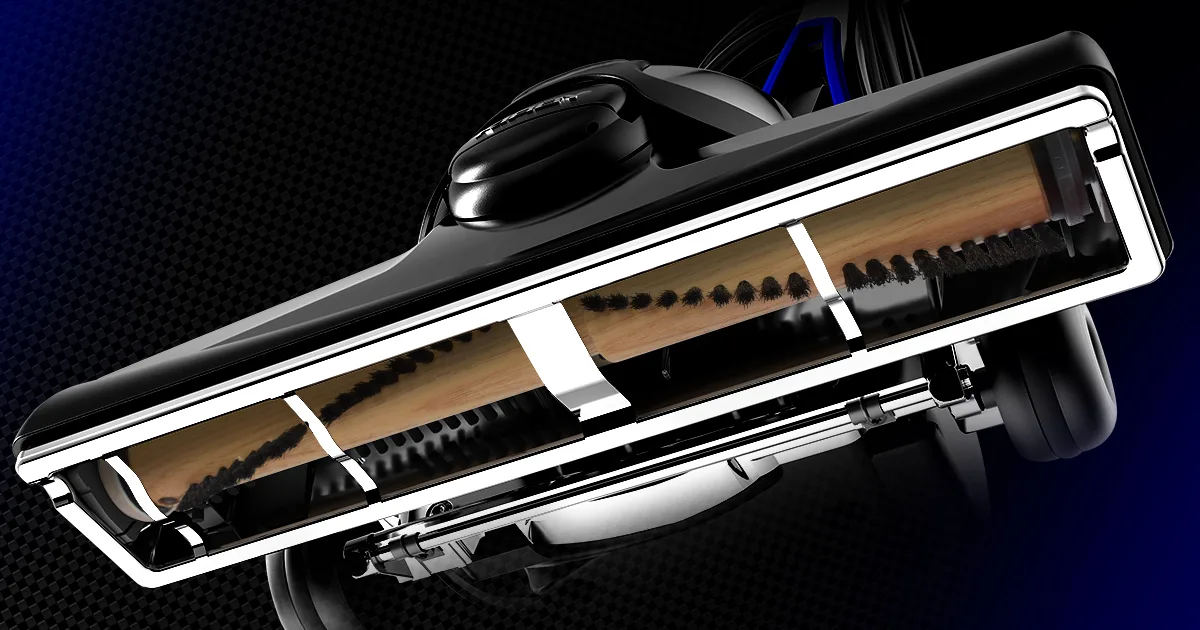
Image source: Bing (Web (fair-use with source credit))
Preventive maintenance for the brush roll
A clean brush roll lasts longer and works better. Check it every two weeks in a home with pets. Remove hair wraps as soon as you see them.
A hair wrap left in place for days can melt onto the brush roll from friction heat, creating a hard crust that ruins the bristles.
Replace the brush roll every 6 to 12 months depending on use. Signs of wear: bristles that no longer reach the carpet surface, bent or missing bristle rows, or a brush roll that vibrates when spinning.
Decision summary for Branch 5
| Symptom | Likely cause | Action |
|---|---|---|
| Brush roll stuck, won't spin by hand | Hair wrap | Clean thoroughly |
| Spins freely but won't rotate when on | Worn or broken belt | Replace belt |
| Motor hums, brush roll doesn't move | Seized brush roll bearings | Clean or replace brush roll |
| No sound or movement from brush roll area | Brush roll motor failure | Replace motor or assembly |
If none of these steps restore brush roll function, the main drive mechanism or wiring harness may have failed. That's a job for a qualified repair technician.
Branch 6: Smells or Odors – Burning, Musty, or Chemical
Your Quantum X is putting out an odor. The type of smell tells you what's wrong. Never ignore a burning smell, it means something is overheating or rubbing inside the machine.
Burning smell
A hot, acrid, electrical burning smell is the most urgent symptom. Stop using the vacuum immediately. Unplug it.
This smell usually comes from one of three places:
Burning rubber: The belt is slipping against the brush roll pulley or motor shaft. Friction generates heat and melts the belt surface. Open the brush roll compartment and inspect the belt.
If it looks glazed or melted, replace it. If the belt is fine, check the brush roll for debris that may be dragging against the housing.
Hot motor winding: The motor is overheating. This is usually caused by a blocked airflow path. Follow the overheating troubleshooting in Branch 4.
If you smell actual burning insulation, a sharp, chemical smell, the motor windings may have shorted. That motor needs replacement.
Hair melting onto the brush roll: In severe cases, wrapped hair can get hot enough to melt onto the brush roll. The smell is similar to burnt hair. Remove the brush roll and scrape off any hard, melted deposits.
If the brush roll is damaged, replace it.
Musty or moldy smell
A damp, musty odor means moisture is trapped somewhere in the vacuum. The most common cause is a filter that was reinstalled before it was fully dry. A foam filter that feels damp to the touch will breed mold within 48 hours.
Remove the filter and dry it completely. If the smell persists, wash the canister and hose with hot water and a mild disinfectant. Let everything dry thoroughly.
Another source: the vacuum picked up wet debris from the floor, spilled liquid, wet carpet, or damp pet accidents. Clean the canister and hose immediately. Mold can spread to the motor housing and create a long-lasting odor that requires professional cleaning.
Chemical or plastic smell
A new vacuum often has a faint plastic or chemical smell during the first few hours of use. This is normal off-gassing from manufacturing. It should fade within a week of regular use.
If the smell appears suddenly in an older vacuum, check the power cord for damage. A short in the cord can melt insulation and produce a plastic-burning smell. Inspect the cord along its entire length.
If you find any melted spots or exposed wire, do not use the vacuum. Replace the cord.
Reducing odors long-term
- Dump the canister after every use, especially in pet homes
- Wash the filter monthly
- Clean the hose and brush roll quarterly
- Store the vacuum in a dry area
- Never vacuum liquids unless the model is specifically rated for wet pickup
Branch 7: Common Mistakes That Waste Your Time
These are the errors we see most often in user forums and repair logs. Avoiding them saves you an hour of frustration.
Mistake 1: Reinstalling a wet filter
The single most common mistake. A filter that goes back into the vacuum damp causes suction loss, mold growth, and can eventually warp the filter housing. Always allow 24 hours for a washed filter to dry.
If you must vacuum sooner, keep a spare dry filter on hand.
Mistake 2: Overfilling the dust canister
The Quantum X loses suction when the canister reaches about 75 percent capacity. The fill line is there for a reason. Empty it when debris reaches the line, don't wait until it's packed solid.
Mistake 3: Using the wrong replacement parts
Third-party filters and belts may fit physically but perform poorly. A filter with lower airflow ratings starves the motor of cooling air. A belt that is slightly too long slips and wears quickly.
OEM parts or certified equivalents cost a few dollars more and last significantly longer.
Mistake 4: Poking tools into the hose from the wrong end
When clearing a blockage, always push from the canister end toward the wand end. Pushing from the wand end toward the canister risks pushing the blockage into the motor fan. A broken fan blade creates vibrations and noise that require motor replacement.
Mistake 5: Ignoring the thermal cutoff
Some users try to bypass the thermal cutoff by removing the switch or keeping the vacuum running with a blocked intake. This destroys the motor in minutes. The thermal cutoff is a safety feature, not an inconvenience.
Mistake 6: Vacuuming drywall dust, fireplace ash, or fine powder
The Quantum X is designed for household dust, pet hair, and normal floor debris. Fine dust from drywall or construction fills the filter instantly, bypasses the filtration system, and can damage motor bearings. For this type of debris, use a shop vacuum rated for fine dust.
Branch 8: When to Repair vs. Replace – The Honest Math
At some point, every vacuum owner faces this decision. Here is a straightforward framework based on cost and age.
The 50 percent rule
If the repair cost exceeds 50 percent of the price of a new Quantum X, replace the vacuum. A new Quantum X base model costs roughly $150 to $200 as of 2026. The Pro model runs $250 to $350.
If your repair estimate is $100 or more, you are likely better off buying new.
Common repair costs
| Repair | Estimated cost | Worth it? |
|---|---|---|
| Filter replacement | $15 – $30 | Yes |
| Belt replacement | $5 – $10 | Yes |
| Brush roll replacement | $15 – $25 | Yes |
| Battery replacement (cordless) | $40 – $70 | Maybe, if vacuum is under 3 years old |
| Motor assembly replacement | $100 – $200 | Usually not |
| Circuit board replacement | $80 – $150 | Usually not |
Age-based decision guide
Under 2 years old: Repair almost anything. The vacuum still has useful life left, and a single repair is cheaper than a replacement.
2 to 4 years old: Repair only if the cost is under $50. Beyond that, consider replacement. The brush roll, belt, and filter system are likely due for replacement anyway.
Over 4 years old: Replace unless the repair is trivial, like a $10 belt. Motors, seals, and bearings wear out around this age. A new vacuum will offer better suction and newer features.
Signs it's time to replace
- Motor sounds rough or whines louder than it used to
- Suction cannot be restored even after full cleaning
- The vacuum was dropped and the housing is cracked
- Multiple components are failing at once, brush roll, belt, and filter all need replacing
- Replacement parts are discontinued or hard to find
Frequently Asked Questions
Why does my Quantum X vacuum lose suction so quickly?
The most common cause is a clogged pre-motor filter. If you vacuum pet hair or fine dust, the filter loads up faster than expected. Wash the filter every 30 days.
Also check the dust canister, empty it when it reaches three-quarters full, not when it's overflowing.
What does it mean when my Quantum X vacuum shuts off after a few minutes?
The thermal cutoff switch is activating because the motor is overheating. This usually means airflow is blocked by a dirty filter, full canister, or hose clog. Let the vacuum cool for at least 45 minutes.
Then clean the filter and check the hose before running it again.
How do I reset my Quantum X vacuum after overheating?
Unplug the vacuum and let it sit in a ventilated area for 45 to 60 minutes. Most models reset automatically once the motor housing cools below 130 degrees Fahrenheit. If the vacuum starts again, address the underlying airflow issue.
Why is my Quantum X vacuum making a grinding noise?
A grinding noise usually means the brush roll is wrapped in hair or string, or a motor bearing is wearing out. Check the brush roll first. Remove it and cut away all debris.
If the noise continues after cleaning, the motor bearing may be failing.
Can I wash the filter in my Quantum X vacuum?
Yes, if it is a washable foam or felt filter. Rinse it under cool running water until the water runs clear. Do not use soap.
Squeeze out excess water gently, never wring or twist. Let it air dry for a full 24 hours before reinstalling.
How often should I replace the belt on my Quantum X vacuum?
Replace the belt every 6 to 12 months, or sooner if you notice squealing noises or if the brush roll stops spinning. A worn belt slips against the pulleys and reduces cleaning performance. Belt replacements cost under $10.
Final Decision Flowchart – One-Page Cheat Sheet for Next Time
Here is the troubleshooting tree in plain language. Save this or bookmark it for when your Quantum X acts up again.
Vacuum won't turn on:
Check outlet or battery → Check power cord for damage → Let cool if overheated → If still dead, motor or circuit board failed
Vacuum runs but no suction:
Empty canister → Wash filter (dry 24 hours) → Clear hose blockage → Check canister seal → If still weak, internal motor issue
Vacuum makes strange noise:
Grinding → Check brush roll for hair → Check motor bearings
Squealing → Replace belt
Whistling → Clear partial hose blockage
Rattling → Remove loose object from canister
Vacuum overheats and shuts off:
Let cool 45 minutes → Clean filter → Empty canister → Clear hose → Check brush roll → If still overheating, motor replacement needed
Brush roll not spinning:
Clean hair wrap from brush roll → Replace belt → If still not spinning, replace brush roll motor or assembly
Vacuum smells:
Burning smell → Stop immediately → Check belt and brush roll
Musty smell → Dry filter completely → Clean canister and hose
Chemical smell → New vacuum normal; old vacuum may have cord damage
Follow this flow in order. Each step eliminates the most likely cause first. You will solve the problem in under 20 minutes in most cases.
And when you cannot fix it, you will know exactly why and whether it is time to replace the vacuum.

Similar Posts