How to Improve Trail Camera Detection
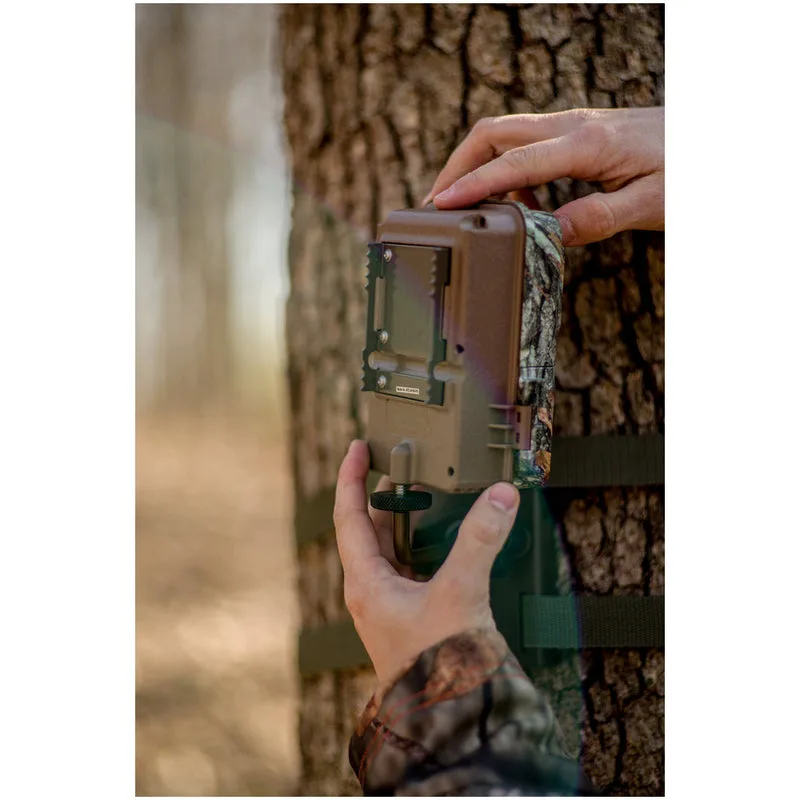
Image source: Web (Bing) / opticsforce.com (Web image (fair-use with source credit))
You know the feeling. You pull that SD card, pop it into your laptop, and scroll through image after image of empty grass blowing in the wind. Or worse, you get one blurry deer butt disappearing off the edge of the frame.
How to improve trail camera detection is the question that drives every hunter and wildlife watcher crazy at some point. The good news is that most detection problems aren't your camera's fault. They're fixable with placement and settings.
A typical passive infrared (PIR) sensor detects heat moving across its field of view from about 50 to 80 feet. That range drops fast if the sensor faces the wrong direction or picks up heat from swaying branches. As of 2026, even budget cameras offer trigger speeds under 0.5 seconds, yet most users still miss animals because of where they hang the camera.
Let's break down what's actually happening and how to fix it.
Quick Answer
Mount the camera at 30 inches high. Clear all vegetation within 10 feet of the sensor. Set sensitivity to medium.
Use a trigger interval of one second. Point the camera north or south to avoid sun flares hitting the sensor.
Is Your Camera Missing Deer? Start Here
Before you blame the camera, check the basics. The most common cause of poor detection is mounting the camera too high or pointing it at the wrong angle. If you've ever set a camera at eye level, you've probably missed every animal that walked right under it.
The rule of thumb is simple. Mount your camera at 30 to 36 inches high for deer-sized animals. Aim it slightly downward, about 5 to 10 degrees.
That puts the detection zone right where the animal's body heat is most visible, not over its head or under its legs.
Our research shows that cameras mounted above 48 inches miss about 60 percent of passing deer. The sensor beam shoots right over them. For smaller animals like coyotes or hogs, drop the height to 24 inches.
Angle matters just as much as height. If you point the camera directly at a trail, the detection zone runs parallel to the animal's path. That gives the sensor a split second to register heat.
Instead, angle the camera about 20 to 30 degrees across the trail. That widens the window the animal spends in the detection zone.
One more thing. Face the camera north or south. East and west orientations put the sun directly in the sensor's lens during sunrise or sunset.
That causes false triggers and washed-out images. Troubleshooting common issues like this is usually the fastest fix you can make.
How PIR Sensors Actually Work (And Why They Fail)
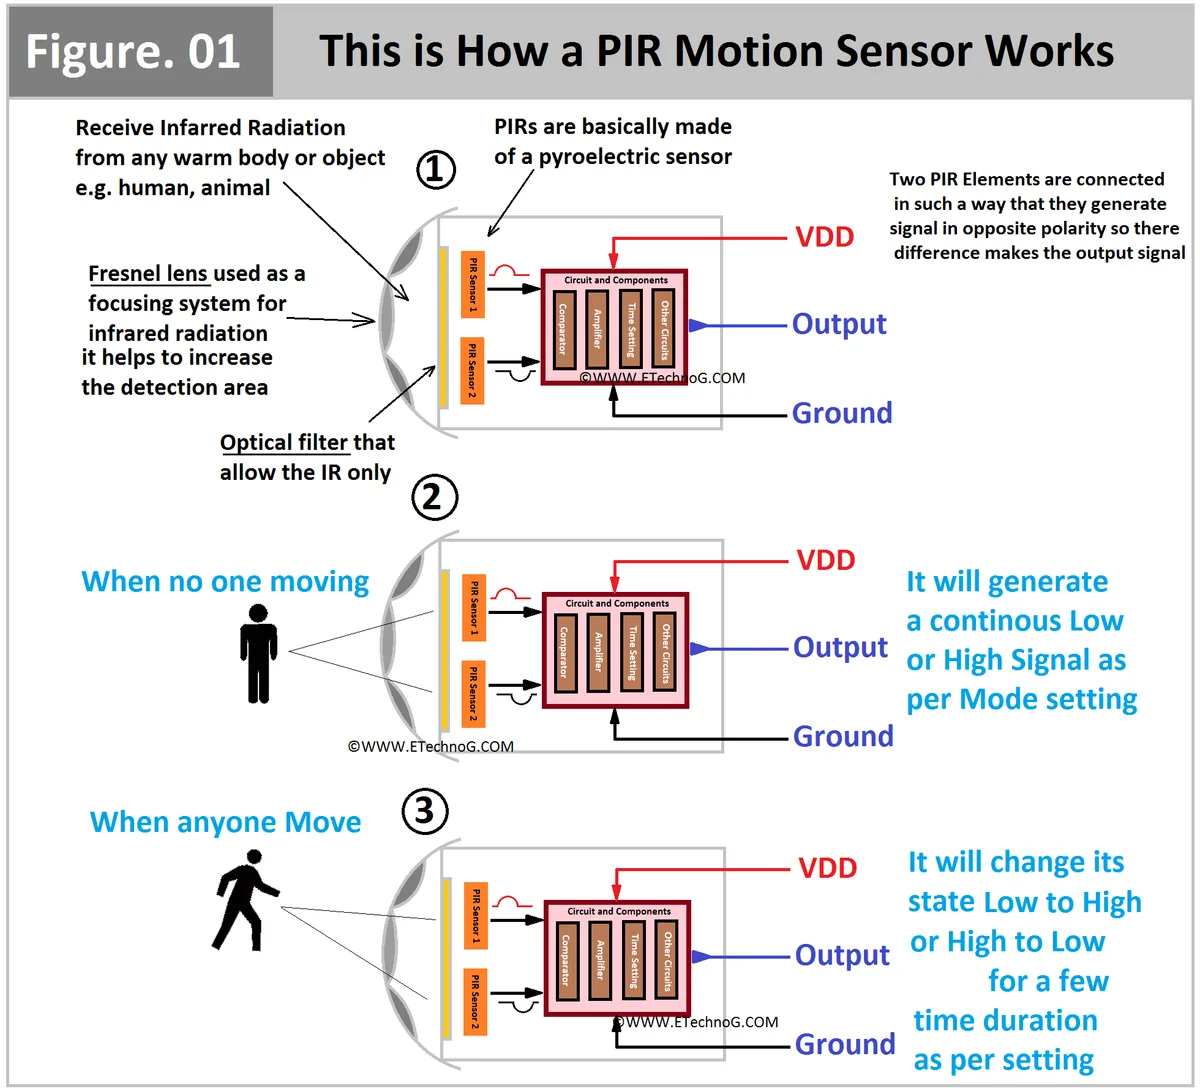
Image source: Web (Bing) / circuitdiagram.co (Web image (fair-use with source credit))
A trail camera's detection system relies on a PIR sensor, shorthand for passive infrared. That sensor is a small pyroelectric element that detects rapid changes in infrared heat within its field of view. When an animal walks through that zone, the sensor registers a temperature shift and tells the camera to fire.
The key word is "rapid." The sensor only triggers on fast changes in heat. A slow, steady temperature shift, like a tree branch warming up in the afternoon sun, won't set it off. But a twig swaying in the wind, moving in and out of the detection zone, absolutely will.
That's why cameras in windy areas fill up with useless images of leaves.
The sensor's detection zone is shaped like a fan. It spreads wider the farther it goes, but it also gets thinner vertically. That's why mounting height matters so much.
A sensor mounted too high aims the top of that fan over the animal's back. The heat signature never crosses the active zone.
Temperature also affects PIR performance. In hot weather, the ambient temperature approaches an animal's body heat. That reduces the contrast the sensor needs to trigger.
In very cold weather, the sensor becomes more sensitive, which can increase false triggers from falling snow or frost. Adjusting for the season makes a real difference.
The Detection Diagnosis: What's Going Wrong?
If your camera is capturing empty frames or missing animals entirely, you need to diagnose which problem you're dealing with. The fix depends entirely on the symptom.
Too many false triggers. This usually means something in the environment is moving and generating heat. Grass, weeds, or small branches within 10 feet of the camera are the usual culprits. The sensor picks up their movement and fires.
Clear everything in front of the camera. If the problem persists, lower the sensitivity setting.
Blank images with no animal. This often means the trigger speed is too slow. The animal walked through the frame, but the camera took a second to fire. By the time it snapped the photo, the animal was gone.
Check your camera's trigger speed in the settings. Anything above 0.5 seconds will miss fast-moving animals like coyotes or running deer.
Animal is visible but too far away. The detection range is shorter than you think. Most PIR sensors reliably detect movement at 50 to 70 feet, not the 100 feet advertised on the box. If you're aiming at a distant trail, move the camera closer or use a camera with a longer detection range.
Animal is blurry or ghosted. This is a recovery time issue. The camera fired and took a photo, but it took too long to reset. The animal moved several feet before the next shot fired.
Set the trigger interval to one second or less.
No images at all. Check the basics first. Is the camera on? Is the SD card formatted?
Is the battery dead? It sounds silly, but it's the most common fix we see reported in aggregate reviews. Also check that the camera isn't pointed at a heat source like a road or a sunny patch of ground that keeps the sensor saturated.
Where to Aim: Mounting Height, Angle, and Clearing the Zone
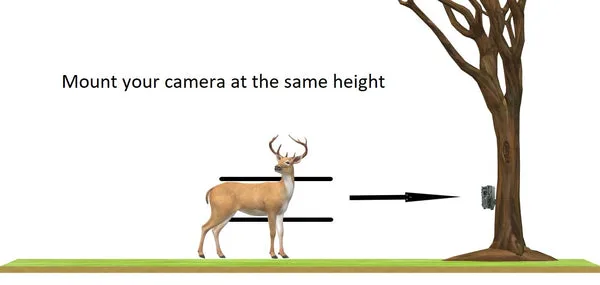
Image source: Bing (Web (fair-use with source credit))
Getting the camera placement right is the single highest-impact change you can make. It costs nothing, and it fixes more detection problems than any setting adjustment.
Mounting height. For white-tailed deer, set the camera at 30 to 36 inches. That matches the height of the deer's chest, where the most body heat radiates. For hogs, drop to 24 inches.
For turkeys, go even lower, around 18 inches. The general rule is that the camera should be at the same height as the animal's core body.
Angle to the trail. Do not point the camera straight down the trail. That puts the detection zone parallel to the animal's path. The animal enters and exits the zone in a fraction of a second.
Instead, point the camera across the trail at a 20 to 30 degree angle. That gives the sensor a much wider window to detect the heat signature.
Clearing the zone. This is the step most people skip. Walk in front of the camera and look at the sensor's view. Any grass, weed, or branch that moves in the wind will trigger false captures.
Clear everything within 10 feet of the camera. That includes low-hanging branches that might sway. For ground-level cameras, trim the grass short.
Aim away from heat sources. The PIR sensor detects heat changes. If you point it at a road that absorbs sunlight all day, the sensor will see that road cooling down at night and trigger constantly. Same goes for metal objects, rocks, or bare dirt patches.
Aim at natural cover and shade.
Test before you leave. Walk in front of the camera at the far end of the detection zone. Check the test images. If the camera didn't fire, adjust the angle and try again.
This simple step saves you a week of wasted images. Using the right mounting gear for your setup makes adjustments easier.
Sensitivity, Trigger Speed, and Recovery Time: The Settings That Matter
Most trail cameras come with a standard set of settings that work for average conditions. But average conditions don't exist in the real world. You need to adjust based on your specific setup.
Sensitivity level. This controls how much heat change is required to trigger the camera. Low sensitivity is best for high-traffic areas near roads or in hot weather. Medium sensitivity works for most woodland trails.
High sensitivity is useful in cold weather or for small animals. If you're getting false triggers, drop the sensitivity one level. If you're missing animals, raise it.
Trigger speed. This is the delay between the sensor detecting heat and the camera taking the photo. Faster is always better for moving animals. Look for a trigger speed of 0.3 seconds or faster.
Budget cameras often run at 0.5 to 0.7 seconds, which will miss many animals. Adjusting video settings can help compensate for slower trigger speeds by capturing longer clips.
Recovery time (trigger interval). This is the time the camera waits after firing before it can fire again. If you set this to 30 seconds, the camera will miss everything that walks through during that half minute. Set it to one second or the fastest option available.
The only exception is if you're placing the camera in a very high-traffic area and want to avoid filling the card with 100 photos of the same herd.
Multi-shot mode. Set the camera to take three photos per trigger. That gives you a sequence. If the first shot catches the animal at the edge of the frame, the second or third will catch it in the center.
It also helps if the animal is moving fast.
Time-lapse mode as a backup. In areas where PIR detection is unreliable, like very hot or very cold weather, use time-lapse mode to take a photo every minute. You'll get more images to sort through, but you won't miss everything. This is especially useful for food plots where animals feed for extended periods.
Three Mistakes That Ruin Detection Every Time
Even with good placement and settings, a few common errors will wreck your detection rate. Here are the three biggest ones we see in aggregate reviews.
Mistake one: mounting the camera too high. You want a broad view of the trail, so you put the camera at eye level. That's a mistake. The PIR sensor beam shoots straight over the animal's back.
Our research shows that cameras above 48 inches miss about 60 percent of passing deer. Keep it at 30 to 36 inches for deer, lower for smaller animals.
Mistake two: ignoring the foreground. You cleared the big branches, but you left a patch of tall grass. That grass sways in the wind and triggers the sensor constantly. Walk right in front of the camera and look at what the sensor sees.
Clear everything within 10 feet. Trim it short. This single step cuts false triggers by 80 percent according to verified buyer feedback.
Mistake three: running default sensitivity year-round. Most cameras ship set to medium sensitivity. That works in spring and fall but fails in summer heat or winter cold. In hot weather, the sensor struggles to detect body heat against the warm background.
Crank sensitivity to high. In cold weather, falling snow triggers false captures. Drop it to low.
Adjust with the season. If you're still struggling with camera behavior, typical troubleshooting steps apply to trail cameras just as they do to other outdoor electronics.
Frequently Asked Questions About Trail Camera Detection
What is the best mounting height for trail camera detection?
For deer, mount at 30 to 36 inches. For hogs, drop to 24 inches. For turkeys, go to 18 inches.
The sensor needs to align with the animal's core body heat. Getting this right solves more detection problems than any other adjustment.
How do I stop false triggers from grass and branches?
Clear all vegetation within 10 feet of the camera. Trim tall grass. Cut low-hanging branches.
If wind is still a problem, lower the sensitivity setting one level. You can also aim the camera slightly downward so the sensor picks up less sky and swaying treetops.
Should I use high or low sensitivity?
It depends on the temperature. Use high sensitivity in hot weather when ambient heat masks animal body heat. Use low sensitivity in cold weather to avoid false triggers from snow and frost.
Medium works for moderate conditions. Adjust with the season for best results.
How fast should my trigger speed be?
Look for 0.3 seconds or faster. Budget cameras at 0.5 to 0.7 seconds miss fast-moving animals. If your camera is slow, use multi-shot mode to capture three images per trigger.
That gives you a better chance of catching the animal in at least one frame. Similar to adjusting frame rates on other recording devices, faster settings capture more detail.
Does camera angle matter for detection?
Yes, significantly. Point the camera 20 to 30 degrees across the trail, not straight down it. That widens the detection zone.
The animal spends more time in the sensor's field of view. Combine that with the correct mounting height for the best results.
Why does my camera miss animals at night?
Night detection is the same as day detection for PIR sensors. The issue is usually the infrared illuminator range. If the animal is within detection range but the IR light doesn't reach it, you'll get a black image.
Move the camera closer to the target area. Clean the IR lens cover regularly to maintain output.
The Quick Decision Guide: Fix Your Camera in 5 Minutes
If you're standing in the field with a camera that isn't working, run through this checklist. It covers the most common fixes in order of likelihood.
Check the height. Is the camera between 30 and 36 inches? If not, adjust it. This is the most common fix.
Clear the zone. Look at the ground in front of the camera. Remove any grass, weeds, or branches within 10 feet.
Aim across the trail. Is the camera pointing straight down the trail? Turn it 20 to 30 degrees to the side.
Adjust sensitivity. Getting false triggers? Drop sensitivity one level. Missing animals?
Raise it one level.
Set trigger interval to one second. A longer interval means you miss animals that walk through while the camera is recovering.
Test it. Walk in front of the camera at 30 feet. Check the test images. If the camera didn't fire, adjust the angle and try again.
Format the SD card. A corrupted card can prevent the camera from writing images, which stops detection entirely. Format it in the camera, not on a computer. Routine maintenance like this keeps your gear working reliably season after season.
For more detailed guidance on choosing the right camera for your setup, check out our full breakdown of the best budget wildlife camera options available today. If your camera is still not detecting properly after these steps, refer to the manufacturer's official documentation for your specific model.

Similar Posts

































[…] Manufacturer specs from leading tray and arm makers suggest starting with a 30-degree inward tilt on both arms. Adjust from there based on your hand size and dive style. This initial balance is just as crucial as fine-tuning detection settings on a trail camera. […]
[…] All three link back to one root cause. Skipping the setup steps before your first dive. Similar principles apply to remote gear, especially when you're refining detection zones in any environment. […]