How to Improve Underwater Camera Low Light Photos
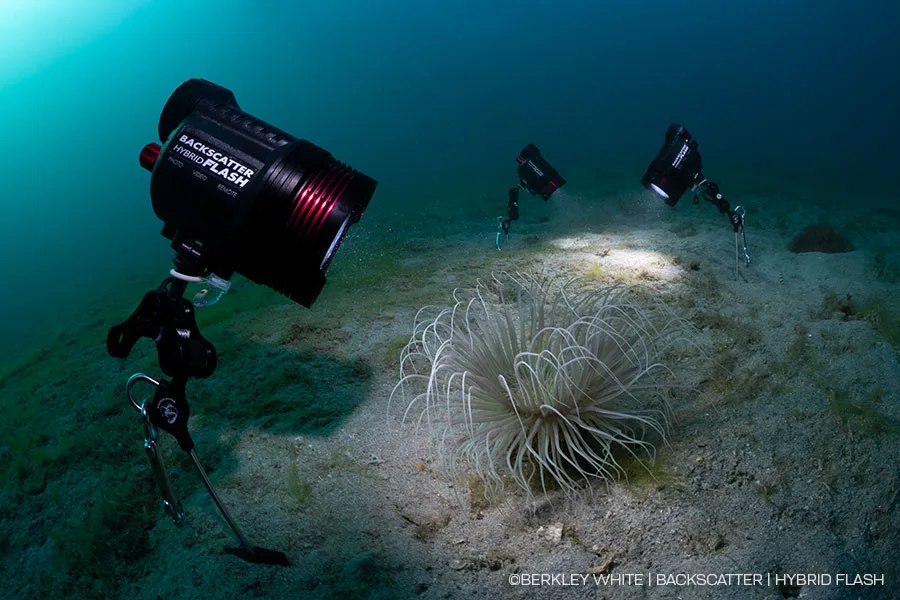
If you've ever wondered how to improve underwater camera low light photos, the answer starts with understanding why water wreaks havoc on your camera's sensor. Water absorbs and scatters light, kills color, and forces your camera to work much harder than it does on land. The result is usually a blurry, noisy, green-tinted mess.
Here's a fact that changes everything: red light disappears completely at around 3 to 5 meters depth. By 10 meters, you're shooting in a world where orange and yellow are gone too. That's why your camera's automatic white balance panics.
And that's where your fix really begins.
Quick Answer
Set your white balance manually before you dive. Add a strobe or video light to restore color. Shoot in RAW format.
Raise your ISO to 1600 or higher. Keep your shutter speed fast enough to avoid motion blur. Position your light source off-axis to reduce backscatter.
Start Here: Why Underwater Photos Look Bad in Low Light
Low light underwater isn't just dim light. It's a triple problem. First, the water column absorbs color wavelengths in order, red goes first, then orange, then yellow.
What's left is a blue-green cast that your camera's auto white balance can't fix.
Second, your camera's sensor needs more light to create a clean image. In low light, it boosts the ISO, and that introduces digital noise. The noise looks like grain, but it's worse: it smears fine detail and makes colors look muddy.
Third, slow shutter speeds happen when your camera tries to gather enough light. That's fine for a stationary subject, but fish move, currents move, and you move. Motion blur is the result.
And then there's backscatter. When you add a light source, particles in the water reflect back into the lens. It looks like snow in a snow globe.
The closer your light is to the lens axis, the worse the backscatter becomes.
So the fix involves controlling each of these variables. You can't change the physics of water, but you can change your approach.
Step 1 — Read the Conditions: Depth, Visibility, and Light Availability
Before you touch a single setting, look at the water. The condition you're in determines the entire decision tree.
Clear, Shallow Water
You're above 10 meters, visibility is good, and the sun is out. In this scenario, you can rely mostly on available light. Set your white balance to a custom value using a white slate at the shooting depth.
Use a wide aperture, f/2.8 or wider if your lens allows. Raise your ISO to 400 to 800. Keep your shutter speed at 1/100s or faster.
You might not need extra light at all.
Deep or Dark Water
You're below 15 meters, or you're on a night dive. Available light is essentially gone. You must bring your own light source.
A strobe or video light isn't optional here. Set your white balance to a daylight preset or use a custom value that matches your light source. ISO will need to climb to 1600 or 3200.
Aperture stays wide. Shutter speed stays at 1/100s or faster to freeze motion.
Poor Visibility / Murky Water
Visibility is low, and there's a lot of suspended particles. This is the hardest condition. Adding light causes heavy backscatter.
If you can, use a strobe with a diffuser and position it far off to the side. If that's not possible, try shooting with available light only and accept a slower shutter speed. Use a higher ISO to compensate.
Post-processing will handle the noise. The goal is to avoid turning the water into a snowstorm.
Step 2 — Choose Your Light Approach: Strobes, Video Lights, or Available Light
This is the most important decision you'll make. The three options have different strengths and weaknesses.
| Light Approach | Best For | Pros | Cons |
|---|---|---|---|
| Strobe (flash) | Freezing motion, macro, wide-angle with color | Bright, freezes motion, adds color, no heat | Hard to position, single shot, creates backscatter if too close |
| Video light (continuous) | Video, macro, close-up, night dives | See what you're shooting, easy to position, less backscatter with diffusion | Drains battery fast, can startle some marine life, less powerful than strobe |
| Available light only | Shallow clear water, silhouette shots, wide-angle | No equipment, natural look, no backscatter | Limited depth, slow shutter, no color below 5m |
Image source: Bing (Web (fair-use with source credit))
If you can only buy one light source, get a strobe. It's bright enough to overpower ambient light and restore full color. For video or macro work, a video light is better because you can see the effect in real time.
If you're shooting in very shallow water with good visibility, skip the light entirely. Use available light and let the natural colors come through. You'll avoid backscatter completely.
Step 3 — Set Your Camera for Low Light: ISO, Aperture, Shutter Speed, and White Balance
Once you know the condition and your light source, dial in these settings. Start with white balance, then exposure.
White Balance
Set it manually. Use a white slate or gray card at the depth you're shooting. Hold it in front of the lens and set custom white balance.
If you're using a strobe, set white balance to flash or daylight. If you're using a video light, set it to match the light's color temperature (usually around 5000K to 5500K).
ISO
Start at 800 if you have light. Go to 1600 if you're deeper or using available light. Many modern cameras handle ISO 3200 well.
Don't be afraid to push it. Noise is easier to fix in editing than motion blur.
Aperture
Use the widest aperture your lens allows. That's f/2.8 or f/1.8 if you have it. This lets in the most light.
For macro shots, you might need to stop down to f/8 or f/11 for depth of field, but that requires more light from your strobe.
Shutter Speed
Keep it at 1/100s or faster for handheld shots. If you're using a strobe, you're limited by sync speed, usually 1/200s or 1/250s. For video light or available light, 1/60s can work if you're steady, but motion blur is a risk.
Shoot RAW
Always shoot RAW. JPEGs bake in the white balance and noise reduction. RAW files give you full control over color temperature, exposure, and noise reduction later.
It's the single biggest improvement you can make, as of 2026.
Step 4 — Compose and Shoot: Positioning, Focus Lights, and Strobe Placement
Settings are useless if you can't get the shot. Here's the practical part.
Use a Focus Light
In low light, your camera's autofocus will hunt. A small focus light (a video light or a dedicated dive torch) aimed at your subject gives the autofocus system something to lock onto. It also helps you see what you're framing.
Position Your Strobe Off-Axis
Backscatter happens when light bounces off particles straight back into the lens. The fix is to move your strobe away from the camera's lens axis. Aim it from the side, above, or below.
The light hits the subject from an angle, and the particles in the water column are not directly illuminated in front of the lens.
If you're using a video light, hold it to the side, not directly above the camera. Diffuse the light with a softbox or a piece of white plastic to spread the beam and reduce harsh shadows.
Compose for the Light
Think about where the light is falling. If you're using a single strobe, position the subject so the light hits the front or side. Avoid backlighting unless you're going for a silhouette.
Shoot in Burst Mode
In low light, the first shot might be blurry. Fire a short burst of 3 to 5 frames. The sharpest one will be usable.
This also helps catch fast-moving subjects.
Check Your Histogram
The camera's rear screen is useless in bright sunlight or underwater. Use the histogram. It shows you the actual exposure.
If the graph is bunched to the left, you're underexposed. If it's against the right wall, you're blowing out highlights. Aim for a balanced histogram with no clipping.
For more on optimizing camera settings for low light, our guide on nighttime shooting approaches covers similar principles for a different environment. And if you're dealing with camera sensitivity issues, the advice on optimizing sensor sensitivity applies broadly.
Step 5 — Recover What You Can in Editing: RAW Files, Noise Reduction, and Color Correction
Even with perfect settings, some shots need post-processing. Editing is where you save the ones that didn't come out perfect underwater.
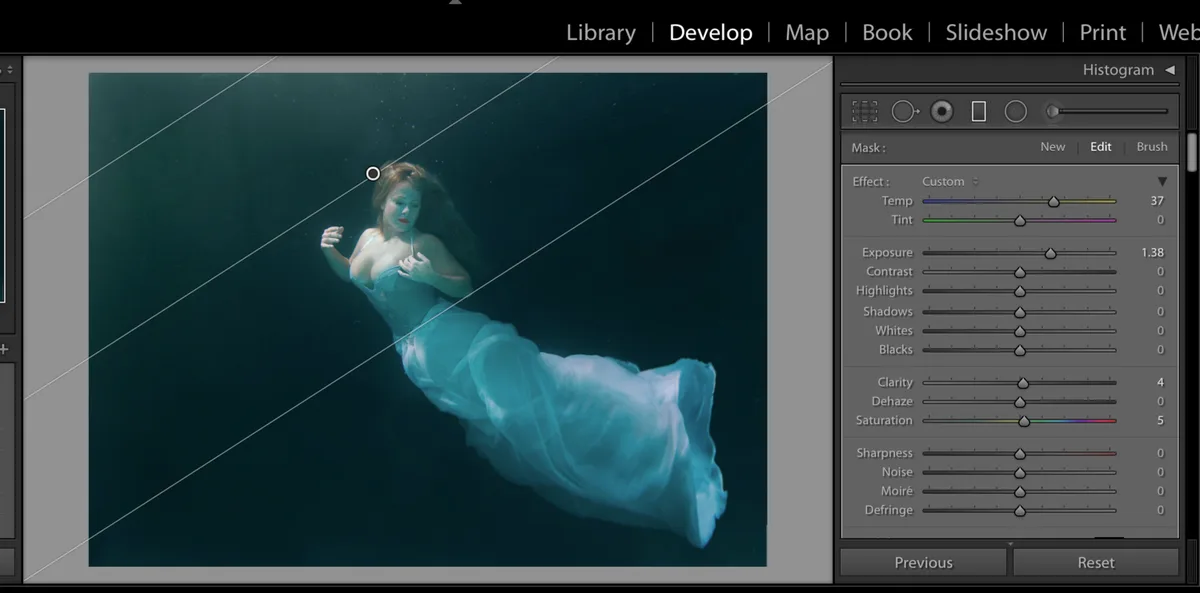
Image source: Web (Bing) / fstoppers.com (Web image (fair-use with source credit))
Start with exposure. Adjust the exposure slider to bring up the midtones. Don't push it more than one or two stops, that brings back noise.
Next, adjust white balance. Use the eyedropper tool on a neutral gray area, or manually slide the temperature until the water looks blue or teal, not green.
Noise reduction is crucial. Use the luminance noise reduction slider. Start at 20 to 30 percent.
Increase until the grain is acceptable, but don't overdo it, too much smears details. For color noise, a lower setting (10 to 15 percent) usually cleans up the greenish blotches.
Sharpening helps bring back lost texture. Apply a small amount of sharpening, between 20 and 40 percent, with a radius of 1.0. Focus it on the edges, not the background.
If you shot RAW, you can also recover highlights and shadows. Pull down the highlights to bring back detail in the sunburst or white sand. Lift the shadows to reveal the subject's body details.
Finally, adjust the saturation slightly. Don't overdo it, underwater scenes look unnatural with too much saturation. Add 5 to 10 points, and use the vibrance slider first, which protects skin tones.
Quick Decision Guide: What to Do for Each Low-Light Scenario
| Scenario | White Balance | ISO | Aperture | Shutter Speed | Light Source |
|---|---|---|---|---|---|
| Shallow, clear, sunny | Custom WB at depth | 400–800 | f/2.8 | 1/100s | None or strobe for color |
| Deep water, 15–30m | Custom WB with strobe | 1600–3200 | f/2.8 | 1/125s | Strobe (off-axis) |
| Night dive | Daylight or flash WB | 3200–6400 | f/2.8 | 1/60s–1/125s | Video light or strobe |
| Murky vis (<3m) | Custom WB with light | 1600–3200 | f/2.8 | 1/100s | Strobe with diffuser, off-axis |
| Wreck or cave (dark) | Daylight WB for strobe | 3200 | f/2.8 | 1/100s | Dual strobes or video lights |
This table covers the most common scenarios. Adjust based on your camera's sensor and lens.
Common Low-Light Mistakes Underwater (and How to Fix Them)
Mistake: Using auto white balance. The camera sees blue water and tries to warm it up, giving you a greenish cast. Fix it: set custom white balance at depth before you shoot.
Mistake: Shooting JPEG only. JPEG compression discards color detail and white balance adjustments are limited. Fix it: switch to RAW. You gain at least two stops of recovery room in editing.
Mistake: Pointing the strobe straight forward from the camera. This lights up the water column between you and the subject, creating massive backscatter. Fix it: move the strobe to one side, at least 45 degrees off-axis.
Mistake: Using too slow a shutter speed. 1/60s might be fine on land, but underwater you're constantly moving with the surge. Fix it: keep shutter speed at 1/100s or faster.
Mistake: Not using a focus light. The autofocus hunts endlessly in low light. Fix it: add a small video light or dive torch aimed at the subject. It transforms autofocus performance.
Mistake: Overprocessing noise reduction. Too much noise reduction softens the image and kills texture. Fix it: use luminance NR only up to 30% and sharpen after. Accept some grain, it's better than a mushy image.
Frequently Asked Questions
What ISO should I use for underwater low light photos?
Start at ISO 800 if you're using a strobe. For deeper or night dives, go to ISO 1600 or 3200. Most modern cameras produce clean images at 3200.
Don't be afraid to push it, motion blur is worse than noise.
Do I need a strobe or video light for underwater photography?
You need one or the other unless you're shooting in very shallow, clear water (above 5m). A strobe is better for stills and macro. A video light is better for video and night dives.
Having both offers the most flexibility.
How do I fix the green tint in underwater photos?
The green tint comes from auto white balance trying to compensate for blue water. Set custom white balance at depth using a white slate. If you already shot with the wrong WB, correct it in editing using the temperature and tint sliders.
Can I use a red filter instead of a strobe?
A red filter helps restore some color in available-light shooting, but it doesn't add light. It cuts the blue wavelengths by about two stops, which means you need even more light. A strobe or video light is far more effective in low light.
How do I avoid backscatter underwater?
Move your strobe or video light off to the side, at least 45 degrees from the lens axis. Use a diffuser to soften the beam. If conditions are exceptionally silty, consider shooting with available light only and correcting color in editing.
Should I shoot in RAW or JPEG for underwater?
RAW. Always. JPEG compression discards color data and limits your ability to adjust white balance and exposure.
RAW files give you the full sensor data. The difference is dramatic, especially in low light where you need all the recovery you can get.
For more on setting up your camera gear and optimizing it for tough conditions, check out our guide on testing a trail camera before a dive, the same principles apply to checking housing seals and battery levels. If you need help recovering lost images from a corrupted card, our recovery guide walks through the process. And for general troubleshooting of camera performance in low light situations, our troubleshooting guide covers common sensor issues.

Similar Posts
































