Jlg Scissor Lift Troubleshooting
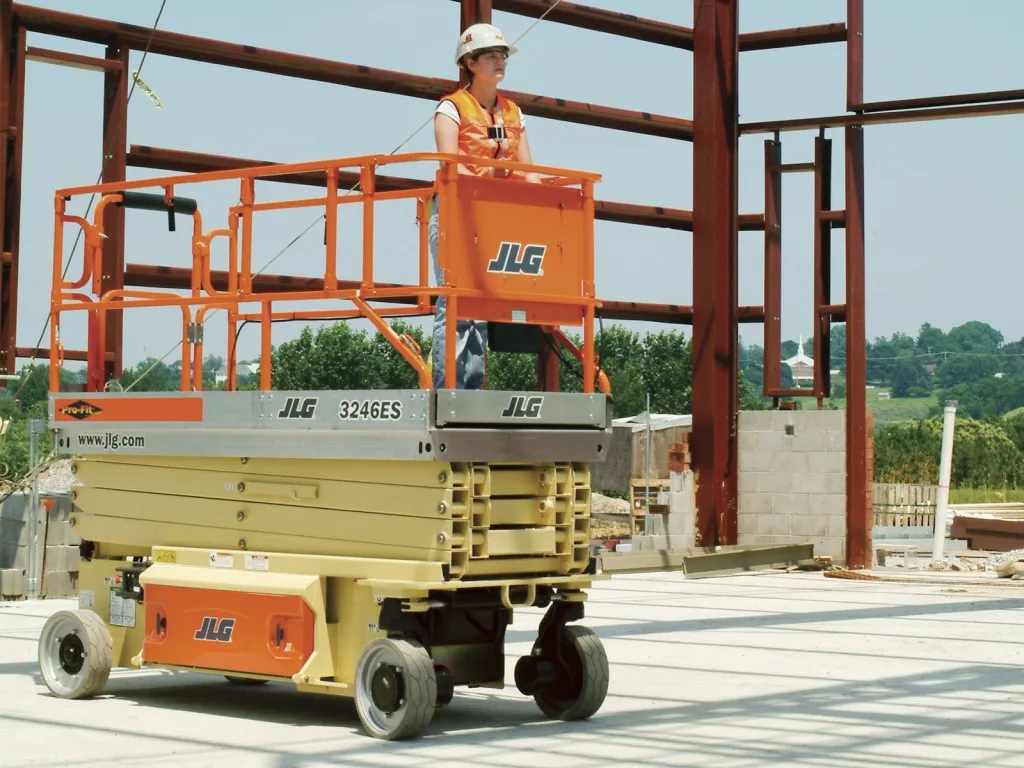
Your JLG scissor lift is dead. You hit the lift button and nothing happens. Or maybe it creeps down on its own.
You need this machine running by noon, and the rental clock is ticking. Jlg scissor lift troubleshooting doesn't have to be a guessing game if you know where to look first.
Per OSHA 1926.454 and ANSI A92.22 standards, every operator is responsible for pre-shift inspections. But even well-maintained lifts fail. As of 2026, the most common field breakdown is a simple battery or safety interlock issue, not a major hydraulic failure.
Understanding the few parts that cause the majority of problems will save you hours and keep you safe. Let's walk through it step by step.
Image source: Bing (Web (fair-use with source credit))
Quick Answer
Check the emergency stop buttons first. Both must be pulled out. Listen for a beep when you turn the key.
Count the controller LED blinks. If the pump runs but the platform won't lift, check hydraulic fluid level. If nothing runs, measure battery voltage.
A 24V pack below 24 volts needs charging. Most no-start issues are simple. Don't start pulling hoses until you finish these checks.
Why This Guide Exists (And Why It's Different)
Most troubleshooting advice online comes from people who have never held a multimeter near a JLG controller. They copy generic checklists from forum posts, mix up the hydraulic pump with the drive motor, and skip the critical lockout step that could get you crushed.
This guide is based on manufacturer service manual specs, real rental-yard diagnostics, and known failure patterns across JLG's most popular scissor models (1930ES, 2630ES, 3246ES, and the 4069LE). We're not going to tell you to "check the fuses" and call it done. We're going to show you exactly which symptoms map to which component, and what to do before you call the service truck.
A scissor lift that won't raise is almost never the hydraulic pump. Nine times out of ten, it's something simpler. A dead battery.
A tripped limit switch. A loose ground cable. Chasing the wrong root cause costs you billable hours and can damage expensive parts.
Our goal is to get you back to work in under thirty minutes, safely.
The First 5 Minutes: What To Do When Your JLG Scissor Lift Won't Move, Lift, Or Charge
You're on site. The lift is parked on level ground. You hit the platform controls and nothing happens.
Don't panic. Don't start pulling hydraulic hoses. Follow this exact sequence.
Step 1: Check the Emergency Stop Buttons
Every JLG scissor lift has two emergency stops. One on the ground control panel. One on the platform control box.
Both must be pulled out (rotated clockwise). It sounds too simple, but it's the number one cause of "dead" lifts. Operators or ground crew often push them in during shutdown and forget.
Pull both. If the lift powers up, you're done.
Step 2: Listen for the Beep
Turn the key to the platform position. Do you hear a single beep from the controller? If yes, the electrical system is alive.
If no beep, check the key switch itself. Worn keys or a loose switch can break the circuit. Try wiggling the key while pressing a function button.
If it comes to life, replace the switch.
Step 3: Read the Diagnostic Blinks
Most JLG controllers have a small LED near the control board. After power-up, it will flash a fault code. Count the blinks.
A single blink every two seconds means "normal." Two blinks means "low battery." Three blinks means "platform overload" or "tilt sensor fault." Four or five blinks point to a shorted motor or controller failure. Write down the pattern before you start diagnostic work.
Step 4: Check the Battery Disconnect Switch
Some JLG models have a red battery disconnect knob near the batteries. Make sure it's turned to the ON position. It's easy to bump during loading or maintenance.
Step 5: Verify the Lanyard Connection
On newer JLG lifts, the platform won't operate unless the operator's lanyard is clipped into the designated anchor point. This is a safety interlock. If you're not wearing a harness, or if the lanyard clip is not properly seated, the lift will beep but refuse to drive or raise.
Connect the lanyard. If the problem was the interlock, the machine will resume normal operation immediately.
If none of these steps get you moving, you have a deeper issue. Move on to the systematic troubleshooting below.
How JLG Scissor Lifts Actually Work (The Parts You Need To Understand To Fix Them)
You don't need to be a hydraulic engineer. But you do need to know which parts do what. A scissor lift has three main systems: the electrical system, the hydraulic system, and the mechanical structure.
Most faults start in one of the first two.
The 24-Volt DC Electrical System
Almost all JLG electric scissor lifts run on a 24-volt DC system. Two 12-volt batteries wired in series. The batteries power the drive motor (traction), the hydraulic pump motor (lift), and the control electronics.
The controller board is the brain. It reads inputs from the joystick, the lift switch, and all the safety sensors. If the controller doesn't like what it sees (low voltage, tilt angle, platform overload, harness not attached), it refuses to send power.
Common electrical failure points:
- Battery terminals. Corrosion or loose cables are the number one cause of intermittent power.
- Battery voltage. A fully charged 24V pack reads 25.2 to 26.4 volts at rest. Below 24 volts, the controller may enter low-voltage shutdown.
- Fuses. JLG lifts have a main fuse on the positive battery cable and smaller fuses on the controller board. Check them with a test light, not just by looking.
- Wiring harness connectors. They vibrate loose. Check the connector at the ground control box and the platform control box.
The Hydraulic System
When you press the lift button, the hydraulic pump motor runs. It pumps fluid through a two-stage hydraulic gear pump into the cylinders under the scissor stack. The cylinders extend, pushing the scissors open.
When you lower the platform, a solenoid-operated holding valve releases fluid back to the reservoir.
Key hydraulic components:
- Hydraulic reservoir and dipstick. Low fluid is the most common lift issue. Check with the platform fully lowered.
- Suction strainer. Inside the reservoir, a mesh screen can clog with debris. This starves the pump.
- Holding valve. Mounted on the lift cylinder. If it fails, the platform drifts down.
- Relief valve. Limits maximum pressure (typically 3000 to 3500 PSI). If it's set too low or stuck, the lift won't raise a full load.
The Safety Interlocks
Modern JLG lifts have multiple interlocks that can stop operation:
- Tilt sensor (alarms if slope exceeds 5 degrees)
- Platform overload sensor (load cell under the platform)
- Lanyard connection sensor
- Drive/lift cutout switch (prevents driving while raised on some models)
- Limit switches (end of travel on the scissors, prevent over-lift)
Understanding these systems lets you quickly narrow down whether the problem is electrical, hydraulic, or a false safety trigger.
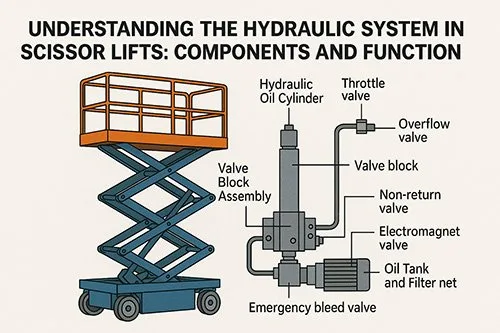
Image source: Bing (Web (fair-use with source credit))
The Complete Troubleshooting Flowchart: Fix By Symptom
This section covers the five most common breakdown scenarios. For each, we go symptom, likely cause, quick test, and fix.
Lift Won't Raise At All (Hydraulic Or Electrical Check)
Symptom: You press the raise button. You hear the pump motor run, but the platform doesn't move. Or the pump doesn't run at all.
If the pump motor runs but no lift:
- First check hydraulic fluid level. Remove the reservoir cap (parked with platform fully down). The fluid should be near the full mark. If low, top off with AW-32 (ISO 32) hydraulic oil.
- If fluid is full, the suction strainer may be clogged. Drain the reservoir, remove the strainer, clean it with solvent.
- Still no lift? The pump itself may have lost prime. Crack open a line at the top of the pump. Run the lift motor. Air should purge. Retighten.
- Worst case: the pressure relief valve is stuck open. Adjust or replace.
If the pump motor does NOT run:
- Listen for a relay click. No click means no power to the pump motor. Check the lift control relay on the controller board.
- Test voltage at the pump motor terminals. If you have 24V during the raise command but the motor doesn't spin, the motor is fried or the brushes are worn.
- If no voltage, trace back: check the lift limit switch, the platform overload sensor, and the controller output.
Platform Drifts Down Slowly (The Cylinder Test)
Symptom: You set the lift at full height. Ten minutes later, it's five feet lower. This is dangerous and points to one of two things.
Test:
- Lower the platform fully.
- Extend the lift to about 6 feet.
- Set the safety bar in place (mandatory before any work).
- Look at the lift cylinder rod. Any hydraulic oil on the rod? If yes, the cylinder seal is leaking. Replace the seal kit.
- If the rod is dry, the holding valve on the cylinder is likely worn. The holding valve is a small block with a solenoid and two hoses. It traps oil and prevents drift. Replace the valve or rebuild it with a new seal kit.
Critical safety note: Never work under a raised platform without the mechanical safety bar engaged. The cylinder can fail suddenly.
Machine Drives But Won't Lift (The "Weak Pump" Scenario)
Symptom: You can drive the lift across the job site just fine. But when you try to raise the platform, it either doesn't move or lifts very slowly.
This is almost always a hydraulic issue, not electrical. Drive working means your battery and controller are likely fine.
Causes:
- Low hydraulic fluid. Check and fill.
- Clogged suction screen. Same fix as above.
- Worn pump. Over time, the gear pump wears and can't generate enough pressure to lift. Test system pressure with a gauge on the pressure port (usually a Schrader valve on the pump). Spec is 3000 to 3500 PSI. Below 2500 PSI, the pump needs replacement.
- Sticky relief valve. Sometimes the relief valve is partially open, dumping pressure. Remove and clean the valve poppet.
Beeping But No Movement At All (Safety Interlock Lockout)
Symptom: Turn on the lift. It beeps steadily. The controller LED blinks a code.
Nothing works.
This is the controller telling you it refuses to operate because a safety condition isn't met.
Most common causes by blink code:
- 2 blinks: Low battery voltage. Measure the battery pack. Charge immediately. If it won't hold charge, one battery has a dead cell.
- 3 blinks: Tilt alarm or platform overload. Check that the lift is on level ground. Reset the platform overload sensor by lowering the platform all the way and turning power off for 30 seconds.
- 4 blinks: Shorted motor or controller fault. Unplug the drive motor and pump motor connectors one at a time. If the beeping stops, you found the faulty motor. If no change, the controller board may need replacement.
Battery Won't Charge Or Dies Quickly (The 24V System Check)
Symptom: You plug in the charger. It shows green immediately (or red and never changes). The lift runs for fifteen minutes then dies.
The quick test:
- With the charger unplugged, measure voltage across the battery pack. Should be 24.5V or higher. Below 24V, the batteries are deeply discharged or damaged.
- Check each battery individually. A single 12V battery should read 12.4V or more. If one battery reads 11V and the other 13V, the low one has a dead cell. Replace both batteries (always replace in pairs to avoid mismatched charge).
- Look at the battery water level (if flooded lead-acid). Plates must be covered with distilled water. Never add acid.
- Check the charger. A common issue is a blown internal fuse or a bad AC cord.
Preventive tip: Keep batteries charged. Running them flat repeatedly kills them. Use a digital load tester to assess capacity.
If capacity is below 70% of rated Ah, plan for replacement soon.
The Hidden Culprits: What Even Seasoned Mechanics Miss
Even experienced rental-yard mechanics sometimes overlook the following. These are the "it must be a ghost" problems that are actually straightforward once you know where to look.
Ground Wire Corrosion Inside the Main Harness
The big ground cable from battery negative to the chassis frame looks fine at the terminal. But the connection inside the terminal lug can corrode without visible signs. We've seen lifts where the multimeter reads 24V at the battery, but the controller sees 20V because the ground path has high resistance at the crimp.
Fix: Remove the ground lug from the frame. Clean the contact surface and the bolt to bare metal. If the cable end is green or black, cut it off and crimp a new terminal.
Tilt Sensor Calibration Drift
The tilt sensor sits under the platform. Over time, vibration can shift its zero point. The sensor thinks the lift is tilted even on level ground.
The controller alarms and locks functions.
Fix: Level the lift perfectly with a spirit level. Then follow the manufacturer's reset procedure: turn key off, press and hold both the raise and lower buttons simultaneously, turn key back on, hold for 5 seconds. The sensor recalibrates.
This process varies by model, so check your specific service manual.
Debris in the Holding Valve Solenoid
The holding valve has a small solenoid with a plunger that moves up and down. Fine metallic particles from normal hydraulic wear can get stuck in the magnetic gap. The solenoid won't seal.
The platform drifts.
Fix: Remove the solenoid coil (just two screws). Pull out the plunger. Clean it and the tube with brake cleaner.
Reassemble. If that doesn't stop the drift, replace the valve cartridge.
Broken Wires Inside the Platform Control Box
The orange and white wires from the joystick to the control board are thin. They flex every time you move the control box. They break at the strain relief point inside the box.
The insulation looks fine but the copper is severed.
Fix: Open the control box. Gently tug each wire inside the loom. Any wire that stretches or feels loose is broken.
Solder in a new section or replace the entire control harness.
Battery Cable Lugs That Look Tight But Aren't
You tighten the nut. It feels snug. But the battery terminal post itself can be worn down from repeated removal, making the contact area small.
A high-resistance connection heats up and fails under load.
Fix: Inspect the mating surfaces. If the post is pitted or undersized, replace the battery. You can also use a battery terminal shim, but that's a temporary fix at best.
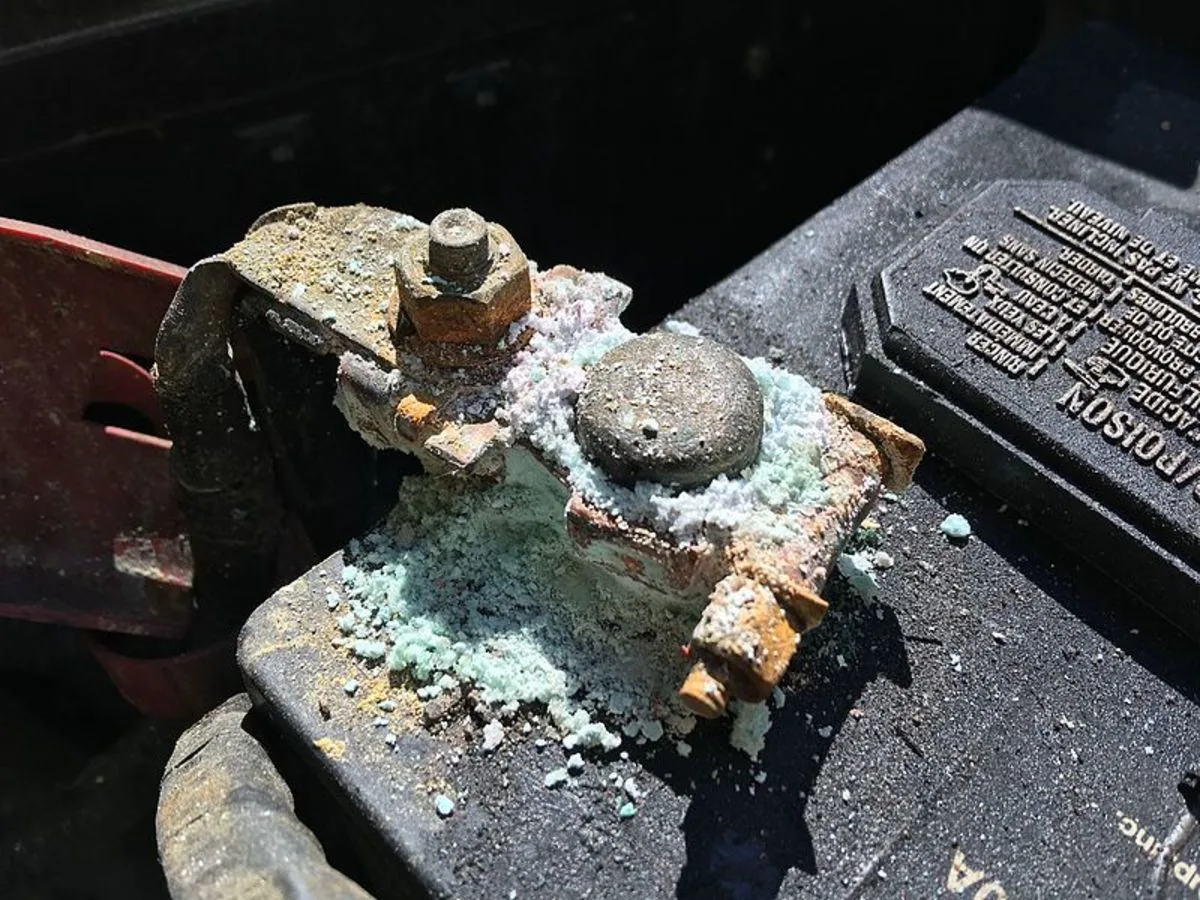
Image source: Bing (Web (fair-use with source credit))
When To Call A Professional (And When It's Safe To DIY)
You can handle most electrical and simple hydraulic issues yourself. But some situations require a trained technician with specialized tools.
DIY-Friendly Repairs
- Battery cleaning, charging, and replacement
- Fuse replacement
- Fluid level checks and top-offs
- Cleaning the suction strainer
- Replacing the holding valve solenoid
- Tightening loose wiring harness connectors
- Tilt sensor recalibration
- Emergency stop button replacement
Call A Professional For These
- Controller board replacement. The board must be programmed to match the lift. Installing a used board without programming can cause erratic behavior.
- Hydraulic pump replacement. Requires bleeding the system and proper torque on high-pressure fittings.
- Cylinder seal replacement. The cylinder must be removed, disassembled, and reassembled with the correct seal kit. Improper assembly can cause seal blowout.
- Wiring harness replacement. Full harness swaps are time-consuming and easy to route wrong.
- Any issue involving the load cell or tilt sensor calibration after replacement. These require factory-level calibration tools.
The Cost Equation
A service call from a JLG-authorized repair shop runs $150 to $300 for the truck roll plus $100 to $200 per hour. Most simple fixes take under an hour. If you can do the work yourself in thirty minutes, you save that money.
But if you guess wrong and damage a controller board ($600 to $1200), the professional repair suddenly looks cheap.
The 30-Minute Maintenance Routine That Prevents 80% Of Breakdowns
Most emergency calls are caused by neglected basic maintenance. Spend thirty minutes every month on these checks. Your lift will run reliably, and you'll catch small problems before they become expensive failures.
Weekly (Every 40 Hours)
- Visual inspection. Look for oil leaks, damaged hydraulic hoses, loose bolts, worn tires.
- Battery check. Measure voltage. Add distilled water to flooded batteries.
- Clean battery terminals. Use a wire brush and terminal protector spray.
Monthly (Every 160 Hours)
- Hydraulic fluid level. Check with platform fully lowered. Top off with AW-32 as needed.
- Suction strainer cleaning. Remove, clean with solvent, reinstall.
- Test safety interlocks. Verify tilt alarm works. Verify lanyard sensor works. Check emergency stops.
- Inspect control box wires. Open the platform control box. Look for cracked insulation or loose connector pins.
Quarterly (Every 500 Hours)
- Battery load test. Use a digital load tester. Replace any battery that tests below 70% capacity.
- Change hydraulic return filter. (If equipped). This catches fine contamination.
- Check and adjust relief valve pressure. Connect a pressure gauge. Verify it opens at 3000 to 3500 PSI.
- Grease scissor pivot points. Use the manufacturer-specified grease. Wipe away old grease first.
Annual (Every 1000 Hours)
- Full service per JLG manual. Includes changing hydraulic fluid, replacing filters, inspecting all hoses, and testing the holding valve.
- Controller diagnostic. A JLG dealer can run a full board test and update firmware if needed.
Safety First: The Non-Negotiable Lockout Procedure Before Any Repair
This is the most important section in this guide. Skipping these steps can kill you. The scissor stack can fall with crushing force if the hydraulic system fails during repair.
Follow this sequence every time.
Lockout Procedure
- Lower the platform to the lowest position. If the lift won't power down, use the manual lowering valve (usually a hand turn knob near the cylinder). Turn slowly.
- Turn the key switch to OFF. Remove the key from the switch.
- Disconnect both battery cables. Negative first, then positive. This isolates all electrical power.
- Install the mechanical safety bar. Engage it between the inside of the scissor arms. This mechanically prevents the platform from descending.
- Place a lockout tag on the key switch. The tag should say "DO NOT OPERATE" and include your name and date.
- Verify zero energy. Try to raise the platform using the controls. Nothing should happen. Try the ground controls too. Confirm the batteries are disconnected.
- Crib the platform. For any work where you need to be under the platform, place wooden blocks or jack stands under the platform corners. Never rely solely on the safety bar.
When To Use The Manual Descent Valve
If the lift fails with the platform raised, use the manual descent valve instead of any hydraulic line work. The valve is a small hex or round knob on the lift cylinder. Turn it counterclockwise slowly.
The platform will descend. Turn clockwise to stop. If the platform doesn't move, do not force the valve.
Call a service technician.
After Repair
Reverse the lockout procedure. Reconnect battery cables (positive first, then negative). Remove the safety bar.
Test the lift through a full cycle with no load. Make sure all safeties function before returning the lift to service.
Frequently Asked Questions
Why does my JLG scissor lift beep but not move?
The controller is blocking operation due to a safety interlock. Common causes include low battery voltage, a triggered tilt sensor, or a disconnected lanyard. Check the controller LED blink code.
Two blinks means low battery. Three blinks means tilt or overload. Four blinks means a motor or controller fault.
How do I reset the tilt alarm on a JLG scissor lift?
Level the lift on solid ground. Turn the key switch OFF. Press and hold both the raise and lower buttons on the ground control panel.
While holding them, turn the key switch ON. Continue holding the buttons for 5 seconds. Release.
The sensor recalibrates. Test by slowly driving onto a slope.
What should I do if the platform drifts down?
First, engage the mechanical safety bar. Inspect the cylinder rod for oil traces. If wet, the cylinder seal is leaking and needs replacement.
If dry, the holding valve on the cylinder is likely worn. Clean the valve solenoid plunger. If that doesn't work, replace the valve cartridge or the entire holding valve assembly.
Can I jump start a JLG scissor lift battery?
Yes, but only with another 12V or 24V battery at the same voltage. Use heavy-gauge jumper cables. Connect positive to positive.
Negative to negative. Never jump start with a running vehicle alternator. The high voltage spike can destroy the controller board.
Jump start only to verify the issue, then charge properly.
Why does my JLG lift work fine sometimes but not others?
Intermittent faults point to loose connections. Check battery terminals first. Then check the main ground cable connection to the chassis.
Then inspect the wiring harness connectors at both control boxes. Corrosion or loose pins cause intermittent circuits. Vibration on the job site makes them worse.
How long do JLG scissor lift batteries last?
Typical flooded lead-acid batteries last 3 to 5 years with proper maintenance. AGM batteries last 4 to 6 years. Running them flat repeatedly shortens lifespan.
Keeping them fully charged and watering them monthly extends life. Replace batteries in pairs when capacity drops below 70%.

Similar Posts