Manitowoc Ice Machine Troubleshooting

Your Manitowoc ice machine is acting up. Maybe it's not making ice at all. Maybe the cubes are small, hollow, or bridged together.
Or maybe water is pooling where it shouldn't be. Whatever the symptom, you need answers fast, because downtime in a commercial kitchen costs real money. That's where Manitowoc Ice Machine Troubleshooting comes in, and the good news is most issues follow predictable patterns.
Manufacturer specifications indicate that a well-maintained Manitowoc unit should produce a full batch of ice every 15 to 20 minutes, depending on the model and ambient temperature. As of 2026, the Indigo series remains the most common line in North American commercial kitchens, and its onboard diagnostic system simplifies troubleshooting considerably. But even without a touchscreen, you can diagnose most problems in under 10 minutes using the right sequence of checks.
Let's walk through them.
Image source: Bing (Web (fair-use with source credit))
Quick Answer
Troubleshoot your Manitowoc ice machine by matching the symptom to the cause. No ice means check power, water supply, and the bin switch. Small cubes point to a harvest issue or low water level.
Error codes on Indigo models tell you exactly what's wrong. Leaks usually come from a cracked water trough or loose drain fitting. Start with the simplest fix first, the water filter, and work your way up.
The Most Common Signs Your Manitowoc Ice Machine Is Having a Problem
Every malfunction shows itself through one of a handful of symptoms. Once you learn to read those symptoms, you can trace them back to the root cause with surprising accuracy.
No ice production at all
This is the most urgent call we get from restaurant owners. The compressor is running, the fan is spinning, but the bin stays empty. In our research, the top three causes are a stuck bin switch, a failed water inlet valve, or a control board that has lost its mind.
If the machine is completely silent, check the power cord and the breaker first. It sounds obvious, but a tripped GFCI is often the culprit.
Small, hollow, or oddly shaped cubes
When your ice looks wrong, the problem is almost always in the harvest cycle or the water level. Small cubes mean the ice thickness probe is triggering too early. Hollow cubes, those with a dimple or hole in the center, indicate the water trough wasn't full enough during the freeze cycle.
And bridged cubes, where several stick together, point to a harvest assist valve that isn't opening fully or a condenser that is running too hot.
Water leaking or pooling
A puddle under your ice machine is never normal. The most common leak sources are the water trough drain plug, which can crack or loosen over time, and the water inlet valve fitting. On Q-Series machines, the plastic water trough itself develops hairline cracks after a few years of thermal cycling.
If the leak is coming from inside the bin, check the bin drain gasket. It dries out and shrinks.
Error codes on the display
The Indigo series uses a simple alphanumeric display to communicate problems. Each code maps to a specific subsystem. An "H" code means the discharge temperature is too high, usually from a dirty condenser or a bad fan motor.
A "C" code means the machine is overdue for its cleaning cycle. A "d" code means the door is open. Knowing these codes is the fastest shortcut to a repair.
Machine runs but no harvest
You can hear the compressor running. The evaporator gets cold. But the ice never releases and falls into the bin.
That is a harvest cycle failure. The two most likely suspects are the hot gas valve, which redirects hot refrigerant to loosen the cubes, and the harvest assist solenoid, which pushes water over the evaporator. On older machines, the timer board can lose its programming and skip the harvest step entirely.
How the Freeze and Harvest Cycle Works
Before you start swapping parts, it helps to understand what your machine is supposed to be doing. The freeze and harvest cycle is the core operating rhythm of any commercial ice maker.
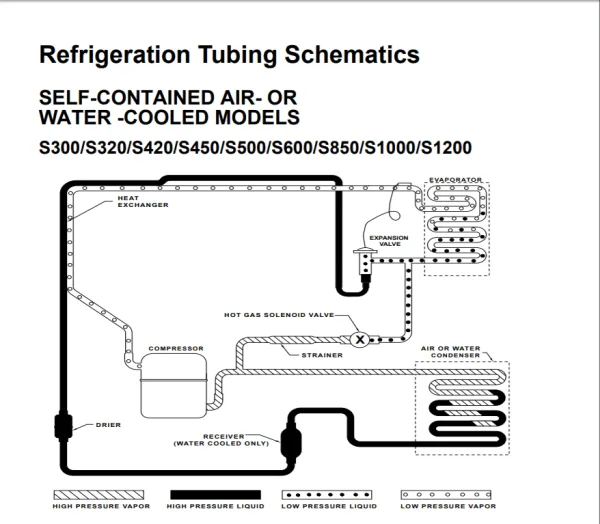
Image source: Bing (Web (fair-use with source credit))
The freeze phase
The freeze cycle starts when the bin switch tells the control board the bin is empty. The water pump kicks on, circulating water from the trough over the evaporator plate. The compressor starts, and the evaporator gets cold enough to freeze water into clear ice cubes.
The water pump runs continuously during this phase, keeping a thin film of water flowing over the ice as it forms. This is what gives Manitowoc cubes their characteristic clarity. Any interruption in water flow, whether from a clogged filter, a failing pump, or low water pressure, will show up immediately in the quality of the ice.
The harvest phase
Once the ice reaches the correct thickness, the ice thickness probe signals the control board to begin harvest. The hot gas valve opens, sending hot refrigerant into the evaporator to warm it up. The cubes slide off the plate and fall into the bin below.
On most models, a harvest assist solenoid also opens to push a small amount of water over the evaporator, helping the release. The whole harvest cycle takes about 90 seconds to 3 minutes. If it takes longer than that, something is wrong.
The bin full signal
After the ice drops, the machine waits. The bin switch, either a mechanical arm on older models or an infrared sensor on Indigo machines, monitors the ice level. When the bin is full, the machine stops producing.
When ice is removed, the switch closes and a new cycle starts. This is where many false "no ice" complaints come from. The machine is working fine.
The bin is just full. Check the bin level before you dive into deeper diagnostics.
Step-by-Step: No Ice at All – Freeze Cycle Not Running
This is the most common troubleshooting scenario. Your machine is plugged in, the display is lit, but the evaporator never gets cold and the bin stays empty. Follow this sequence in order.
Step 1: Confirm power to the unit
Check the circuit breaker and the GFCI outlet. Many commercial kitchens share circuits, and a tripped breaker on the fryer line can kill power to your ice machine. If the display is dark, test the outlet with a multimeter or a known good device.
If the display is on but the compressor never kicks, move to step two.
Step 2: Check the bin switch
The bin switch is the most common false negative in ice machine diagnostics. If the bin arm is stuck in the up position, or if the infrared sensor is blocked by a bag of ice or a stray piece of plastic, the machine thinks the bin is full. On mechanical arm models, manually lift and lower the arm.
You should hear a click. On Indigo models, check the sensor window for dirt or obstruction. Clean it with a soft cloth and warm water.
Step 3: Verify water supply
The machine needs water to make ice. If the water inlet valve is closed, the filter is clogged, or the supply line is kinked, the machine will try to start a cycle but will fail after a few minutes. Look at the water trough.
Is there water in it? If not, trace the supply line back to the shutoff valve. Open it fully.
Replace the water filter if it is more than six months old. Manitowoc recommends changing filters every six months or 15,000 gallons, whichever comes first.
Step 4: Check the water pump
The water pump circulates water over the evaporator during the freeze cycle. If the pump is dead, the evaporator will freeze dry and the machine will time out. Listen for the hum of the pump during the freeze cycle.
If you hear nothing, test the pump motor with a multimeter. A failed pump is one of the easiest repairs on a Manitowoc machine. It is a single module that unclips from the water trough.
Step 5: Test the control board
If all the above checks pass and the machine still won't start a freeze cycle, the control board may be faulty. On Q-Series machines, you can often see a small LED on the board that indicates power and cycle state. If the LED is off, the board is not receiving power or has failed.
On Indigo models, the display will typically show an error code if the board detects a problem. Power cycling the machine, unplugging it for 30 seconds and plugging it back in, will sometimes reset a glitched board. But if the board is truly dead, replacement is the only fix.
Step 6: Inspect the compressor and start components
This is the point where many DIY troubleshooters should stop and call a professional. A compressor that hums but won't start, or one that starts and trips the overload, requires refrigerant handling certification and specialized tools. Check the start capacitor and relay first.
These are common failure points and can be replaced without opening the sealed system. If the capacitor is bulging or leaking, replace it with the exact microfarad rating specified on the original part.
Step-by-Step: Small, Hollow, or Bridged Cubes – Harvest or Water Issues
Ice quality problems are frustrating because the machine is running. It is making something that looks like ice, just not good ice. These symptoms are almost always correctable with adjustments or simple part replacements.
Small cubes: adjust the ice thickness probe
The ice thickness probe sits on the evaporator plate and senses when the ice has reached the right thickness. If the probe is adjusted too close to the evaporator, it triggers harvest too early, and you get small cubes. Locate the probe adjustment screw.
Turning it counterclockwise moves the probe further away, allowing the ice to grow thicker before harvest. Manufacturer specifications suggest a gap of about 1/8 to 1/4 inch between the probe tip and the evaporator. Adjust in small increments and run a full cycle to see the change.
Hollow cubes: check water level and pump flow
Hollow cubes mean the water trough was not full enough during the freeze cycle. The water level in the trough should be about 1/2 inch deep during operation. If it is lower, the inlet valve may not be opening fully, or the water filter is restricting flow.
Another common cause is a faulty water pump that is not moving enough water over the evaporator. When the water film is too thin, the center of the cube freezes last, leaving a small hole or dimple. Clean the water trough and pump inlet screen.
Scale buildup is the usual culprit.
Bridged cubes: diagnose harvest assist failure
Bridged cubes, where several cubes freeze together into a solid block, are a clear sign of a harvest problem. The ice sticks to the evaporator too long, and the next freeze cycle starts before the previous batch has fully dropped. The hot gas valve is the most likely suspect.
If it is not opening fully, the evaporator stays too cold for the ice to release. On some models, the harvest assist solenoid also plays a role. When it fails, the water assist does not happen, and the cubes have nothing to help them slide off.
Test the hot gas valve by feeling the outlet line during harvest. It should get noticeably warm. If it stays cold, the valve is stuck closed.
Scale buildup: the hidden cause of everything
Hard water scale is the enemy of commercial ice machines. It builds up on the evaporator, inside the water trough, and inside the water pump. Scale acts as an insulator, reducing heat transfer and making the machine work harder to freeze ice.
It also clogs the thickness probe, causing false readings that lead to small or oversized cubes. Manitowoc machines have a self-cleaning cycle on Indigo models. Run it every three months with a nickel-safe ice machine cleaner.
For machines in hard water areas, quarterly cleaning is not optional. It is necessary for reliable operation.
Low ambient temperature: a winter problem
Commercial ice machines are designed to operate in temperatures between 50°F and 100°F. If your machine is installed in an unheated garage, a warehouse, or a loading dock, cold ambient temperatures can cause the harvest cycle to stall. The refrigerant does not build enough pressure to open the hot gas valve.
The result is ice that forms but never drops. This is not a component failure. It is an installation problem.
Relocating the machine or adding a winter kit with a crankcase heater is the solution.
Step-by-Step: Leaking, Overflowing, or Water in the Bin
Water where it should not be is both a safety hazard and a sign of a mechanical problem. A wet floor near an ice machine creates slip risks and can damage nearby equipment.
Check the drain system first
The bin drain is the most common leak point. Over time, the rubber gasket between the drain fitting and the bin wall dries out and shrinks. Water seeps past it and runs down the outside of the machine.
Remove the drain cover and inspect the gasket. If it is cracked or flattened, replace it. The part costs a few dollars and takes five minutes to swap.
Inspect the water trough for cracks
The plastic water trough on Q-Series machines is a known weak point. Thermal cycling, the constant expansion and contraction from hot harvest gas and cold water, eventually causes hairline cracks. Look closely at the corners and around the drain plug.
A crack that opens during the freeze cycle closes when the machine warms up. This makes it hard to spot when the machine is off. Fill the trough with water while it is still in the machine.
Watch for drips underneath.
Test the water inlet valve
A stuck open water inlet valve will overfill the trough and send water spilling onto the floor. This happens when debris lodges in the valve seat or the diaphragm fails. Disconnect the water supply line and remove the valve.
Look for small grit or scale inside. Clean it with a soft brush or replace the entire valve assembly. Do not try to rebuild it.
The cost difference is negligible and a rebuilt valve rarely seals as well as a new one.
Check the bin thermostat seal
On older mechanical bin switch models, the thermostat bulb enters the bin through a small grommet. That grommet can dry out and let water wick along the wire. Seal it with food-grade silicone or replace the grommet.
It is a tiny fix that solves a frustrating intermittent drip.
Look for condensation issues
Not every wet floor is a leak. In humid environments, the cold surfaces of the ice machine can collect condensation and drip onto the floor. This is normal but can be minimized.
Insulate the cold water supply line and make sure the machine is level so condensation runs into the drain rather than pooling. If condensation is heavy, consider a dehumidifier in the room.
Step-by-Step: Interpreting Error Codes and Flashing Lights
The Indigo series made troubleshooting much easier by putting diagnostic information right on the display. But you still need to know what each code means and what to do about it.
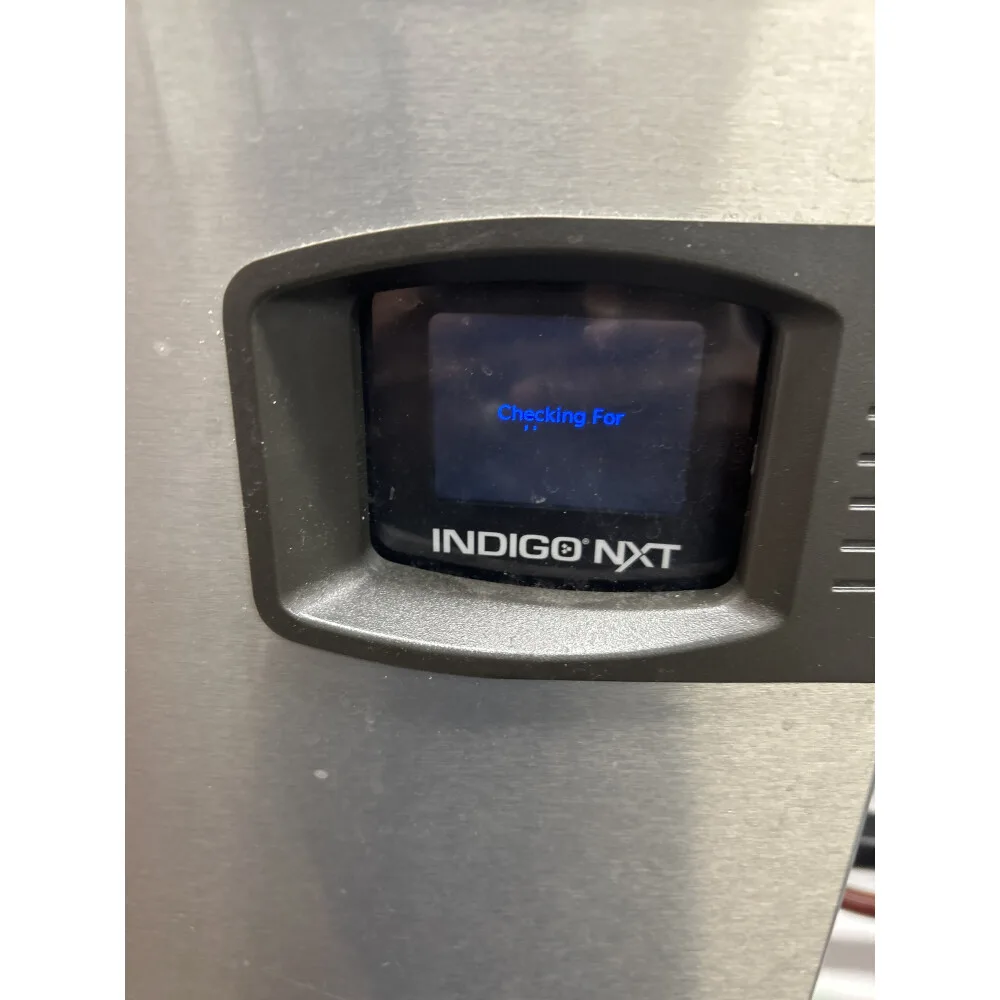
Image source: Bing (Web (fair-use with source credit))
Common error codes and their meanings
Here is a quick reference table for the most frequently seen codes on Indigo machines.
| Code | Meaning | Most Likely Cause |
|---|---|---|
| H | High discharge temperature | Dirty condenser, failed fan motor, low refrigerant |
| C | Cleaning cycle overdue | Machine has run past its cleaning interval |
| d | Door open | Door switch stuck or door ajar |
| F | Freeze cycle timeout | Water pump failure, low water, bad control board |
| r | Harvest cycle timeout | Hot gas valve failure, harvest assist problem |
| b | Bin sensor fault | Dirty infrared lens, misaligned sensor, bad board |
How to respond to an H code
An H code means the compressor discharge temperature has exceeded the safe limit. This is serious. Running the machine in this state can damage the compressor.
Turn the machine off immediately. Clean the condenser coil with a brush and compressed air. Check the condenser fan motor.
If the fan is not spinning, the motor is dead. Check the refrigerant pressures. An H code with a clean condenser and running fan usually means low refrigerant and a leak.
That is a job for a certified technician.
How to respond to a C code
A C code is not an emergency. It is a reminder that the self-cleaning cycle is due. The machine will continue to produce ice but the code will remain until you run the cycle.
On Indigo models, press and hold the clean button for three seconds. The machine will run through a 30 minute cleaning cycle. Use a nickel-safe ice machine cleaner.
Regular household bleach damages the evaporator coating.
How to respond to F and R codes
An F code means the freeze cycle took too long. An R code means the harvest cycle timed out. Both point to a mechanical problem rather than a sensor issue.
For an F code, check water flow and pump operation. For an R code, check the hot gas valve and harvest assist solenoid. If both codes appear together, the control board may be misreading the cycle timing.
Reset the machine and run a manual test cycle. If the codes return right away, focus on the hot gas valve first.
Flashing lights on older machines
If you have a Q-Series or S-Series machine without a digital display, the control board uses LED indicators instead. A single flash pattern tells you the machine is in freeze cycle. A double flash means harvest.
A steady on light with no flash indicates the bin is full. If the light is off entirely, check power to the board. If the light flashes rapidly, the board has detected a fault.
Count the flashes and consult the service manual for your specific model.
Mistakes Even Experienced Owners Make
Even seasoned restaurant owners and maintenance staff make these common errors. Avoid them and you will save time and money.
Replacing parts without diagnosing first
The number one mistake we see is throwing parts at a machine. New water pump, new inlet valve, new control board. Then the original problem is still there.
Diagnose first. Swap second. A 10 minute check of the bin switch would have saved you the cost of a pump you did not need.
Ignoring the water filter
A clogged water filter causes a cascade of problems. Low water level, small cubes, slow production, scale buildup. Many troubleshooting calls end with a simple filter change.
If you cannot remember when you last changed the filter, change it now. Mark the date on the filter housing with a permanent marker.
Using the wrong cleaner
Bleach is not an ice machine cleaner. It corrodes the nickel plating on the evaporator and damages the rubber seals. Use only nickel-safe ice machine cleaner from Manitowoc or an equivalent brand.
The cleaner is formulated to dissolve scale without attacking the metal. Follow the instructions on the bottle.
Forgetting to clean the condenser
A dirty condenser is the cause of more H codes than anything else. The condenser coil pulls in kitchen air full of grease and dust. Over time, it gets coated and loses its ability to shed heat.
Clean it every three months. Use a soft brush and a vacuum. Do not use a pressure washer.
The high pressure bends the fins and pushes debris deeper into the coil.
Assuming the control board is the problem
Control boards do fail. But they fail less often than other components. Before you order a new board, verify that every other component is working.
Check the bin switch, the water pump, the inlet valve, and the hot gas valve. A bad connection on a wire harness looks like a board failure. Inspect the connectors for corrosion or loose pins.
When to DIY vs. Call a Pro (Decision Guide)
Not every problem is meant for the restaurant owner or maintenance person to solve. Some repairs require tools, skills, and certifications you probably do not have. This decision guide will help you know where to draw the line.
You can handle these repairs yourself
If the fix involves cleaning, adjusting, or swapping a modular component, you can do it. Replace a water pump. Change a water filter.
Clean the condenser. Adjust the ice thickness probe. Replace a bin arm switch.
These repairs take basic hand tools and a little patience. Manitowoc designs their machines for serviceability. Parts unclip and slide out without special tools.
Call a pro for these repairs
If the fix involves the sealed refrigeration system, refrigerant, or compressor, call a certified technician. Recovering refrigerant requires EPA Section 608 certification. Charging the system requires a manifold gauge set and knowledge of superheat and subcooling.
Replacing a compressor requires a torch, vacuum pump, and recovery machine. These are not DIY jobs. Attempting them without training can damage the machine and void the warranty.
The gray area: control boards and wiring
Replacing a control board is technically a DIY job. Unplug the old one, plug in the new one. But misdiagnosing a board can waste money.
If you have verified every other component and the board is the last suspect, go ahead and swap it yourself. But if you are unsure, a service call to confirm the diagnosis is cheaper than buying two boards.
When the math says call a pro
Service calls cost money. But so does downtime. If your machine is down during peak business hours, the lost revenue from iced tea, margaritas, and ice baths for salad greens adds up fast.
A professional can often diagnose and repair the machine in one visit. If you spend two hours guessing and swapping parts, you have already lost more than the service call cost.
| Symptom | DIY or Pro? | Why |
|---|---|---|
| No ice, bin switch fine | DIY | Check water inlet, pump, filter |
| H code with dirty condenser | DIY | Clean condenser, verify fan |
| H code with clean condenser | Pro | Likely refrigerant leak |
| Small cubes | DIY | Adjust thickness probe |
| Bridged cubes | DIY | Check hot gas valve |
| Compressor won't start | Pro | Needs capacitor and sealed system check |
| Leaking water trough | DIY | Replace trough or gasket |
| Error code after power cycle | Pro | Board or wiring fault |
Frequently Asked Questions
Why is my Manitowoc ice machine not making ice?
The most common cause is a bin switch stuck in the full position. Manually lift and lower the bin arm or clean the infrared sensor window. If the switch is fine, check the water supply and water filter.
A clogged filter starves the machine of water.
What does the H code mean on my Manitowoc Indigo machine?
An H code means high discharge temperature. The compressor is running too hot. Clean the condenser coil and check the condenser fan motor.
If those are fine, you likely have a refrigerant leak. Turn the machine off and call a certified technician.
How often should I clean my Manitowoc ice machine?
Run the self-cleaning cycle every three months. Use a nickel-safe ice machine cleaner. In hard water areas, clean every two months.
Regular cleaning prevents scale buildup that causes small cubes, slow production, and error codes.
Can I use bleach to clean my ice machine?
No. Bleach corrodes the nickel plating on the evaporator and damages the rubber seals. Use only nickel-safe ice machine cleaner.
It dissolves scale without attacking the metal. Follow the instructions on the bottle.
How do I adjust the ice thickness on my Manitowoc machine?
Locate the ice thickness probe on the evaporator plate. Turn the adjustment screw counterclockwise to make larger cubes and clockwise for smaller cubes. Adjust in small increments and run a full cycle to check the result.
The ideal gap is 1/8 to 1/4 inch between the probe tip and the evaporator.
When should I call a professional instead of fixing it myself?
Call a pro if the repair involves refrigerant, the compressor, or the sealed refrigeration system. Also call if you have replaced the obvious parts and the problem persists. A service call is cheaper than buying parts you do not need.
Why does my ice machine keep leaking water?
Check the bin drain gasket first. It dries out and leaks. Next, inspect the water trough for cracks.
Then test the water inlet valve. A stuck open valve overfills the trough. Condensation in humid environments can also look like a leak.
How do I reset my Manitowoc ice machine after an error code?
Unplug the machine for 30 seconds and plug it back in. On Indigo models, you can clear some codes through the display menu. If the error returns immediately, the underlying problem is still there.
Diagnose the root cause before resetting again.

Similar Posts