Honeywell Water Heater Troubleshooting
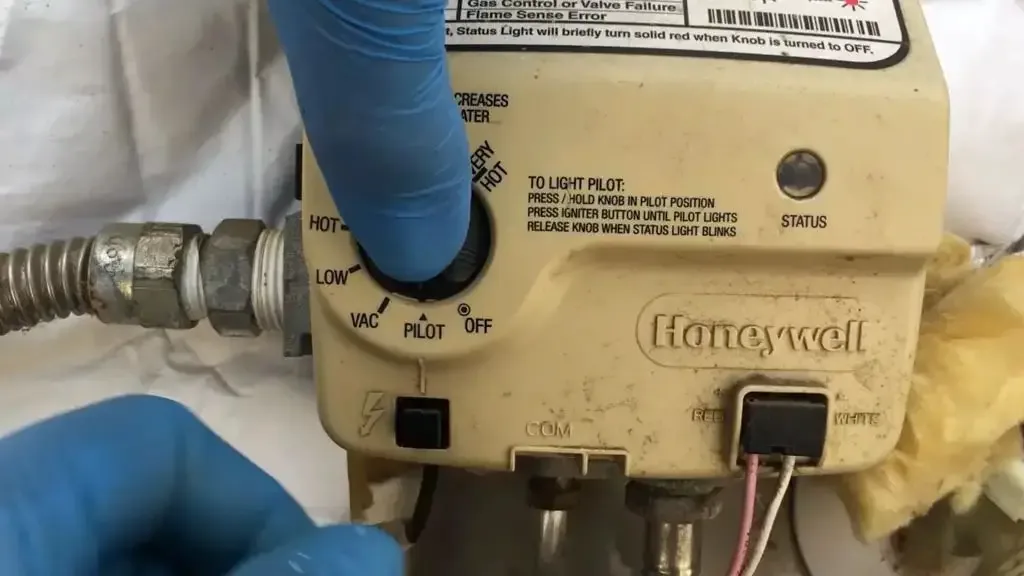
If your gas water heater is acting up, you are not alone. Honeywell water heater troubleshooting is one of the most common DIY searches for homeowners who suddenly find themselves facing cold showers and a flashing red light. The good news is that most problems boil down to a handful of causes. You can often fix them without calling a plumber.
Over 80% of Honeywell gas valve service calls are caused by four things: a weak or dead thermopile, a tripped ECO (energy cut-off) switch, a dirty pilot assembly, or a blocked vent tripping the pressure switch. Honeywell's diagnostic LED system tells you exactly which one it is. Let us walk through what is happening inside that metal box before you grab your wallet.
Image source: Bing (Web (fair-use with source credit))
Quick Answer
Honeywell water heater troubleshooting starts with reading the LED flash code. Count the flashes. One flash means a pilot issue.
Two flashes mean low thermopile voltage. Three flashes mean a failed thermopile. Four flashes mean a bad temperature sensor.
Five flashes mean a failed gas valve. Six flashes mean a blocked vent. Turn off the gas.
Wait five minutes. Follow the code-specific fix.
How Water Heaters with Honeywell Controllers Actually Work
Understanding the basics saves time and keeps you safe. A Honeywell gas control valve is the brain of your water heater. It sits on the outside of the tank near the bottom.
It manages gas flow to the pilot and main burner. It also monitors safety systems that shut everything down if something goes wrong.
The Self-Powered System
Most Honeywell residential water heaters use a millivolt system. They generate their own electricity. No batteries.
No wall outlet. The pilot flame heats a device called a thermopile. That device produces a small DC voltage.
That voltage powers the gas control valve electronics and keeps the gas supply open.
If the pilot goes out, the thermopile cools down. Voltage drops. The valve closes.
No gas flows. That is a safety feature. But if your thermopile is old, corroded, or coated in soot, it may not produce enough voltage even with the pilot burning.
That is the most common reason pilots will not stay lit.
What Each Component Does
Knowing the key parts helps you diagnose faster.
| Component | Function | Common Failure |
|---|---|---|
| Gas control valve | Regulates gas flow to pilot and burner | Internal mechanical failure (rare) |
| Thermopile | Generates electricity from pilot flame | Weak output, open circuit, soot coating |
| Thermocouple | Older safety device (some models) | Low mV output |
| Temperature sensor | Reads water temperature | Drift or open circuit |
| Pressure switch | Confirms vent is clear | Blocked vent or failed switch |
| ECO (energy cut-off) | Overheat protection | False trip from nearby heat source |
| LED indicator | Displays error codes | Rarely fails |
The Ignition Sequence
Turn the gas control knob to "Pilot" and hold it down. Gas flows to the pilot assembly. Press the igniter button.
A spark or hot surface igniter lights the pilot flame. Hold the knob down for about 60 seconds. This lets the thermopile warm up.
Once it reaches around 650 millivolts or more, the electromagnet in the valve holds the gas open. Release the knob. Turn it to "ON."
If the pilot goes out during operation, the thermopile cools. Voltage drops below the holding threshold. The valve snaps shut.
A drafty basement or a windy day can kill your pilot. That is intentional, not a design flaw.
The Diagnostic LED
Every Honeywell gas control valve since the early 2000s has a small LED indicator on the front. It sits behind a small window. The LED blinks a specific number of flashes, pauses, and repeats.
Count the flashes. That is your starting point.
As of 2026, Honeywell publishes standardized flash codes across all their residential water heater gas valves. The codes are the same whether you have a Rheem, Bradford White, State, or AO Smith tank. That makes troubleshooting predictable.
The Most Common Problem: Pilot Won't Light or Stay Lit
This is the number one call. You turn the knob to "Pilot." Press it down. Hit the igniter.
Nothing happens. Or the pilot lights. You hold the knob.
Release it. It goes out. Let us break down each scenario.
If the Pilot Won't Light at All
You have three possible culprits. First, the gas supply. Check that the manual shut-off valve on the gas line is fully open.
It should be parallel to the pipe. A partially closed valve can reduce gas flow enough that the pilot will not light.
Second, air in the gas line. If you just turned the gas back on, air can be trapped. Hold the control knob down in "Pilot" position for several minutes.
You may hear a faint hissing. Keep holding. The air clears and gas reaches the pilot.
It can take up to 90 seconds.
Third, a blocked pilot orifice. Dirt, dust, or spider webs can clog the tiny hole where gas exits. Remove the pilot assembly.
Inspect the orifice. Use compressed air or a fine wire to clear it. Do not enlarge the hole.
That changes gas flow and can cause a dangerous flame.
If the Pilot Lights but Goes Out When You Release the Knob
This is the classic thermopile problem. You held the knob for 30 to 60 seconds. The pilot stayed lit.
Release the knob. The flame dies. Here is what is happening.
The thermopile needs at least 650 millivolts to hold the gas valve open without the knob pressed. Test this with a multimeter. Set it to DC millivolts.
Disconnect the two white wires from the gas control valve. Connect your meter leads to those wires. Light the pilot.
Watch the reading climb.
A new thermopile in a clean system reads 800 to 900 millivolts. A weak one might top out at 500 or 600. Below 650, the valve will not hold.
The pilot goes out.
Your options are simple. Clean the thermopile with fine steel wool. Remove the pilot assembly.
Gently wipe the thermopile rod clean of black soot or white oxidation. Reinstall and retest. If reading stays below 650, replace the thermopile.
They cost about $15 to $25.
If the Pilot Lights but Goes Out Minutes or Hours Later
This is different. The system worked for a while, then the pilot died. Common causes are a draft, low gas pressure, or a failing thermopile that drifts after heating up.
Drafts are sneaky. A basement window left open. A dryer running that depressurizes the room.
A vent fan in a nearby bathroom. Check for environmental causes before replacing parts.
Low gas pressure can also cause intermittent outages. Natural gas should be between 5 and 7 inches of water column. LP gas needs 11 to 13 inches.
Low pressure can happen when the gas company reduces pressure during peak demand or when your regulator is failing. This is harder to diagnose without a manometer. If your pilot goes out repeatedly at the same time each day, call a professional.
Decoding Your Honeywell Error Codes (Flash by Flash)
The LED on your Honeywell gas control valve is your best diagnostic tool. You may need to remove the metal access cover to see it clearly. Count the flashes.
The light blinks a number of times, pauses for a few seconds, and repeats.

Image source: Bing (Web (fair-use with source credit))
Here is the complete Honeywell error code guide as published by the manufacturer.
1 Flash: Pilot Flame Not Detected. The gas control valve does not detect a pilot flame. Usually the pilot is out or the thermopile is not generating enough voltage. Start by checking the pilot.
If it is out, follow the relight procedure. If it is lit, your thermopile may be weak or bad.
2 Flashes: Thermopile Voltage Low. The pilot is burning, but the thermopile produces less than 650 millivolts. This is the most common error code. Clean or replace the thermopile.
Do not ignore this code. A weak thermopile can cause the pilot to go out randomly.
3 Flashes: Thermopile Open Circuit. The thermopile produces no voltage. The wire inside is broken. Replace it.
Verify with a multimeter. Disconnect the thermopile wires. Test for resistance.
An open thermopile reads infinite resistance.
4 Flashes: Temperature Sensor Failure. The NTC thermistor inside the tank has failed. This sensor tells the gas valve the water temperature. If it fails, the valve cannot regulate heat.
The sensor is a small probe that slides into a well in the tank. Replace it. The part costs $10 to $20.
You do not need to drain the tank in most models.
5 Flashes: Gas Control Valve Failure. The electronics inside the gas valve have failed. Replace the valve. This is not user-serviceable.
Buy a matching Honeywell valve. Swap it yourself or call a plumber. A new valve runs $85 to $150.
6 Flashes: Pressure Switch Open. The pressure switch is not closed. The vent is blocked or the switch has failed. Check the vent pipe for obstructions.
Look for bird nests, debris, or a collapsed pipe. If the vent is clear, the pressure switch may be bad. Test it with a multimeter for continuity.
A failed switch will not close.
7 Flashes: Wiring Error. There is a misconnection in the wiring harness. Check all connections. Make sure they are clean and tight.
This code is rare but can happen after a repair where wires were swapped.
8 Flashes: Internal Controller Fault. The gas valve internal processor has failed. Replace the valve. No DIY fix exists.
Step-by-Step: How to Test and Replace a Honeywell Thermopile
The thermopile is the most replaced part on Honeywell-controlled water heaters. This is a safe job if you follow the steps carefully. You need a multimeter, a flashlight, and a replacement thermopile.
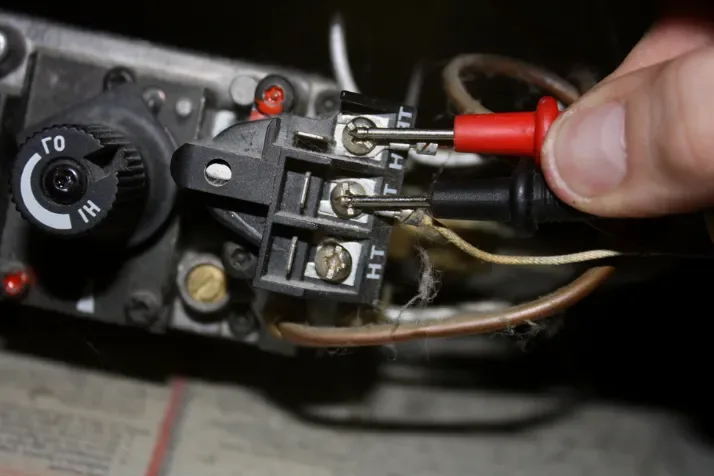
Image source: Bing (Web (fair-use with source credit))
Tools and Materials You Will Need
| Item | Purpose |
|---|---|
| Digital multimeter | Measure thermopile voltage |
| Fine steel wool or abrasive pad | Clean thermopile rod |
| Replacement thermopile | Install if cleaning fails |
| Flashlight | See inside the burner chamber |
| Socket set or adjustable wrench | Remove gas line (if needed) |
| Soapy water in spray bottle | Check for gas leaks |
Step 1: Turn Off the Gas
Locate the manual gas shut-off valve on the supply line. Turn it perpendicular to the pipe. This stops gas flow entirely.
Turn the Honeywell gas control knob to "OFF." Wait five minutes for residual gas to dissipate.
Step 2: Access the Pilot Assembly
Remove the metal access cover at the bottom of the water heater. You will see the burner assembly and the pilot tube. The thermopile is the rod that sits directly in the pilot flame.
It has two white wires running to the gas control valve. You may need to remove the burner assembly to reach it.
Step 3: Test the Thermopile
Disconnect the two white wires from the gas control valve. They attach to screw terminals marked "TP" and "TP." Set your multimeter to DC millivolts. Connect the red lead to one wire and the black lead to the other.
Polarity does not matter.
Turn the knob to "Pilot." Press and hold it down. Push the igniter to light the pilot. Keep holding for one minute.
Watch the meter. Voltage should climb steadily. A good thermopile reaches 800 to 900 millivolts in 30 to 60 seconds.
If it stays below 650 after a full minute, it is weak. If it reads zero, it is dead.
Step 4: Clean the Thermopile
If reading is low but not zero, try cleaning. Remove the thermopile from the pilot assembly. It slides out or is held by a retaining clip.
Use fine steel wool to gently scrub the entire rod until bright and shiny. Do not use sandpaper. Rinse off dust with a dry cloth.
Reinstall and retest.
Step 5: Replace the Thermopile
If cleaning does not bring voltage above 650, buy a new thermopile. Purchase the correct replacement for your Honeywell model. Universal Honeywell thermopiles work with most residential gas water heaters.
Install it exactly as the old one was positioned. The tip must sit directly in the pilot flame. Too high or too low means it will not heat properly.
Step 6: Relight and Test
Turn the knob to "Pilot." Hold it down. Light the pilot. Continue holding for 60 seconds.
Release the knob. The pilot should stay lit. Turn the knob to "ON." Wait five minutes.
Check that the burner fires when you run hot water. Use a spray bottle with soapy water to check the gas valve connections. No bubbles means no leaks.
Pressure Switch and Vent Blockage: A Misunderstood Cause of Lockouts
The pressure switch is a safety device that ensures your vent is working properly. If the vent is blocked, combustion gases can back up into your home. That is dangerous.
The pressure switch detects this and shuts the system down before carbon monoxide can accumulate.
How the Pressure Switch Works
The pressure switch is a simple on-off switch. It has a hose that runs to the vent hood at the top of the water heater. When the burner fires, hot gases rise through the vent.
This creates negative pressure in the vent hood. That negative pressure pulls air through the hose and closes the switch. The gas control valve sees the closed switch and allows the burner to stay on.
If the vent is blocked, the negative pressure does not develop. The switch stays open. The gas valve sees the open circuit and locks out.
You get a 6-flash error code.
What Blocks Vents
Bird nests are the most common cause. Birds build nests in the top of vent pipes. The nest restricts airflow.
You may not see it from the ground. Look down the vent from the roof or remove the vent hood to inspect it.
Debris from storms, fallen leaves, or a collapsed vent pipe can also cause problems. In cold climates, ice or frost can partially block the vent opening. If you have heavy snowfall, check that snow has not covered the vent outlet.
Testing the Pressure Switch
Test the pressure switch with a multimeter. Set it to continuity or ohms. Disconnect the two wires from the switch.
Connect the meter leads to the switch terminals. With the water heater off and cold, the switch should be open. No continuity.
If it shows continuity when the system is off, it is stuck closed. Replace it.
You can also blow gently into the hose. A working switch clicks closed when you apply pressure. If it does not click, the diaphragm may be torn or stuck.
Cleaning a Blocked Vent
If you find a blockage, clear it carefully. Do not push debris further down. Use a stiff brush or a shop vacuum with a long hose.
If the blockage is on the roof, consider calling a professional. Roof work is dangerous. After clearing the vent, reset the water heater.
Turn the gas control knob to "OFF" for 30 seconds. Turn it back to "ON." The lockout should clear. Run hot water to confirm the burner fires.
Frequently Asked Questions
Why does my Honeywell water heater keep flashing 3 times?
Three flashes mean a thermopile open circuit. The thermopile has failed internally and produces no voltage. Replace it.
You can confirm with a multimeter. Disconnect the thermopile wires and check for resistance. An open circuit reads infinite ohms.
Can I reset my Honeywell water heater without a plumber?
Yes. Turn the gas control knob to "OFF." Wait five minutes. Turn it back to "ON." This clears most lockouts.
If the light returns to the same flash code, the underlying problem is still there. Follow the code-specific fix.
How long does a Honeywell water heater gas valve last?
Most Honeywell gas control valves last 10 to 15 years. Failure is rare. When they do fail, you get a 5-flash or 8-flash error code.
Replacement is straightforward. The valve costs $85 to $150. You can swap it yourself with basic tools.
Is it safe to clean a Honeywell thermopile myself?
Yes, if you follow safety steps. Turn off the gas. Wait five minutes.
Remove the thermopile. Use fine steel wool to clean it. Do not use sandpaper.
Reinstall and test. If you smell gas at any point, stop and call a professional.
What does a 6-flash code mean on a Honeywell water heater?
Six flashes mean the pressure switch is open. The vent is blocked or the switch has failed. Check the vent pipe for bird nests or debris.
If the vent is clear, test the switch with a multimeter. Replace it if it does not close.
Do I need to drain the tank to replace the temperature sensor?
In most models, no. The temperature sensor slides into a well on the outside of the tank. You do not need to drain water.
Disconnect the wires. Remove the retaining clip. Pull out the old sensor.
Insert the new one. Reconnect the wires. That is it.

Similar Posts