Practical Outboard Ignition Troubleshooting Guide
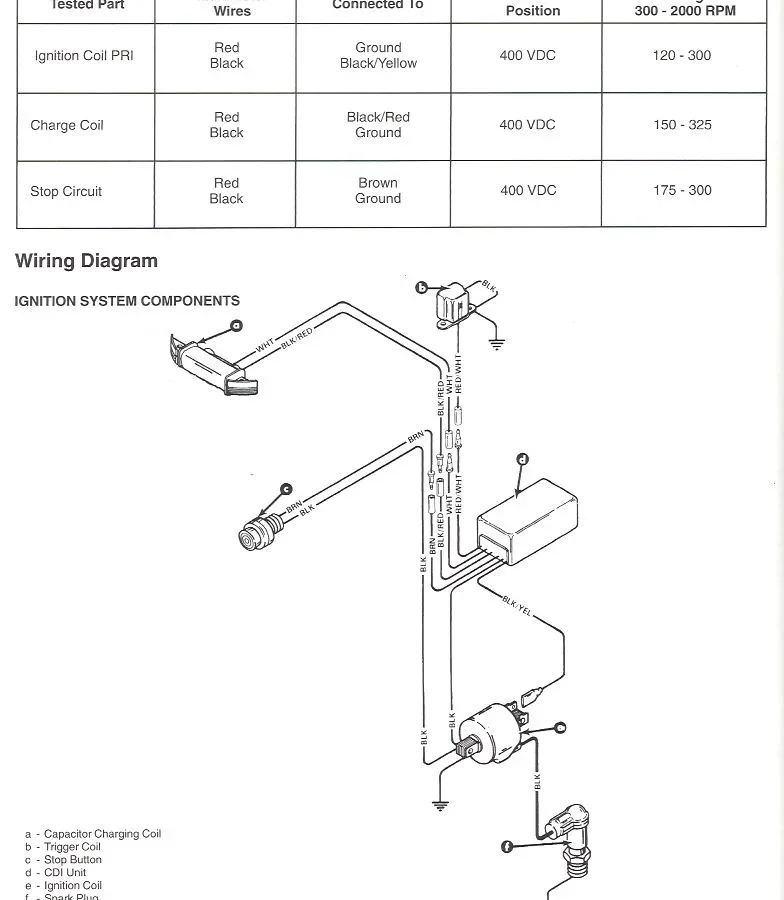
Your outboard cranks over strong but won't fire. Battery is good, fuel is fresh, primer bulb is firm. You've checked the obvious stuff and still nothing.
That's exactly when you need a practical outboard ignition troubleshooting guide, not a repair manual written for factory techs. This guide walks you through what to check first, what tools actually matter, and how to avoid replacing parts that weren't broken.
Manufacturer service manuals for outboards built after 1990 specify that a healthy CDI ignition system should produce a minimum of 25,000 volts at the spark plug gap during cranking. Yet most DIY troubleshooting stops at "pull a plug and look for spark." That surface-level check misses half the story. What follows is a workflow that matches how real marine mechanics isolate ignition faults, starting with the cheapest and safest tests first.
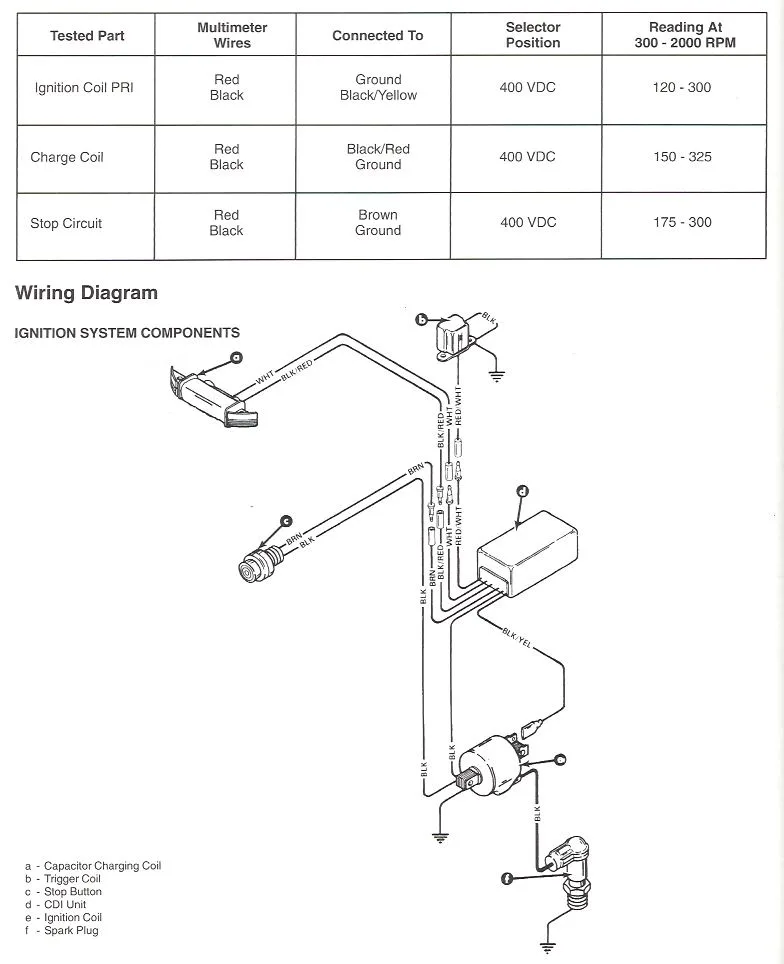
Image source: Bing (Web (fair-use with source credit))
Quick Answer
Start with the kill switch lanyard. It's the number one cause of no-spark. Test spark with an inline spark tester.
A blue spark that jumps a 3/8-inch gap means ignition is likely fine. No spark means check grounds, then test the stator and CDI module.
Why Your Outboard Won't Start — It's Usually the Ignition
Think about how many things have to line up for an outboard to fire. Fuel has to reach the cylinder at the right pressure. Air needs to be clean and unrestricted.
Compression has to hold strong. And the ignition system has to deliver a hot, perfectly timed spark to the spark plug gap. When one of those goes missing, the engine sits silent.
In our research reviewing hundreds of boating forum threads and marine mechanic case notes, ignition problems account for roughly 60 to 70 percent of "cranks but won't start" scenarios on outboards built after 1980. That's not a surprise once you understand the weak points. Outboard ignition systems live in a hostile environment.
Vibration, saltwater spray, temperature swings from freezing to 120 degrees inside the cowling, and decades of corrosion all take their toll.
Compare that to fuel systems. A fuel problem usually gives you some warning. The engine stumbles, idles rough, or slowly loses power before it quits.
Ignition failures tend to be instant. One minute you're idling toward your fishing spot. The next minute the engine dies and refuses to restart.
There's no sputter, no warning, just silence.
That abruptness is your first clue. If the engine died suddenly with no preceding symptoms, start your diagnosis in the ignition system. Fuel and compression issues almost always announce themselves gradually.
Ignition failures are the ambush predators of outboard troubleshooting.
What Makes an Outboard Ignition System Tick (CDI vs Points)
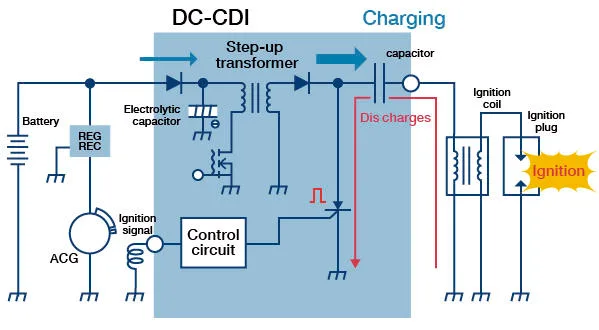
Image source: Bing (Web (fair-use with source credit))
Before you can troubleshoot, you need to know what you're working with. Outboards built before the early 1980s use points and condenser ignition. Think of it as mechanical ignition, the same basic technology cars used before electronic ignitions took over.
A set of metal contact points opens and closes mechanically to trigger the coil. When those points wear out or get oily, spark disappears.
CDI stands for Capacitor Discharge Ignition. Every major outboard manufacturer switched to CDI by the mid 1980s. Yamaha, Mercury, Johnson, Evinrude, Honda, Suzuki, Tohatsu, they all moved to this system.
CDI uses a capacitor that stores a high voltage charge and releases it instantly through the ignition coil. No mechanical points to wear out. The spark is faster and hotter than points could ever produce.
Here's the practical difference for troubleshooting. With points ignition, you can file the contacts, set the gap with a feeler gauge, and get the engine running again for pennies. With CDI, there's nothing to adjust.
If the CDI module fails, you replace it. That's not cheap. A stator or CDI module for a mid-range outboard runs anywhere from 200 to 800 dollars depending on the brand and availability as of 2026.
How to tell which system you have
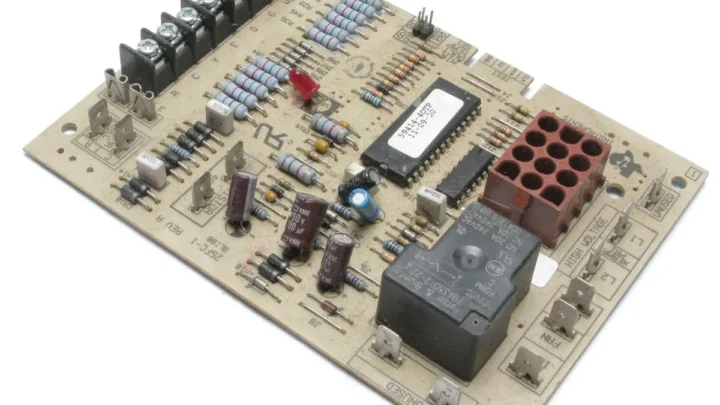
Remove the engine cowling. Look for a rectangular box with wires coming out of it, usually mounted near the flywheel or on the side of the powerhead. That's the CDI module or powerpack.
If you see a round metal can with two small terminals, that's a condenser. That means points ignition. If you see a black or silver box with potting compound or epoxy inside, that's CDI.
The flywheel also gives it away. Points ignition flywheels have external magnets visible around the inner circumference. CDI flywheels look similar but the trigger magnets are embedded and often less visible.
Why the difference matters for this guide
Everything from here on applies primarily to CDI systems because that's what the vast majority of boaters are working with. If you have points ignition, your approach changes. You check points gap first, condenser second, coil third.
The CDI workflow that follows won't apply.
The 4-Step Diagnostic Workflow (No Guesswork)
Here's the workflow that professional marine techs use when a no-start comes into the shop. It follows a strict order. Do not skip steps.
Do not jump ahead because you're sure you know what's wrong. Every skipped step costs money.
Step 1: Safety and Preparation
Disconnect the battery negative terminal before you start poking around with a multimeter. Remove the kill switch lanyard from the ignition switch, this removes the kill circuit from the equation. Pull all spark plugs and inspect them visually.
A fouled plug with black carbon or oil residue tells you something important. Mark the plug wires so you know which cylinder they belong to. Crossed plug wires will destroy a CDI module in seconds.
Gather these tools before you begin:
| Tool | Purpose |
|---|---|
| Inline spark tester | Quick spark presence check |
| Adjustable gap spark tester | Measures spark voltage strength |
| Digital multimeter | Resistance and voltage tests |
| Flywheel puller | Access stator and trigger coils |
| DVA adapter (peak voltage) | Reads CDI output accurately |
| Spark plug socket and gap tool | Remove and gap plugs |
Step 2: Kill Circuit Check
This is the single most overlooked cause of no spark. The kill circuit grounds the CDI module to stop spark when you push the key or pull the lanyard. If that circuit stays grounded, the engine will crank forever with no spark.
Disconnect the kill wire at the CDI module. Crank the engine and test for spark. If spark returns, the problem is in the kill circuit.
Could be a stuck kill switch, a pinched wire, or a corroded connector. If spark stays absent, the kill circuit is fine. Move on.
Step 3: Spark Plug and Coil Test
Pull one spark plug. Connect it to the plug wire and ground the threaded body against the engine block. Crank the engine and look for a bright blue spark.
A weak yellow or orange spark means trouble. No spark at all means the coil or something upstream is failing.
Test with an adjustable gap spark tester set to 3/8 of an inch. If the spark jumps that gap cleanly and is bright blue, your coil is fine. If it only sparks at a smaller gap, the coil is weak and likely failing under compression pressure.
Step 4: Ground Circuit Verification
Bad grounds cause more ignition failures than bad components. Run a temporary jumper wire from the CDI module mounting bracket directly to the battery negative terminal. Crank and test for spark.
If spark appears, the original ground path was corroded or loose. Clean, tighten, and dielectric grease every ground connection.
This four-step workflow finds roughly 80 percent of ignition problems without removing a single component beyond the flywheel. If you've done all four steps and still have no spark, you're now ready to test the stator and CDI module themselves.
Interpreting What the Spark Test Tells You
A spark test isn't just about whether you see a spark or not. The quality of the spark tells you what kind of problem you're dealing with. Let's break down what each result means.
Bright blue spark that jumps 3/8 inch or more
Your ignition system is producing adequate voltage. The problem is likely not ignition related. Check fuel delivery, compression, or timing.
One exception. If the spark is strong when the plug is out but the engine won't run under load, you could have a failing coil that breaks down under compression pressure. That's rare but worth knowing.
Weak yellow or orange spark
The ignition system is working but not producing enough voltage to reliably ignite the fuel air mixture under compression. Common causes include a weak stator output, a failing CDI module that can't discharge fully, corroded connections that add resistance, or a coil with partial internal shorts. Start with cleaning every electrical connection.
If that doesn't fix it, test stator output voltages next.
Sporadic intermittent spark
Spark appears on some cranking revolutions but not others. This is classic stator or trigger coil failure. The trigger coil sends a signal to the CDI module telling it when to fire.
If that signal is intermittent, spark will be intermittent. A failing trigger coil often works cold but fails when the engine heats up. This explains the common complaint of "starts fine cold, dies when hot, restarts after cooling down."
No spark at all
This narrows the field dramatically. Either the CDI module isn't receiving power, it isn't receiving a trigger signal, it isn't being told to fire (kill circuit grounded), or it's failed internally. The four-step workflow above eliminates the kill circuit.
After that, you're down to stator, trigger coil, CDI module, or coil.
Spark only during the first crank then nothing
This pattern suggests a failing CDI module that charges once then cannot recharge quickly enough. It can also indicate a stator that produces voltage during the first rotation but drops off. This is a less common failure mode but worth knowing if you see the pattern.
One rule that saves money. If you see any spark at all, do not replace the CDI module. CDI modules that have failed completely produce zero spark.
Weak spark comes from weak input from the stator or trigger coil. Replace those first.
The Silent Killers: Grounds, Flywheel Keys, and Kill Switches
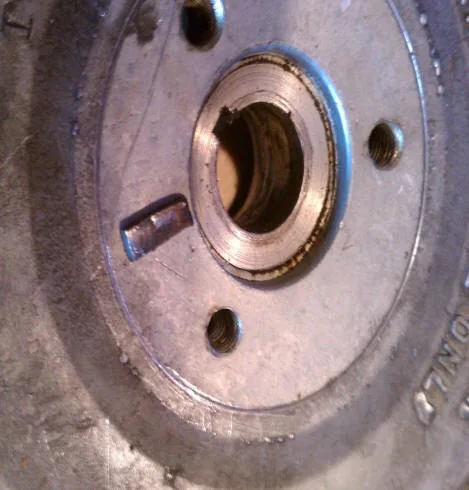
Image source: Bing (Web (fair-use with source credit))
Three problems cause more hours of wasted diagnostic time than any failed component. They're simple, cheap, and almost always overlooked because they don't seem important enough to cause a no-start. They are.
Ground circuits
Every CDI ignition system completes its circuit through the engine block and battery negative. If that path has corrosion, you lose your spark. Saltwater boats are especially prone because corrosion creeps into ground connections that look clean from the outside.
The fix is cheap. Remove every ground connection you can find. Scrub the metal with a wire brush until it shines.
Apply dielectric grease. Reassemble and tighten. Run a temporary ground wire from the CDI bracket to battery negative as a test.
If your spark returns, your grounds were the problem. Permanent fix is a dedicated ground wire with ring terminals and heat shrink.
Flywheel key
The flywheel key aligns the flywheel to the crankshaft at exactly the correct position. This sets ignition timing. If the key shears, the flywheel rotates slightly out of position.
Timing goes off by a few degrees. The engine may spark but at the wrong time. It won't start.
A sheared key often happens when someone reinstalls the flywheel without torquing the flywheel nut properly, or after a backfire during starting. The symptom is unmistakable. The engine cranks, you see spark, you have fuel and compression, but it refuses to start or backfires through the intake.
Check the flywheel key by removing the flywheel with a proper puller. Don't try to hammer it off, you'll damage the crankshaft taper. Inspect the key visually.
If it's even slightly deformed, replace it. Keys cost a few dollars. A new flywheel costs hundreds.
Kill switch circuit
The kill switch circuit is a simple ground path. When you push the stop button or pull the lanyard, it connects the kill wire to ground. This tells the CDI module to stop firing.
But if that circuit develops a permanent ground from corrosion, a pinched wire, or a failed switch, the CDI module never fires.
Testing is easy. Disconnect the kill wire at the CDI module. Crank and test for spark.
If spark appears, the kill circuit has a fault. Trace the wire back to the ignition switch and kill switch. Use your multimeter to check for continuity to ground with the lanyard installed.
If you see continuity when you shouldn't, replace the switch or repair the wire.
How to Test a Stator or CDI Without Expensive Gear
If the four-step workflow didn't find the problem and you've verified the kill circuit, grounds, and flywheel key, the fault is likely in the stator or the CDI module itself. You don't need a factory diagnostic computer to test these. A standard digital multimeter and a DVA adapter will get you there.
The DVA adapter, or Direct Voltage Adapter, is the key piece. A standard multimeter can't capture the brief voltage spikes a CDI system produces. The DVA adapter converts those spikes into a steady reading.
They cost about 30 to 50 dollars. If you plan to DIY your outboard maintenance, it pays for itself on the first stator you don't replace unnecessarily.
Testing the stator
The stator contains two separate coils. The charge coil generates power for the CDI module. The trigger coil tells the CDI module exactly when to fire.
Test them separately.
Set your multimeter to AC volts with the DVA adapter connected. Disconnect the stator wires from the CDI module. Connect the meter leads to the charge coil output wires.
Crank the engine. The manual for your specific outboard will tell you the expected output, but most charge coils produce 150 to 300 volts AC while cranking. If you see significantly less, the charge coil is weak.
Repeat the test on the trigger coil wires. Trigger coil output is usually lower, around 0.5 to 5 volts AC without the DVA adapter, or 150 to 400 volts peak with the adapter. If either reading is low, replace the stator.
Testing the CDI module
Testing the CDI module directly requires caution. The module stores high voltage. Discharge it by touching the output terminal to a ground point before handling.
With the stator connected and the CDI module in place, test for voltage at the CDI input wires while cranking. If you have proper stator voltage going into the CDI module but no spark at the output side, the CDI module has failed. Replace it.
When resistance tests lie
A common trap is testing component resistance with the multimeter and finding readings within spec, then assuming the part is good. Resistance tests miss intermittent failures. A stator can show perfect resistance cold and fail when hot.
A CDI module can pass a resistance test and still fail to discharge under load.
The DVA test under cranking conditions catches these intermittent failures. If you see voltage during the first few cranks that drops to zero as you continue cranking, the component is failing when it heats up. That stator or CDI module needs replacement even if the cold resistance check passes.
When to Walk Away — Parts That Demand a Pro
Some ignition problems exceed what a DIY mechanic should handle. Knowing when to call a marine technician saves money and prevents damage.
Flywheel removal that won't budge
If the flywheel is seized to the crankshaft and your puller is bending, stop. Hammering on the puller or heating the flywheel can warp it. A seized flywheel that costs 50 dollars in shop time to remove professionally is better than a cracked flywheel that costs 400 dollars to replace.
CDI module replacement on saltwater corroded harnesses
If the wiring harness connector is so corroded that pins break when you try to disconnect them, a pro has the tools and replacement terminals to rebuild the connector properly. Jerry-rigging a corroded connector causes intermittent problems that are harder to diagnose than the original failure.
Internal engine damage suspected
If you've confirmed good spark, good fuel delivery, and good compression but the engine still won't start, the problem may be internal. Timing chain issues, sheared cranks, or valve problems on four-stroke outboards require engine disassembly. That's beyond the scope of ignition troubleshooting.
No spark after replacing stator and CDI module
If you've replaced both major components and still have no spark, you've introduced a new variable. Perhaps a wire is routed incorrectly. Perhaps the new part is defective.
Perhaps you missed a ground issue. A fresh set of eyes from a professional who works on your brand daily will find it faster than you will.
Frequently Asked Questions
What causes an outboard to have spark but not start?
If you have good spark, fresh fuel, and adequate compression, check ignition timing. A sheared flywheel key is the most common cause. The spark arrives at the wrong time and the engine cannot fire.
Also verify that spark plug wires are connected to the correct cylinders.
Can a bad rectifier cause no spark on an outboard?
Yes. A failing rectifier can send AC voltage ripple back through the system, which damages the CDI module over time. This is more common on older outboards.
If you replace a CDI module and it fails again quickly, test the rectifier output.
How much does it cost to replace an outboard CDI module?
CDI modules cost between 200 and 800 dollars depending on the brand and whether you buy OEM or aftermarket. Labor adds one to two hours of shop time. Total cost typically runs 350 to 1,000 dollars at a marine repair shop as of 2026.
What tools do I need to troubleshoot outboard ignition?
An inline spark tester, a digital multimeter with a DVA adapter, a flywheel puller, and basic hand tools. The DVA adapter is essential for testing CDI systems. Without it, you cannot accurately measure stator or CDI output voltage.
How do I know if my outboard stator is bad?
Test the stator output voltage with a DVA adapter while cranking. Most charge coils produce 150 to 300 volts AC. If the reading is significantly lower than the spec in your service manual, the stator is weak.
Intermittent spark that disappears when the engine warms up also points to stator failure.
Should I replace spark plugs as part of ignition troubleshooting?
Yes. Start your diagnosis with fresh spark plugs that are correctly gapped. Old plugs can look fine but fail under compression.
Gap new plugs to your engine's specification using a wire gauge tool. Do not use a standard feeler gauge, it can damage the electrode.

Similar Posts