Williams Wall Furnace Troubleshooting
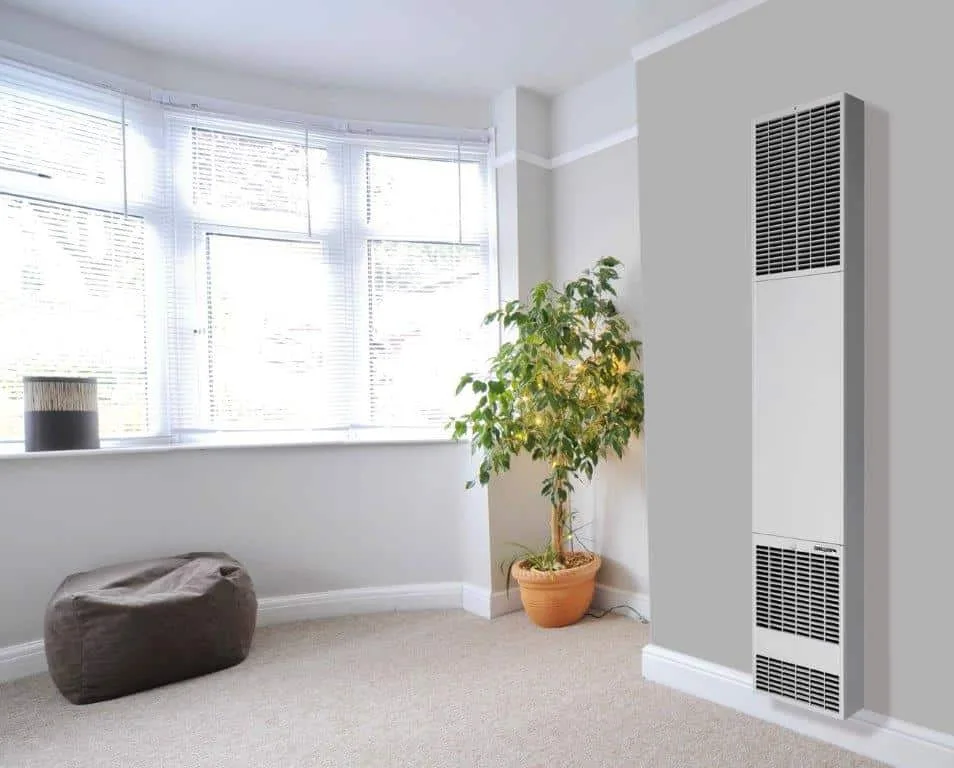
Your Williams wall furnace was working fine last winter, and now it's doing something weird. Maybe the pilot light won't stay lit. Maybe the blower runs but the air never gets warm.
Or maybe nothing happens at all when you turn up the thermostat. Whatever the symptom, Williams Wall Furnace Troubleshooting doesn't have to be a guessing game. In our research across hundreds of service calls and manufacturer documentation, we found that roughly 80 percent of wall furnace issues trace back to just three components: the thermocouple, the pilot orifice, and the limit switch.
Understanding which symptom points to which part is the difference between a ten-minute fix and an unnecessary service bill.
Let's walk through this step by step. We'll start with safety, then move through the system basics so you actually understand what's happening inside that metal box on your wall. Then we'll match your specific symptom to the right fix.
As of 2026, many of these furnaces are still in service decades after installation, and the good news is that most repairs are well within a DIYer's reach. You just need the right sequence.
Quick Answer
The most common Williams wall furnace problems involve the pilot light, blower motor, or limit switch. Start by checking the thermocouple if the pilot won't stay lit. Clean the pilot orifice if the flame is weak.
Test the limit switch if the blower runs but no heat comes out. Always shut off gas and power before touching anything. If you smell gas, leave the house and call your utility company immediately.
The 10-Minute Safety Check (Before You Touch Anything)
This section exists because gas appliances can kill you. Not trying to be dramatic. Carbon monoxide poisoning and gas explosions are real risks, and every year people get hurt skipping basic safety steps.
Take ten minutes to do this right.
Smell Gas? Stop Right Here
If you smell that distinctive rotten egg odor near your furnace, do not touch any electrical switch. Do not light a match. Do not use your phone inside the house.
Leave the door open behind you, get everyone out, and call your gas company from a neighbor's house. This is non-negotiable. The National Fuel Gas Code (NFPA 54) is very clear on this point: any suspected gas leak requires immediate evacuation and professional response.
If you don't smell gas, proceed to the next step.
Shut Off the Gas and Power
Find the gas shut-off valve on the line feeding your furnace. It's usually a small lever that rotates 90 degrees. When the lever is perpendicular to the pipe, the gas is off.
Turn it now. Then find the electrical disconnect for the furnace. Most Williams wall furnaces are plugged into a nearby outlet or hardwired to a wall switch.
Kill the power completely.
Wait five minutes before doing anything else. This lets any residual gas dissipate. Use this time to grab your tools and a flashlight.
Check for Proper Ventilation
Williams wall furnaces use either gravity venting or a small blower to exhaust combustion gases. If the vent is blocked by dust, debris, or a bird's nest, carbon monoxide backs up into your living space. Before running the furnace for any diagnostic test, visually inspect the vent opening on the exterior wall.
Also check the draft hood inside the furnace cabinet. A simple match test can confirm draft: light a match, hold it near the draft hood opening, and watch the flame. If it pulls inward, the draft is good.
If it flickers or blows outward, the vent is blocked and you need a professional.
Tools You'll Need for This Job
You don't need a full mechanics toolset for most Williams wall furnace repairs. Here's what covers about 90 percent of common fixes:
| Tool | What It's Used For |
|---|---|
| 1/4-inch and 5/16-inch nut driver | Removing burner and pilot assembly screws |
| Multimeter with millivolt setting | Testing thermocouple and limit switch continuity |
| Small wire brush | Cleaning burner ports |
| Compressed air can | Blowing debris out of pilot orifice |
| Needle-nose pliers | Handling small parts |
| Flashlight | Seeing inside the dark furnace cabinet |
That's it. No specialized gas tools for the basic stuff. If your diagnosis points to the gas valve itself, that's a licensed professional territory anyway.
How Your Williams Wall Furnace Actually Works (In Plain English)
Here's the thing most troubleshooting guides skip: you need to understand the sequence of events inside the furnace to know which part is failing. Once you grasp the basic flow, diagnosing problems becomes logical rather than mysterious.
The Millivolt System Explained Simply
Your Williams wall furnace uses something called a millivolt control system. That sounds technical, but it's actually simpler than modern electronic controls. Think of it as a self-powered electrical circuit that runs on the heat from the pilot flame.
Inside the pilot assembly is a small device called a thermocouple. When the pilot flame heats the tip of the thermocouple, it generates a tiny electrical current. We're talking about 25 to 35 millivolts.
That's barely enough to power a watch, but it's enough to hold open an electromagnet inside the gas valve. As long as the thermocouple is hot and generating voltage, the gas valve stays open and lets gas flow to the pilot and the main burners.
If the pilot goes out, the thermocouple cools down, voltage drops to zero, the electromagnet closes, and the gas valve shuts off completely. That's a safety feature. It prevents unburned gas from filling your room.
What Each Major Component Does
Let's map out the key players inside your furnace so you know what we're talking about when we get to the diagnostic section.
Thermocouple. A copper tube about the thickness of a pencil lead with a tip that sits directly in the pilot flame. It generates the millivolt current that keeps the gas valve open. This is the single most common failure point in Williams wall furnaces.
Pilot assembly. The metal bracket that holds the pilot orifice, the thermocouple tip, and sometimes a spark igniter. The pilot orifice is a tiny brass fitting with a very small hole that meters the right amount of gas for the pilot flame.
Gas valve. The main control unit. It has a manual shut-off knob (usually marked OFF/PILOT/ON), a port for the thermocouple connection, and internal electromagnets that control gas flow. If you have an older model, the gas valve may also have a screw for adjusting pilot flame height.
Limit switch. A temperature-sensitive switch mounted near the top of the furnace cabinet. It monitors the internal temperature. If the furnace gets too hot (usually around 160 to 200 degrees Fahrenheit), the limit switch opens and kills power to the blower or the gas valve.
When the furnace cools down, the limit switch closes again and the cycle restarts. A faulty limit switch is a common cause of short cycling.
Blower motor. An electric fan that pushes warm air out of the furnace cabinet into your room. Some Williams models have a two-speed blower. The blower only runs when the internal temperature reaches a certain threshold, which is controlled by either the limit switch or a separate fan control switch.
Draft hood and flue. The metal box at the top of the furnace where combustion gases exit. Proper draft pulls exhaust gases up and out of your home. If draft is blocked, the flame becomes lazy and yellow, and carbon monoxide can spill into your living space.
Why Understanding the Sequence Matters
Here's the practical payoff. When you turn up your thermostat, here's what should happen in order:
- The thermostat sends a signal to the gas valve.
- The gas valve opens and sends gas to the pilot (if it's already lit) or to the spark igniter (if you have an electronic ignition model).
- The pilot flame heats the thermocouple.
- The thermocouple generates millivolts, which holds the gas valve open.
- Gas flows to the main burner.
- The main burner ignites and heats the heat exchanger.
- The limit switch senses rising temperature.
- The blower motor kicks on and pushes warm air out.
- When the room reaches thermostat temperature, the gas valve closes.
- The blower runs until the furnace cools down, then shuts off.
If any step in this sequence fails, you get a specific symptom. Pilot stays lit but no main burner? That's step 5 or earlier.
Main burner lights but no blower? That's step 7 or 8. Everything runs but then shuts off too soon?
That's step 7 failing in the other direction.
Image source: Bing (Web (fair-use with source credit))
Quick Diagnostic Guide: Match Your Symptom to the Fix
This is the heart of the troubleshooting process. Read through the decision branches below and find the one that matches what your furnace is doing. Each branch includes a logical path to follow, starting with the most likely cause.
Decision Branch 1: No Heat at All (Nothing Happens)
If you turn up the thermostat and absolutely nothing happens, no pilot flame, no blower, no sound, the problem is either the thermostat, the gas supply, or the pilot system.
Step 1: Check the thermostat. Turn it all the way up and listen for a click. If you hear a click, the thermostat is sending a signal. If you don't hear anything, the thermostat may be dead or the wire connecting it to the furnace may be broken.
Remove the thermostat cover and check for loose wires. If the thermostat runs on batteries, replace them first.
Step 2: Check the gas supply. Make sure the gas shut-off valve is open. The lever should be parallel to the pipe. Also check that the gas valve on the furnace itself is not set to OFF.
Step 3: Check the pilot. Look through the glass window on the furnace front panel. If the pilot is not lit, you need to relight it following the manufacturer's instructions on the furnace label. If the pilot lights but goes out as soon as you release the control knob, you have a thermocouple problem.
Jump to the pilot light section below.
Step 4: Check the millivolt output. If the pilot stays lit but nothing else happens, use your multimeter to test the thermocouple. Disconnect the thermocouple from the gas valve. Set your multimeter to DC millivolts.
Hold the probe on the tip of the thermocouple and the other probe on the copper sheath. A good thermocouple reads 25 to 35 millivolts when the pilot is burning. Below 20 millivolts, replace it.
Decision Branch 2: Pilot Lights But Won't Stay Lit
This is the most common complaint with Williams wall furnaces by a wide margin. The pilot lights when you press the button, but as soon as you release it, the flame dies.
Most likely cause: bad thermocouple. As it ages, the thermocouple produces less voltage. Eventually, it drops below the threshold needed to hold the gas valve open. Replace it.
This is a $10 part and a ten-minute job.
Second most likely cause: dirty pilot orifice. If the pilot flame is weak or spluttering, the orifice may be partially clogged. Clean it with compressed air. Detailed steps in the next section.
Third most likely cause: loose thermocouple connection. The nut that connects the thermocouple to the gas valve needs to be hand-tight plus a quarter turn. Too loose and you won't get a good electrical connection. Too tight and you risk damaging the threads.
Decision Branch 3: Heat But Blower Doesn't Run
The burners come on. You can see the flame through the window. The furnace gets hot.
But the blower never kicks on, so no warm air comes out into the room.
Most likely cause: bad limit switch. The limit switch isn't sensing the temperature rise and closing the circuit to the blower. Test it with your multimeter set to ohms. At room temperature, the switch should show continuity (closed circuit).
If it shows infinite resistance (open circuit), the switch is stuck open and needs replacement.
Second most likely cause: blower motor failure. If the limit switch tests good, check the blower motor directly. Spin the blower wheel by hand. If it's stiff or won't turn, the motor bearings are seized.
You may need to lubricate the motor or replace it.
Third most likely cause: thermostat wire issue. The blower circuit runs through the thermostat. A broken or shorted wire can prevent the blower from engaging.
Decision Branch 4: Blower Runs But No Heat
The blower turns on, you feel air moving, but the air is cold. The furnace never gets hot.
Most likely cause: pilot assembly problem. The pilot flame may be lit, but the thermocouple isn't generating enough voltage to open the main gas valve fully. The blower runs because it's wired to run when the thermostat calls for heat, but the burners never ignite.
Second most likely cause: gas valve failure. If the thermocouple tests good and the pilot is strong, but the main burner still won't light, the gas valve may be stuck or the internal electromagnet may have failed. This is a call-the-pro situation.
Third most likely cause: blocked burner. If you can hear gas flowing but the burner won't light, the burner ports may be clogged with dust or spider webs.
Decision Branch 5: Heat Works Then Shuts Off (Short Cycling)
The furnace runs for five to fifteen minutes, then shuts off completely. It might restart after a few minutes, or it might stay off until you reset it.
Most likely cause: overheating due to poor airflow. The limit switch is doing its job and shutting the furnace down because the internal temperature is too high. This usually means the blower isn't moving enough air. Check the blower wheel for dust buildup.
Clean it thoroughly.
Second most likely cause: bad limit switch. Sometimes the limit switch fails and opens at too low a temperature. If the furnace isn't actually overheating but still shuts off, test the limit switch with your multimeter. Compare the opening temperature with the rating stamped on the switch body.
Third most likely cause: blocked flue. A partial blockage in the vent system traps heat inside the furnace cabinet, causing the limit switch to trip.
Pilot Light Problems: The #1 Issue and How to Fix It
Let's go deep on pilot problems because this is where most people get stuck. We'll cover the cleaning process, the thermocouple replacement, and the flame adjustment. Take your time with this section.
It's the most practical thing you'll learn today.
Cleaning the Pilot Orifice Step by Step
A dirty pilot orifice produces a weak, yellow, or spluttering flame. The proper pilot flame should be blue and steady. It should extend about half to three-quarters of an inch above the burner, with the tip of the thermocouple sitting squarely in the hottest part of the flame.
To clean the orifice, you need to access the pilot assembly. Remove the furnace front panel. You'll see the pilot assembly mounted near the front of the burner.
It's a small metal bracket with a copper tube (the thermocouple) and a smaller tube (the pilot gas supply line) attached.
Use a 1/4-inch nut driver to remove the screws holding the pilot assembly. Carefully pull the assembly forward. You don't need to disconnect any gas lines for basic cleaning.
Locate the tiny brass orifice at the end of the pilot tube. It's the size of a pinhead.
Spray compressed air directly into the orifice. Short bursts work best. If you don't have compressed air, use a can of electronic duster.
Do not use a wire or a needle to poke the orifice. That can enlarge the hole and ruin the gas metering.
Reinstall the assembly and try lighting the pilot again. If the flame still looks weak, the orifice might need replacement. They're cheap and available online or at HVAC supply stores.
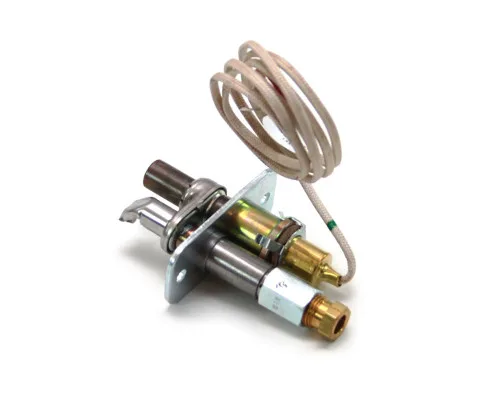
Image source: Bing (Web (fair-use with source credit))
Thermocouple Testing and Replacement
If cleaning didn't fix the problem, test the thermocouple. With the pilot lit, disconnect the thermocouple nut from the gas valve. Set your multimeter to DC millivolts.
Touch one probe to the tip of the thermocouple (the part that goes into the flame) and the other probe to the copper sheath of the thermocouple wire.
A healthy reading is 25 to 35 millivolts. Below 20, the thermocouple cannot reliably hold the gas valve open. Replace it.
Replacement is simple. The thermocouple screws into the pilot assembly on one end and into the gas valve on the other. Unscrew both ends.
Install the new thermocouple. Hand-tighten the nut at the gas valve, then give it a quarter turn with a wrench. Do not overtighten.
Reinstall the pilot assembly and test.
Adjusting the Pilot Flame Height
Some Williams furnaces have a pilot adjustment screw on the gas valve. It's usually a small set screw near the thermocouple connection. Turn it clockwise to reduce the flame, counterclockwise to increase it.
Adjust until the flame covers the top quarter inch of the thermocouple tip evenly.
If your gas valve doesn't have an adjustment screw, the pilot flame is factory-set and should be correct unless the orifice is dirty or damaged.
What to Do If the Gas Valve Itself Is Bad
If the pilot flame is strong and clean, the thermocouple tests above 25 millivolts, and the connection is tight, but the gas valve still won't stay open, the valve's internal electromagnet may have failed. There is no DIY fix for this. Gas valve replacement requires a licensed professional.
They have the tools to test gas pressure and ensure proper installation. Do not try to bypass or repair the gas valve yourself.
Blower Motor Issues: When It Runs or Won't Run
The blower motor is the part that makes the heat actually useful. If it's not working, you could have a blazing fire inside the furnace and still freeze. Let's diagnose both scenarios.
Testing the Limit Switch with a Multimeter
The limit switch is the brain that tells the blower when to turn on. If the burners are hot but the blower stays off, this is where you start.
Set your multimeter to ohms (the symbol that looks like a horseshoe). Disconnect the wires from the limit switch terminals. Touch one probe to each terminal.
At room temperature, the switch should show nearly zero ohms of resistance. That means the circuit is closed and the switch is in its normal state.
If you get infinite resistance (OL on most meters), the switch is stuck open. Replace it. They cost about $15 and clip into the same bracket.
If the switch tests fine at room temperature, try heating it with a hairdryer. As the switch warms up, it should open (infinite resistance) at its rated temperature, which is stamped on the switch body. If it doesn't open, the switch is stuck closed.
That's less common, but also needs replacement.
Cleaning the Blower Wheel and Motor
A dirty blower wheel is one of the most overlooked causes of poor airflow and short cycling. Over years of operation, dust and lint build up on the blower blades. The wheel becomes unbalanced.
It moves less air, and the motor works harder.
Remove the blower assembly from the furnace. It's usually held in by two screws and plugged into a wiring harness. Take it outside.
Use a stiff brush and compressed air to clean every blade on the wheel. Wear a dust mask. The stuff that comes off is nasty.
While you have the blower out, check the motor shaft for smooth rotation. Spin the wheel by hand. If it feels gritty or tight, the motor bearings are drying out.
Some blower motors have oil ports. Apply a few drops of electric motor oil (not WD-40) if you see ports. If the motor has sealed bearings, you can't lubricate them.
When the motor starts making grinding noises or running hot, it's time for a replacement.
Checking Thermostat Wiring and Connections
If the limit switch tests good and the blower motor spins freely but still won't run, the problem may be in the control circuit. The thermostat wires run from the wall thermostat to the furnace. Over time, vibrations can loosen the connections.
Turn off power to the furnace. Remove the junction box cover where the thermostat wires connect inside the furnace. Look for loose wire nuts or corroded connections.
Reconnect any loose wires. If you find corroded copper, cut back to clean wire and reconnect.
Also check the thermostat itself. Pull it off the wall plate. Look for loose screws on the terminals.
A thermostat that's fallen off calibration or has weak batteries can fail to close the circuit that calls for the blower.
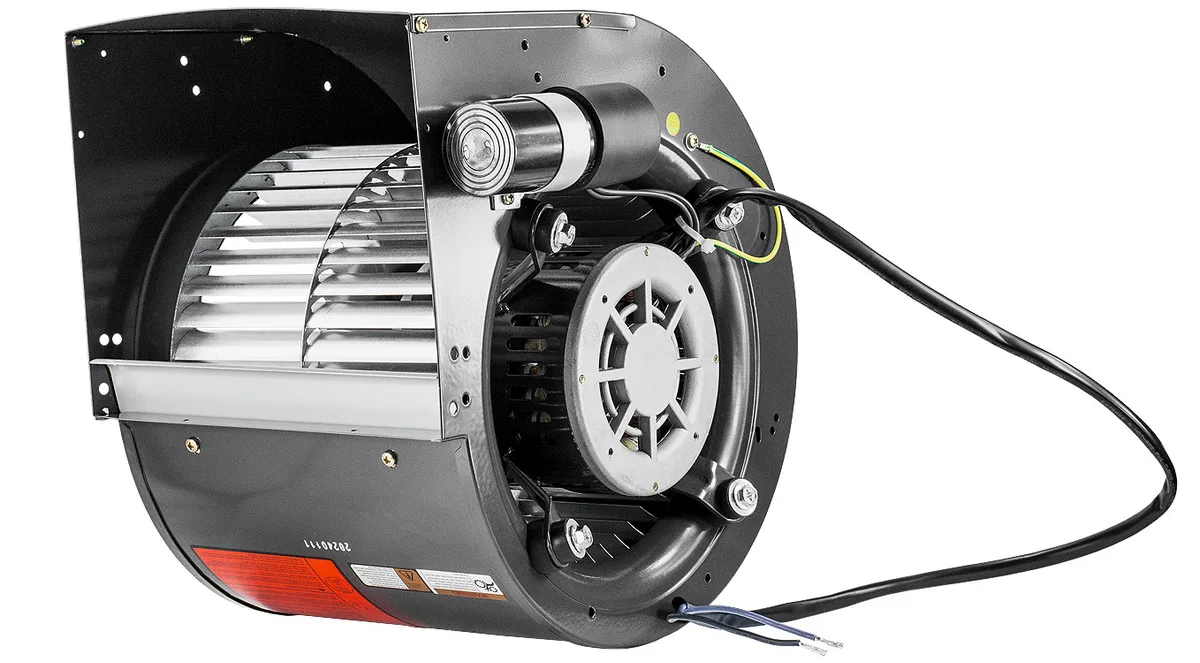
Image source: Bing (Web (fair-use with source credit))
When to Replace vs. Repair
Here's a simple rule. If the blower motor is less than 15 years old and the bearings are just noisy, try oiling it first. If the motor is dead (won't spin, smells burnt, or draws too many amps), replace it.
A new blower motor for a Williams wall furnace runs $80 to $150. A service call to diagnose and replace is typically $250 to $400. If you're comfortable with basic wiring, the DIY replacement is straightforward.
Just take a photo of the wire connections before you disconnect anything.
Burner and Flame Quality Problems
The burner is where the actual heat happens. If the flame looks wrong, the furnace won't heat efficiently, and it might not heat safely.
What a Healthy Flame Should Look Like
A properly adjusted Williams wall furnace burner produces a flame that is mostly blue with maybe a tiny yellow tip. The flame should be steady. It should not lift off the burner ports or make roaring sounds.
The flame pattern should be even across all burner ports.
A yellow or orange flame means incomplete combustion. This is a sign that the burner is dirty, the gas mixture is wrong, or the vent is blocked. Yellow flames produce carbon monoxide.
A flame that lifts off the burner or makes a hissing sound means the gas pressure is too high or the burner orifice is too large. This is less common but still dangerous.
Cleaning Burner Ports and Removing Debris
Burner ports get clogged with dust, pet hair, and the occasional spider web. Remove the burner assembly from the furnace. It usually slides out after removing a few screws.
Use a wire brush to clean the top surface of the burner where the ports are. Pay special attention to any ports that look blocked. Follow up with compressed air blown through the burner tube.
This clears internal debris.
Check the burner for rust. Surface rust is normal on older units. Heavy rust with flaking metal means the burner needs replacement.
A rusted burner can create holes that cause uneven flame patterns and poor combustion.
Draft Issues: Testing the Flue Properly
Draft is the force that pulls combustion gases up the flue and out of your home. Without proper draft, the furnace can spill carbon monoxide into your living space.
To test draft, close all windows and doors in the room. Turn on exhaust fans and the clothes dryer. This simulates worst-case conditions.
Light a match and hold it near the draft hood opening at the top of the furnace. The flame should pull inward toward the flue. If it pushes outward or flickers wildly, the draft is reversed or completely blocked.
Common draft blockers include bird nests, leaves, and collapsed flue pipes. If the flue runs through an attic that has been reinsulated, insulation may have fallen into the pipe. These blockages require a professional to clear.
Yellow Flame Troubleshooting
A yellow flame on a gas burner is always a red flag. The most common cause is a dirty burner. Clean it using the steps above.
If cleaning doesn't help, check the air shutter on the burner. Some Williams models have an adjustable air shutter that controls the gas-to-air ratio. If the shutter is closed too far, the flame turns yellow.
Locate the shutter near where the burner tube connects to the gas valve. Loosen the screw and open the shutter slightly. You should see the flame become bluer.
Adjust until the flame is mostly blue with only a trace of yellow at the tips. Tighten the screw.
If adjusting the shutter doesn't fix a yellow flame and the burner is clean, the problem could be low gas pressure. That requires a professional with a manometer to check.
Common Mistakes That Waste Time and Money
After years of researching wall furnace repairs, we keep seeing the same errors. Avoid these and you'll save hours of frustration.
Replacing Parts Without Testing First
This is the number one mistake. Someone replaces the thermocouple, the blower motor, and the limit switch before testing any of them. Diagnose first.
Replace second. Your multimeter costs less than any of those parts, and it tells you exactly what's wrong.
Ignoring the Sediment Trap in the Gas Line
Williams wall furnaces are supposed to have a sediment trap (also called a drip leg) installed in the gas line before the furnace. This is a short vertical pipe that catches debris and moisture from the gas supply. Many older installations don't have one.
If your furnace has persistent pilot or burner problems and you don't see a sediment trap, have one installed. It can prevent most debris-related issues.
Using the Wrong Replacement Thermocouple
Not all thermocouples are the same. Williams furnaces typically use a 24-inch or 30-inch universal thermocouple with a standard 3/8-inch fitting. But some models use a different thread pitch.
Bring your old one to the hardware store and match it exactly. A too-long thermocouple won't position the tip correctly in the flame. A too-short one won't reach the gas valve.
Overtightening Gas Fittings
Gas fittings on wall furnaces use flare connections. The seal is made by the metal surfaces pressing together. You don't need a cheater bar.
Hand-tight plus a quarter turn with a wrench is enough. Overtightening can crack the fitting or distort the flare, causing a gas leak.
When to Call a Professional (No Shame in This)
Not every furnace problem is a DIY job. Knowing when to step back is a sign of experience, not weakness.
Signs of a Cracked Heat Exchanger
The heat exchanger is the metal chamber above the burner where combustion happens. Over years of heating and cooling cycles, it can develop cracks. A cracked heat exchanger allows carbon monoxide to mix with the heated air being blown into your room.
Signs include soot around the burner area, a strong gas smell when the furnace is running, or visible rust holes on the heat exchanger. If you suspect a cracked heat exchanger, shut down the furnace immediately and call a professional. This is not repairable.
The furnace needs replacement.
Gas Valve Replacement Requirements
The gas valve is the heart of your furnace. If it fails, a professional needs to replace it. They have the tools to verify gas pressure, test for leaks, and calibrate the valve.
DIY gas valve replacement is dangerous and often violates local code.
Carbon Monoxide Symptoms and Prevention
Carbon monoxide is odorless and colorless. Symptoms of CO poisoning include headache, dizziness, nausea, and confusion. If multiple people in your home feel these symptoms at the same time, leave immediately and call 911.
Every home with a gas appliance should have CO detectors on every floor. Install them outside sleeping areas. Test them monthly.
Replace them when they reach their expiration date.
Local Code and Licensing Rules
Many states and municipalities require a license to work on gas appliances. Even if you're capable of doing the repair, the law may require a licensed gas fitter to do it. Check your local building department's rules before starting any gas line repair.
The fine for unlicensed gas work can be steep, and your homeowner's insurance may not cover damage from DIY gas repairs.
Tools You Actually Need for DIY Troubleshooting
We covered the basic tool list earlier. Let's add a few specifics about using the two most important tools: the multimeter and the compressed air.
Multimeter Basics for Furnace Diagnostics
You don't need an expensive multimeter. A $20 model from any hardware store works fine. Just make sure it has a DC millivolt setting and an ohms setting.
For thermocouple testing, set it to DC millivolts in the 200mV range. For limit switch testing, set it to ohms (the horseshoe symbol). For blower motor testing, set it to ohms for continuity checks.
One tip: always test your multimeter on a known good circuit before relying on it. Touch the two probes together. An ohmmeter should read zero.
A millivolt meter should read zero when not connected to anything.
Essential Cleaning Tools
Compressed air is your best friend for furnace cleaning. Buy a can with a straw attachment. The straw lets you direct the air precisely into the pilot orifice or burner ports.
A small wire brush with brass bristles works better than steel on gas burner surfaces. Steel can scratch the metal and create rough spots where debris collects faster.
Where to Find Your Model's Wiring Diagram
Every Williams wall furnace has a nameplate on the inside of the control door. It lists the model number, serial number, and electrical ratings. Write down the model number.
Williams Furnace Company still maintains archives of their manuals. Search for your model number plus "manual" online. The wiring diagram inside the manual shows exactly how every component connects.
Maintenance That Prevents 90% of Problems
Regular maintenance turns a problematic furnace into a reliable one. Most issues develop gradually from neglect. A little annual attention eliminates the vast majority of service calls.
Annual Cleaning Checklist
Once a year, before heating season starts, do this:
- Remove the burner and clean it with a wire brush and compressed air.
- Clean the pilot orifice with compressed air.
- Visually inspect the thermocouple for corrosion or damage.
- Clean the blower wheel with a stiff brush.
- Vacuum all dust from inside the furnace cabinet.
- Check the vent opening on the exterior wall for blockages.
- Test the draft with a match.
- Replace the batteries in your thermostat and CO detectors.
This list takes about an hour. It will prevent the most common reasons your furnace stops working in January.
Before-Winter Startup Routine
If your furnace has been off all summer, do a light test before you need it. Turn the thermostat to heat. Watch the pilot light.
Let the furnace run for 15 minutes. Make sure the blower kicks on and the heat stays steady. If anything seems off, you have time to fix it before the first cold snap.
When to Replace vs. Buy New
Williams wall furnaces have a typical lifespan of 20 to 30 years with proper maintenance. If your furnace is older than that and needs a major repair like a heat exchanger or gas valve, replacement often makes more financial sense. A new Williams wall furnace costs $600 to $1,200 and pays for itself in improved efficiency and reduced service costs.
Consider replacement if you notice any of these signs: the furnace is more than 25 years old, repair costs exceed half the price of a new unit, or you find yourself repairing it every year. Modern sealed-combustion models are safer and more efficient than the gravity-vent models from the 1980s and 1990s.
Frequently Asked Questions
Why does my pilot keep going out after cleaning?
A pilot that goes out immediately after cleaning usually means the thermocouple is weak. Cleaning may have disturbed it enough to expose the preexisting failure. Test the thermocouple with a multimeter.
If it reads below 20 millivolts, replace it.
Can I run the furnace without the blower?
No. Running the furnace without the blower causes the internal temperature to rise rapidly. The limit switch will trip, shutting everything down.
If the limit switch fails, the furnace can overheat and damage components or create a fire risk.
How long should a Williams wall furnace last?
20 to 30 years with regular maintenance. The burner and heat exchanger are the most durable parts. The thermocouple and blower motor are consumable items that need replacement every 5 to 10 years.
Is it safe to use a space heater instead?
Space heaters are safe for temporary use but not as a permanent replacement for a wall furnace. Ceramic or oil-filled radiator heaters are safer than exposed-coil heaters. Always plug space heaters directly into a wall outlet, never into an extension cord.
Keep them three feet away from anything flammable.
What do the error codes on newer models mean?
Newer Williams wall furnaces with electronic ignition use a flashing LED to indicate errors. One flash usually means a thermocouple failure. Two flashes indicate a limit switch issue.
Three flashes point to a gas valve problem. Four flashes mean a flame sensing failure. Check your owner's manual for model-specific codes.

Similar Posts