Breville Barista Express Troubleshooting
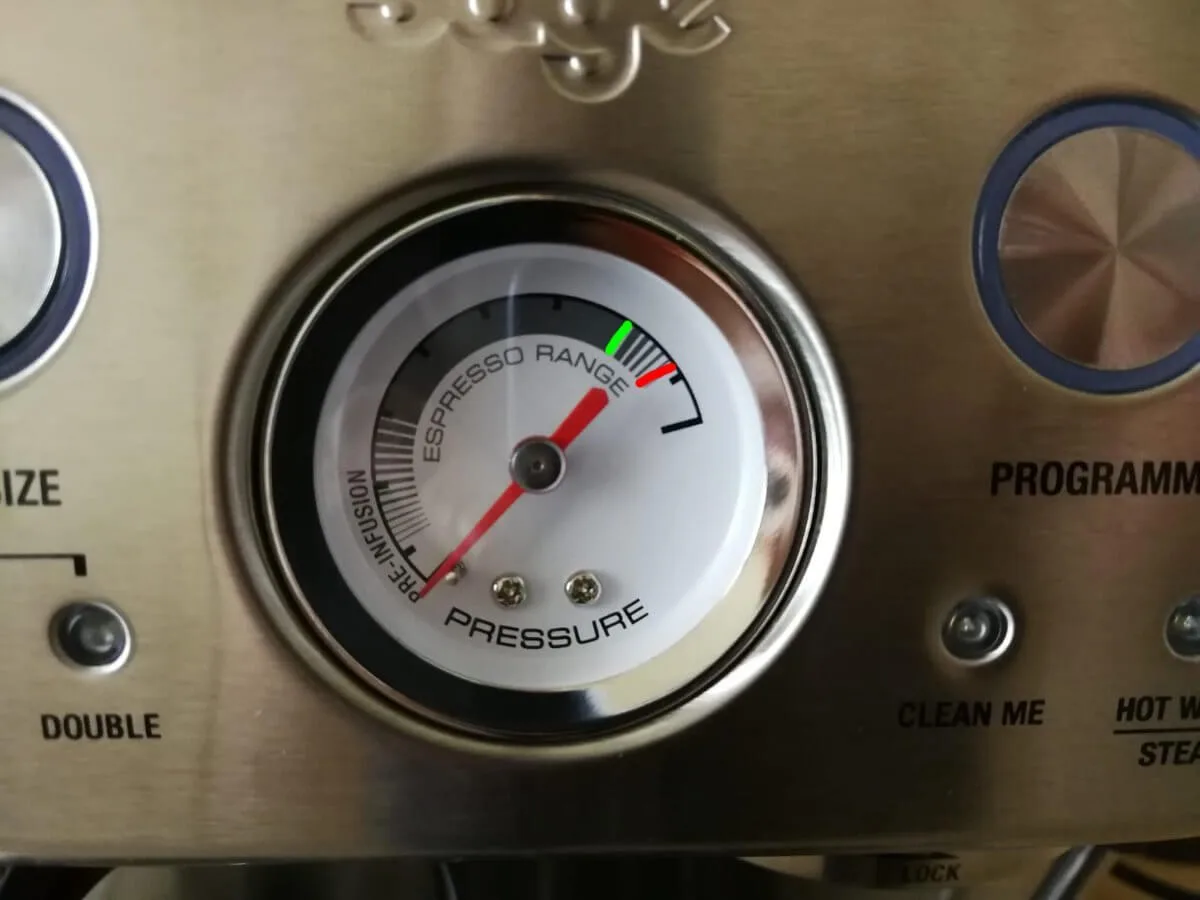
Your Breville Barista Express pulls a watery shot that tastes like sour lemon juice. You've tried grinding finer. You've tried tamping harder.
Nothing works, and the pressure gauge sits at the bottom of the range. You're not alone. This is the single most common frustration with this machine, and it's almost always fixable without a service call.
Breville Barista Express Troubleshooting starts with reading what the machine is telling you. Built-in feedback tools, the pressure gauge, the shot timer, and the steam wand behavior, each point to a specific root cause. Manufacturer specifications indicate the machine is designed to deliver a 25-35 second extraction at roughly 200°F with 9 bar of pressure at the group head.
When you understand those benchmarks, your machine tells you exactly what's broken. Let's walk through the diagnostic path.
Quick Answer
Most Breville Barista Express problems come down to grind size, dose weight, or a clogged part. If the shot runs fast, grind finer. If it chokes, grind coarser.
If the pressure gauge stays low, your dose is too light. If steam sputters, clean the wand tip. If the grinder jams, remove the burrs and clean them.
Follow this logic in order. You'll fix 90 percent of issues in ten minutes.
Start with the Feedback: What the Pressure Gauge and Shot Timer Tell You
The machine gives you two information streams in real time. The pressure gauge shows hydraulic resistance inside the puck. The shot timer shows how fast water is flowing through.
Together they form a complete diagnostic picture.
Reading the pressure gauge
The gauge has three zones. The low zone (below 9 o'clock) means the pump isn't building enough resistance. The ideal zone (9 o'clock to 12 o'clock) means your puck is creating the right back pressure.
The high zone (above 12 o'clock into red) means too much resistance. Your puck is choking the flow.
If your needle sits in the low zone for the entire shot, you have too little resistance. That usually means grind is too coarse, dose is too light, or the coffee is stale. If it climbs into the red zone quickly, your grind is too fine or your dose is too heavy.
If it climbs slowly over 10 seconds and then sticks in the ideal zone, you're very close to dialed in.
Reading the shot timer
The timer starts when you flip the brew switch. Target is 25 to 35 seconds for the first drops to appear after about 5 to 7 seconds of pre-infusion. If you see liquid at 5 seconds and the shot finishes in 15, that's a fast shot.
Under-extracted. If nothing comes out until 12 seconds and the shot takes 45 seconds, that's a slow shot. Over-extracted.
The combination tells the story
A fast shot with low pressure means coarse grind or low dose. A fast shot with normal pressure means the machine might be working correctly but you need a finer grind to slow extraction. A slow shot with high pressure means grind too fine.
A slow shot with normal pressure means dose too heavy.
Write these combinations down. They're the core of every Breville Barista Express troubleshooting session you'll ever do. Once you understand them, you stop guessing and start adjusting with confidence.
Image source: Bing (Web (fair-use with source credit))
Shot Extraction Troubleshooting: Fast, Slow, or Choked Flow
If your shot is coming out fast, slow, or not at all, the adjustment path depends on which symptom you see. Follow the decision tree below.
Branch 1: Shot runs fast (under 20 seconds) and pressure is low
Your grind is too coarse or your dose is too light. The water finds the path of least resistance and blasts through. Fix: go finer on grind size by one full number on the outer dial.
For example, if you were at 12, move to 11. Pull another shot. If it's still fast, go finer again.
If the gauge starts climbing into the ideal zone but the shot is still fast, increase your dose by 0.5 grams. Do not change both variables at once. Adjust one, test, then adjust the other.
If you've gone three steps finer and the machine starts making a loud groaning sound but still runs fast, your beans are stale. Fresh beans (roasted 5 to 21 days ago) are the only way to build proper resistance. Stale beans have lost their gas and simply can't create back pressure no matter how you grind them.
Branch 2: Shot runs slow (over 40 seconds) or drips
Your grind is too fine or your dose is too heavy. The water can barely push through the puck. Fix: coarsen the grind by one full number.
If the shot is still slow, go coarser again. If you're already at a very coarse setting (say 25 or higher) and the shot is still slow, reduce your dose by 1 gram. Again, change one variable at a time.
If the machine stops flowing entirely after 10 seconds, you have a choke. That's a frozen puck. Immediately stop the shot, dump the puck, and rinse the basket.
A choked shot can damage the pump if you run it too long. Don't let the machine sit with water blocked for more than 15 seconds.
Branch 3: Shot runs at normal time but tastes bitter or sour
If the timer and pressure gauge look textbook, 28 seconds, needle at 10 o'clock, but the coffee tastes bad, your problem is not grind or dose. It's temperature or distribution.
Bitter means over-extraction. Try a slightly coarser grind (half a number) and see if bitterness fades. Sour means under-extraction.
Try a slightly finer grind (half a number) and see if acidity mellows. If neither works, check your water temperature. The Breville Barista Express PID is factory set to roughly 200°F.
If you're in a cold room, the machine might not hold temperature first shot. Run a blank shot through the group head to warm up the portafilter and basket.
Branch 4: Channeling — uneven flow with spray
If you see liquid spraying sideways or the flow is lopsided (more water from one side), you have channeling. That's a distribution problem. You didn't level the grounds before tamping, or you're tamping at an angle.
Solution: use a distribution tool or WDT (Weiss Distribution Technique). A simple paper clip or toothpick can work. Break up clumps, level the bed, then tamp straight down with even pressure.
Also check that your basket isn't overfilled. The puck should have a fingernail's width of headspace after tamping.
Pressure Gauge Diagnostics: Low, High, or Stuck in Pre-Infusion
The pressure gauge is your most reliable diagnostic tool because it measures hydraulic resistance directly. But it only helps if you know what different readings mean at different stages of the shot.
Gauge stays in the pre-infusion zone (below 9 o'clock) the whole shot
This is the number one complaint among new Breville Barista Express owners. The needle barely moves off zero. What's happening: the pre-infusion phase normally sends low-pressure water to saturate the puck for a few seconds, then the pump ramps up to full pressure.
If the needle never leaves the pre-infusion zone, the pump is running but the water is flowing straight through the puck without resistance.
Root causes in order of likelihood:
- Grind too coarse. The most common. Go finer until the gauge jumps.
- Dose too light. Add 0.5 to 1 gram.
- Pressurized basket used with stale beans. Pressurized baskets (dual-wall) require less precision, but stale beans can still be too porous.
- Overfilling the basket. Too much coffee can create a seal failure if the puck hits the shower screen. Check for a screw impression on the dry puck.
- Pump issue. Less likely. If you've gone very fine (setting 1 to 3) and the gauge still reads zero, your pump may be failing, or the over-pressure valve (OPV) is stuck open. Pre-2019 models have a known OPV issue. Check if the machine is still under warranty.
Gauge climbs to the red zone (above 12 o'clock) immediately
Your puck is too dense. The water can barely push through. Root causes in order of likelihood:
- Grind too fine. Go coarser.
- Dose too heavy. Reduce by 0.5 grams.
- Channeling with a false high pressure. Sometimes the gauge spikes if one channel forms and the rest of the puck is solid. Check for spray or lopsided flow.
- Blocked shower screen. Remove the screen and clean it. Built-up coffee oils can restrict flow and fool the gauge.
Gauge rises slowly over 10 to 15 seconds then pegs red
You're close to dialed in, but the puck is still slightly too tight. This often happens when the grind is just a hair too fine or when the dose is perfect but the distribution is uneven. Fix: try going coarser by a half-number (you can try a partial adjustment on the outer burr between detents).
Or compare the same dose with a coarser grind one full number up.
Gauge stays normal but shot still tastes off
If the needle sits at 10 o'clock and the shot timed at 28 seconds but tastes bad, the issue is temperature stability. Run two blank shots through the group head to warm the group. The machine absorbs heat from the first shot.
After the second blank, pull your real shot. That alone often fixes a sour or bitter note because the temperature is stable.
Steam Wand Troubleshooting: Weak, Sputtering, or No Steam
The steam wand on the Breville Barista Express is a single-hole manual wand with a dedicated thermoblock. It heats up in about 15 seconds. But when it stops working properly, every milk drink becomes a headache.
Symptom: Steam weak after a few seconds
You press the steam button, wait for the light, open the valve. Steam comes out strong for a few seconds, then turns into a weak dribble. This is almost always a clogged tip.
Milk solids accumulate inside the tiny hole after multiple uses. The hole is roughly 1mm diameter. Even a partial blockage drops steam pressure significantly.
Fix: the pin test. Turn off the machine. Wait for the wand to cool.
Remove the tip (it unscrews). Use the small pin that came with the machine (or a sewing needle) to poke through the hole from the inside out. Run water through the tip to flush debris.
Reattach, prime, and test. If steam is still weak, the blockage might be deeper in the wand. Use a flexible brush to clean the wand tube.
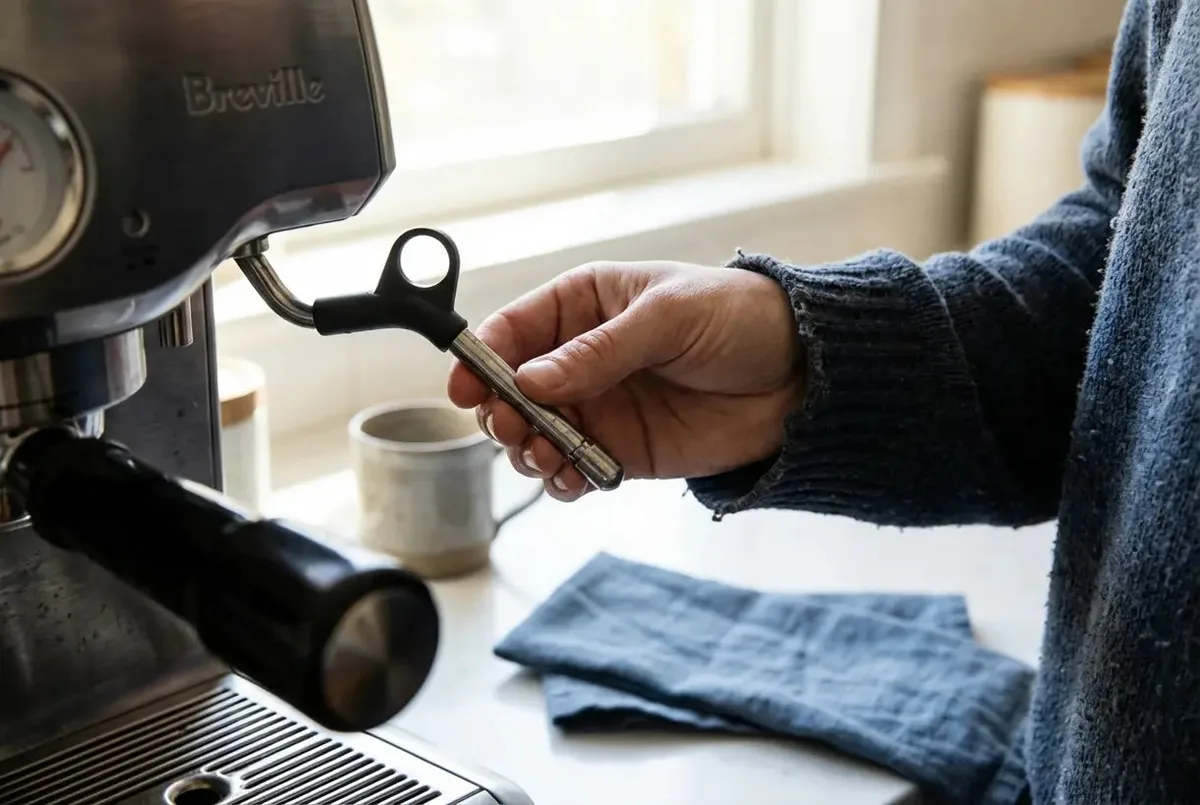
Image source: Bing (Web (fair-use with source credit))
Symptom: Steam sputters and spits
Sputtering means there's water mixed with the steam. That usually happens when the machine hasn't primed properly after descaling or after a refill of the water tank. Another cause: the steam boiler is partially empty because the machine was used for brewing and steam back-to-back without a recovery cycle.
Fix: purge the wand. Open the steam valve fully for 5 seconds before you insert the tip into milk. This forces out any condensed water in the steam path.
If sputtering persists, run 5 seconds of steam, wait 10 seconds, then run another 5 seconds. Repeat until steam comes out dry and continuous.
If you still get sputtering after purging, the machine may have air in the steam system from a recent descale. Run a full tank of water through the steam wand by opening the valve and letting it run until steam is steady. That forces out trapped air.
Symptom: No steam at all
No steam usually means one of three things. The steam thermoblock is not heating. The steam valve is stuck closed.
Or the machine has a circuit error. First, check if the steam light comes on and blinks. If it doesn't, the machine hasn't entered steam mode.
Turn the knob to steam and wait 15 seconds. If the light blinks but never stays solid, the thermoblock may have failed.
Second, try unplugging the machine for 30 seconds. A hard reset often clears a software glitch that blocks steam mode. After reboot, run water from the group head for 10 seconds (no coffee) to confirm water flow, then try steam again.
Third, if none of that works, the steam valve could be stuck closed by mineral deposits. Descale the machine. If you've been using filtered water, you might need to remove and clean the steam valve.
That's a more advanced repair. See the maintenance section for the full descale procedure.
Symptom: Steam wand leaks when not in use
A slow drip from the wand tip when the machine is idle means the steam valve isn't sealing fully. Usually it's a worn O-ring inside the valve body. Breville sells replacement O-ring kits.
You can also try tightening the valve stem nut (accessible under the top panel). If neither works, the valve assembly needs replacement. That's a service center job.
Pro tip: weekly steam wand cleaning
Dip the wand tip into a cup of water and run steam for 3 seconds immediately after each use. This flushes milk residue out before it can dry and harden. At the end of each week, remove the tip and soak it in hot, soapy water for 10 minutes.
Ream the hole with the pin. That one habit prevents 90 percent of steam problems.
Grinder and Dose Troubleshooting: Jams, Drift, and Inconsistent Grinds
The integrated conical burr grinder is the most praised and most cursed feature of the Barista Express. When it works, it's convenient. When it doesn't, you get clumpy, inconsistent grounds or a jammed motor.
Symptom: Grinder jams during grinding
You hear a clicking sound, the grinder stops, and the machine vibrates. That's a burr jam. It happens when a hard coffee bean, a piece of chaff, or a foreign object gets wedged between the burrs.
It can also happen if you're trying to grind very fine with oily beans.
Fix without tools: turn off the machine. Open the bean hopper and remove any beans. Use a small brush or toothpick to clear the upper burr area.
Turn the burr by hand (you can access it through the top) to dislodge the blockage. Often that's enough.
If it still won't turn, you need to remove the burrs. Unplug the machine. Lift out the upper burr.
It's held by a collar that unscrews counter-clockwise. Clean both burrs with a stiff brush. Reassemble, add a few beans, and run the grinder without the top hopper to test.
If the grinder jams every time you grind fine, your burrs might be worn. The stock conical burrs last roughly 500 to 700 shots. After that, they lose their sharp edges and produce more fines, which clog the chute.
Replacement burrs from Breville cost about $40 and can be swapped at home with a screwdriver.
Symptom: Grind size drifts over time
You dial in a perfect shot with grind setting 8. One week later, same beans, same dose, the shot runs fast. You check the outer dial.
It's still on 8. What changed? The inner burr adjustment drifted.
The Barista Express has a secondary grind adjustment on the upper burr. The factory default is usually at setting 6 (or middle of the range). Over time, vibration can cause the inner burr to loosen or shift.
If you've been turning the outer dial to the finest settings and still getting under-extraction, the inner burr probably needs to move finer.
Fix: remove the upper burr, adjust the inner burr by rotating the adjuster ring one number finer (counter-clockwise from the top). Reassemble and test. This is the same process shown in many Breville maintenance videos.
Mark your inner setting with a white dot so you can detect future drift.
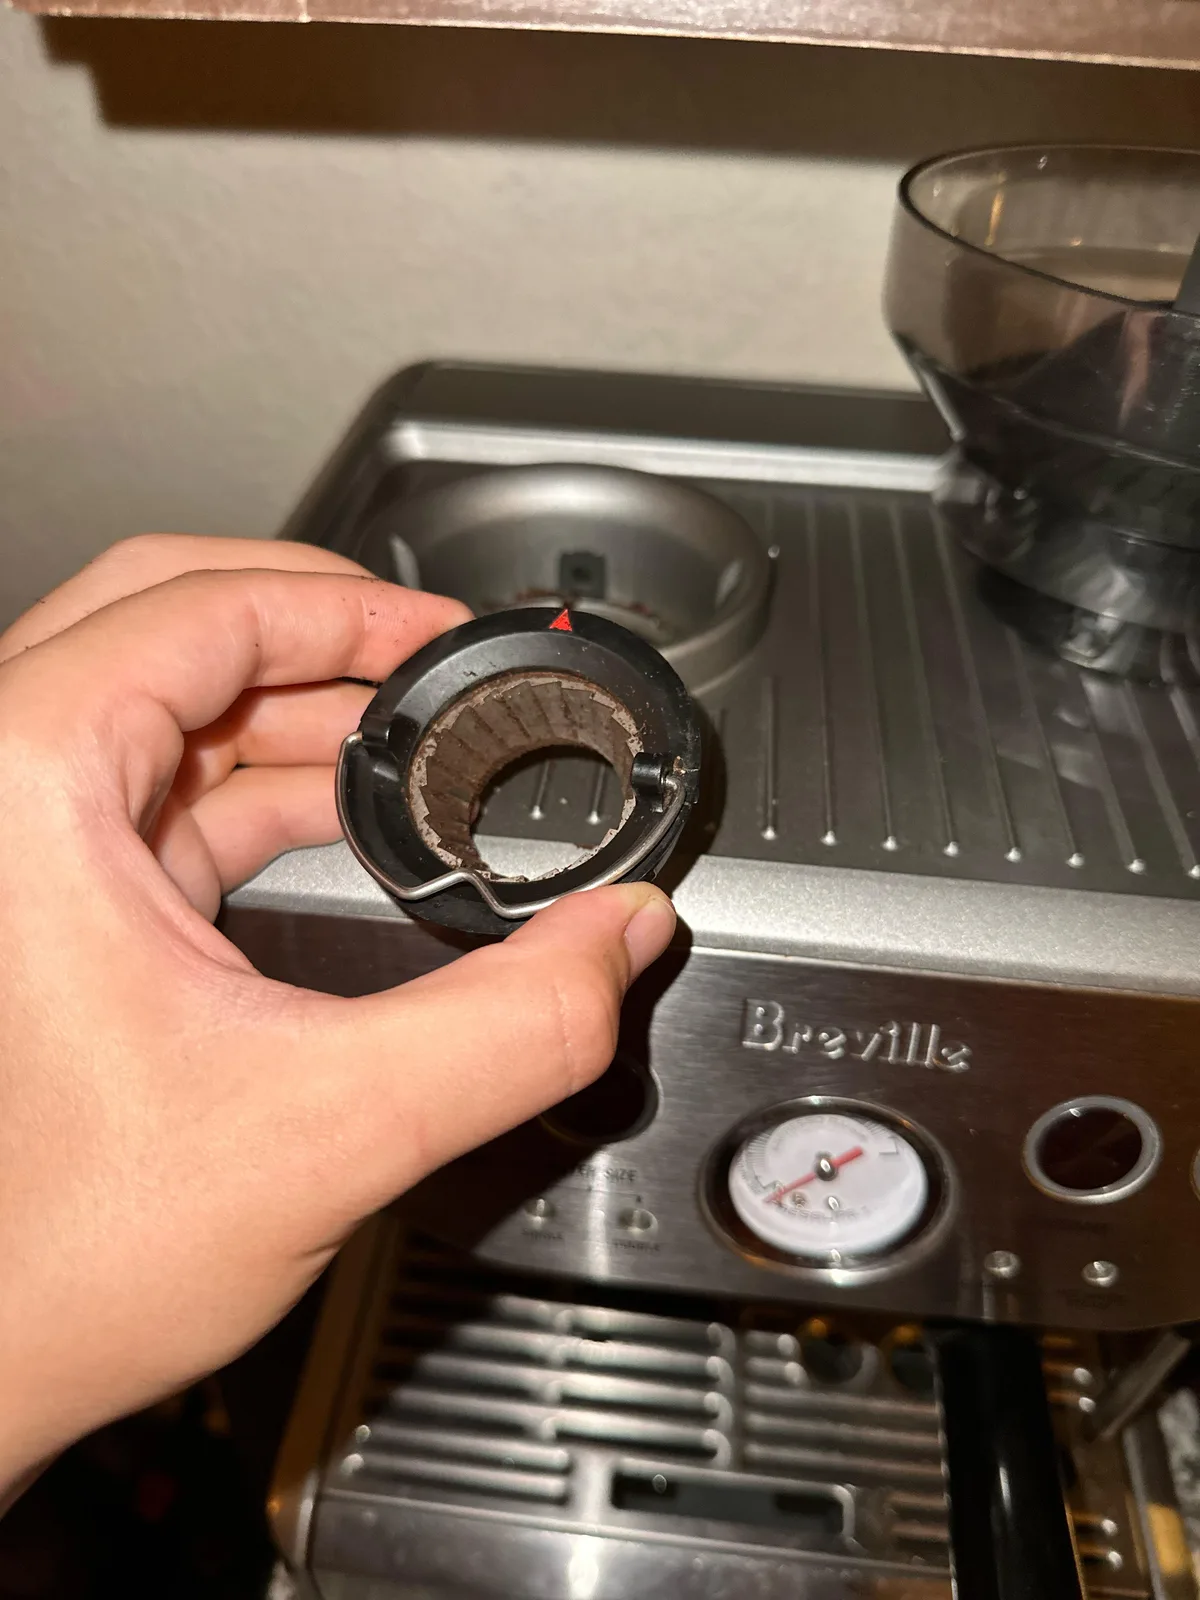
Image source: Bing (Web (fair-use with source credit))
Symptom: Grounds are clumpy or distribution is inconsistent
Clumpy grounds are normal with oily, dark-roasted beans. The static charge and oil content cause them to stick together. That's not a machine problem.
It's a bean property. Solutions: run a couple of grams of rice through the grinder to absorb excess oil. Do this weekly.
Use a WDT tool to break up clumps in the basket.
If the inconsistency is extreme (some shots pull fine, others are chaos), your burrs might be misaligned. Breville burrs are factory aligned, but a hard knock can shift them. Check by running a felt-tip pen test.
Color the outside of the lower burr, reassemble, run the grinder for a second, then inspect. If the color wears evenly, alignment is fine. If one side shows more wear, you need to shim the burr.
Third-party shim kits are available for about $15.
Symptom: Hopper and shut-off lever issues
The bean hopper has a shut-off lever that lets you remove the hopper without spilling beans. If the lever is stuck or the hopper doesn't seat properly, the grinder won't engage. Check that the lever is fully open and the hopper tab is inserted correctly.
A common mistake: leaving the lever half-closed, which starves the burrs.
Maintenance that prevents grinder problems
- Clean the burrs every 2 to 3 months with a stiff brush and a vacuum.
- Run a grinder cleaning tablet every 6 months to remove caked-on oils.
- Use fresh beans. Oily aged beans accelerate burr wear.
- Do not store beans in the hopper for more than 3 days. They stale quickly, and stale beans are harder to grind consistently.
Water, Cleaning, and Descaling Workflow
Most recurring problems with the Breville Barista Express come from neglected maintenance. Scale buildup, coffee oil residue, and clogged filters cause symptoms that mimic grind or dose issues. A proper cleaning schedule prevents 80 percent of troubleshooting calls.
Backflushing: the weekly habit
Backflushing cleans the group head and the three-way solenoid valve. You need the rubber cleaning disc that came with the machine and a cleaning tablet (Breville recommends their own tablets, but any espresso machine cleaning tablet works). Place the disc in the single-wall basket.
Add a tablet. Lock the portafilter in. Run a full cycle (about 10 seconds).
Turn the machine off. Let it soak for 15 minutes. Run another cycle without the tablet.
Repeat with plain water until no bubbles come out.
Do this every week if you pull more than 4 shots per day. Every two weeks if you pull fewer.
Descaling: every 3 to 6 months
Scale is the biggest enemy of the Thermojet system. Hard water leaves mineral deposits that restrict flow and cause temperature fluctuations. The machine has a descaling indicator light.
When it flashes, you need to descale. Don't ignore it.
Breville's official descale procedure (as of 2026):
- Empty the water tank. Mix Breville descaling solution with water according to the package instructions. Do not use vinegar. Vinegar can damage the internal seals and void your warranty.
- Remove the portafilter and cleaning disc. Place a large container (at least 2 liters) under the group head.
- Enter descale mode. On the BES870XL, press and hold the 2-shot button for 10 seconds. The descale light will blink.
- Open the steam wand. The machine will cycle solution through the group head and steam wand in alternating bursts. This takes about 20 minutes.
- When the tank is empty, the machine beeps. Refill the tank with fresh water.
- Rinse by running the same cycle again.
- Wipe down the machine. Run a blank shot to confirm flow is normal.
Group head gasket replacement
The group head gasket seals the portafilter to the machine. Over time it hardens and leaks. Replace it every 9 to 12 months.
Signs of a worn gasket: water dripping around the portafilter during extraction, the portafilter turning past the 6 o'clock position, or a loose fit. Replacement gaskets cost about $10 and swap in 30 seconds with a flathead screwdriver.
Shower screen cleaning
Remove the shower screen (one screw) every month. Soak it in hot water with a drop of dish soap. Scrub with a brush.
Coffee oils build up behind the screen and block water distribution. A clean screen makes a noticeable difference in even extraction.
What happens if you skip maintenance
Scale buildup narrows the internal water passages. The machine's PID compensates by raising temperature, which leads to burnt-tasting shots. The pump has to work harder, which shortens its lifespan.
The steam wand loses power. Eventually, the Thermojet can fail completely. A replacement Thermojet costs about $150 and requires professional installation.
An ounce of prevention saves a lot of money.
Real-World Scenario Walkthroughs
Theory is useful. Real numbers help more. Here are three common situations and exactly how to fix them.
Scenario 1: The new user with 10-second gushers
Case: Sarah just got her Barista Express. She's using the double-wall basket (the one with the single hole in the bottom) because she heard it's easier. Grind setting 15. 18 grams of pre-ground supermarket coffee.
Pulls a shot in 10 seconds. Gauge barely moves. Tastes like sour water.
The issue: everything is fighting against her. Pre-ground coffee is too coarse. The double-wall basket creates back pressure, but stale pre-ground coffee can't create it.
The dose is slightly light for that basket.
The fix: switch to fresh whole beans roasted within the last 3 weeks. Use the single-wall basket. Set grind to 12.
Dose 18 grams. Tamp firmly. Result: 28 seconds, gauge at 10 o'clock, drinkable crema.
Lesson: fresh beans and the correct basket matter more than any other variable.
Scenario 2: The 6-month-old machine with a red-zone gauge
Case: Mike has been using his machine daily for 6 months. Never backflushed. Never descaled.
Lately, shots take 45 seconds. The gauge pins at red after 5 seconds. He's been grinding coarser, but it's not helping.
The issue: scale buildup and a clogged shower screen. The machine is choking itself.
The fix: first, descale the machine. Second, remove and clean the shower screen. Third, backflush with a cleaning tablet.
After all three, grind at Mike's usual setting (10). Result: 32 seconds, gauge at 11 o'clock. He's back.
Lesson: maintenance issues mimic grind problems. Always clean before you adjust.
Scenario 3: No steam after a descale
Case: Jen descales her machine for the first time. The descale cycle completes. She refills the tank.
Now the steam wand blows cold air and a little water. No hot steam.
The issue: air trapped in the steam thermoblock. The descale cycle empties the steam path, and refilling doesn't automatically prime it.
The fix: open the steam wand fully. Run the pump. Wait 30 seconds for the thermoblock to heat.
After about 20 seconds of sputtering, steam comes out hot and dry. Close the wand, wait 10 seconds, open again. Normal operation resumes.
Lesson: always purge the wand after a descale. It's not broken. It just needs to be primed.
Common User Errors and Misconceptions
Some mistakes pop up over and over in Breville Barista Express troubleshooting. Knowing them saves you from chasing phantom problems.
"More pressure will fix it"
New users see a low gauge and think the machine needs more pump pressure. The 15-bar pump already delivers more than enough. The gauge is reading resistance from the puck, not pump output.
If the gauge is low, the puck is not resisting enough. Go finer, not harder.
"Stale beans look fine"
Stale beans produce fast shots, no crema, and sour taste. They look identical to fresh beans. If your grind is dialed in and the shot still runs fast, suspect your beans.
Buy from a roaster with a roast date. Discard beans more than a month past roast.
"Tamping harder fixes everything"
Tamping pressure has a wide tolerance (15 to 30 pounds). Once you compress the puck fully, more pressure does nothing. Level tamping matters more than heavy tamping.
If your shot is channeling, fix your distribution, not your tamping force.
"Vinegar is a good descaler"
Vinegar is acidic enough to dissolve scale, but it's also corrosive to rubber seals and the Thermojet's aluminum components. Breville explicitly advises against it. Use the manufacturer's descaling solution or a compatible brand.
It costs more per use, but it's cheaper than replacing a seal.
"Just grind finer"
The most common troubleshooting advice on forums is "grind finer." It works for some problems. But if your grinder is already at the finest setting and the shot is still fast, you have a different problem. Stale beans, worn burrs, or a clogged machine.
Don't chase the grind dial past the point of reason.
The Decision Guide: Fix It Yourself, Deep-Clean, or Send It Out?
Not every problem needs a trip to the service center. Here's how to decide.
Fix it yourself (5 minutes)
- Fast shot with low pressure: adjust grind finer, increase dose.
- Slow shot with high pressure: adjust grind coarser, reduce dose.
- No steam: purge the wand, descale if needed.
- Grinder jam: clean the burrs.
- Clumpy grounds: use WDT tool.
Deep-clean maintenance (1 hour)
- Multiple symptoms at once (fast shots, weak steam, strange noises).
- Machine has not been descaled in 6+ months.
- Shots taste bad despite correct grind and dose.
- You have never backflushed.
Send to service center or warranty claim
- Pump runs but no water flows after descaling.
- Machine leaks from the bottom.
- Steam thermoblock never heats (light blinks indefinitely).
- Grinder motor burns out (smell of burning plastic).
- Machine error code on display (BES870XL has no display, but later models do).
- Machine is under 2 years old and has not been repaired before.
Check your warranty status before opening the case. Breville's standard warranty is 1 year, extendable to 2 years with registration. If the machine is out of warranty, a service center diagnostic fee is typically $50 to $100, which is applied to the repair cost.
Frequently Asked Questions
What should the pressure gauge read during extraction?
The needle should sit between 9 o'clock and 12 o'clock for the duration of the shot. If it stays below 9 o'clock, the grind is too coarse or the dose is too light. If it climbs into the red zone above 12 o'clock, the grind is too fine or the dose is too heavy.
Aim for 10 o'clock as your target.
What is the correct shot time for a Breville Barista Express?
Target is 25 to 35 seconds from the moment you flip the brew switch. This includes roughly 5 to 7 seconds of pre-infusion at low pressure. First drops should appear at about 6 to 8 seconds.
If the shot finishes under 20 seconds, it's under-extracted. Over 40 seconds, it's over-extracted.
How often should I descale my Barista Express?
Every 3 to 6 months depending on water hardness. If you have hard tap water, descale every 3 months. With filtered water, every 6 months.
The machine's descaling indicator light will flash when it's time. Don't delay. Scale buildup damages the Thermojet over time.
Why is my Breville Barista Express leaking from the water tank?
The water tank connection uses a rubber seal that can dry out or shift. Remove the tank and check the O-ring on the bottom of the tank's valve. Clean it with a damp cloth.
If it's cracked or flattened, replace it. Another common cause: the tank is not seated properly. Push it firmly into place until you hear a click.
Does the grinder need replacing, or just adjusting?
Most of the time, the grinder just needs adjustment. If you've been using the outer dial at the finest settings (1 to 4) and still getting under-extraction, adjust the inner burr finer. If the grinder stalls regularly or makes a scratching noise, the burrs may be worn.
Replace them after 500 to 700 shots. A burr replacement costs about $40 and takes 15 minutes.

Similar Posts