DJI Osmo Action 5 Pro How to Use
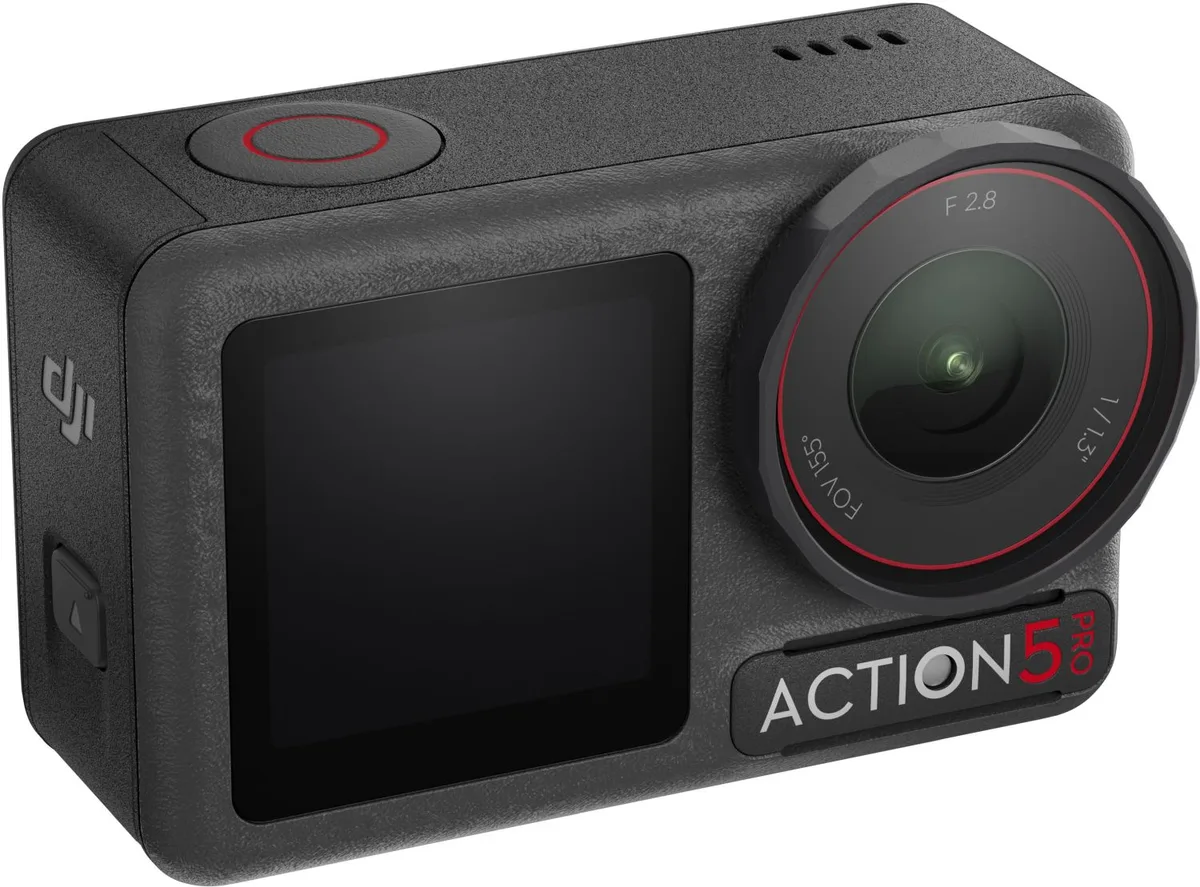
Getting the hang of the DJI Osmo Action 5 Pro how to use process is straightforward once you know where to look. The dual-screen design throws a lot of people at first, but it actually makes things easier. You just need to understand what each button does and how the menus work.
Manufacturer specs confirm this camera shoots 4K at 120 frames per second with RockSteady 3.0 stabilization. That is a lot of processing power packed into a small body. As of 2026, it remains one of the most capable action cameras on the market.
Let us walk through exactly what you need to do from the moment you open the box.
Quick Answer
Turn on the camera with the power button on the side. Frame your shot using the front or rear touchscreen. Press the large record button on top.
RockSteady 3.0 stabilization activates automatically. Tap the rear screen to adjust settings and switch modes. That is the entire basic workflow.
Image source: Bing (Web (fair-use with source credit))
Why the Dual-Screen Design Changes How You Shoot
Most action cameras give you one screen and call it a day. The Action 5 Pro gives you two. The rear touchscreen is a 2.25-inch panel where you access all menus and settings.
The front screen is a smaller 1.4-inch display that mirrors your framing for selfies and vlogs.
This matters because you never have to guess what is in the shot. If you are filming yourself mountain biking or talking to the camera on a hike, the front screen lets you see exactly what the lens sees. No more filming your chin while thinking you are framed perfectly.
The rear screen also supports touch gestures. Swipe down for quick settings. Swipe up for playback.
Swipe left or right to switch between video, photo, and time-lapse modes. It takes about ten minutes of playing around to get comfortable with it.
One thing to note: the front screen is touch-sensitive too. You can tap it to change settings when the camera is mounted in front of you. This is a huge help for helmet or chest mount setups where you cannot reach the rear screen.
Step-by-Step: From Box to Your First Recording
Let us start with the physical setup. Charge the battery fully using the included USB-C cable and a power adapter. DJI states the 1770mAh battery takes about 50 minutes to charge with USB Power Delivery.
While it charges, insert a microSD card into the slot on the side. The camera supports cards up to 512GB. Format the card inside the camera before your first use to avoid a persistent recording error later.
Image source: Bing (Web (fair-use with source credit))
Now mount the camera. The fold-out bracket at the bottom works with standard action camera mounts. You can attach it to a helmet strap, handlebar clamp, or tripod.
Make sure the bracket clicks into place firmly. A loose mount causes shaky footage even with RockSteady on.
Turn on the camera by holding the power button on the left side for about two seconds. The DJI logo appears, then the rear screen lights up. You will see the live viewfinder with icons along the edges.
Press the record button on top to start recording. The red light on the front lights up. Press it again to stop.
That is it. Your first clip is saved. The camera defaults to 4K at 30fps with RockSteady enabled, which is a solid starting point for most users.
Every Button, Screen, and Icon You Need to Know
The camera has three physical buttons. The power button on the left side turns the camera on and off. A long press powers it down.
A short press wakes the screen. The Quick Switch button on the right side lets you jump between custom presets. You can set it to switch from video to photo mode, or toggle stabilization on and off.
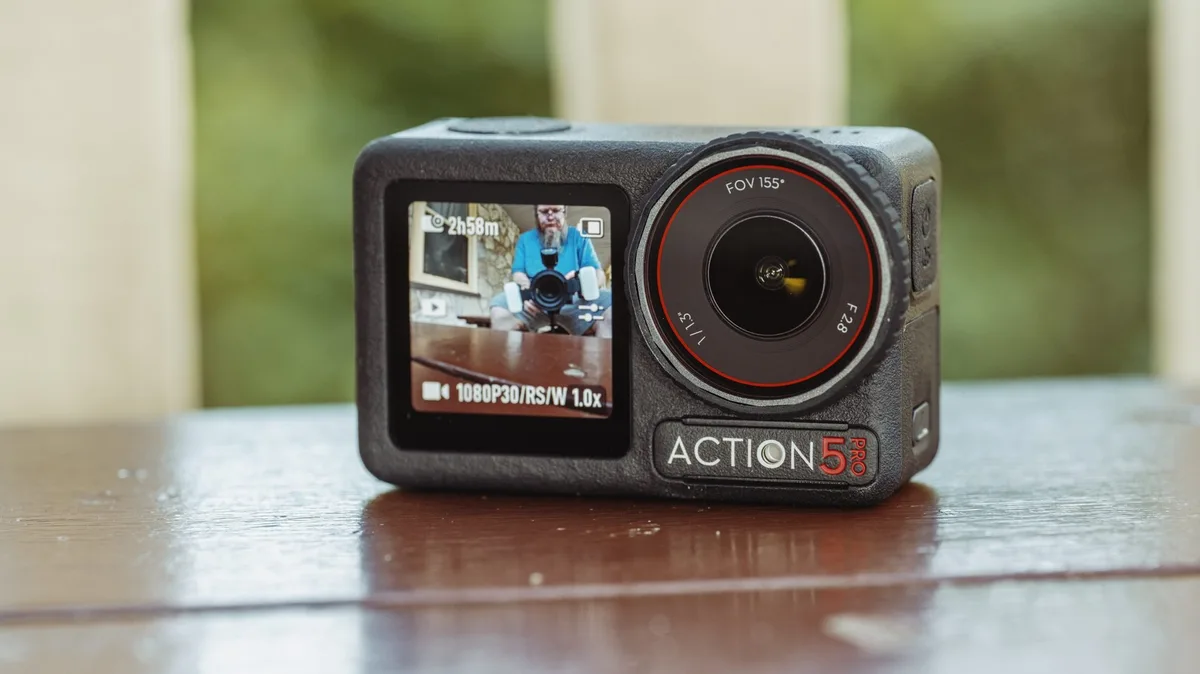
Image source: Bing (Web (fair-use with source credit))
The record button on top is the largest button. It is easy to find even with gloves on. A single press starts recording regardless of what mode you are in.
That is intentional. You never want to fumble for controls when something exciting happens.
On the rear screen, you will see several icons. The battery indicator sits in the top right corner. The remaining recording time is next to it.
The resolution and frame rate appear in the top left. The bottom of the screen shows your current mode video, photo, or time-lapse.
Tap the screen to bring up the full menu. You will see options for resolution, frame rate, field of view, stabilization, and exposure. The field of view settings include Ultra Wide, Wide, Linear, and Linear + HorizonSteady.
Each one changes how much of the scene the camera captures.
Common First-Time Mistakes (and What to Look For on the Screen)
The most common error is forgetting to remove the lens protective cover. The camera ships with a removable plastic cover over the lens. If you leave it on, footage looks hazy and soft.
Check the front of the camera before you record. The lens sits behind a flat glass window. The plastic cover is a thin piece that peels off.
Another frequent mistake is mounting the camera upside down and not flipping the image in settings. If your footage is recorded upside down, the rear screen shows it the correct way. You only realize the mistake when you review the clips on a computer.
The fix is simple. Go to the settings menu and enable the Auto Orientation option. The camera then rotates the footage automatically.
Battery life catches people off guard too. At 4K 60fps with RockSteady on, the battery lasts about 60 to 70 minutes. That is normal for a camera this size.
Carry a spare battery if you plan to film for longer. The battery door is on the bottom of the camera. Press the latch and slide it open.
Overheating is another concern. The camera can get warm during extended recording, especially in direct sunlight. If the screen shows a temperature warning icon, stop recording for a few minutes.
Let the camera cool down. This is a common issue with high-performance action cameras, and you can find similar heat-related problems reported with other models on the market.
Best Settings for Vlogging, Sports, and Underwater
Different activities need different settings. For vlogging, use the front screen to frame yourself. Set the resolution to 4K at 30fps.
This gives you good quality with manageable file sizes. Enable RockSteady to smooth out handheld movement. The Linear field of view reduces the fisheye distortion that makes backgrounds look curved.
This is the most flattering look for talking head videos.
For sports like mountain biking or skiing, use 4K at 60fps. The higher frame rate captures fast motion without blur. RockSteady is essential here.
It keeps the footage watchable even when the trail gets rough. If you want the horizon to stay perfectly level regardless of camera tilt, switch to HorizonSteady. This mode crops the image slightly but the results are impressive.
For underwater filming, set the white balance to the underwater preset. This compensates for the blue tint that water adds to footage. The camera is waterproof to 20 meters without a housing.
That is plenty for snorkeling and recreational diving. Use the Wide field of view to capture as much of the underwater scene as possible. The 10-bit color profile, D-Log M, gives you more flexibility when color grading later.
This is a nice touch for anyone who wants professional-looking underwater footage.
Pro Tips for Battery Life, File Management, and Stabilization
Battery life on the Action 5 Pro depends heavily on your settings. At 4K 30fps with RockSteady on, you get about 80 minutes per charge. Bump that to 4K 120fps and the runtime drops to around 45 minutes.
Cold weather below freezing cuts battery life by roughly 30 percent. Keep a spare battery in a warm pocket if you are filming in winter conditions. Check battery performance in cold conditions for more tips on managing runtime during winter shoots.
| Recording Setting | Estimated Battery Life |
|---|---|
| 4K 30fps, RockSteady on | 80 minutes |
| 4K 60fps, RockSteady on | 65 minutes |
| 4K 120fps, RockSteady on | 45 minutes |
| 1080p 30fps, RockSteady off | 100 minutes |
File management is where most users run into trouble. The camera records at high bitrates, so a 10-minute 4K clip can be over 4GB. Always format your microSD card inside the camera before a big shoot.
This prevents corruption and ensures the file system is compatible. Aggregate reviews report that using a card below V30 speed rating causes recording errors and dropped frames. If you run into persistent card errors, the issue is often the card speed rather than the camera.
Transfer files directly to your computer with the USB-C cable. The camera shows up as a mass storage device. You can also use the DJI Mimo app for wireless transfers, but this is slower.
A 5GB file takes about 8 minutes over USB-C compared to 25 minutes over Wi-Fi.
Stabilization settings deserve a closer look. RockSteady 3.0 works in all modes and resolutions up to 4K 120fps. It smooths out most handheld movement and works well for walking, running, and biking.
HorizonSteady keeps the horizon level even when the camera rotates a full 360 degrees. This is the best choice for POV shots where the camera tilts as you lean into turns.
The trade-off is field of view. RockSteady crops the image slightly. HorizonSteady crops it more.
If you want the widest possible angle for a stationary shot, turn stabilization off. The camera has enough internal gyro data that you can stabilize footage in post-production if you prefer. This is a common workflow for professional editors who want maximum creative control.
For firmware updates and official specifications, refer to the DJI support page for the latest documentation. The camera also complies with FCC standards for wireless operation, so you can use it confidently in most regions.
Frequently Asked Questions
How do I turn on the front screen?
Tap the rear screen twice quickly with two fingers. The front screen activates and mirrors the rear display. Double-tap again to switch back.
The front screen stays off by default to save battery.
Can I use the camera while charging?
Yes. The USB-C port supports pass-through power. You can record continuously while plugged into a power bank or wall adapter.
This is useful for long time-lapses or dash-cam style recording.
How do I update the firmware?
Open the DJI Mimo app on your phone. Connect the camera via Wi-Fi or Bluetooth. The app checks for updates automatically.
Follow the on-screen instructions. The update takes about 10 minutes and the camera restarts twice.
Why is my footage shaky?
Check that RockSteady is enabled in the settings menu. The icon looks like a mountain with a line through it. If it is grayed out, you may be in a resolution or frame rate that does not support stabilization. 4K 120fps supports RockSteady but not HorizonSteady.
How do I transfer files to my phone?
Open the DJI Mimo app and connect to the camera. Select the album tab. Choose the clips you want and tap download.
The app transfers files over Wi-Fi. For large files, use the USB-C cable to a computer instead.

Similar Posts