Flushmate 503 Troubleshooting
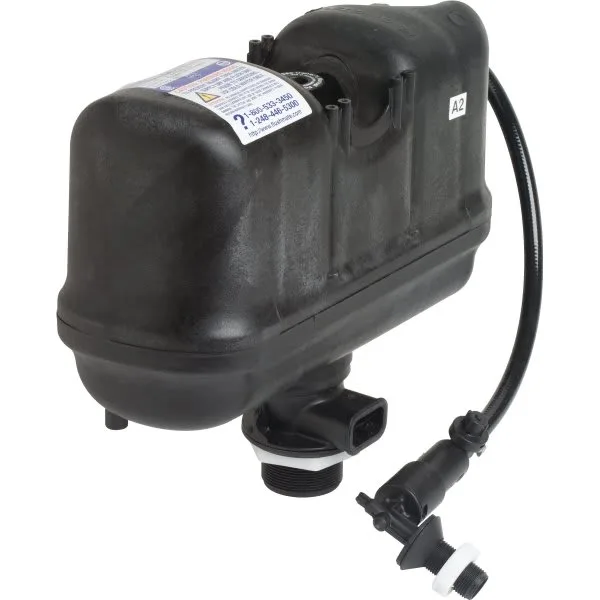
Your Flushmate 503 is acting up, and you’re probably standing in front of the toilet wondering where to even start. The good news: troubleshooting this system isn’t a guessing game. The Flushmate 503 uses a pressure-assisted flush, which means it works on a completely different principle than a standard gravity toilet.
Once you understand the difference, the fix becomes obvious.
The failure modes are actually pretty predictable. The 503 operates at a working pressure between 20 and 125 PSI, and most problems stem from that pressurized air-water interaction failing in one of four specific ways. This guide walks you through each symptom, tells you exactly what to check, and helps you decide whether a quick fix will hold or if you’re better off replacing the whole unit.
Let’s get started.
Image source: Bing (Web (fair-use with source credit))
Quick Answer
Flushmate 503 troubleshooting starts by identifying your exact symptom. A continuously running toilet usually means a stuck air-inlet check valve. A weak flush points to a loss of air pressure in the vessel.
No fill at all suggests a blocked inlet screen or faulty fill valve. Most repairs take under thirty minutes. If the tank is over ten years old, replacement is often the smarter call.
First, a Quick Reality Check: Repair or Replace?
Before you pull out any tools, let’s be honest about what you’re dealing with. The Flushmate 503 is a pressure-assisted flushing system that uses compressed air to force water into the bowl with significant force. It’s a different beast entirely from the old gravity-fed toilets most of us grew up with.
No float ball, no flapper chain, no refill tube. Instead, you’ve got a sealed plastic vessel inside the tank that traps air and water under pressure.
That design difference matters because it changes how you approach every single repair. If you treat it like a gravity toilet, you’ll waste time and potentially break something. I’ve seen people try to adjust a water level screw that doesn’t exist, or yank on the flush handle and snap the actuator rod.
Don’t do that.
Here’s a quick decision tree to help you sort out whether you’re about to do a simple fix or a full replacement:
| Condition | Likely Fix | Time Involved |
|---|---|---|
| Unit is under 5 years old | Minor cleaning or valve adjustment | 15 to 30 minutes |
| Unit is 5 to 10 years old | Part replacement (check valve, fill valve) | 30 to 60 minutes |
| Unit is over 10 years old | Full Flushmate 503 replacement | 45 to 90 minutes |
| Visible cracks or leaks in tank | Immediate replacement, no debate | Same day |
Age is the single biggest factor here. The manufacturer rates these units for roughly 10 years of service life, and failure rates climb sharply after year 8. If you’re in that zone and already having problems, the math rarely works out in favor of a repair.
The cost angle also points toward replacement in many cases. A replacement Flushmate 503 unit runs anywhere from $90 to $150 depending on where you buy it. A service call from a plumber will cost you more than that just to show up, and if they don’t specialize in pressure-assisted systems, they might misdiagnose the problem and charge you for parts you don’t need.
That said, there’s a specific group of people who should absolutely repair instead of replace. If your unit is under 5 years old and showing a minor symptom like a slow trickle or a weak flush, a thorough cleaning and a small part swap will buy you years of additional service. Replacing a young unit is just throwing money away.
Start with the age check. Look at the manufacture date printed on the tank itself, usually on a sticker near the bottom or on the underside of the lid. That’s the single most reliable starting point.
Write that date down before you do anything else.
Before You Touch Anything: Safety Steps for a Pressurized Tank
This is the part I can’t stress enough. The Flushmate 503 tank is a pressure vessel, which means it stores energy even when the toilet isn’t being used. The air inside that plastic tank is compressed to anywhere from 20 to 125 PSI depending on your home’s water pressure.
If you disassemble it while it’s still charged, you’re risking a violent release of water, plastic shrapnel, and a very bad day.
The good news is that depressurizing the system is simple, as long as you do it in the right order. First, shut off the water supply at the wall shutoff valve behind the toilet. Turn it clockwise until it stops.
Don’t force it. If it resists, that’s normal.
Next, flush the toilet to release the pressure already in the tank. Hold the handle down for a few seconds to let as much water and air escape as possible. You’ll hear a hissing sound as the pressure vents.
The tank should now be empty and at atmospheric pressure. Now you can safely remove the tank lid and start working.
One more step you shouldn’t skip: the Flushmate 503 has an interlock safety switch on the tank lid. If you remove the lid while the unit is still pressurized, that switch is supposed to shut down the fill valve and prevent the system from pressurizing. It’s a good feature, but it won’t help if the switch itself is faulty, so always go through the full depressurization sequence even if the lid is already off.
Here’s a quick safety checklist to burn into memory:
- Shut off the water supply valve first. Always.
- Flush the toilet and hold the handle down for 3 to 5 seconds.
- Listen for the hiss of escaping air, then wait 10 seconds.
- Remove the tank lid and set it aside where it won’t chip or crack.
- If water is still trickling in, the shutoff valve is leaking, so replace it before proceeding.
A lot of people ask whether they need to call a plumber for this. Plumbers absolutely do handle these systems, but you don’t need one just to diagnose the problem. The components are designed for homeowner service, and the manufacturer provides detailed instructions with every replacement part.
As of 2026, those instructions are also readily available on the official Flushmate website.
You do want to call a professional if you notice a visible crack in the pressure vessel itself. That’s not a repair job. That’s a safety issue.
A cracked tank under pressure can fail catastrophically, and no amount of epoxy or duct tape will fix it. Replace the entire unit immediately.
One more thing: when you’re working on the tank, keep your face and body out of the line of fire when disconnecting the water supply line. The fitting can be tight from mineral buildup, and when it finally lets go, a little water might spray out. Point it away from you and have a towel ready.
Symptom 1: Toilet Runs Non-Stop / Water Trickles Into the Bowl
If your Flushmate 503 won’t stop running, or you hear water trickling into the bowl minutes after a flush, the most common culprit is the air-inlet check valve. This small valve sits at the top of the pressure vessel and lets air into the tank as water drains out. When it gets stuck in the open position, water keeps flowing past it and down into the bowl.
Hard water is the usual suspect. Mineral deposits build up on the valve seat and prevent it from closing fully. This is the most frequently reported problem for this model, especially in areas with well water or high calcium content in the municipal supply.
Here’s how to check if this is your issue. Remove the tank lid after following the safety steps in the previous section. Look down into the tank.
If you see water actively flowing or dripping, try pressing down on the check valve stem with a small screwdriver. If the flow stops, the valve is definitely sticking.
The fix depends on how bad the buildup is. For light mineral deposits, you can sometimes clean the valve in place. Use a cotton swab dipped in white vinegar to wipe around the rubber seat and the metal or plastic stem.
Move the stem up and down a few times to work the vinegar into the mechanism. Then flush the toilet a few times to see if the running has stopped.
If the cleaning doesn’t solve it, the valve itself likely has a worn rubber seal. Replacement of the air-inlet check valve is straightforward. You’ll need a replacement part kit, which typically includes the valve assembly and a new rubber gasket.
The entire replacement takes about 20 minutes.
Here’s the general sequence:
- Depressurize the system following the safety steps.
- Disconnect the water supply line from the flush valve.
- Remove the two retaining screws that hold the valve assembly to the tank.
- Lift the old valve out and discard it.
- Lubricate the new valve’s O-ring with silicone grease.
- Install the new valve and hand-tighten the retaining screws.
- Reconnect the water supply line.
- Turn the water back on and test the flush.
The tricky part is avoiding over-tightening the retaining screws. Most DIY repair failures happen right there. Over-tightening warps the valve body and distorts the O-ring, which creates a new leak that behaves exactly like the old one.
Just snug them down with a screwdriver, and that’s it.
If the running stops, you’re done, and this repair cost you less than twenty dollars. If it doesn’t, the issue might not be the check valve at all. Move on to the next symptom.
Symptom 2: Weak Flush or Incomplete Flush
A weak flush on a Flushmate 503 usually means the pressure vessel isn’t holding its air charge. The system’s power comes from compressed air pushing water out. If air is escaping slowly over time, the force behind each flush gets weaker and weaker until you’re just dropping water into the bowl without any real punch.
You’ll recognize a weak flush pretty quickly. The bowl clears partially, maybe some paper stays behind, and you might see a second swirl of water that doesn’t have any force. Sometimes you’ll hear a longer-than-usual hissing sound at the start of the flush, which indicates air escaping before the water even moves.
Loss of air pressure has a few different causes. The most common is a minor leak at one of the gaskets or O-rings where the flush valve meets the pressure vessel. Over the years, those rubber seals dry out, shrink, and lose their ability to hold a seal.
To diagnose this properly, run a two-flush test:
| Flush # | What You Should Observe | If It’s Wrong |
|---|---|---|
| First flush | Strong, complete bowl evacuation | Weak or partial evacuation means low air charge |
| Second flush immediately after | Similar force to the first | Noticeably weaker second flush points to a slow air leak |
A second flush that’s significantly weaker is a strong indicator of an air leak, because the system hasn’t had time to fully recharge its pressure between flushes. If both flushes are weak but equal, the problem is more likely low water pressure at the supply line or a partially blocked inlet screen.
Check the inlet screen first, since it’s the easiest thing to rule out. The screen is a small mesh filter where the water supply line connects to the fill valve. Shut off the water, unscrew the supply line, and inspect the screen.
If it’s clogged with sediment or mineral flakes, clean it with a toothbrush and vinegar, then reassemble and test.
If the screen is clean, your leak is probably at one of the internal gaskets. The fill valve gasket and the flush valve gasket are the two spots to check. You’ll need to disassemble the top of the unit to access these.
This repair is more involved, so set aside about an hour and clear your work area.
Another angle to consider is water pressure from your home’s supply. The Flushmate 503 requires a minimum of 20 PSI to function correctly. If your home’s pressure has dropped below that threshold, the vessel won’t fill properly, and you’ll get a weak flush even with a perfectly sealed system.
A simple pressure gauge that screws onto an outdoor spigot will tell you what you’re working with.
If your pressure is fine and you don’t find a leak in the gaskets, the problem could be a failing flush valve assembly itself. That brings us back to the age question. If the unit is past its expected service life, repair attempts beyond a simple cleaning have a success rate of less than 50%.
In that case, a full replacement is the more reliable path.
Symptom 3: Toilet Won’t Fill at All
If you flush and nothing refills, you’re dealing with a completely different set of possibilities. This is usually a straightforward water supply problem, and it’s the easiest symptom to diagnose because there are only a few things that can cause it.
Start by checking the shutoff valve. Make sure it’s fully open. Turn it counterclockwise until it stops.
If it’s already open, move to the supply line. Disconnect it from the toilet and stick the end into a bucket, then turn the shutoff valve on for a second. If water flows out at a steady pressure, your supply is fine, and the problem is inside the Flushmate unit.
If water doesn’t flow, the shutoff valve itself is clogged or failed. This is rare but it does happen, especially in older homes with galvanized pipes that shed rust flakes. Replacing a shutoff valve is a simple plumbing job that any competent DIYer can handle, and it’s a good idea to add a mesh screen at the same time to catch any debris from the pipe.
Assuming your supply is good, the most likely culprit is the fill valve. Over time, the rubber diaphragm inside the fill valve can stiffen or warp, which prevents it from opening fully. When that happens, the tank never gets water, and nothing works.
Testing the fill valve is easy. After depressurizing the system, remove the fill valve cap and inspect the diaphragm. If it’s cracked, warped, or has a permanent impression from the valve seat, replace it.
Replacement fill valves are available as individual parts, and the swap takes about 15 minutes.
The other possibility is a clogged inlet screen. The screen is a small mesh filter where the water supply line connects to the fill valve. Shut off the water, unscrew the supply line, and inspect the screen.
If it’s clogged with sediment or mineral flakes, clean it with a toothbrush and vinegar, then reassemble and test.
This is the same screen you checked in the weak flush section. If you already cleaned it and the problem came back, you might have a larger sediment issue in your plumbing. Consider installing a whole-house filter or at least a toilet-specific inline filter to prevent future buildup.
Symptom 4: Flush Handle Is Stiff or Won’t Move
If your flush handle feels like it’s stuck in concrete, the problem is almost always the actuator rod. This rod connects the handle to the flush valve, and it runs through a rubber seal at the top of the pressure vessel. Over time, that seal can swell or harden, which creates friction and makes the handle hard to push.
This is one of the easiest fixes on the entire unit. Depressurize the system, remove the tank lid, and find the actuator rod where it exits the pressure vessel. Apply a small amount of silicone grease around the rod where it passes through the seal.
Work the handle back and forth a few times to distribute the grease. If the stiffness is minor, this will solve it immediately.
If the handle still binds, the seal itself might be too far gone. Replacement seals are cheap and widely available. The swap requires removing the flush valve assembly, which takes about 30 minutes.
Follow the same disassembly sequence you used for the check valve replacement.
You should also check the handle mechanism itself. Some models have a plastic bushing where the handle pivots, and those can crack or bind just like any other plastic part. If the bushing is cracked, replace the entire handle assembly.
It’s a simple swap that requires no tools beyond a screwdriver.
One thing to note: don’t use petroleum-based lubricants like WD-40 on any part of the Flushmate system. Petroleum products can degrade the rubber seals and gaskets, which would create new leaks. Stick with silicone grease or silicone spray.
Symptom 5: The Tank Is Leaking From the Top
If you see water pooling on top of the pressure vessel or dripping from under the tank lid, you’re dealing with a leak at the fill valve or the vacuum breaker. Both sit near the top of the unit, and both have small gaskets that can fail.
The vacuum breaker is the small plastic cap that sits above the fill valve. It has a tiny rubber disc inside that prevents water from siphoning back into your supply line. If that disc gets debris stuck under it, water can dribble out around the cap.
Cleaning the vacuum breaker is a two-minute job. Depressurize the system, lift the cap off, and wipe the rubber disc with a vinegar-dampened cloth. Rinse away any loose debris and snap the cap back into place.
If the disc is visibly cracked or hardened, replace it.
The fill valve gasket is the other candidate. This is the rubber seal where the fill valve body meets the top of the pressure vessel. If it’s leaking, you’ll typically see water running down the outside of the vessel.
Replacing the gasket requires removing the fill valve assembly, which is the same process as the check valve replacement outlined earlier.
Let’s also talk about condensation while we’re here. A small amount of moisture on the outside of the tank in humid weather is normal and not a leak. But if you’re seeing actual drips or puddles, that’s a true leak, and it needs fixing.
A slow leak that goes unnoticed can cause water damage to your floor, subfloor, and joists over time.
When to Call a Professional
I’ve laid out the DIY path for each symptom, but there are situations where you’re better off handing the work to someone else. These are the signs that you’re past the point of a quick fix:
- Visible cracks in the pressure vessel
- Water leaking from the bottom of the tank that isn’t from the supply line
- A flush that suddenly becomes very loud or violent
- Plumbing codes in your area that require licensed installation of these devices
A professional who specializes in pressure-assisted toilets will charge between $150 and $300 for a service call plus parts, depending on your region. That might sting, but it’s a lot cheaper than replacing a water-damaged bathroom floor.
If you do call a plumber, be clear that you own a pressure-assisted system. A general plumber who mostly works on gravity toilets might not have the specific parts in their van, which turns a one-hour job into a multi-day ordeal while they order parts online.
Final Verdict: Fix It or Replace It?
Here’s the bottom line, and it’s pretty simple. If your Flushmate 503 is under 8 years old, you should repair it. The parts are cheap, the labor is reasonable, and you’ll get several more years of service.
If the unit is between 8 and 10 years old and you’re already seeing major symptoms like a weak flush or a running tank, you’re in the gray zone. A single repair might buy you a year or two, but you’re likely to encounter another failure soon after. Many homeowners choose to replace the unit proactively at this point to avoid the hassle of repeated fixes.
If the unit is over 10 years old, or if you see any cracks in the plastic, replace it. Period. The cost of a new unit is between $90 and $150, and the installation takes about an hour for a competent DIYer.
That’s a small price to pay for a reliable flush and peace of mind.
Replacement isn’t complicated. Turn off the water, depressurize the system, disconnect the supply line, and unbolt the tank from the bowl. The new Flushmate unit sets into place with the same bolts and gaskets, so the swap is genuinely plug-and-play.
You can find complete units that include the pressure vessel, fill valve, and flush valve all pre-assembled.
Whichever path you choose, you now know exactly what to look for, how to test it, and how to fix it. You’ve got this.

Similar Posts