How to Calibrate Mirrorless Camera Autofocus
You've been nailing focus on every shot, right? Then you pull up a portrait and the eyes are soft. The nose is sharp, but the eyes aren't.
That's the moment you start wondering how to calibrate mirrorless camera autofocus.
Manufacturer specifications indicate that a typical AF fine-tune adjustment range spans -20 to +20 steps, with each step representing roughly 1/4 to 1/2 of the depth of field at the calibration distance. Get it wrong, and every shot with that lens is subtly off. Let's break down exactly what you're looking for and how to find it.
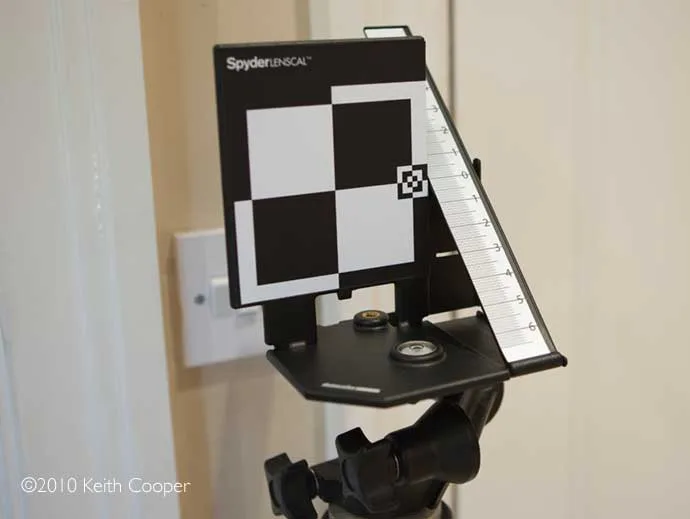
Image source: Web (Bing) / northlight-images.co.uk (Web image (fair-use with source credit))
Quick Answer
Calibrate by shooting a test chart from a measured distance. Compare the focus plane in your images. Adjust the AF fine-tune value in your camera's menu.
Repeat until the focus is consistent. A tripod and good light are essential.
Why You Can't Calibrate Without a Test Chart and Good Light
Your camera's autofocus system is a closed loop. It doesn't know if the lens is hitting the exact plane you intended. It only knows what it computes.
A test chart gives you a measurable reference.
Without a chart, you're guessing. You might shoot a brick wall or a ruler, but those lack the contrast and pattern needed to judge front focus versus back focus. A proper chart uses a high-contrast target with a known focus plane.
You shoot it, zoom in, and compare.
The light matters almost as much as the chart. Diffuse, even light at roughly 5000K daylight color temperature works best. Direct sunlight creates shadows that fool the autofocus system.
Inconsistent light produces inconsistent results.
The chart needs to be parallel to the sensor plane. Tilt it even slightly, and your calibration will be wrong. A spirit level on the chart and on the camera hot shoe solves this.
Getting the lens seated correctly on the mount is just as important for consistent results.
What Front Focus and Back Focus Actually Look Like (and How to Spot Them)
Front focus happens when the lens focuses closer than the intended subject. The background falls off faster than the foreground. The subject's nose is sharp, but the eyes are soft.
Back focus is the opposite. The lens focuses behind the subject. The ears are sharp, but the eyes are soft.
In portraits, this is the most common complaint. Critical eye focus in portraits is exactly where calibration pays off.
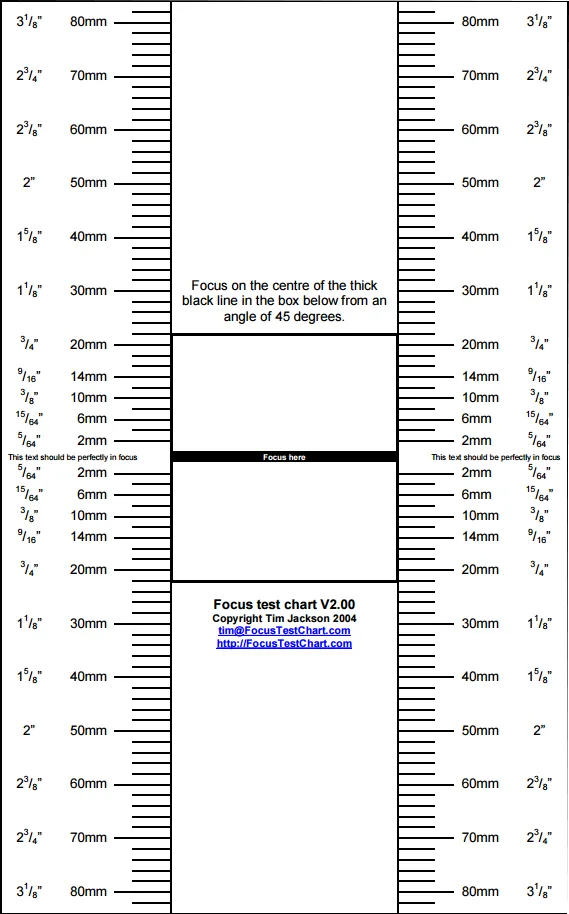
Image source: Web (Bing) / volkanakgul.com (Web image (fair-use with source credit))
On a test chart, you'll see a sharp center target. The markings in front of and behind the target will show you the direction of the error. If the front markings are sharper, you have front focus.
If the back markings are sharper, you have back focus.
The amount of error is visible in the distance between the sharpest point and the target. You can estimate the number of steps needed based on the depth of field at that aperture and distance. As of 2026, most mirrorless cameras allow adjustments in single-step increments.
The Step-by-Step Calibration Workflow (with Visual Cues at Every Step)
Set up your test chart at a distance of 50 times the focal length of the lens. A 50mm lens goes at 2.5 meters. A 100mm lens goes at 5 meters.
Measure it with a tape measure.
Level the chart and the camera. Use a tripod. Use a remote shutter release or a 2-second self-timer.
Set the camera to single-shot AF (AF-S) and the center focus point. Choosing the right focus point for calibration is critical. Shoot at the widest aperture.
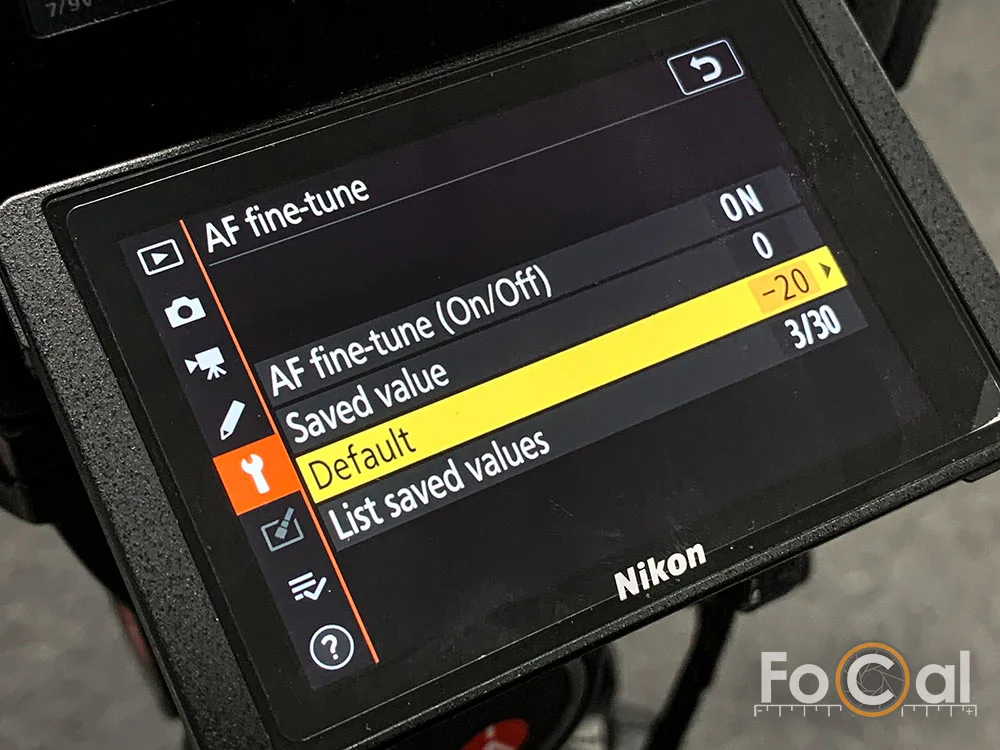
Image source: Web (Bing) / blog.reikanfocal.com (Web image (fair-use with source credit))
Take a shot. Zoom into the image on the LCD. Look at the target.
Is the sharpest point exactly on the target? If not, note the direction and estimate the error.
Go into the camera's AF fine-tune menu. Adjust the value. Take another shot.
Compare. Repeat until the sharpest point is exactly on the target.
For zoom lenses, calibrate at the wide end, the middle, and the telephoto end. Average the values or store separate profiles if your camera supports it. Some cameras store per-lens settings automatically.
Common Visual Mistakes That Ruin Calibration
The most common mistake is not leveling the chart. A tilted chart shifts the focus plane. You'll correct for a phantom error.
Another mistake is using the wrong distance. The 50x focal length rule is a guideline. Calibrating at a different distance gives different results.
For general use, stick to the formula.
Poor lighting fools the system. Autofocus relies on contrast. In low light or uneven light, the system may hunt.
Calibrate in good, even light.
Not using a tripod introduces camera shake. The shot appears soft, and you think the lens is out of calibration. Use a tripod and a remote release.
Finally, calibrating with a dirty sensor or lens elements throws off the results. Clean the sensor and the lens before you start. Proper gear storage between uses keeps everything in good shape.
The Gear You Actually Need: Charts, Software, and Tripods
A test chart is the most important piece. You can buy a printed chart like the SpyderLensCal or LensAlign, or you can print a high-contrast target from a digital file. The pattern must be sharp and flat.
Software like Reikan FoCal automates the process. It measures the focus plane to 0.1 step accuracy. It saves time and reduces human error.
For manual calibration, magnified live view inspection on the camera LCD is enough.
A sturdy tripod is non-negotiable. A lightweight tripod wiggles. Use a tripod rated for your camera and lens weight.
A ball head helps with leveling.
A remote shutter release or a cable release eliminates finger shake. The 2-second self-timer works too. For the best results, use a wired release.
A spirit level for the camera hot shoe and a level for the chart ensure parallelism. You can buy a small bubble level for a few dollars. It's a critical tool.
Pro Tips for Reading the Focus Target Like a Technician
Look at the target markings, not the center. The center is always somewhat sharp. The markings in front and behind tell the real story.
Shoot at the widest aperture. This gives the shallowest depth of field. The error is more visible.
At f/8, the depth of field may hide a small front or back focus.
Take multiple shots in a sequence. Don't rely on one image. Slight variations in tripod vibration or mirror slap (if using a DSLR in live view) can skew results.
Use the camera's magnified view at 10x or higher. Look at the edges of the target markings. The transition from sharp to soft is where the focus plane sits.
If you're having trouble reading the chart, take a shot with a known good lens. Compare the results. This helps you isolate whether the issue is the lens or the camera body.
Diagnosing focus issues systematically saves time.
When to Recalibrate (and When to Leave It Alone)
Recalibrate after a firmware update. Camera and lens firmware updates can change autofocus behavior. Manufacturer documentation from Sony and Nikon confirms this.
Recalibrate after a lens repair or service. Any change to the lens elements or mount can shift the focus plane.
Recalibrate if you notice consistent softness at wide apertures. This is the most reliable real-world indicator.
Don't recalibrate for every lens on every shoot. If the lens is consistently sharp, leave it alone. Building a solid photography foundation means knowing when to trust your gear.
Don't recalibrate in extreme temperatures. Autofocus systems can drift in cold or heat. Calibrate at a normal room temperature around 20 degrees Celsius.
Don't recalibrate based on a single bad shot. Check for camera shake, subject movement, or missed focus first. Rule out the obvious before touching the fine-tune menu.
Frequently Asked Questions
Why does my mirrorless camera need autofocus calibration?
Mirrorless cameras use phase-detection autofocus on the sensor. Small manufacturing tolerances in the lens and camera body can cause a mismatch. The lens focuses slightly in front of or behind the intended target.
Calibration corrects this mismatch.
Does every lens need its own calibration value?
Yes. Each lens has its own unique tolerances. Two copies of the same lens model can require different values.
Your camera stores individual calibration values for each lens you attach.
Can I calibrate my autofocus without a test chart?
You can try, but it's not reliable. A brick wall or ruler lacks the contrast pattern needed to judge front focus versus back focus. A dedicated test chart gives you a measurable reference.
How often should I recalibrate my lenses?
Recalibrate after a firmware update, lens repair, or if you notice consistent softness at wide apertures. Otherwise, once is enough for a given lens and body combination. Frequent recalibration is unnecessary.
What if my camera doesn't have an AF fine-tune menu?
Some mirrorless cameras lack a built-in fine-tune menu. In that case, use a lens dock from the manufacturer. Sigma, Tamron, and Tokina offer USB docks that let you adjust autofocus values directly on the lens.
Does calibration affect video autofocus?
It can. The same phase-detection system often handles both stills and video autofocus. A calibration that improves stills focus may also improve video focus.
Test your video autofocus separately after calibration.

Similar Posts