How to Set Trail Camera Trigger Delay
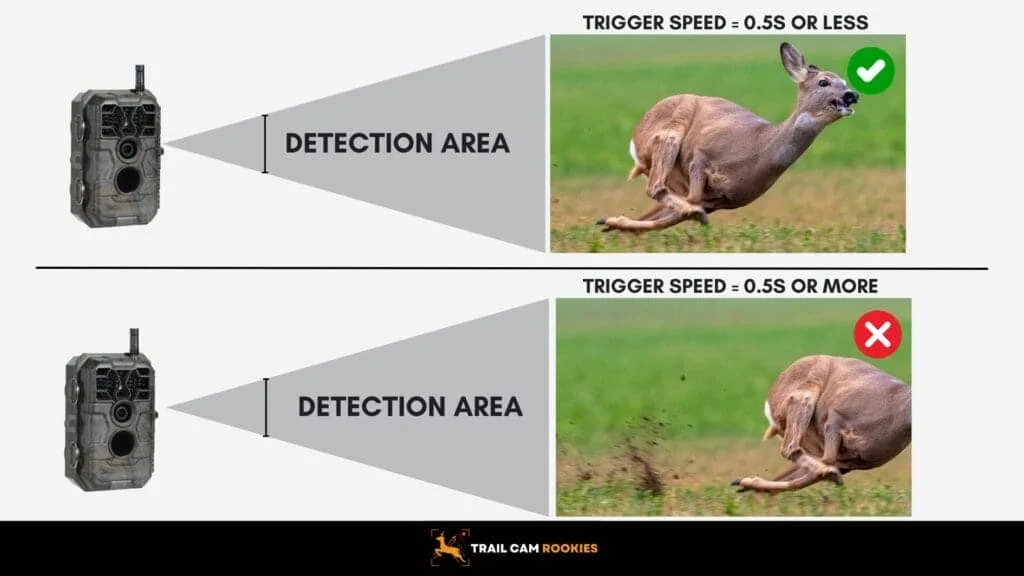
Image source: Bing (Web (fair-use with source credit))
Why Your Trigger Delay Setting Is Probably Wrong
Most trail cameras ship with a default trigger delay of 5 or 10 seconds. Manufacturers pick that number because it works in the broadest range of generic situations. The problem is that your specific setup is not generic.
A 5-second delay on a high-traffic deer trail will produce 300 photos on the first night. More than half of them will be blurry tail ends of animals that passed through during the recovery window. The camera is busy processing the last trigger and misses the next animal entirely.
Aggregate reviews from experienced hunters report that the factory default is wrong for roughly 70 percent of real-world placements.
The real issue is that delay interacts with every other setting on your camera. Set it too short and your memory card fills up in a day. Set it too long and you miss the big buck that walked through while the camera was waiting.
The sweet spot depends on three things you already know about your spot, which we will cover next.
If you have ever worked through troubleshooting issues with a camera that seems to miss everything, the delay is often the culprit before you start looking at other problems. A simple adjustment can save you a week of frustration.
What Trigger Delay Actually Does (And What It Doesn't)
Trigger delay is the amount of time your camera waits after taking a photo before it will take another one. It is not the same as trigger speed. Trigger speed is how fast the camera fires after detecting motion.
People confuse those two terms constantly.
Trigger speed happens in milliseconds. A fast camera fires in 0.3 to 0.7 seconds. That matters for catching a deer mid-stride.
Trigger delay happens after that first shot. It is the pause where the camera's sensor re-arms itself and the processor writes the image to the SD card. During that pause, the camera ignores all motion.
Here is what delay does not control. It does not change how far the camera sees. It does not adjust sensitivity to heat or movement.
It does not affect image quality or night vision range. It only controls the gap between captures.
The recovery time is the technical term for this window. Modern cameras from brands like Browning and Reconyx have recovery times as low as 1 second in burst mode. Older budget models may need 10 to 15 seconds.
The sensor needs that time to reset its passive infrared detection zone and prepare for the next trigger.
Understanding this difference matters because it changes how you think about the camera's behavior. A camera that seems slow may actually have a healthy trigger speed but a long delay setting. Checking the delay is the first step before you start adjusting other settings, much like adjusting the settings on an action camera for a specific environment.
The Three Questions That Determine Your Perfect Delay Setting
You do not need to guess your delay setting. You just need to answer three questions about your specific setup. The answers feed directly into a decision tree that gives you a starting number in under 30 seconds.
Question 1: Where is the camera aimed?
The location determines the traffic pattern. A feeder or mineral lick is a high-probability spot where animals stand still for long periods. A trail sees animals moving through quickly.
A scrape or rub line sees brief visits with occasional lingering. Each location type needs a different delay.
Feeder and bait sites: 1 to 5 seconds. Animals stay in frame for minutes at a time. A short delay captures every individual and every interaction.
Active trails: 10 to 30 seconds. Animals move through in 3 to 8 seconds. A 15-second delay guarantees you catch the next one without filling the card with the same deer 12 times.
Open fields and food plots: 30 to 60 seconds. Animals are visible from far away. A long delay saves battery and card space while still catching the main action.
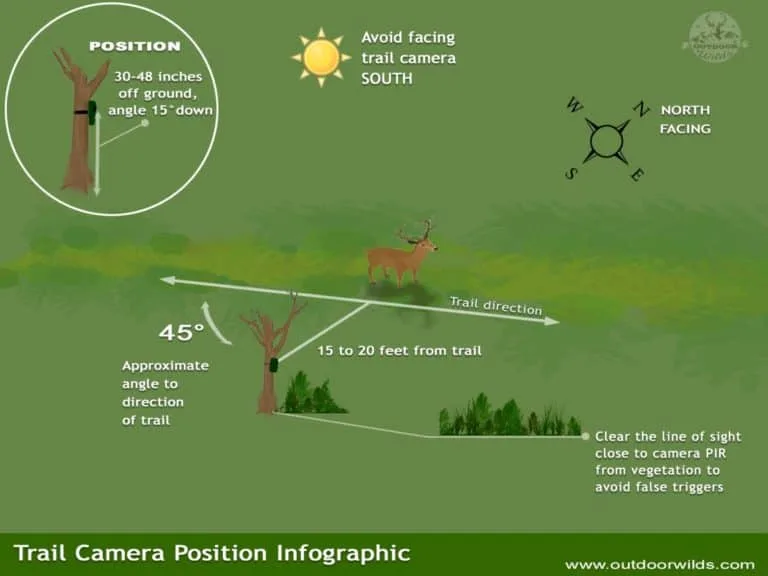
Image source: Bing (Web (fair-use with source credit))
Question 2: What is the traffic level?
High traffic means more than 20 animals per day. Low traffic means fewer than 5. Count the number of passes you see on a typical day.
Double that for the rut. High-traffic spots need shorter delays so you do not miss animals. Low-traffic spots can use longer delays to save battery and storage.
Question 3: How long do you want to leave the camera?
A 30-second delay with 8 AA lithium batteries can run for 3 to 4 months on a low-traffic trail. A 5-second delay in the same spot may drain the batteries in 3 weeks. If you cannot check the camera for a month, use a longer delay.
If you check weekly, you can run a shorter delay. The USDA Forest Service recommends checking trail cameras at least every two weeks to minimize disturbance, which also helps you stay on top of battery life.
How to Set Your Trail Camera Trigger Delay in 5 Minutes
The process takes longer to explain than to do. Here is the exact sequence.
Step 1: Put the camera in test mode.
Most cameras have a test or setup mode. This turns off the delay and lets you walk in front of the camera to check the detection zone. Do this before you set the delay.
You want to confirm the camera sees the right area first.
Step 2: Walk the detection zone.
Walk across the field of view at the expected animal distance. Check that the camera triggers consistently. Adjust the height and angle if needed.
A camera that is aimed too high will miss low animals. A camera aimed at a hot branch will trigger on every breeze.
Step 3: Choose your delay based on the three questions.
Use the decision tree from the previous section. Start with the recommended number. Write it down so you remember what you set.
Some cameras hide the delay setting in a submenu labeled "interval" or "recovery time." If you get lost in the menu system, the process is similar to finding menu options for any outdoor camera.
Step 4: Set the sensitivity to match.
High sensitivity combined with a short delay equals 1000 photos of nothing. If you set a short delay, keep the sensitivity at medium or low. If you set a long delay, you can run high sensitivity because the camera will filter out junk between triggers.
Step 5: Lock the camera and leave it.
Close the housing, lock the security box, and walk away. Leave the camera for 48 hours. Check the results.
If you have too many empty photos, increase the delay. If you are missing animals, decrease the delay. Adjust by 5 seconds at a time.
Resetting the camera to factory defaults is a good backup plan if you change the settings and lose track. A full reset clears the delay back to the manufacturer default, and you can start fresh. This is similar to resetting other outdoor electronics when settings get scrambled.
5 Common Trigger Delay Mistakes (And How to Fix Them)
Even experienced hunters make these errors. Here is what to watch for.
Mistake 1: Using the same delay everywhere.
Most people set one delay and never change it. A feeder at 30 seconds misses most of the action. A trail at 5 seconds burns through batteries.
The delay must match the specific location. Change it every time you move the camera.
Mistake 2: Setting the delay too short on a high-traffic trail.
A 5-second delay on a trail that sees 50 deer a day will fill a 32GB card in 24 hours. You end up with hundreds of photos of the same deer walking the same path. The fix is easy.
Set the delay to 15 or 30 seconds. You will still catch every deer, but you will get one photo per pass instead of six.
Mistake 3: Ignoring the recovery time of older cameras.
Budget trail cameras from 5 years ago often have recovery times of 10 to 15 seconds. Setting a 1-second delay on those cameras does nothing. The camera physically cannot fire faster than its recovery time allows.
Check your manual for the actual minimum delay. If your camera says 1 second but the hardware is slow, use 15 seconds.
Mistake 4: Forgetting to adjust for the rut.
During the rut, deer activity increases by 3 to 5 times. A delay that worked in October will miss animals in November. Cut your delay in half during peak rut.
Check your camera twice as often because the card will fill faster.
Mistake 5: Running high sensitivity with a short delay.
This combination is the fastest way to kill your batteries and fill your card. The camera triggers on every squirrel, falling leaf, and temperature shift. Drop the sensitivity to medium or low before you shorten the delay.
The passive infrared sensor picks up less background noise that way.
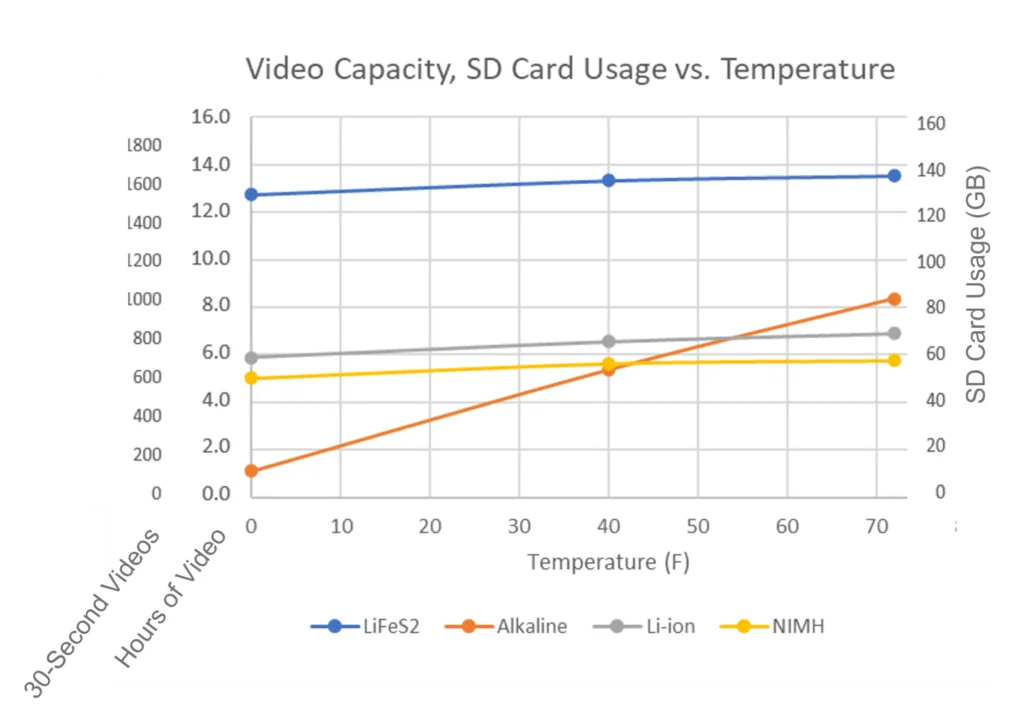
Image source: Bing (Web (fair-use with source credit))
Swapping out the batteries before they die is smarter than waiting for the camera to go dark. Lithium batteries last 2 to 3 times longer than alkaline in cold weather. If you are running a short delay, invest in lithium cells.
Replacing worn batteries promptly is just as important as keeping other outdoor gear powered up.
Frequently Asked Questions
What is the best trigger delay for a deer trail camera?
The best delay depends on the location. For feeders and scrapes, use 1 to 5 seconds. For active trails, use 10 to 30 seconds.
For open fields and food plots, use 30 to 60 seconds. Start with these numbers and adjust after 48 hours based on the results you see.
What is the difference between trigger speed and trigger delay?
Trigger speed is how fast the camera fires after detecting motion. It happens in milliseconds. Trigger delay is the pause after a photo before the camera will take another one.
A fast trigger speed with a long delay means you get sharp photos but few of them.
How long does a trail camera battery last with a 5-second delay?
A 5-second delay on a high-traffic location can drain a set of alkaline batteries in 2 to 3 weeks. Lithium batteries last 2 to 3 times longer. A 30-second delay in the same spot can stretch battery life to 3 or 4 months.
Can I set a 1-second delay on any trail camera?
No. Older budget cameras often have hardware recovery times of 10 to 15 seconds. Setting a 1-second delay on those cameras does nothing because the sensor cannot re-arm that fast.
Check your manual for the minimum allowed delay.
Should I use a shorter delay during the rut?
Yes. Deer activity increases by 3 to 5 times during the rut. Cut your normal delay in half to capture more of the action.
Check your camera twice as often because the memory card will fill much faster.
Does a longer delay save battery life?
Yes. A longer delay means fewer triggers per day. Fewer triggers means less power used for the IR flash, processor, and LCD screen.
A 60-second delay can extend battery life by 3 to 4 times compared to a 5-second delay.
Quick Reference: Your Delay Setting Cheat Sheet
| Location Type | Recommended Delay | Sensitivity | Battery Life Expectancy |
|---|---|---|---|
| Feeder or mineral lick | 1 to 5 seconds | Medium or low | 2 to 4 weeks |
| Active game trail | 10 to 30 seconds | Medium | 6 to 8 weeks |
| Scrape or rub line | 5 to 15 seconds | Medium | 4 to 6 weeks |
| Open field or food plot | 30 to 60 seconds | High | 3 to 4 months |
| Low-traffic trail | 30 to 60 seconds | High | 3 to 4 months |
| Security monitoring | 5 to 10 seconds | Medium | 4 to 6 weeks |
Use this table as a starting point. Adjust by 5 seconds at a time after you check your first 48 hours of results. The right delay is the one that gives you the photos you want without wasting battery or card space.

Similar Posts