How To Stop Faucet From Dripping

A dripping faucet is one of those home repairs that you put off for months. But it's actually a fast fix. If you want to stop faucet from dripping, the secret is to match the repair to your faucet type.
Most fixes take under 30 minutes and cost less than $25.
According to EPA WaterSense data, a faucet dripping once per second wastes about 3,000 gallons a year. That's enough water for dozens of loads of laundry. The longer you wait, the more the internal seal degrades and the higher your risk of water damage.
Image source: Web (Bing) / indianexpress.com (Web image (fair-use with source credit))
Quick Answer
Stop a dripping faucet by identifying the valve type first. The fix is different for each design. Turn off the water.
Remove the handle. Replace the worn washer or cartridge. Reassemble and test.
Why a Dripping Faucet Is Worth Fixing Right Now
A faucet drip is not just an annoyance. It's a small, active leak that only gets worse. The rubber washer or cartridge seal keeps degrading until the leak becomes a stream.
In hard-water homes, it also leaves stubborn mineral stains on porcelain and chrome.
The numbers are plain. Per EPA WaterSense, a faucet dripping once per second wastes about 3,000 gallons per year. At average U.S. water rates in 2026, that costs between $40 and $80 annually.
Then add the hidden damage. Water creeps down the faucet base and soaks into the cabinet below. Particleboard swells, laminate peels, and mold can take hold.
That kind of repair costs far more than the fixture itself.
| Drip rate | Water wasted per year | Annual cost (avg U.S.) |
|---|---|---|
| 1 drip per second | 3,000 gallons | $40 to $80 |
| 10 drips per minute | 400 gallons | $5 to $15 |
| 30 drips per minute | 1,200 gallons | $20 to $40 |
There is a smart-money argument for fixing it now. A $5 washer or $25 cartridge protects the whole faucet. Wait too long, and you'll face a corroded valve seat or a cracked fixture worth $150 to $500.
Step One: Identify Your Faucet Type
Before you touch a wrench, you need to know which faucet design you own. The repair path splits into different directions based on the internal valve. Guessing and buying a generic repair kit is the fastest way to turn a 20-minute job into an afternoon of frustration.
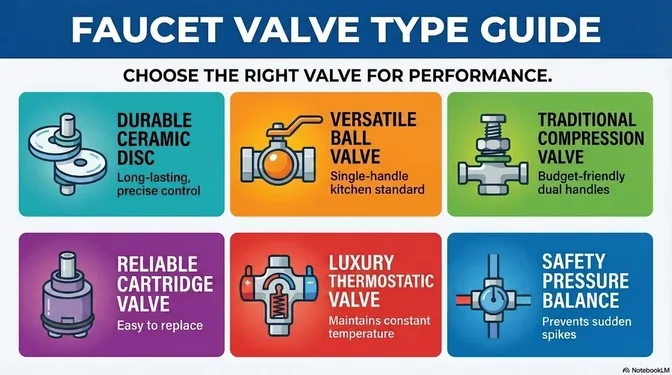
Image source: Bing (Web (fair-use with source credit))
Here's how to spot each type:
- Compression faucets. Two handles, one for hot and one for cold. Each handle turns a threaded stem that presses a rubber washer against the valve seat. That washer wears flat, and that's what drips.
- Cartridge faucets. Found in both single-handle and double-handle models. A plastic or brass cartridge controls flow. It fails by wearing, cracking, or collecting debris. Repair means replacing the whole cartridge.
- Ceramic disc faucets. Usually single-handle. Two ceramic discs slide against each other to mix water. Sediment can scratch or wedge between the discs. Repair means replacing the cartridge entirely.
- Ball faucets. A single-handle design most common in kitchens. The handle moves a metal ball that seals against rubber springs and inlet seals. These use a repair kit, not a full valve replacement.
| What you see | Likely type | Most common drip fix |
|---|---|---|
| Two handles | Compression or cartridge | Replace washer or cartridge |
| Single handle with rounded cap | Ball | Replace ball springs and seals |
| Single handle with flat top | Cartridge | Replace cartridge |
| Single lever, modern style | Ceramic disc or cartridge | Replace cartridge or clean debris |
If you're still unsure, pop off the handle cap and peek inside. Cartridges sit behind a large retention nut. Compression stems are threaded and visible.
Ball faucets have a rounded cap and a slotted ring underneath.
How to Fix a Dripping Compression Faucet (Two-Handle)
Compression faucets are the oldest design you'll find in a home, and they're the easiest to repair. The drip comes from a worn rubber washer at the bottom of the stem. Replace the washer, and you're done.
Tools and materials:
- Adjustable wrench
- Flathead screwdriver
- Replacement rubber washers (assorted sizes)
- Plumber's grease
- Valve seat dressing tool (if needed)
Step-by-step repair:
- Shut off the water. Turn both shutoff valves clockwise under the sink, then open the handle to drain any remaining water.
- Remove the handle screw. Check the side of the handle or under a decorative cap. Pop the cap off with a flathead screwdriver, then remove the screw.
- Lift off the handle. If it's stuck, tap it upward gently with the handle of your screwdriver. Don't pry against the sink surface.
- Unscrew the packing nut. This large nut sits just below the handle. Use an adjustable wrench and turn it counterclockwise.
- Pull out the stem. The brass stem comes out whole, with the old rubber washer at its base.
- Match the washer at the store. Bring the old one with you. Washers look similar, but the exact diameter and shape matter.
- Grease and reassemble. Coat the new washer and the stem threads with plumber's grease. Reinsert the stem, snug the packing nut, and put the handle back.
- Test. Turn the water back on slowly and check both handles.
If it still drips from the spout, the problem may be the valve seat inside the faucet body. A rough or pitted seat chews up new washers fast. Use a valve seat dressing tool to smooth it, or replace the seat with a seat wrench if it's badly corroded.
How to Fix a Dripping Single-Handle Faucet (Cartridge, Ceramic Disc, or Ball)
Single-handle faucets work differently from compression models. There's no rubber washer pressing on a seat. Instead, a cartridge, ceramic disc, or ball assembly controls the water.
That's the part you replace or repair.
Cartridge faucets
The process is simple and consistent:
- Shut off the water supply valves under the sink.
- Remove the handle cap and screw. Lift off the handle.
- Pull the retaining clip with needle-nose pliers.
- Unscrew the large nut, then pull the cartridge straight out.
- Match the cartridge cross-section at the hardware store.
- Press in the new cartridge, then reassemble.
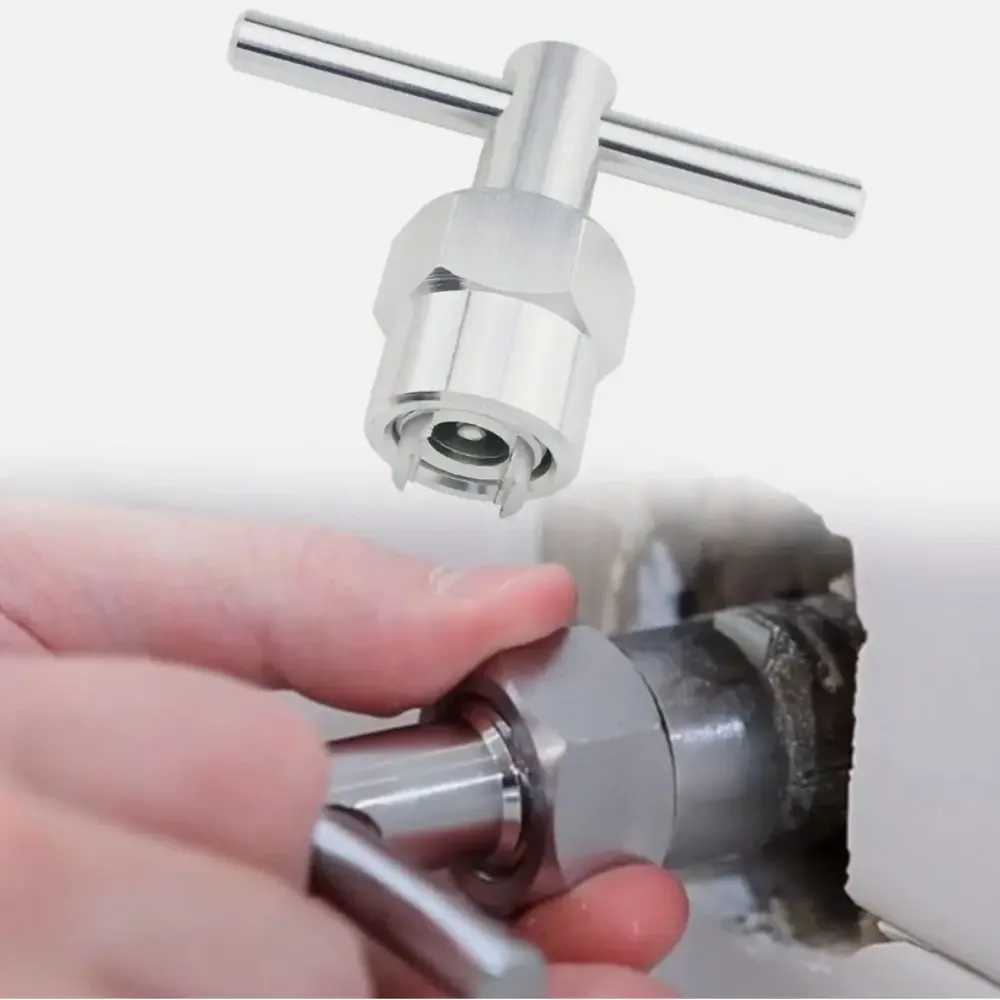
Image source: Bing (Web (fair-use with source credit))
A new cartridge usually costs $5 to $30, and it's often the only part that fails. If the cartridge is stuck, use a cartridge puller tool to avoid damaging the faucet body.
Ceramic disc faucets
These look similar to cartridge faucets, but the valve uses two ceramic discs inside a sealed housing. If it drips, the whole cartridge must be replaced. Match the exact brand and model, since ceramic cartridges are not universal.
Expect to pay $20 to $60.
Ball faucets
If you have a single handle with a rounded cap and a wide arc of motion, it's a ball faucet. Repair kits include a new ball, springs, and inlet seals for under $15. Shut off the water, remove the handle and cap, lift the ball out, and swap in the new rubber parts.
Reassemble and test.
The key for all three is identifying the exact brand and model. Delta, Moen, Kohler, and Pfister parts look similar but are not interchangeable. Bring the old part with you, or snap a clear photo of the model number before heading to the store.
Common Mistakes That Keep the Drip Coming Back
Most DIY repairs fail for one of seven reasons. Here's what to avoid.
- Working on the wrong faucet type. Buying a cartridge for a compression faucet, or a washer for a disc faucet. Identify the valve before you buy anything.
- Leaving a rough valve seat. On compression faucets, a pitted seat destroys new washers in a matter of weeks. Inspect it with a flashlight and dress or replace it.
- Overtightening hardware. Crank down the packing nut too hard and you'll crack the faucet body or strip the threads. Snug is enough.
- Skipping plumber's grease. Seals need a thin coat to seat properly. A dry O-ring rolls and tears, and then it leaks.
- Buying a universal cartridge. Cartridges are brand-specific. Bring the old part with you, or at least a clear photo of the model number.
- Forgetting the debris factor. Sometimes the drip isn't a worn part at all. A speck of mineral buildup under the cartridge can cause a persistent leak. Clean the valve body before reassembly.
- Rushing the test. Turn the water back on slowly and let it run for a full minute. A slow weep may need a gentle quarter-turn of the packing nut before the visible drip stops.
Do the diagnosis once, do it carefully, and this repair will stick.
When to Replace Instead of Repair (And When to Call a Pro)
A repair kit works most of the time. But some situations call for a full faucet replacement or a licensed plumber.
Replace the faucet when:
- The faucet body is cracked or corroded. No washer or cartridge can seal a crack.
- The valve seat is badly pitted and cannot be dressed. On older compression faucets, the seat is part of the brass body.
- You cannot find the correct replacement cartridge. Manufacturers discontinue models after about 10 to 15 years.
- The finish is peeling or rusting through. A full replacement costs $100 to $500, but it gives you modern seals and a warranty.
Call a plumber when:
- The shutoff valves under the sink are stuck or broken. Forcing them can snap the stem and flood your cabinet.
- The faucet is a specialty model with hidden mounting hardware. Some undermount kitchen faucets require access from below.
- You have a recurring drip in a brand-new faucet still under warranty. Let a pro handle the warranty claim so you don't void it.
| Situation | Best move | Typical cost |
|---|---|---|
| Worn washer or O-ring | DIY repair | $5 to $10 |
| Bad cartridge (available) | DIY replacement | $15 to $40 |
| Bad cartridge (discontinued) | Replace faucet | $100 to $500 |
| Cracked faucet body | Replace faucet | $100 to $500 |
| Stuck shutoff valve | Call plumber | $100 to $300 |
One more thing worth noting. If you own a home built before 1990, check for lead content in the brass before replacing. Modern faucets sold in the U.S. comply with lead-free standards under NSF/ANSI 61.
Swap the old fixture and get the peace of mind.
Frequently Asked Questions
Why does my faucet drip even after I replaced the washer?
You replaced the washer, but the valve seat underneath is rough or pitted. The new washer seals against that damaged seat and fails fast. Use a valve seat dressing tool to smooth it, or replace the seat with a seat wrench.
How do I know if I need a cartridge or a washer?
Look at the handle count. Two handles usually mean a compression faucet that uses washers. A single handle usually means a cartridge, ceramic disc, or ball faucet.
Pop off the handle cap and you can see the valve assembly directly.
Can a dripping faucet cause water damage?
Yes. A spout drip stains the sink and wastes water. A leak from the handle base or faucet body runs down into the cabinet.
Over time, it warps particleboard, peels laminate, and promotes mold growth. Fix it as soon as you notice dampness under the sink.
Is it safe to use plumber's tape on faucet threads?
Plumber's tape works on threaded pipe connections. It does not help on faucet stems, cartridge seals, or O-rings. Use plumber's grease on rubber seals instead.
Tape can shred and cause debris to enter the valve.
Why does my faucet drip only at night?
Temperature changes cause metal parts to contract. That slight movement can open a gap around a worn seal that stays closed during the day. The fix is the same regardless of when the drip happens.
Replace the worn seal or cartridge.
What tools do I need for a basic faucet repair?
An adjustable wrench, a flathead screwdriver, and needle-nose pliers cover most jobs. Pick up an Allen wrench set if your handle uses a set screw. A cartridge puller helps if the old cartridge is stuck.
Keep a bucket and towel handy for drips.

Similar Posts