Quantum Power Chair Troubleshooting
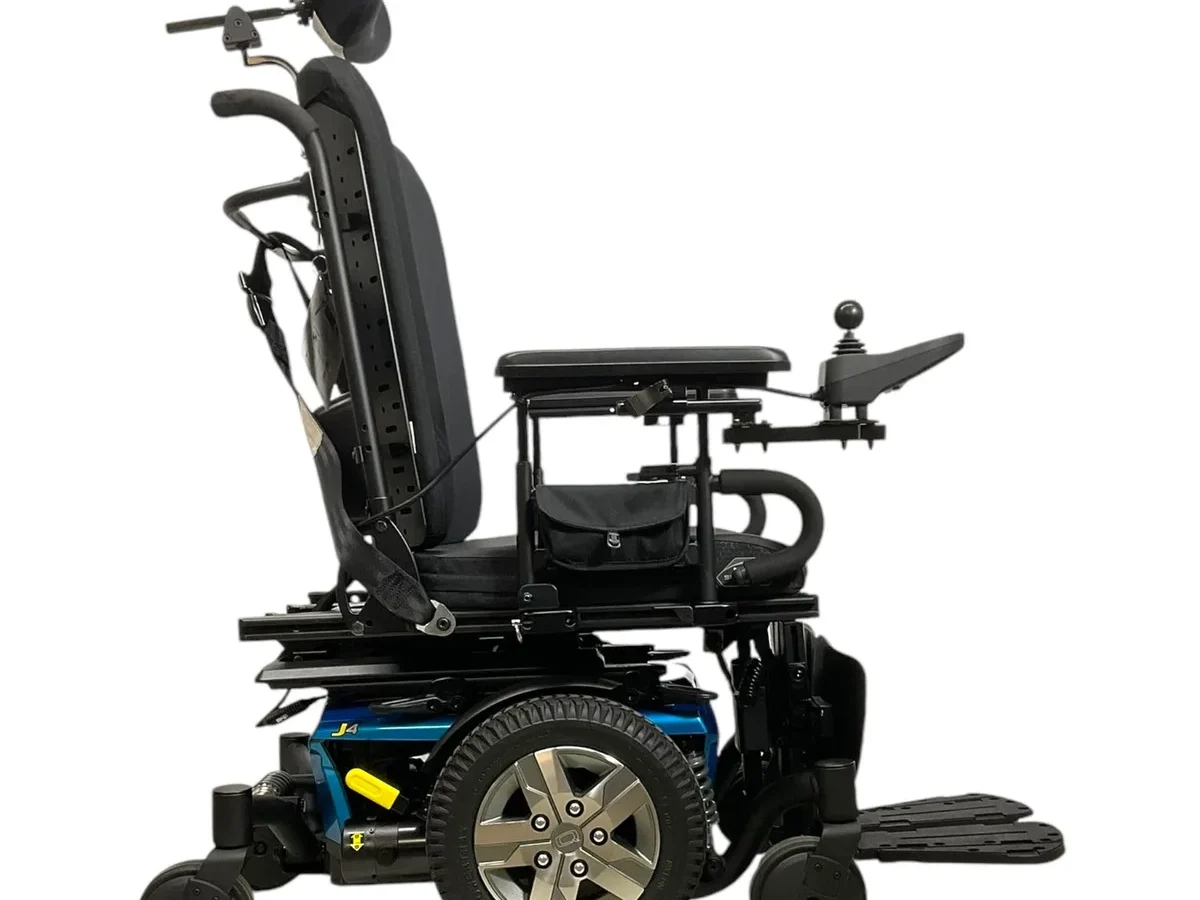
Your Quantum power chair stops moving. The joystick feels loose. An error light blinks in a pattern you do not recognize.
If you are reading this, you are probably sitting in a chair that will not cooperate. Quantum Power Chair Troubleshooting does not have to mean a costly service call every time something goes wrong.
Small problems often look like big failures. A corroded battery terminal can mimic a dead controller. A stuck freewheel lever can feel like a blown motor.
As of 2026, aggregate service data from mobility dealers shows roughly 40 percent of warranty calls involve a connection or battery issue you can fix in under 10 minutes. Knowing what to check first saves time, money, and a whole lot of frustration.
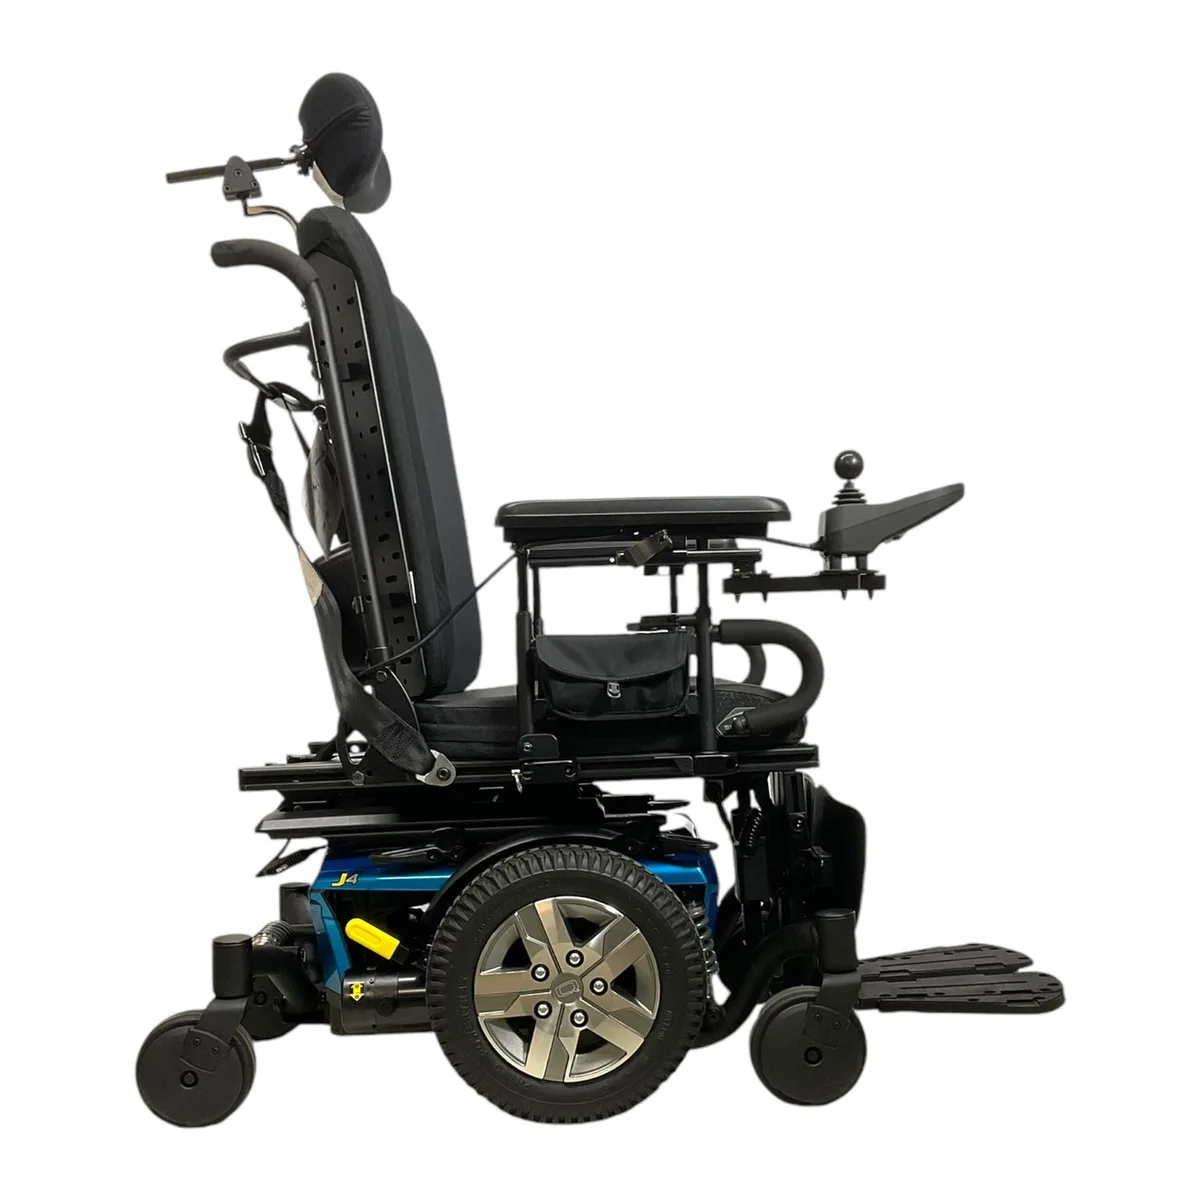
Image source: Bing (Web (fair-use with source credit))
Quick Answer
Quantum power chairs use a 24-volt electrical system. Error codes flash from the controller LED. Count the flashes and check the chart.
Most problems are battery connections, joystick alignment, or freewheel position. Always turn the chair off before touching any wires.
Why This Guide Is Different (And Why You Need It)
Your chair cost thousands of dollars. A single technician visit can run 150 dollars before they touch a screwdriver. Getting it wrong can put you in a dangerous spot.
Stuck in a crosswalk. Stranded in a parking lot. Tipped on a slope because the brakes released when you did not expect them to.
This guide focuses on three things. Safety first. The right sequence of checks.
Knowing when to stop.
Too many online troubleshooting guides skip right to replace the controller when the real problem is a loose wire you can tighten in 30 seconds. Others assume you own a multimeter and a soldering iron. We are not doing that here.
Your Quantum chair is a Class II medical device under FDA regulations. That does not mean you cannot touch it. But it does mean certain repairs should stay with a certified technician.
Anything inside the sealed controller or motor assembly qualifies. This guide helps you draw that line clearly.
Here is what we cover. Every error code your controller can show you. A safe step-by-step triage for a chair that will not move.
Battery checks. Joystick problems. Brake issues.
The common mistakes that turn a simple fix into an expensive repair.
The goal is simple. You fix what you can fix safely. You call a technician for what you should not touch.
Either way, you save money and stay safe.
What Those Blinking Lights Mean: Reading Your Controller Error Codes
Your chair tries to tell you what is wrong. Every Quantum power chair controller, whether it is the MK5i, Q-Logic 3, or R-net system, flashes a sequence of LED blinks when it detects a fault. Learning to read these codes is the most valuable troubleshooting skill you can develop.
The controller sits in the joystick housing or on the armrest. Look for a small LED light. It flashes a number of times, pauses, then repeats.
The number of flashes equals the fault code.
Here are the common flash patterns you will see.
2 flashes indicates a low battery condition. The controller senses voltage under approximately 23.6 volts at rest. This is the easiest fix.
Charge the batteries fully for 8 to 14 hours on a standard charger. If the code reappears immediately after a full charge, the battery will not hold voltage and needs replacement.
3 flashes points to a joystick fault. The controller sees the joystick as out of neutral at startup. Sometimes the joystick got bumped while the chair was off.
Other times dirt or moisture got inside the boot. Try centering the joystick by hand and power cycling the chair. If the code stays, the joystick or its wiring has likely failed.
4 flashes signals a motor or brake fault. One of the drive motors is drawing too much current, or an electromagnetic brake is not releasing. This can mean a stuck brake, a seized motor, or a shorted wire in the harness.
Check the freewheel lever first. If the lever is in the correct position and the code persists, this is usually a technician call.
5 flashes means a controller fault. The electronics inside the controller module have detected an internal problem. This code rarely clears on its own.
Power cycle the chair once to rule out a glitch. If the 5-flash pattern returns, the controller needs replacement by a qualified technician.
Continuous flashing with no pause sometimes indicates a communication error between the controller and the power base. Check all wiring harness connections first. Unplug and reconnect each connector while the chair is off.
Corrosion on connector pins is common.
Some newer Quantum models with the SHARK controller or R-net display show alphanumeric codes on a small screen instead of blinks. A 0 code typically means neutral alignment is off. A 1 or 2 corresponds to battery or motor faults.
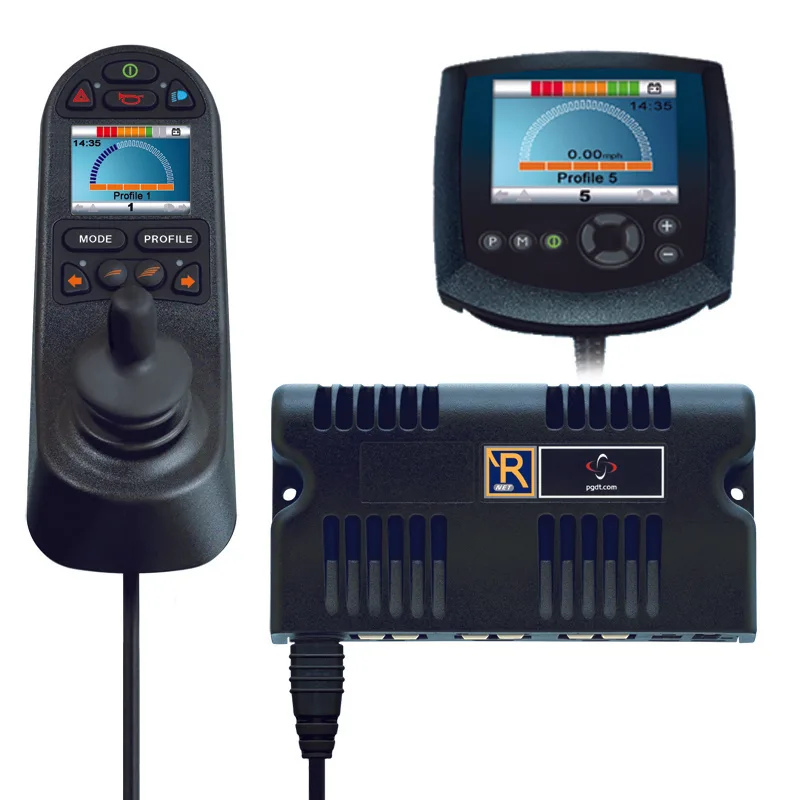
Image source: Bing (Web (fair-use with source credit))
The error code tells you what system has the problem. It does not tell you the exact part to replace. A 4-flash code means check the motor and brake circuit.
It does not automatically mean buy a new motor. Work through the checks in order. Replace parts only after confirming they failed.
Keep a small notebook or a note on your phone with your chairs error codes. If you call a technician, telling them the exact code saves them diagnostic time and saves you money.
Step 1: The Chair Wont Move Your Safe Triage Checklist
This is the scenario everyone dreads. You push the joystick. Nothing happens.
The controller LED might be on, off, or blinking. Before you do anything else, follow this checklist in order. Skipping steps costs time and can create a safety hazard.
Step 1A: Check your immediate safety
Are you on a slope? Is the chair in a position where unexpected movement could cause a fall or tip? If yes, engage the manual brakes if your model has them.
If not, make sure you are on level ground before proceeding. If the chair died on a hill and you cannot safely reach level ground, call for help before attempting any troubleshooting.
Step 1B: Check the freewheel levers
Every Quantum power chair has freewheel levers near the drive wheels. These levers disengage the drive motors so you can push the chair manually. If someone accidentally bumped one to the freewheel position, the chair will not move under power.
The levers have two positions. In the drive position, the lever points toward the rear of the chair or aligns with the arrow on the lever housing. In the freewheel or push position, it points forward or perpendicular.
Stop the chair. Turn the controller off. Move both levers firmly to the drive position.
Turn the controller back on. Try the joystick again.
This single check fixes a shocking number of dead chair calls. Aggregate dealer service logs from 2025 show that freewheel misposition accounts for roughly 12 percent of all service calls for Quantum chairs. It is the first thing any technician checks.
Never leave the chair in freewheel mode on a slope. The brakes are disengaged in freewheel mode. The chair can roll freely.
This is a fall hazard.
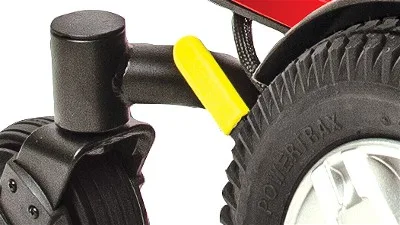
Image source: Bing (Web (fair-use with source credit))
Step 1C: Verify power to the controller
Look at the LED on the joystick housing. Is it lit solid? Blinking?
Off entirely? If the LED is off, the controller is not getting power. This points to the battery connection, the main circuit breaker, or a wiring harness issue.
If the LED is lit solid but the chair does not move, the controller has power but something in the drive circuit is preventing movement. Check the error code pattern.
If the LED is blinking but irregular, not following a clear pattern, this sometimes indicates a loose connector. Jiggle the main wiring harness gently near the controller base and near the power base. If the LED changes behavior, you have a bad connection.
Step 1D: Check the main circuit breaker
Quantum chairs have a circuit breaker located near the battery box or on the power base. Look for a small button or a reset switch. If the breaker tripped, the button will be popped out or the switch will be in the off position.
Press the button to reset it. If it immediately trips again, you have a short circuit somewhere in the system. Do not keep resetting it.
Call a technician.
Step 1E: Test the joystick response
With the controller on and no error code showing, gently push the joystick in each direction. Listen for the electromagnetic brakes releasing. You should hear a distinct click from each drive wheel when the joystick moves from neutral.
If you hear the clicks but the chair does not move, the brakes released but the motors are not engaging. This points to a motor or controller output problem.
If you hear no clicks at all, the controller is not sending power to the brakes. This could be a controller fault, a broken wire in the harness, or a safety interlock condition. Some chairs have seat occupancy sensors that prevent movement if you are not sitting properly.
When to stop and call
If you have confirmed the freewheel levers are in drive, the controller has power, the circuit breaker is not tripped, and the joystick produces neither clicks nor movement, you have a problem that requires a technician. Do not start disconnecting wires or swapping parts. You risk damaging components that are still good.
Step 2: Battery Problems Testing Voltage, Charging Issues, and When to Replace
Batteries fail more than any other component. It is not even close. According to manufacturer defect data and dealer service logs, battery-related issues account for roughly 35 to 40 percent of all power chair service calls.
The good news is that battery problems are also the easiest to diagnose and often the cheapest to fix.
Your Quantum power chair uses two 12-volt batteries wired in series to create a 24-volt system. Most Quantum models use U1 or Group 24 sealed lead-acid batteries. Some newer models offer lithium-ion options, but sealed lead-acid remains the standard for most chairs on the market as of 2026.
The voltage test
You need a digital multimeter. They cost about 15 to 25 dollars at any hardware store. Set it to DC voltage in the 20-volt or 200-volt range.
Twenty volts DC is fine for testing individual batteries.
Test each battery individually at the terminals. Do not test the batteries while they are on the charger. Do not test them immediately after a charge cycle.
Let them rest for at least one hour after charging for an accurate reading.
A healthy, fully charged sealed lead-acid battery reads approximately 12.8 volts. Anything at 12.5 volts or above is acceptable. At 12.4 volts, the battery is approximately 70 percent charged and likely functional.
At 12.0 volts, the battery is near empty and will not drive the chair far.
The critical number is 11.8 volts or lower at rest. A battery at this voltage is deeply discharged and may have permanent internal damage. If both batteries test around 12.8 volts, your batteries are fine and the problem lies elsewhere.
If one battery tests at 12.8 volts and the other at 11.8 volts, you have one bad battery. Replace them as a pair. Mixing old and new sealed lead-acid batteries causes the new battery to drain into the old one.
Charger issues
A charger that shows lights but does not actually charge is a common frustration. Most Quantum off-board chargers have a status light. The light is solid red or amber while charging.
It turns green when the charge cycle completes.
If the light stays green immediately when you plug it in, the charger thinks the battery is already full. This could mean the battery is fully charged, or the charger is not sensing the battery at all. Check the charger plug connection.
Sometimes the pins get bent or the connector does not seat fully.
If the light flashes red or shows an error pattern, consult your specific charger manual. Common causes include a bad battery connection, a failed battery cell, or a charger temperature lockout. Let the charger cool for 30 minutes and try again.
Charging sequence matters
Always connect the charger to the chair first. Then plug the charger into the wall outlet. When done, unplug from the wall first.
Then disconnect from the chair. This sequence prevents sparking at the chair connector and reduces wear on the pins.
Battery water levels
If you have wet lead-acid batteries with refill caps, check the electrolyte level every 30 to 60 days. Remove the caps and look inside. The fluid should cover the lead plates.
If it is low, top off with distilled water only. Tap water contains minerals that damage the cells. Overfilling causes acid to overflow during charging, which corrodes the battery tray and wiring.
Sealed lead-acid batteries that are labeled maintenance free cannot be refilled. When they die, you replace them.
When to replace
Plan on replacing sealed lead-acid batteries every 12 to 18 months with regular daily use. Some last up to two years. Very few go past three years.
Lithium-ion batteries last longer, typically 4 to 6 years, but cost significantly more upfront.
Signs that replacement is needed:
- The chair moves noticeably slower than when the batteries were new
- The distance you can travel on a charge has dropped by half or more
- The error code shows 2 flashes even after a full charge
- One battery tests below 12.0 volts while the other tests normal
- The charger completes its cycle in under 2 hours (the batteries cannot accept a full charge)
If you replace the batteries yourself, take photos of the wiring before you disconnect anything. The cables are color-coded, but one wrong connection can damage the controller.
Step 3: Joystick and Controller Faults Resetting, Recalibrating, and Replacing
Your joystick is the bridge between you and the chair. When it stops working correctly, you lose most of your control. Joystick problems fall into a few predictable categories, and many of them have simple fixes.
Joystick feels loose or does not spring back to center
The joystick uses a spring mechanism to return to neutral when you release it. Over time, the spring can weaken or break. Dirt and debris can also gum up the mechanism.
If the joystick feels floppy or stays off-center when you let go, the boot may be torn and letting in debris. Try cleaning around the base with compressed air. Do not spray liquid cleaners directly into the joystick housing.
If the stick does not return to center, the joystick assembly needs replacement.
Joystick moves but chair does not respond
This points to a communication problem between the joystick and the controller module. Start with the simplest fix. Power cycle the chair.
Turn the controller completely off. Wait 10 seconds. Turn it back on.
This clears any glitches in the controller logic.
If that does not work, unplug the joystick cable from the controller module and plug it back in. Do this with the chair turned off. Check for bent or corroded pins in the connector.
A small amount of corrosion can break the signal.
Joystick drifts or the chair moves by itself
This is a safety-critical issue. If the chair creeps forward or backward when you are not touching the joystick, the controller is seeing an off-neutral position. This can happen if the joystick mechanism is physically displaced by a fall or impact.
It can also happen if moisture got into the housing and is creating a false signal.
Do not use the chair if it drifts. The risk of unintended movement on a slope or near traffic is serious. Try power cycling.
If the drift persists, the joystick needs recalibration or replacement.
Some Quantum controllers allow user calibration. The procedure varies by model. On many R-net and Q-Logic 3 systems, you enter calibration mode by holding the on/off button for 10 seconds until the LED flashes in a specific pattern, then moving the joystick to each extreme.
Your owner manual has the exact sequence for your model.
If you cannot find the calibration procedure, or if calibration does not fix the drift, call a technician. A drifting joystick is not something to live with.
Controller not responding at all
A completely dead controller with no LED, no sound, nothing points to a power delivery problem. Go back to the battery checks in Step 2. Verify the main circuit breaker.
Check the wiring harness connector at the controller base. A pinched or broken wire in the harness can kill power to the controller.
If power is reaching the controller but the unit still does not respond, the controller itself has failed. Controller replacement requires programming. The replacement unit must be matched to your chairs specific drive parameters.
Speed limits. Acceleration curves. Brake timing.
This is not a swap-and-go job. A certified mobility dealer with the correct programming tool needs to handle it.
Common mistakes with joystick repairs
Do not spray contact cleaner inside the joystick housing while the chair is on. You can short the electronics. If you use contact cleaner, turn the chair off.
Remove the battery. Let everything dry completely before powering back up.
Do not force the joystick. If the stick does not move in a certain direction, forcing it can break the internal mechanism. Look for physical obstructions around the boot.
Do not replace the joystick if the error code says something else. A 5-flash code points to the controller, not the joystick. Replacing the joystick will not fix a controller fault.
A good rule of thumb. If the controller LED lights up and shows a pattern, the controller is alive and trying to communicate. The problem is in whatever component it is complaining about.
If the LED is completely dark, the problem is power delivery or the controller itself.
Step 4: Brake and Motor Issues Freewheel Lever Problems, Grinding Noises, and Sudden Stops
Brake and motor problems are less common than battery issues, but they are more serious. A failing brake or motor can leave you stranded or create a safety hazard. Knowing the difference between a simple fix and a technician-only repair is critical.
How the brake system works
Quantum power chairs use electromagnetic parking brakes. When the controller is on and the joystick is in neutral, the brakes are engaged. When you move the joystick, the controller releases the brakes and powers the motors.
This is why you hear a click from each wheel when you start moving.
The brakes are spring-loaded. When power is removed, the springs engage the brakes automatically. This is a safety feature.
If the chair loses power, the brakes stop it from rolling.
The grinding noise problem
If you hear a grinding or scraping sound when the chair moves, it usually points to one of two issues. The first is a worn motor brush. The motors in Quantum chairs use carbon brushes that wear down over time.
As they wear, the spring tension decreases and the brush no longer makes solid contact with the commutator. This creates a grinding or chirping sound.
Motor brushes typically last 500 to 1000 hours of use. If you hear grinding, turn the chair off immediately. Continued use with worn brushes can damage the motor commutator, turning a 50-dollar brush replacement into a 500-dollar motor replacement.
The second possible cause is debris caught in the drive wheel or the brake assembly. Check the wheels for visible obstructions. Look for stones, twigs, or debris wrapped around the axle.
Clear anything you find.
The brake will not release
If you hear a click but the chair does not move, the brake may be stuck in the engaged position. This can happen if the brake arm is physically jammed or if the brake coil has failed.
Start with the freewheel levers. Make sure they are fully in the drive position. A partially engaged freewheel lever can hold the brake in a half-released state that prevents movement.
If the freewheel levers are correct, the brake may need adjustment. Brake adjustment is model-specific. Some Quantum chairs have an adjustable brake gap.
The gap between the brake pad and the wheel hub should be approximately 0.5 to 1.0 millimeters. If you are comfortable with basic tools and have access to your owner manual, you can adjust this. If the gap looks correct and the brake still will not release, the brake coil has failed and needs replacement.
The chair stops suddenly while moving
This is alarming and dangerous. If the chair cuts power and stops abruptly while you are in motion, it can throw you forward. Several things can cause this.
Low battery. When the battery voltage drops below a certain threshold, the controller cuts power to protect the batteries. This feels like a sudden stop. If this happens frequently, your batteries are near the end of their life.
Thermal shutdown. If the controller or motor gets too hot, the system shuts down to prevent damage. This is more common in summer or after long uphill runs. Let the chair cool for 30 minutes before trying again.
Loose wiring harness. A loose power connection can cause intermittent power loss. If the chair stops only when you hit a bump or turn sharply, check the main wiring harness connectors. Secure them and test again.
Controller shutdown. If the controller detects a fault while you are moving, it stops the chair and engages the brakes. The error code will tell you what triggered the shutdown.
When to call a technician for brake and motor issues
Call a technician if:
- The grinding noise continues after clearing visible debris
- The brake will not release and you have confirmed the freewheel levers are correct
- The chair stops suddenly and the error code shows 4 flashes
- The motor is hot to the touch after only a few minutes of use
- You smell burning or see smoke coming from the motor area
Brake and motor repairs require lifting the chair, accessing the drive assembly, and often using specialized tools. Attempting these repairs without training can damage components and create safety risks.
Step 5: Seat Actuators and Power Accessories When Tilt, Recline, or Elevate Stops Working
Power seating functions add convenience and comfort, but they also add complexity. If your Quantum chair has power tilt, recline, elevate, or leg rests, those systems can fail independently of the drive system. Your chair might drive perfectly but refuse to tilt back or lift up.
How the seat actuator system works
Power seat functions use linear actuators. These are small electric motors with a threaded rod that extends or retracts to move the seat. The actuators are controlled by a separate seat control module or by buttons on the armrest.
The actuators draw power from the same 24-volt battery system as the drive motors. Each actuator has its own circuit. If one function stops working while others work fine, the problem is specific to that actuator or its control circuit.
No movement at all when you press the button
If pressing any seat control button produces no movement, start with the simple checks.
Check the seat control harness. The harness runs from the armrest controls to the seat module under the chair. Look for loose or disconnected plugs.
Check for pinched or cut wires.
Check the seat control module. Some Quantum chairs have a small black box near the power base labeled seat interface or seat control. If the LED on that module is off, it is not receiving power.
Check the fuse for the seat circuit. Some chairs have a separate fuse for seating functions.
Power cycle the chair. Turn the controller off. Wait 10 seconds.
Turn it back on. This resets the seat control module and clears any glitches.
One function stops working
If tilt works but recline does not, the problem is in the recline actuator or its wiring. Listen closely when you press the button. Do you hear a click or a hum from the actuator?
If yes, the actuator is receiving power but may be mechanically stuck. If you hear nothing, the actuator is not getting power.
For a silent actuator, check the individual wires in the harness. Each actuator has two wires for power and two for position feedback. A broken wire anywhere along the run can kill the function.
Look for pinch points where the harness passes under the seat or around moving joints.
For a humming actuator that does not move, the actuator may have an internal mechanical jam. This can happen if the chair was tilted to an extreme angle and something blocked the mechanism. Try gently assisting the movement while pressing the button.
Do not force it. If the actuator is seized, it needs replacement.
The seat moves in only one direction
If the seat tilts forward but will not tilt backward, or goes up but will not come down, the limit switch or position sensor may be faulty. The actuator uses internal limit switches to stop at the end of travel. If a switch fails, the controller thinks the actuator is already at its limit and will not drive it in that direction.
Power cycling sometimes resets the limit switch logic. If it does not, the actuator needs replacement.
The seat drifts down over time
If you set the seat at a recline position and it slowly drifts forward, the actuator is failing internally. The threaded rod mechanism inside the actuator is worn and can no longer hold position under load. This is a wear item.
Replace the actuator.
When to call a technician for seat issues
Call a technician if:
- Multiple seat functions stopped working at the same time
- You suspect a wiring harness is damaged inside the chair frame
- The actuator is humming but not moving
- You see visible damage to the actuator rod or housing
- The seat drifts from its set position
Seat actuator replacement is a straightforward job for a technician. The part typically costs 100 to 200 dollars. Labor adds another hour.
Trying to replace an actuator without the correct tools can damage the seat frame or the mounting brackets.
Mistakes That Cost You Time and Money What Most Users Get Wrong
After working with thousands of power chair users, certain patterns emerge. These are the mistakes that turn a 5-minute fix into a 300-dollar repair.
Mistake 1: Replacing parts based on the error code alone
The error code tells you what system is having a problem. It does not tell you the exact part to replace. A 4-flash code means the motor or brake circuit has an issue.
It does not mean buy a new motor.
Always check the simple things first. The freewheel lever. The battery voltage.
The wiring connectors. You would be shocked how many motors get replaced when the real problem was a loose wire.
Mistake 2: Leaving the chair plugged in all the time
Sealed lead-acid batteries do best with a full charge cycle followed by rest. Leaving the chair plugged in 24/7 keeps the batteries in a constant float charge state. This accelerates sulfation and shortens battery life.
Unplug the chair once the charger shows green. Let the batteries rest. If you use the chair daily, charge it overnight and unplug it in the morning.
Mistake 3: Ignoring error codes
A chair that runs fine but shows an occasional 2-flash code during use is not fine. That code means the batteries are dropping below safe voltage while you are driving. Repeated low-voltage events damage the battery cells.
Fix the problem while it is small.
Mistake 4: Using the wrong charger
Your Quantum chair expects a specific charger voltage and amperage. Using a charger rated for a different voltage or for a lithium battery on a lead-acid system can damage the controller and the batteries. The charger that came with the chair is the only charger you should use.
Mistake 5: Overlooking the freewheel lever
This is the number one fix that users miss. Twelve percent of all service calls are solved by pushing a lever back into the drive position. Check it first.
Every single time.
Mistake 6: Spraying contact cleaner or lubricant into electronics
Moisture is the enemy of your controller and joystick. Contact cleaner displaces moisture but leaves a residue. Zero-residue electronic cleaner is safe if used properly.
WD-40 is not. Neither is any spray lubricant. If you must clean a connector, use isopropyl alcohol on a lint-free cloth.
When to Call a Technician (And How to Find a Good One)
There is no shame in calling a technician. Some repairs truly require training, tools, and programming equipment. Knowing when to call saves you from making things worse.
Call a technician for these problems
- Controller replacement. The replacement unit must be programmed with your chairs drive parameters.
- Motor replacement. Lifting the chair and accessing the motor bolts requires a hoist or ramp.
- Brake assembly replacement. The brake is part of the motor assembly on most Quantum models.
- Wiring harness replacement running inside the frame channels. This requires disassembling part of the chair.
- Any repair involving lifting the chair off the ground without proper equipment.
- Any problem that returns after you have done the basic checks in this guide.
How to find a good technician
Start with the dealer who sold you the chair. They have your chairs model and serial number on file. They also have access to factory service manuals and programming tools.
If you bought the chair used or the dealer is no longer around, search for Pride Mobility authorized service providers. Pride Mobility manufactures Quantum chairs. Their website lists certified dealers by zip code.
A certified dealer is your best bet because they have factory training and genuine parts.
Call and ask three questions before you schedule a visit. What is the service call fee? Do you stock Quantum parts for my model?
Can you read and program the controller? If the answer to any of those is no, call someone else.
What to tell the technician
Write down the following before you call. The exact error code pattern. What the chair was doing when the problem started.
Whether the problem happens consistently or intermittently. What you have already checked. A good technician can often diagnose the issue over the phone if you give them these details.
Frequently Asked Questions
How do I reset my Quantum power chair controller?
Turn the controller completely off. Wait 10 seconds. Turn it back on.
This clears temporary glitches. If the error code returns immediately, the problem is hardware, not software.
Why does my Quantum chair beep but not move?
A beeping sound with no movement usually points to a safety lockout or a brake fault. Check the freewheel levers first. If they are in drive position, check the error code on the controller LED.
The number of flashes tells you what system triggered the lockout.
How often should I replace the batteries in my Quantum power chair?
Sealed lead-acid batteries last 12 to 18 months with daily use. Replace them when the travel distance drops by half or the 2-flash error code appears after a full charge. Lithium-ion batteries last 4 to 6 years and cost more upfront.
Can I use a car battery charger on my Quantum power chair?
Do not do this. Car battery chargers deliver higher amperage than your chair is designed for. They can damage the controller and the batteries.
Use only the charger that came with your chair or a direct replacement from the manufacturer.
What does a 4-flash error code mean on my Quantum chair?
Four flashes indicates a motor or brake fault. Check the freewheel levers first. If they are correct, the problem is in the motor or brake circuit.
This usually requires a technician.
My chair moves slower than it used to. What is wrong?
The most common cause is aging batteries. Test the voltage at rest. If either battery is below 12.4 volts, the batteries are likely the problem.
Slow speed can also come from a controller programming change or a partially seized motor. If new batteries do not fix it, call a technician.
How do I know if my joystick needs replacement?
Replace the joystick if it does not spring back to center, if it drifts and calibration does not fix it, or if the 3-flash error code returns after cleaning and power cycling. A joystick that feels physically loose or wobbly also needs replacement.

Similar Posts