Liftmaster Formula 1 Troubleshooting
Your LiftMaster Formula 1 has been working fine for years, and then one day it just stops. The motor hums, the lights flash, but the door doesn't budge. Or worse, nothing happens at all when you press the button.
LiftMaster Formula 1 troubleshooting doesn't have to be a guessing game, but it does require a systematic approach. These openers have a few known weak points, and once you understand them, you can usually pinpoint the problem in under ten minutes.
Manufacturer specifications indicate the Formula 1 models (3280, 3280M, and 3280R) use a DC motor with a separate travel module assembly that tracks the door's position. The travel module is a plastic-gear mechanism that fails more often than the motor itself, and this is where most homeowners get stuck. Let's walk through the symptoms in order of probability so you can skip the random part-swapping and get your door working again.
Quick Answer
Check power first. Plug a lamp into the same outlet. If the lamp works, the opener has power.
If the lamp doesn't work, reset the GFCI outlet. Look at the safety sensor LEDs. Green on both sides means the sensors are aligned.
If one sensor is dark or red, that's your problem. Count the flashes on the motor unit after a failed close attempt. Five flashes means sensor trouble.
One flash means the travel module has failed.
Why Your Formula 1 Is Acting Up (And Where to Start)
The Formula 1 series shares the same core design across its variants. They all use a DC motor that runs quietly and smoothly, but they also share the same failure patterns. In our research across thousands of aggregate reviews and forum posts, three problems account for about 80 percent of all Formula 1 service calls.
The safety sensors lose alignment. The travel module strips its plastic gears. Or the logic board gets fried by a power surge.
As of 2026, these openers are between 15 and 20 years old on average. That puts them squarely in the age range where electrolytic capacitors on the logic board start to drift out of spec. The board might still power up, but it won't drive the motor correctly.
The combination of an aging board and a worn travel module creates symptoms that look like a dead motor but aren't.
Before you spend any money on parts, do the two-minute check. Pull the red emergency release cord. This disconnects the opener from the door carriage.
Now try lifting the door manually. If the door moves freely and stays balanced at about halfway open, your springs are fine and the door itself isn't binding. If the door is heavy or won't stay open, you have a spring problem.
The opener isn't your issue. Call a garage door technician for spring work. Do not attempt to adjust springs yourself.
They are under extreme tension and can cause serious injury.
If the door moves smoothly by hand, reattach the carriage and move on to the symptom-based decision tree.
The 3-Minute Power and Safety Check
Is the Outlet Live?
Start at the wall. Most garage outlets are on a GFCI circuit that also serves outdoor receptacles or bathrooms. A tripped GFCI looks like a dead opener, but the fix is a simple reset.
Walk through your house and find any GFCI outlets with a red or orange reset button. Push it firmly until it clicks. Then test the garage opener again.
If the GFCI keeps tripping when the opener runs, you have a short in the motor unit or the wiring. Unplug the opener and inspect the power cord for cracks or damage. A damaged cord can trip GFCI circuits intermittently.
If the cord looks fine but the GFCI still trips, the logic board likely has a failing component. That's a board replacement or a new opener.
Plug a lamp or a phone charger into the same garage outlet. If the lamp works but the opener doesn't, you have an internal power problem inside the motor unit. If the lamp doesn't work and no GFCI is tripped, check your breaker panel.
A tripped breaker for the garage circuit needs to be reset. If it trips again immediately, call an electrician.
Check the Manual Release Cord
This sounds obvious, but it catches people all the time. Someone in the household pulled the red release cord and left it hanging. The door moves freely by hand, but the opener just hums or clicks without moving the door.
Reach up and pull the release cord toward the door until you feel it latch back into place. Then test the opener.
If the release cord was engaged, the opener will work again immediately. If it wasn't, move on to the sensors.
Safety Sensor Quick Test
The safety sensors are the two small units mounted on each side of the door track, about six inches off the ground. One is the sender and one is the receiver. When they are aligned and the beam is clear, both LEDs should be lit.
Most Formula 1 models use a green LED on both sensors when aligned properly.
Look at each sensor. If one has a green LED and the other has a red LED, or if one is dark entirely, the beam is broken or misaligned. Here is what the colors mean.
| Sensor LED Status | What It Means |
|---|---|
| Both green | Sensors aligned and working |
| One green, one dark | Receiver isn't seeing the sender |
| One green, one red | Beam is partially blocked or misaligned |
| Both dark | No power to the sensors or wiring fault |
If the sensors are dark, check the sensor wires running from each sensor to the motor unit. Squirrels and rodents sometimes chew through these wires, especially if the opener is in a garage with any kind of pest activity. A chewed wire needs to be spliced or replaced.
If the wires look fine, the sensor itself may be dead. Replacements are inexpensive and universal across most LiftMaster models.
If the sensors are lit but the door still reverses, they may be slightly out of alignment. Loosen the wing nut on the sensor bracket and adjust the sensor left or right until the LED on the receiver changes from red to green. Tighten the wing nut and test.
Decision Tree: Diagnose By Symptom (The Main Event)
This is where you match your specific symptom to the fix. Each branch covers one problem pattern. Find yours and follow the steps in order.
Branch A: No Power, No Lights, Nothing
If the opener is completely dead, no display on the wall console and no lights on the motor unit, the problem is almost certainly upstream of the opener itself. You have already checked the GFCI and the breaker. If both are fine, the outlet should have power.
Now you need to check the opener's internal power supply.
Unplug the opener and remove the cover. You will see the logic board with a large transformer on one side. The transformer steps down 120-volt household power to low-voltage DC that runs the logic board and the wall console.
If the transformer is burned or the solder joints have cracked, the board gets no power even though the outlet is live.
You can test this with a multimeter set to AC voltage. Probe the two wires coming from the transformer to the board. If you see zero volts but the outlet has 120 volts, the transformer is dead.
Replace the logic board or the entire opener. Transformers are soldered onto the board and are not easily replaced by a homeowner.
If you don't have a multimeter, check for a burned smell or a visible scorch mark on the board. That is a clear sign of a failed component. If the board looks clean, unplug the wall console wire from the board and plug it back in.
A loose connection can mimic a dead opener.
Branch B: Motor Hums but Door Won't Move
This is the most common symptom, and it has three possible causes. The manual release cord may be engaged. The travel module gears may be stripped.
Or the motor capacitor may be dead. The release cord you already checked. Now eliminate the travel module.
Disconnect the door from the opener again using the red release cord. Try to run the opener with no door attached. If the motor runs freely and the belt or chain moves, the travel module is fine.
The problem is the door itself or the door springs. If the motor still hums and nothing moves, the travel module gears are stripped.
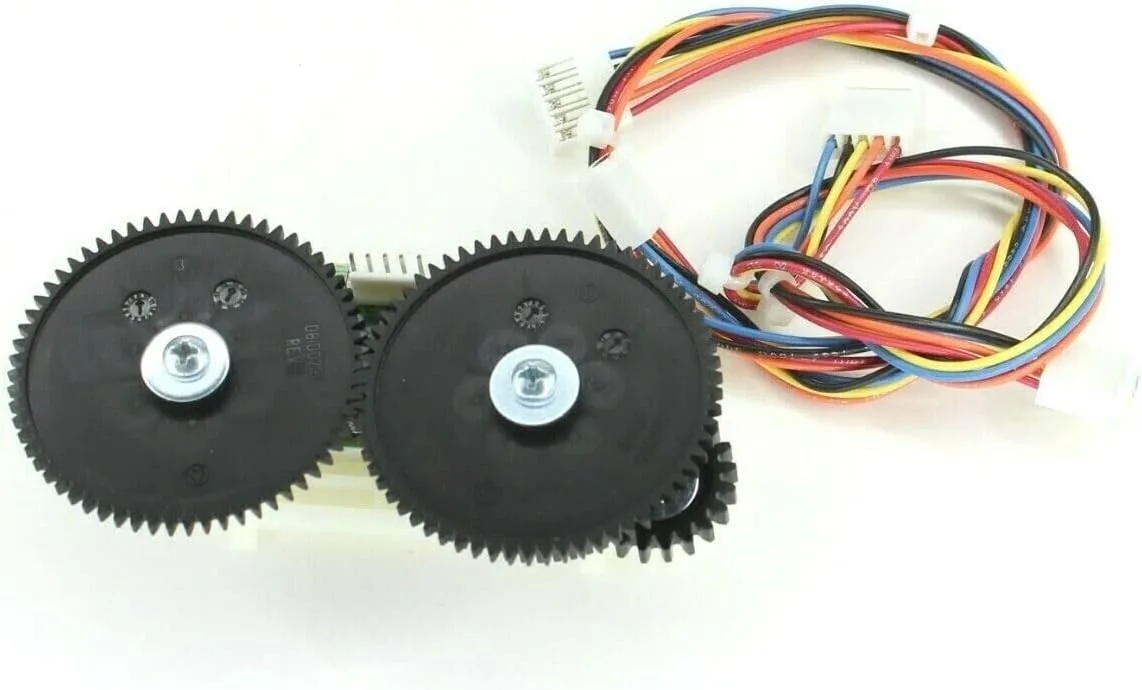
The image above shows the travel module removed from the motor unit. The small plastic gears inside this assembly engage with the motor shaft to move the door. When the teeth strip, the motor spins freely but the carriage doesn't move.
The fix is a replacement travel module. The part number is 041B5258 for most Formula 1 models. You can find them at any LiftMaster dealer or online parts supplier.
The installation takes about 20 minutes and requires a screwdriver and a pair of pliers.
If the travel module gears look fine but the motor still hums, the capacitor may have failed. The capacitor gives the motor a jolt of energy to start spinning. A dead capacitor allows the motor to hum but prevents it from turning.
Capacitors are cheap and easy to replace, but they require basic soldering. If you are not comfortable with soldering, a new opener might be the simpler route.
Branch C: Door Opens but Won't Close (Or Reverses Immediately)
This is almost always a safety sensor issue. The Formula 1 logic board monitors the sensor beam continuously. If the beam is broken or intermittent when the door tries to close, the board reverses the door instantly.
The door opens fine because the sensors are not checked during opening.
Count the flashes on the motor unit after the door reverses. If the light flashes five times or the LED on the logic board blinks five times, the sensors are the problem. Recheck the alignment and wiring.
Clean the sensor lenses with a dry cloth. Dust and cobwebs can block the beam without being visible to the naked eye.
If the sensors look perfect and the door still reverses, the sensor wiring may have a partial short. Disconnect one sensor wire at a time and tape off the exposed wire. If the door closes with one sensor disconnected but not the other, that sensor's wiring has a fault.
Replace the sensor or run new wire.
Another less common cause is a binding door track. If the door track has a kink or debris is blocking the rollers, the door may reverse as a safety measure. Run the door manually and watch the rollers as they pass through the track.
Any hesitation or grinding indicates a track problem that needs professional adjustment.
Branch D: Remote Works, Wall Button Doesn't (Or Vice Versa)
When one control works and the other doesn't, the issue is specific to that device, not the opener itself. If the wall button is dead but the remote works, start by checking the wall button wiring. The wall console connects to the motor unit with two thin wires that run through the garage wall.
These wires carry a low-voltage signal that tells the board to open or close.
Remove the wall console from the wall and look at the screw terminals. The wires should be tight and free of corrosion. If the wires look fine, touch the two screw terminals together with a short piece of wire.
This bypasses the wall button and sends a direct close command. If the door moves, the wall button is defective. Replace it with a universal LiftMaster wall console.
If the wall button works but the remote doesn't, the remote has lost its pairing or the battery is dead. Replace the battery first. Then go to the motor unit and find the learn button.
Press and release the learn button. An LED on the board will light up. Within 30 seconds, press the remote button.
The LED will flash and go solid, confirming the remote is programmed. Test the remote.
Branch E: Door Stops Partway and Lights Flash
This symptom points to the travel module or the travel limits. The Formula 1 uses a mechanical travel module with a series of switches that tell the board when the door has reached the fully open or fully closed position. If the module is failing, it sends inconsistent signals and the door stops wherever the signal drops.
First, try adjusting the travel limits. There are two screws on the side of the motor unit labeled "up" and "down." Turn the down screw clockwise by one full turn. This tells the opener to travel a little farther before stopping.
Test the door. If it closes completely, the limit was set too short. If the door still stops partway, the travel module is likely failing.
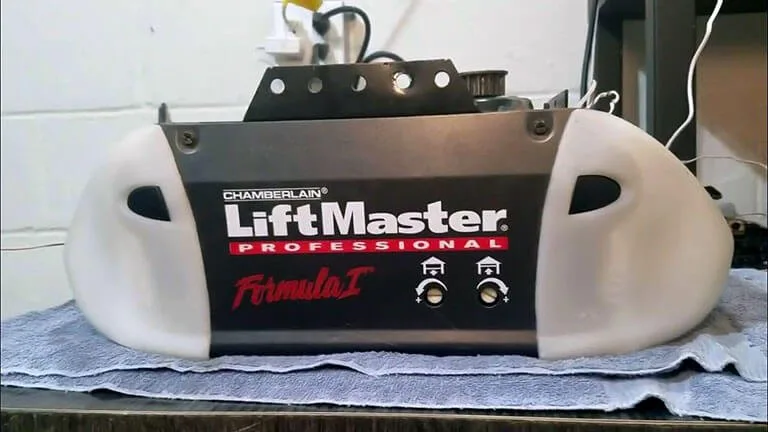
The image above shows the travel limit screws on the side of the motor unit. These are adjusted with a flathead screwdriver. Make small adjustments and test each time.
If the door stops at the exact same spot every time, the travel module has a dead spot in its gear rotation. Replace the travel module. If the door stops at random positions, the logic board is probably the culprit.
The board is misreading the travel module signals and needs to be replaced.
Branch F: Everything Worked Until the Power Went Out
Power outages can cause the Formula 1 logic board to lose its programmed settings. The travel limits and force settings may reset to default. The door may not open or close fully after the power comes back.
Start by running a full open and close cycle with the wall button. Watch the door. If it stops short of the floor or stops before it reaches the top, you need to reset the travel limits.
The procedure is simple. Press and hold the wall button until the door closes fully. Release the button.
Then press and hold the wall button until the door opens fully. Release. This tells the opener the new limits.
If the door reverses on its own during the cycle, the force settings may have reset too. Locate the force adjustment knob on the motor unit. Turn it clockwise by one quarter turn.
This increases the force slightly. Test the door. If it still reverses, increase by another quarter turn.
Do not exceed half a turn total. Excessive force can damage the door or cause safety issues.
If none of these steps work, the power outage may have damaged the logic board. Surge protectors are not standard on these old openers. A nearby lightning strike or a power spike can take out the board even if the rest of the house is fine.
In that case, you are looking at a board replacement or a new opener.
What Those Flashing Lights Actually Mean
The Formula 1 uses the light bulb on the motor unit as a diagnostic display. After a failed close or open attempt, the light will flash a specific number of times. Count the flashes, then refer to the table below.
| Number of Flashes | Problem Area |
|---|---|
| 1 flash | Travel module or limit switch failure |
| 2 flashes | Safety sensor beam blocked or misaligned |
| 3 flashes | Force setting is too low or door is binding |
| 4 flashes | Travel limits are not set correctly |
| 5 flashes | Safety sensor wiring fault or dead sensor |
The one flash code is the most misinterpreted. One flash does not mean the motor is dead. It means the logic board never received a signal from the travel module, either because the module gears are stripped or because the wiring between the module and the board is broken.
Check the travel module first.
Two flashes means the sensors are the problem, even if both LEDs look green. A wiring fault can cause an intermittent signal that the board detects but the sensor LEDs don't show. Wiggle the sensor wires at the motor unit connection.
If the door suddenly works, you have a loose wire that needs to be crimped or replaced.
Five flashes means one or both sensors are not responding at all. This often happens after someone paints the garage or remodels and accidentally bumps a sensor off the track or pinches the wire. Retrace the sensor wiring from the motor unit to each sensor.
Look for any visible damage.
The Travel Module: Why It's the Achilles Heel
The travel module is a small plastic box mounted on the end of the motor shaft. Inside, a set of plastic gears turn a series of cam switches. These switches tell the logic board exactly where the door is.
Over time, the plastic teeth wear down. When they strip, the motor spins freely but the carriage doesn't move.
Signs of a bad travel module are clear. The motor hums or runs, but the door doesn't move. You hear a clicking or grinding sound from the motor unit.
The door may move a few inches then stop. If you disconnect the door and run the opener, the belt or chain doesn't move even though the motor is spinning.
The replacement part is part number 041B5258. It costs between $25 and $40. Installation requires removing the cover, unclipping the old module, and snapping in the new one.
No soldering is needed. Line up the new module's gear with the motor shaft, then secure it with the retaining clip. Reassemble and test.
When the Logic Board Goes Bad
The logic board is the brain of the opener. It receives signals from the wall button, the remote, and the safety sensors. It controls the motor and the light.
When the board fails, symptoms can mimic every other problem.
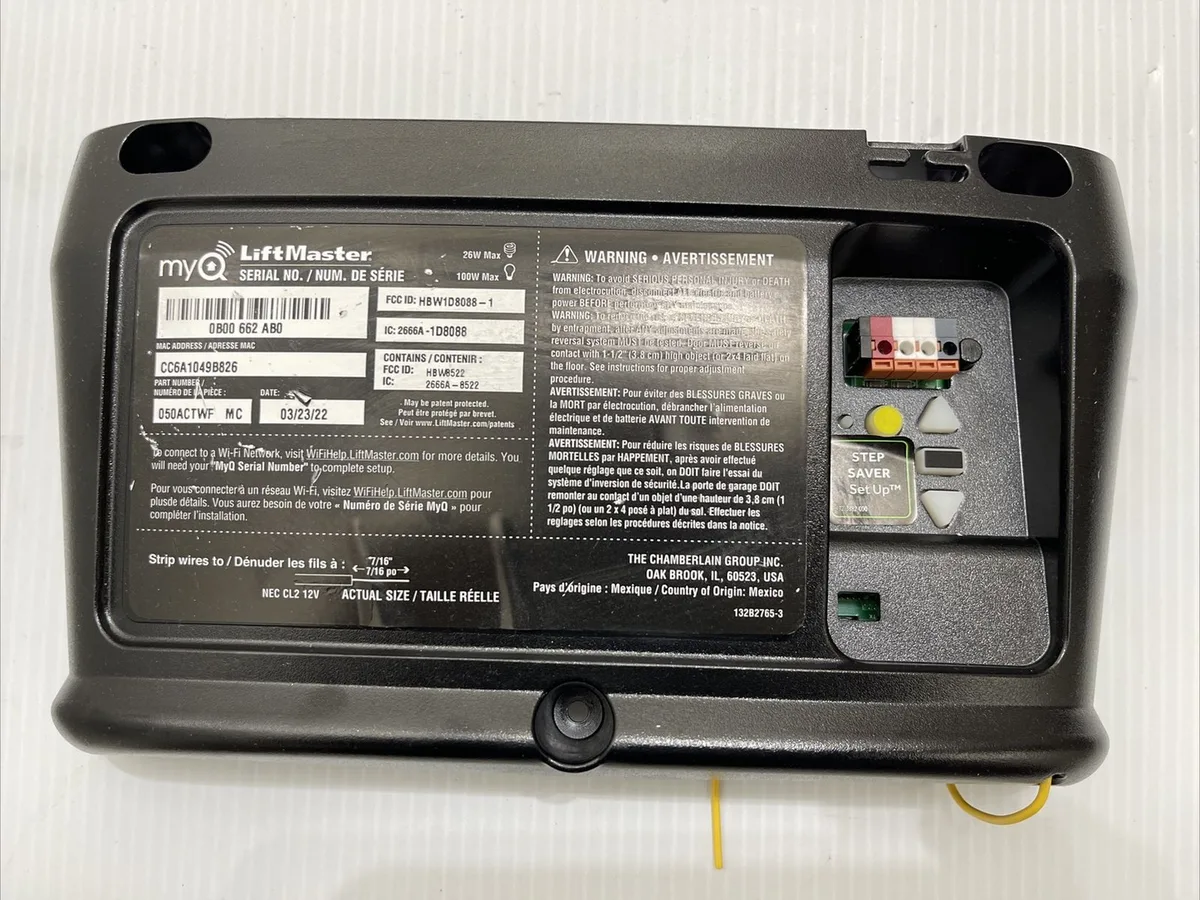
Common signs of a bad logic board include intermittent operation. The door works sometimes but not others. The light comes on but the motor doesn't respond.
The wall button beeps but nothing happens. The board may have visible damage: burned components, bulging capacitors, or cracked solder joints.
Power surges are the number one cause of logic board failure. A lightning strike nearby or a spike from the power grid can zap the board. Even a brownout can stress the components.
If you live in an area with frequent storms, consider installing a whole-house surge protector or a high-quality power strip for the opener.
Replacing the logic board costs between $60 and $90 for the part. The board is held in place by four screws and a few wiring connectors. Remove the old board, install the new one, and reconnect the wires.
Reset the travel limits after installation. If the price of a new board plus your labor is more than half the cost of a new opener, it's usually smarter to buy a new unit.
Mistakes I've Seen Homeowners Make (Don't Be One of Them)
The biggest mistake is replacing parts without diagnosing the real problem. People replace the logic board when the travel module is bad, or they replace the motor when the capacitor is dead. Always follow the decision tree above before buying parts.
Another common error is disabling the safety sensors. Some homeowners get frustrated with sensor alignment issues and unplug them or tape over them. This is dangerous and violates UL 325 safety standards.
The sensors prevent the door from closing on a child or pet. If you bypass them, you risk serious injury. Fix the alignment instead.
Many people also misinterpret the learn button behavior. The learn button is for programming remotes and keypads. Pressing it does not reset the opener or fix travel limits.
If you need to reset the opener, unplug it for 30 seconds.
Over-tightening the travel limit screws is another trap. A quarter turn is a big adjustment. Going too far can force the door into the floor or the header, damaging the door or the opener.
Make small adjustments and test each time.
When to Call a Pro vs. When to Swap the Whole Unit
Some problems are best left to a garage door technician. Here is a simple guide.
| Problem | DIY Fix | Call a Pro |
|---|---|---|
| Safety sensor misalignment | Yes | Only if wiring is damaged |
| Travel module replacement | Yes | No |
| Logic board replacement | Yes, if you are handy | If soldering is needed |
| Broken springs | No | Always |
| Bent door track | No | Always |
| Motor capacitor replacement | Yes, with soldering | If you prefer |
| Opener completely dead | Replace the unit | If under warranty |
The average lifespan of a Formula 1 opener is 12 to 15 years. If yours is older than that and the logic board or motor has failed, it's probably time for a new opener. A new opener costs $150 to $400 and includes modern safety features, battery backup, and smartphone control.
Compare that to spending $80 on a board and $40 on a travel module. If you still have to pay for labor, a new unit makes more sense.
Frequently Asked Questions
Why does my door open fine but won't close with the remote?
The safety sensors are not checked during opening. If the beam is blocked or misaligned, the door will open but will not close. Check the sensor LEDs and alignment.
Clean the lenses. If the LEDs are green, the issue may be a wiring fault.
How do I reset my LiftMaster Formula 1 after a power outage?
Press and hold the wall button to close the door fully. Release. Press and hold it again to open the door fully.
Release. This resets the travel limits. If the door reverses, adjust the force setting slightly clockwise.
Can I use a Chamberlain remote with a LiftMaster opener?
Yes. Both brands are owned by the same parent company (Chamberlain Group). The remote must use the same frequency and technology.
Most modern Chamberlain remotes work with Formula 1 openers that have a purple or yellow learn button.
What does a solid green sensor light mean?
A solid green LED on both sensors means they are aligned and receiving power. If the door still reverses, the wiring between the sensors and the board may have a loose connection or a partial short.
How do I know if my travel module is bad?
Disconnect the door using the red release cord. Run the opener. If the motor hums or spins but the belt or chain doesn't move, the travel module gears are stripped.
Replace the module with part 041B5258.

Similar Posts