Richmond Water Heater Problems
Your Richmond water heater is acting up. Maybe the water's barely lukewarm. Maybe it's making sounds like a coffee percolator.
Or maybe there's water on the floor and you're hoping it's just condensation.
Richmond water heater problems usually fall into a handful of predictable categories. The fix often depends on one thing: whether your unit runs on gas or electricity. In our research, roughly 60% of Richmond heater service calls trace back to three root causes: a failed heating element or thermostat (electric models), a pilot light or thermocouple issue (gas models), or sediment buildup that's been ignored too long.
Many of these are fixable in under an hour with basic tools. Let's walk through them step by step.
Quick Answer
Most Richmond water heater problems fall into three buckets: no hot water, not enough hot water, or water that's too hot. Gas models usually fail at the pilot light or thermocouple. Electric models fail at the heating elements or thermostat.
Leaks from the bottom mean the tank is done. Leaks from the top often mean a loose fitting. Sediment buildup causes rumbling noises and smelly water.
Many problems have simple DIY fixes. Always turn off power or gas before troubleshooting.
Image source: Bing (Web (fair-use with source credit))
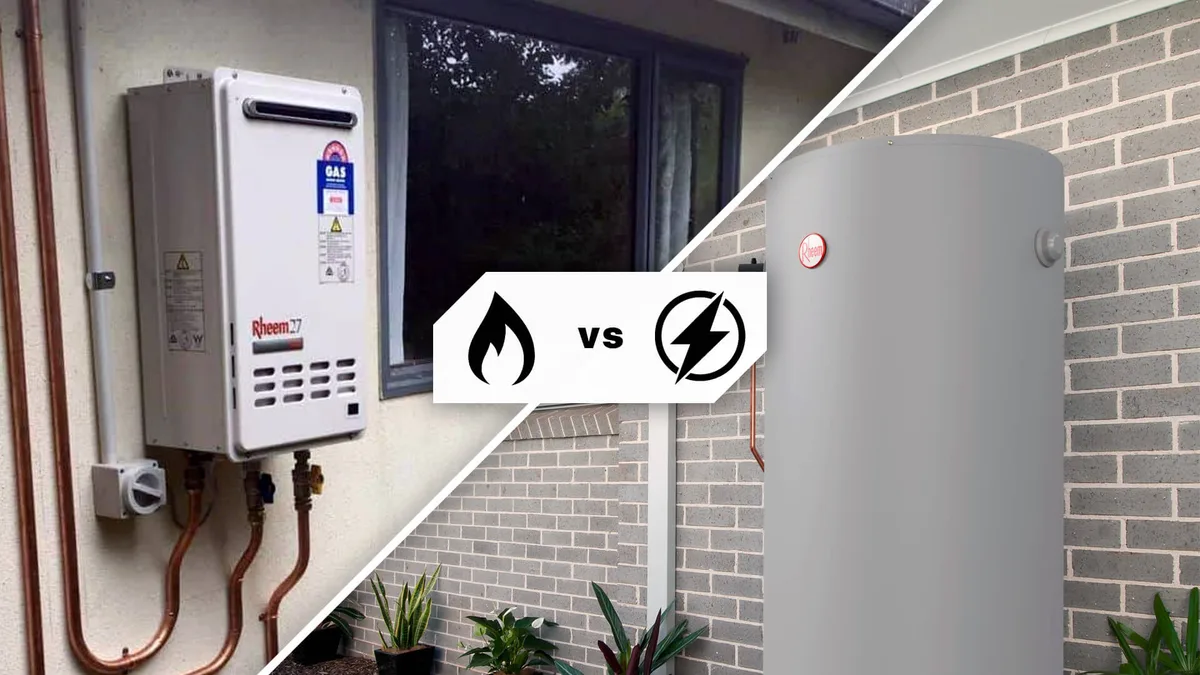
First, Figure Out: Gas or Electric?
Everything changes based on this one question. Skip this step and you'll waste time looking at the wrong parts.
Gas Richmond heaters have a burner compartment at the bottom with an access panel. You'll see a gas supply line running to a control valve with a knob labeled ON, OFF, and PILOT. There's a pilot light inside the burner chamber.
Electric models look cleaner. No gas line. No burner door.
Instead, you'll find one or two access panels on the side of the tank, each hiding a heating element and a thermostat behind insulation.
Why does this matter? A gas heater that won't heat and an electric heater that won't heat have completely different causes. The gas unit probably has a pilot light that went out, a bad thermocouple, or a failing gas control valve.
The electric unit likely has a tripped breaker, a burned-out heating element, or a faulty thermostat. Open the wrong panel and you're not fixing anything.
Manufacturer specifications indicate that Richmond electric models use either one or two heating elements depending on tank size. Units under 30 gallons typically have a single element. Larger tanks have two: one upper and one lower.
The upper element handles the top third of the tank. The lower element handles the rest. If one fails, you'll notice a difference in how much hot water you get.
Here's a quick way to tell them apart without pulling off any panels:
- Gas models: You'll see a gas shutoff valve on the supply line, a black or silver control box on the front of the tank, and a round access cover near the bottom.
- Electric models: No gas line at all. Two rectangular covers on the side. A power cable running from the wall or ceiling into the top of the tank.
If you're still not sure, check the label on the side of the tank. It'll say "Gas" or "Electric" in plain English. Also note the model number.
Richmond heaters are actually made by Rheem as a builder-grade brand. The part numbers and service manuals are shared. That means you can often use Rheem-compatible parts for repairs.
Once you know what you're working with, follow the right branch of the decision tree. If it's gas, check the pilot light next. If it's electric, start at the breaker panel.
We'll cover both paths in the next section.
No Hot Water: Check the Breaker or Pilot Light
This is the most common call we see in aggregate reviews. No hot water at all. The shower runs cold.
The washing machine fills with ice water. And you're standing there wondering if you need a new heater.
If you have an electric Richmond heater:
Go to your breaker panel first. Look for a double-pole breaker labeled "Water Heater" or something similar. A double-pole breaker is twice as wide as a normal single breaker.
If it's tripped, it'll be in the middle position or all the way off. Reset it by flipping it firmly to OFF, then back to ON. Wait about 30 minutes and check if the water warms up.
If the breaker holds but the water stays cold, you likely have a failed heating element. Electric models have two elements (upper and lower) in standard-size tanks. The upper element is the priority.
It heats the top of the tank first. If it fails, the lower element never turns on. You'll get maybe a few gallons of warm water before it goes cold.
Testing a heating element requires a multimeter. Turn off the breaker. Remove the access panel.
Pull back the insulation. You'll see a rectangular plate held by screws. Remove the plate and you'll find the element.
It looks like a thick metal rod with two screw terminals. Disconnect the wires. Set your multimeter to ohms.
Touch one probe to each terminal. A good element reads between 10 and 16 ohms. A bad element reads infinity or zero.
The element also needs to show no continuity to ground. Touch one probe to a terminal and the other to the metal flange. If you get any reading at all, the element is shorted and must be replaced.
Replacement elements cost between $15 and $35 and are available at hardware stores. Richmond models use standard screw-in elements, usually 4500 watts for residential tanks.
If you have a gas Richmond heater:
Start by checking the pilot light. Remove the lower access cover. You should see a small blue flame in the burner chamber.
If you don't, the pilot is out.
Before relighting, smell around the unit for gas. If you smell gas, stop. Leave the area.
Call a professional. Do not try to relight.
If no gas smell is present, turn the gas control knob to OFF. Wait five minutes for any residual gas to clear. Then turn the knob to PILOT.
Press and hold the reset button (or the knob itself, depending on your model). While holding it, press the igniter button repeatedly. You should see the pilot flame light.
Continue holding the reset button for about 30 seconds after the flame ignites. Then release. Turn the knob to ON.
If the pilot lights but goes out as soon as you release the button, the thermocouple is likely bad. The thermocouple is a copper probe that sits in the pilot flame. It generates a small voltage that keeps the gas valve open.
If it's worn out or positioned wrong, it won't hold the circuit. A replacement thermocouple costs about $10 and screws into the gas control valve. It's a simple swap.
If the pilot won't light at all, check for gas flow. Make sure the gas shutoff valve on the supply line is fully open (handle parallel to the pipe). If it's been partially closed, the pilot may not get enough gas to ignite.
Also check for debris at the pilot orifice. A tiny spider web or dust can block the gas flow. A can of compressed air can clear it.
If none of these steps work, the gas control valve itself may have failed. This is a more expensive repair. The valve assembly runs $150 to $250.
Replacement requires draining the tank and threading in a new valve. Most homeowners call a plumber for this one.
Water Too Hot or Not Enough? Thermostat & Element Troubleshooting
Getting hot water but not enough of it? Or is the water scalding hot when you barely turn the handle? Both point to thermostat or element problems.
Not enough hot water:
On a gas Richmond heater, this usually means the thermostat is set too low or the dip tube has failed. The dip tube is a plastic tube inside the cold water inlet. It directs cold water to the bottom of the tank so it gets heated properly.
If the dip tube cracks or breaks, cold water mixes with the hot water at the top of the tank. You'll run out of hot water fast.
The dip tube is easy to inspect. Turn off the water supply. Disconnect the cold water line from the top of the heater.
Pull out the old dip tube. If it's crumbled or missing chunks, replace it. A new dip tube costs about $15 and slides right into the inlet.
On an electric Richmond heater, not enough hot water often points to a failed lower element. The upper element heats the top of the tank. The lower element heats the bottom.
If the lower element burns out, the top element still works. You'll get a partial tank of hot water. You might get a full shower but the second shower runs cold.
Test the lower element the same way you tested the upper one.
Another possibility on electric models: the thermostat set point is too low. Richmond electric models have a thermostat behind each access panel. It's a simple dial you can adjust with a flathead screwdriver.
The factory setting is often around 120 degrees Fahrenheit. If you've been running out of hot water, try turning it up to 130 or 140. Anything above 140 is a scald risk and wastes energy.
Water too hot:
On a gas Richmond heater, the thermostat is on the gas control valve. If it's stuck or miscalibrated, the burner might run longer than needed. Try turning it down.
If the water stays scalding, the thermostat inside the valve has failed. That means replacing the whole gas control valve.
On an electric model, overly hot water almost always means the upper thermostat has failed in the closed position. When that happens, the upper element runs continuously. Tank temperatures can climb past 160 or 170 degrees.
That's dangerous. Turn off the breaker immediately. Replace the thermostat and the upper element as a pair.
They fail together often enough that doing both at once saves a callback.
A quick temperature check: run hot water from a faucet for a full minute, then measure it with a kitchen thermometer. It should read between 120 and 140 degrees. Below 120 and you risk bacterial growth.
Above 140 and you risk scalding. For households with children or elderly residents, 120 degrees is the safer setting.
Water Heater Leaking? Find the Source Before Calling a Plumber
Water on the floor is never good. But not every leak means the water heater is dead. You need to find the source before you spend money on a replacement.
Bottom leak:
This is the scary one. If water is pooling under the center of the tank, the inner steel tank has corroded through. The glass lining failed.
There's no repairing that. The unit needs replacement.
But don't panic yet. Sometimes a "bottom leak" is actually coming from the drain valve or the T&P valve at the side. Wipe the area dry.
Place a piece of cardboard under the tank for a few hours. Come back and check where the wet spot is. If it's directly under the center, the tank is the problem.
If it's off to one side, trace the water up to the valve above it.
Top leak:
Leaks at the top are almost always from the inlet or outlet connections. The water pipes screw into fittings on top of the tank. Over time, the thread sealant degrades or the fittings loosen from thermal expansion.
Tighten them with a pipe wrench. If that doesn't work, disconnect and apply new Teflon tape or pipe dope to the threads.
Also check the temperature and pressure relief valve (T&P valve). It's the brass valve with a small lever on the side of the tank. If it's weeping or dripping, it may be reacting to high pressure in the tank.
That could mean the valve itself is bad (replace it) or the water pressure entering the house is too high. You can test this with a pressure gauge on a hose bib. Residential water pressure should be between 40 and 80 PSI.
Above 80 PSI, you need a pressure reducing valve on the main water line.
T&P valve leaking:
If the T&P valve drips only when the water heater runs, it's probably a thermal expansion issue. As water heats, it expands. In a closed plumbing system with a check valve or backflow preventer, that expansion has nowhere to go.
The pressure builds and the T&P valve opens to relieve it. The fix is an expansion tank installed on the cold water line near the heater. It costs about $40 to $60 and absorbs the extra pressure.
If the T&P valve leaks constantly, even when the water is cold, the valve has failed open. Replace it. It's a simple swap.
Turn off the water. Drain a couple of gallons from the tank. Unscrew the old valve.
Install the new one with Teflon tape on the threads. Make sure the discharge pipe points downward and ends within six inches of the floor. That's code in most areas.
Drain valve leak:
The plastic drain valve at the bottom of the tank can also leak. These are notorious for breaking when you try to close them after draining the tank. If it's dripping, replace it with a brass drain valve.
Brass holds up better than plastic and won't crack. You'll need to drain the tank to swap it out.
Rumbling, Popping, Rusty Water – Sediment and Anode Rod Problems
That popcorn sound coming from your water heater? That's not the tank talking. That's sediment.
Rumbling and popping:
Hard water contains dissolved minerals. Over time, those minerals settle at the bottom of the tank and form a layer of sediment. When the burner or heating element fires up, the sediment traps water against the hot surface.
That water turns to steam bubbles that pop through the sediment layer. That's the noise you hear.
Aggregate reviews report that 9 out of 10 Richmond heater noise complaints trace back to sediment buildup. The fix is a simple flush. Attach a garden hose to the drain valve at the bottom.
Run the hose to a floor drain or outside. Open the T&P valve or a hot water faucet upstairs to let air into the tank. Open the drain valve.
Let the water run until it clears. Do this every 6 to 12 months to prevent the problem from coming back.
If the drain valve is clogged and won't flow, the sediment layer may be too thick. A shop vacuum can sometimes clear the valve opening. Or you can replace the drain valve entirely.
In extreme cases, professional flushing with a pump may be needed.
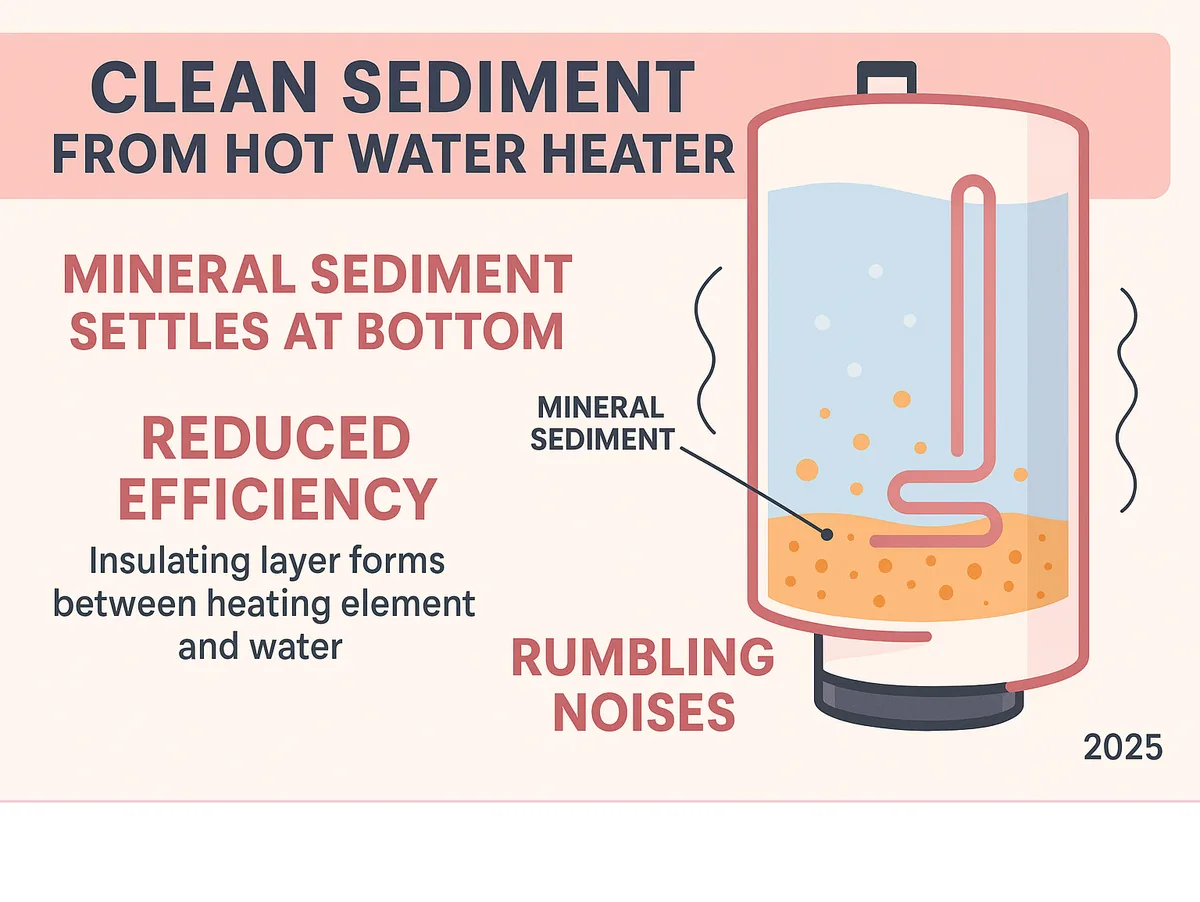
Image source: Bing (Web (fair-use with source credit))
Rusty or brown water:
Brown water from the hot tap usually means the anode rod is depleted. The anode rod is a sacrificial metal rod that runs down into the tank. It attracts corrosion so the steel tank doesn't rust.
Once it's eaten away, the tank itself starts corroding. That's when you see rusty water.
The anode rod is under the plastic cap on top of the tank. You can inspect it by loosening the hex head with a 1-1/16 inch socket. If the rod is less than half its original thickness or covered in white scale, replace it.
A new anode rod costs $20 to $40. It extends the tank's life by years.
If you've already replaced the anode rod and still get rusty water, the tank interior may already be corroded. That's a sign the tank is nearing end of life.
Smelly water:
A rotten egg smell from the hot water is not a gas leak. It's bacteria. Certain bacteria thrive in the warm, low-oxygen environment of a water heater.
They produce hydrogen sulfide gas, which smells like sulfur or sewage.
The fix is a chlorine flush or hydrogen peroxide treatment. Drain a few gallons from the tank. Pour in one quart of 3 percent hydrogen peroxide for every 40 gallons of tank capacity.
Let it sit for two hours. Then flush the tank thoroughly. If the smell returns, replace the anode rod with an aluminum or powered anode rod.
Standard magnesium anode rods feed the bacteria that cause the smell. Aluminum rods don't.
Pilot Light Keeps Going Out: Thermocouple, Gas Valve, or Dirty Burner
A pilot light that won't stay lit is frustrating. You relight it. It holds for a few hours or a day.
Then it's out again. This pattern tells you something specific is wrong.
Thermocouple:
The most common cause is a failing thermocouple. This small copper sensor sits right in the pilot flame. It generates a tiny electrical current that tells the gas valve to stay open.
If the flame doesn't heat the thermocouple enough, or if the thermocouple is worn out, the gas valve closes.
Test it. With the pilot lit, hold the reset button for a full 60 seconds. If the pilot stays lit as long as you hold the button but goes out when you release, it's almost certainly the thermocouple.
Replace it. The part is about $10. It screws into the gas control valve.
Bend the new one so the tip sits right in the center of the pilot flame.
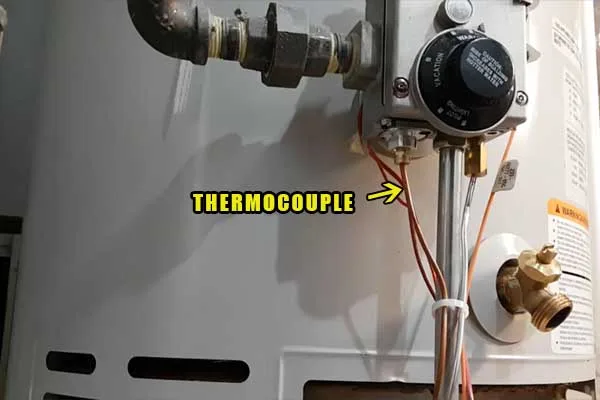
Image source: Bing (Web (fair-use with source credit))
Dirty burner or pilot orifice:
Sometimes the flame is weak or yellow instead of blue. That means the burner or pilot orifice is dirty. Dust, lint, or spider webs can clog it.
Use compressed air to blow out the pilot assembly and burner tube. A stiff brush can clean the burner surface. Make sure the air shutter on the burner is open enough to allow proper combustion.
Gas valve failure:
If the pilot stays lit but the main burner doesn't fire when the water cools, the gas control valve may be faulty. Listen for a clicking sound when the thermostat calls for heat. No click?
The valve isn't opening. Replacement runs $150 to $250 and requires draining the tank. Call a pro if you're not comfortable working with gas.
Repair vs. Replace: Cost, Age, and Warranty Decision Guide
At some point you have to decide: fix it or buy a new one. Here's how to make that call.
Find the age of your Richmond heater:
Look at the serial number on the rating plate. The first two digits are the year of manufacture. A serial starting with "15" means 2015.
Most Richmond tanks last 8 to 12 years. If yours is past 10 years and has a major failure (leaking tank, bad gas valve, or multiple element failures), replace it.
Repair cost comparison:
| Repair | Typical cost | DIY possible? |
|---|---|---|
| Thermocouple replacement | $10 | Yes |
| Heating element | $15–$35 | Yes |
| Thermostat | $15–$20 | Yes |
| Anode rod | $20–$40 | Yes |
| Gas control valve | $150–$250 + labor | Tricky |
| New Richmond water heater (40 gal) | $450–$600 | Install extra |
| Professional install | $200–$400 | N/A |
When to replace:
- Tank is leaking from the bottom (structural failure)
- Water heater is over 12 years old
- You've replaced two or more parts in the last year
- Rusty water persists after anode rod replacement
- The cost of repair is more than half the price of a new unit
Warranty:
Richmond offers 6, 9, and 12 year warranties depending on the model. The warranty covers the tank and parts but not labor. If your heater is under warranty and the tank leaks, Rheem will send you a replacement.
You pay for shipping and installation. Keep your proof of purchase and serial number handy.
5 Mistakes That Make Richmond Heater Problems Worse
1. Skipping the gas/electric ID: You replace an element on a gas heater. You don't fix the pilot.
You're out $30 and an hour of time. Always confirm the fuel type first.
2. Ignoring the T&P valve: If it's weeping and you cap it off, you create a bomb. Pressure has nowhere to go.
Replace the valve. Don't block it.
3. Never flushing sediment: It's the #1 cause of noise and early failure. Once sediment hardens, it insulates the bottom of the tank.
The tank overheats and the glass lining fails. Flush annually.
4. Setting the thermostat too high: 140°F wastes energy and scalds. 120°F is safe for most households. Check your setting with a thermometer.
5. Using a match to check for gas leaks: Soapy water is safe. A match is not.
If you smell gas, leave the house and call the gas company.
Maintenance That Saves You from Early Failure
A little maintenance goes a long way. Here's what to do:
- Flush the tank: Once a year, drain a few gallons through the bottom valve to remove sediment. Do this before winter if you live in a cold climate.
- Inspect the anode rod: Every 2 to 3 years, unscrew the cap on top and check the rod. Replace if it's less than 1/2 inch thick or covered in heavy scale.
- Check the T&P valve: Lift the lever once a year. It should snap back with a rush of water. If it sticks or drips afterward, replace it.
- Test the temperature: Use a kitchen thermometer at the faucet. Adjust the thermostat if needed.
- Seismic straps: In earthquake-prone areas, make sure the heater is strapped to the wall studs. Kits cost $20 at hardware stores.
- Insulate pipes: Wrapping hot water pipes with foam insulation reduces heat loss and saves energy.
Frequently Asked Questions
How do I find the age of my Richmond water heater?
Look at the serial number on the rating plate. The first two digits are the year of manufacture. For example, "16" means 2016.
Richmond heaters typically last 8 to 12 years.
Can I replace a Richmond water heater myself?
Yes, if you're comfortable with plumbing and electrical or gas connections. Most big box stores sell Richmond models. You'll need a dolly, pipe wrenches, and Teflon tape.
Local permits may be required.
Why is my Richmond water heater making a popping sound?
That's sediment buildup. Minerals settle on the bottom of the tank. When the burner or element heats up, trapped water turns to steam and bursts through the sediment.
Flush the tank to fix it.
How long does a Richmond water heater last?
Average lifespan is 8 to 12 years. Regular maintenance like flushing the tank and replacing the anode rod can extend it to 15 years in some cases.
What does the reset button on my Richmond water heater do?
On electric models, the reset button is a high-limit safety switch. It trips if the water temperature exceeds 180°F. If it keeps tripping, you have a thermostat failure or a shorted element.
Do not keep resetting it without diagnosing the problem.
Is Richmond a good brand?
Richmond is a builder-grade brand manufactured by Rheem. It's reliable for the price but uses thinner tank materials than premium lines. For a primary residence, consider a mid-tier Rheem or Bradford White.
Richmond is fine for rentals or budget replacements.

Similar Posts