Submersible Well Pump Troubleshooting
You're standing at your kitchen sink, twisting the faucet handle, and nothing comes out. Or maybe a trickle. Or the pump is clicking on and off every thirty seconds like it's having a panic attack.
Submersible well pump troubleshooting isn't something you think about until you're standing there, staring at a dry spout, wondering how deep that pump really is and whether you're about to drop a thousand dollars on a service call.
The good news? Most well pump problems have a predictable pattern. Manufacturer specifications from Franklin Electric and Grundfos show that roughly 70% of pump failures stem from three common causes: electrical supply issues, failed starting components, or a pressure tank that's lost its air charge.
Not a dead pump motor. Not a collapsed well. And definitely not something that requires pulling 200 feet of pipe before you've checked the simple stuff first.
Quick Answer
Most submersible well pump problems come from the pressure switch, control box, or pressure tank. Check those first. The pump itself usually lasts 8 to 12 years.
A humming pump means a bad capacitor or stuck impeller. A pump that runs but delivers nothing means a failed check valve or broken drop pipe. Short cycling almost always means a waterlogged pressure tank.
Test each before you pull the pump. That saves time, money, and your back.
The Real Problem: Your Well Pump Just Quit — Now What?
When the water stops, your brain jumps straight to the worst case. The pump is dead. The well is dry.
You're looking at a four-figure repair bill and a week of bottled water. Take a breath. Aggregate data from well service companies suggests that a full pump replacement is necessary in only about 30% of service calls.
The other 70% are fixed with parts that cost under $100 and tools you probably already own.
The real problem is that most homeowners don't know where to start looking. A well system has several components that can fail independently. The pressure switch.
The control box. The pressure tank. The wire connections.
The check valve. And finally, the pump itself. That's the order you should work through.
Start at the easiest, cheapest possibility and move toward the hardest and most expensive.
Here's the thing about submersible pumps specifically. They live at the bottom of a pipe string, sometimes 300 feet down. Pulling one is not a casual Saturday project.
It requires a pump puller, a helper, strong arms, and several hours. You want to be absolutely certain the pump is the problem before you pull it.
As of 2026, the average cost for a service call plus pump replacement runs between $1,200 and $2,500 depending on depth and your region. The average cost for a pressure switch is $25. The average cost for a capacitor is $15.
You do the math on which one you want to troubleshoot first.
How a Submersible Well Pump Actually Works (So You Can Fix It)
You don't need to be an electrician to troubleshoot a well pump. But you do need to understand the basic sequence of events that happens every time you open a faucet. That sequence is where the clues live.
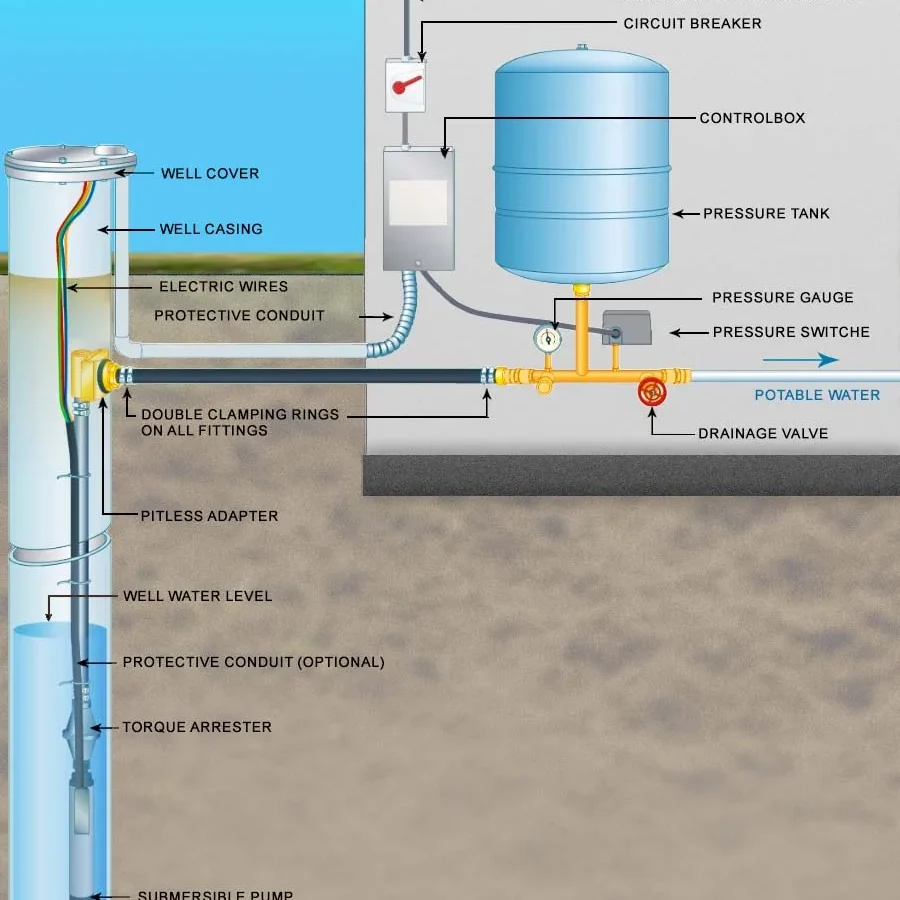
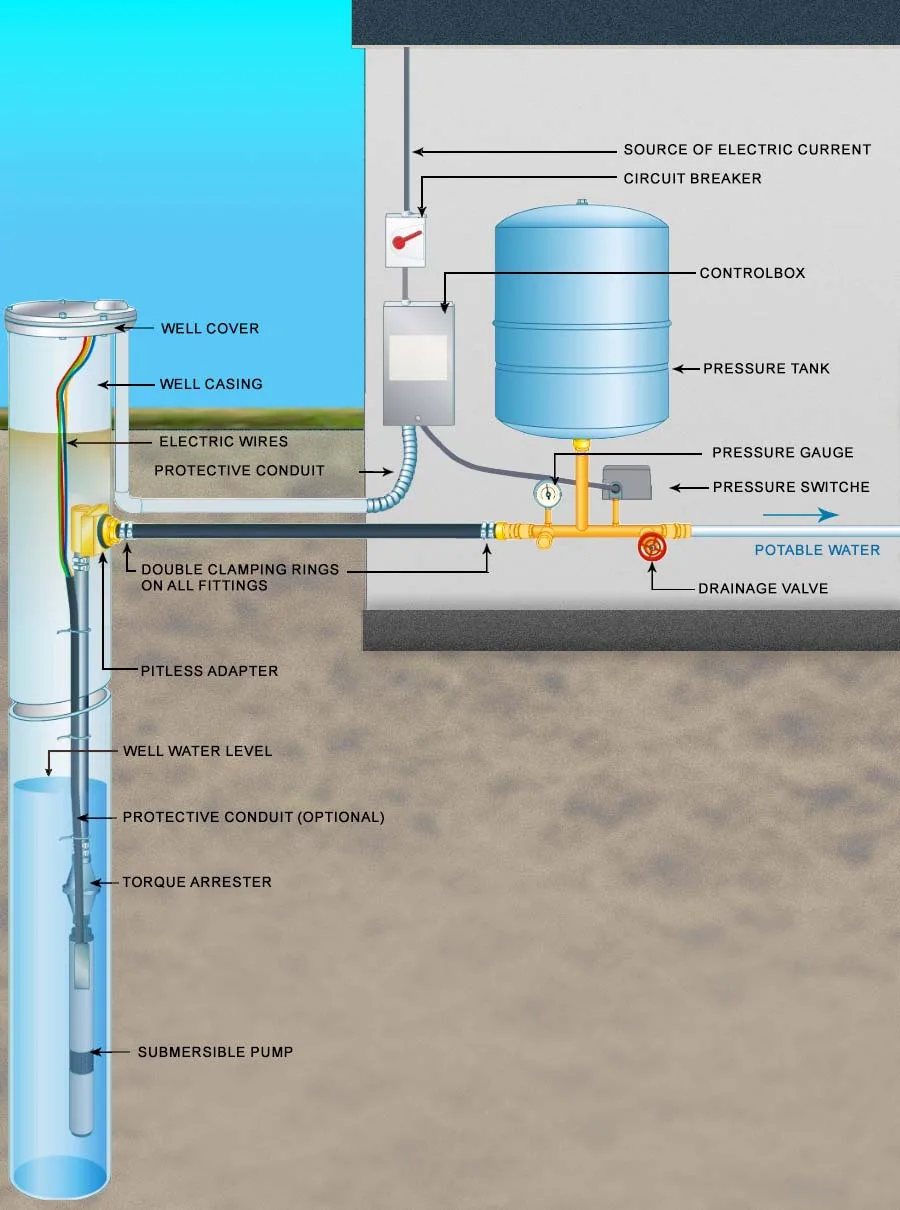
A submersible pump system has five main parts working together. The pressure tank stores water under pressure. The pressure switch senses when pressure drops and tells the pump to turn on.
The control box (on 3-wire pumps) houses the start capacitor and relay that get the motor spinning. The check valve prevents water from draining back down the pipe after the pump shuts off. And the pump itself sits underwater, pushing water up to the tank.
The Sequence of a Normal Cycle
When you turn on a faucet, water flows out of the pressure tank. As the tank empties, the pressure in the system drops. At a specific pressure, usually 20, 30, or 40 PSI depending on your switch setting, the pressure switch closes its electrical contacts.
That sends power through the drop cable down to the pump motor. The motor spins, the impellers push water upward, and the water refills the tank. When the tank reaches the cut-off pressure (typically 40, 50, or 60 PSI), the switch opens, and the pump stops.
A normal pump cycle takes anywhere from 30 seconds to two minutes depending on tank size and your water usage. Short cycles of less than 10 seconds mean something is wrong.
Two-Wire vs. Three-Wire Pumps
This matters because it changes where you look for the problem. A 2-wire pump has the starting components built into the motor housing. A 3-wire pump has a separate control box mounted on the wall above ground.
If you have a 3-wire pump and it hums but won't start, the control box is your first stop. If you have a 2-wire pump and it hums but won't start, the capacitor is inside the motor, 200 feet down, and you're likely looking at a pump pull.
How do you know which you have? Look at the number of wires going into the top of the well casing. Two wires plus a ground wire means 2-wire.
Three wires plus a ground means 3-wire. If you see a gray or silver box mounted on the wall near your pressure tank with a lid that says control box on it, you have a 3-wire system.
The Role of the Pressure Tank
The pressure tank is often the most misunderstood component. It's not just a storage tank. It's a buffer that keeps the pump from cycling on and off every time you flush the toilet.
A tank with a working bladder holds a pocket of compressed air above a rubber diaphragm. That air pushes the water out when you open a faucet. If the bladder ruptures or the air charge leaks out, the tank becomes waterlogged.
The pump turns on, fills the tank, the pressure hits the cut-off, the pump stops, and within seconds the pressure drops again because there's no air cushion. The pump restarts. Repeat forever.
A waterlogged pressure tank is responsible for roughly 40% of short cycling complaints. And it's one of the easiest problems to diagnose and fix.
What Normal Numbers Look Like
Every pump system operates within expected electrical and mechanical ranges. Knowing those ranges is what separates someone who guesses from someone who diagnoses.
- Motor winding resistance between phases: 2 to 10 ohms (varies by HP and brand)
- Resistance to ground: 1 megaohm or higher (anything lower means insulation damage)
- Capacitor microfarad rating: printed on the side, typically 10 to 50 µF, within 10% of spec
- Pressure switch settings: 20/40, 30/50, or 40/60 PSI, never more than a 20 PSI differential
- Pump amp draw: should match the nameplate rating within 10% under load
The Decision Map: Follow These Branches Based on Your Symptom
This is where troubleshooting starts. You match your symptom to the branch, work through the checks in order, and stop when you find the problem. Each branch is ordered from most likely and cheapest to least likely and most expensive.
Branch A: Pump Hums But Won't Start
You can hear the pump trying. There's a low hum coming from somewhere in the well or the control box. But no water flows, and after a few seconds the hum stops (thermal overload tripped) or the breaker trips.
First check: the pressure switch. Turn off the power at the breaker. Remove the pressure switch cover. Look at the contacts.
Are they pitted, burned, or welded together? If they're welded shut, the pump will try to run continuously and may hum if it's stalled. If they're open but dirty, clean them with a file or replace the switch.
This is a $25 fix and 15 minutes of time.
Second check: the control box capacitor (3-wire pumps only). Turn off power. Remove the control box lid. Look at the capacitor.
Is it bulging on top? Leaking fluid? Cracked?
If yes, replace it. If it looks normal, test it with a capacitance meter. The reading should be within 10% of the value printed on the side.
A failed capacitor is the number one cause of a humming, non-starting pump on 3-wire systems.
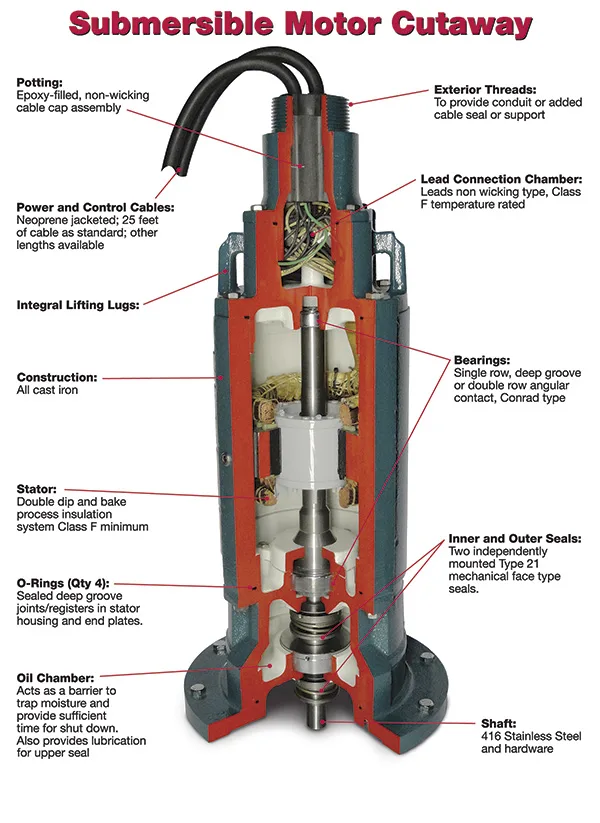
Third check: the pump motor itself. If the capacitor is good and the pressure switch is clean, the motor is likely seized or has a bad start winding. This requires a megger test. Disconnect the drop wires at the control box or well seal.
Megger each wire to ground. Anything under 1 megaohm means the motor insulation is compromised. If the leads show continuity to ground, the motor is shorted.
Both scenarios mean pump replacement.
Branch B: Pump Runs But No Water Comes Out
The pump sounds normal. It runs for a minute or two. But nothing comes out of the faucet.
This is one of the more frustrating problems because everything seems to be working.
First check: the check valve. A failed check valve allows water to drain back down the pipe when the pump shuts off. The pump runs, pushes water up, fills the pipe, and then shuts off. The water drains back down.
Next cycle, it has to fill the entire pipe again before any water reaches the tank. If your pump runs for a long time before producing water, or produces a burst of air followed by water, the check valve is the likely culprit.
Second check: water level in the well. If the water table has dropped below the pump intake, the pump will run but suck air. This is called pumping air as the pump loses its prime (even though submersibles don't technically need priming). Remove the well cap and drop a weighted string down the casing until it hits water.
Compare that depth to the pump's installation depth. If the water level is within 10 feet of the pump intake, low water is your problem.
Third check: broken drop pipe. If the pipe between the pump and the well head has cracked or separated, the pump pushes water up that goes nowhere. It just spills back into the well casing. You'll notice the pump runs normally, pressure builds slowly or not at all, and you might hear water splashing down inside the well casing if you put your ear to the pipe.
This requires pulling the pump to repair.
Branch C: Low Water Pressure or Weak Flow
Water comes out, but it's a sad trickle. The shower barely works. The washing machine takes forever to fill.
First check: the pressure tank air charge. Turn off the pump. Drain the tank completely. Check the air pressure at the Schrader valve on top of the tank using a tire pressure gauge.
The air pressure should be 2 PSI below the pump's cut-in pressure. For a 30/50 system, that's 28 PSI. If the pressure is lower, add air with a compressor.
If it won't hold air, the bladder is ruptured and the tank needs replacement.
Second check: clogged inlet screen. Submersible pumps have a screen at the intake that keeps sand and sediment out. If that screen gets clogged with scale, sand, or mineral deposits, the pump can't pull in enough water. You'll see reduced flow at every faucet.
The fix involves pulling the pump and cleaning or replacing the screen.
Third check: mineral buildup on impellers. In areas with hard water, calcium and lime can build up on the pump impellers over years of use. This reduces pumping efficiency. The pump still runs, but it doesn't move as much water as it should.
This is more common in pumps that are 8 years or older and in regions with hard groundwater. Service data from well companies in the Midwest and Southwest shows this as a leading cause of gradual pressure loss in older systems.
Branch D: Pump Short Cycles (On/Off/On/Off Rapidly)
This is the most common complaint. The pump clicks on, runs for 5 to 15 seconds, clicks off, then clicks back on after a short pause. The pressure gauge needle bounces wildly.
First check: waterlogged pressure tank. This is the cause in the vast majority of cases. Tap the side of the tank near the bottom. A healthy tank sounds hollow halfway up.
A waterlogged tank sounds solid all the way to the top. Check the air pressure as described in Branch C. If the pressure drops immediately when you open the valve, or if water comes out instead of air, the bladder is failed.
Replace the tank.
Second check: failed pressure switch. If the tank is fine but the pump still short cycles, the pressure switch may have lost its calibration or the contacts are sticking. A switch that closes at the wrong pressure will cycle the pump too frequently. Replace it.
Third check: pinched or damaged wire. A short in the drop cable between the well head and the pump can cause the pump to start and stop erratically. This is less common but happens when the cable insulation gets nicked during installation or by rocks shifting in the well casing. This requires pulling the pump to inspect and splice the cable.
Branch E: Breaker Trips or Fuse Blows Repeatedly
You reset the breaker. The pump runs for a few seconds. The breaker trips again.
Or it trips the instant you flip the switch.
First check: control box short (3-wire pumps). Open the control box and look for signs of arcing, burning, or melted wires. A failed relay or capacitor can cause a direct short that trips the breaker immediately. Replace the damaged component or the entire control box.
Second check: motor winding short. Disconnect the pump wires at the control box or well seal. Megger test each wire to ground. If any wire shows continuity to ground (0 ohms or close to it), the motor windings have shorted.
Replacement is required.
Third check: water in the motor housing. Submersible motors are sealed, but seals can fail over time. If water gets inside the motor, it creates a ground fault that will trip any GFCI breaker or standard breaker if the fault is severe enough. Some pumps have a water in oil indicator port on the top of the motor.
If you pull the pump and find milky oil or water, the motor seal is gone.
Branch F: Pump Won't Shut Off
The pump runs and runs. The pressure gauge climbs past the cut-off setting. It keeps climbing until the relief valve blows or you panic and kill the power.
First check: stuck pressure switch contacts. The contacts inside the pressure switch can weld together from arcing over time. When they weld, the switch can't open, and power stays on to the pump. Kill the power, remove the cover, and inspect the contacts.
If they're fused, replace the switch.
Second check: failed control box relay (3-wire pumps). The relay inside the control box is supposed to drop out after the start capacitor disengages. If the relay sticks closed, the start winding stays engaged, which can cause the pump to run continuously and overheat. Replace the relay.
Third check: debris stuck in the pressure switch. Sometimes a piece of sediment or a bug gets inside the pressure switch mechanism and physically blocks it from opening. Blow it out with compressed air or replace the switch.
Step-by-Step: Testing the Most Likely Culprits Before You Pull the Pump
Before you call a service company or start shopping for a new pump, run through these tests in order. Each one eliminates a possible cause and costs nothing except a few minutes of your time.
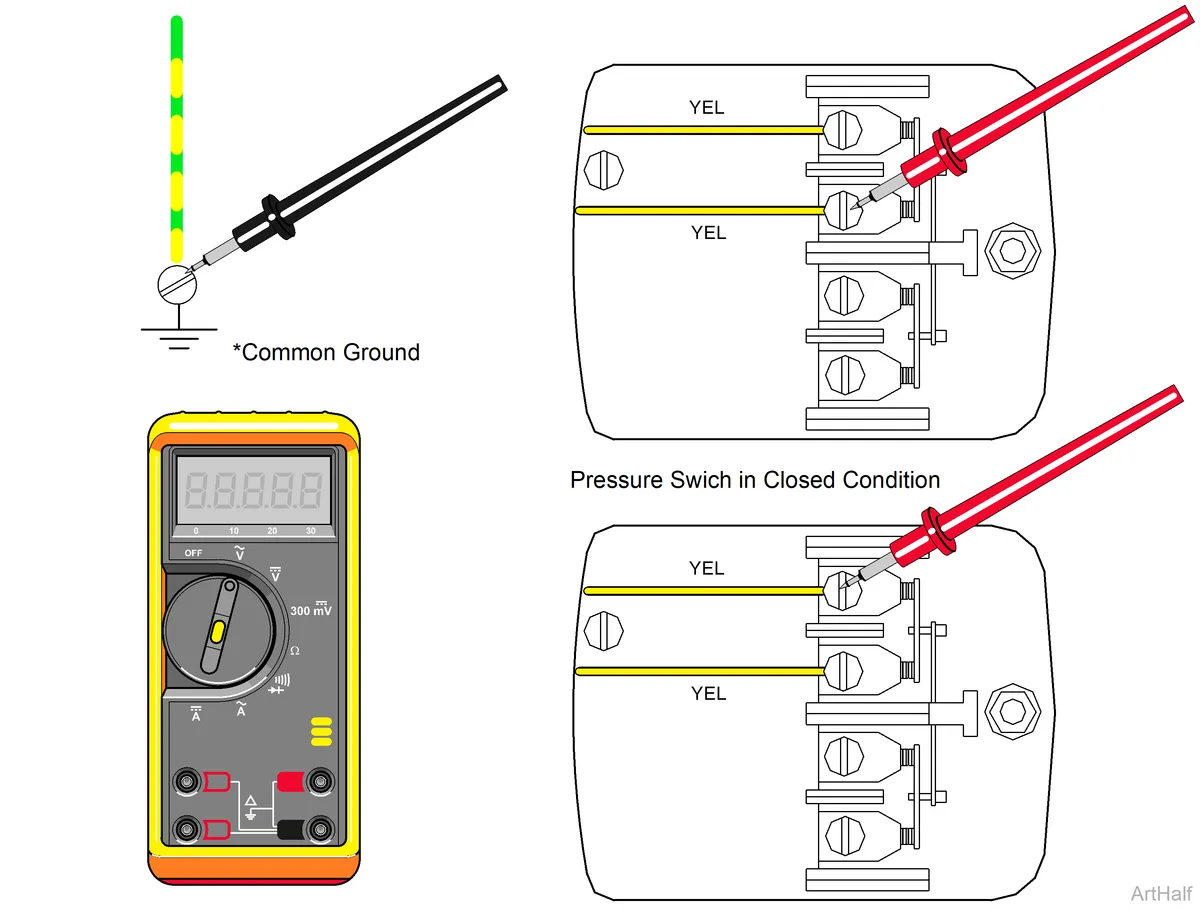
Test 1: Verify Power at the Pressure Switch
Turn off the breaker. Remove the pressure switch cover. Turn the breaker back on.
Use a multimeter set to AC voltage. Test across the two screw terminals where the incoming power lands. You should read 115V or 230V depending on your system.
If you have no voltage, the problem is upstream, a tripped breaker, a blown fuse, or a bad connection in the panel. If you have voltage but the switch contacts are open and the pressure is below the cut-in setting, the switch is bad.
Test 2: Check the Pressure Tank Air Charge
Turn off the pump. Open a faucet until water stops flowing. Locate the Schrader valve on top of the pressure tank.
Check the pressure with a tire gauge. Compare it to your pump's cut-in pressure. For a 30/50 switch, the tank should read 28 PSI.
For 40/60, it should read 38 PSI. If you get water out of the valve instead of air, the bladder is ruptured.
Test 3: Test the Control Box Capacitor
Turn off power. Remove the control box lid. Locate the capacitor.
Discharge it by touching the terminals with an insulated screwdriver. Use a capacitance meter to check the microfarad rating. Compare it to the value printed on the side.
A reading more than 10% off means the capacitor is bad. If you don't have a capacitance meter, look for physical signs: bulging top, leaking fluid, or cracked casing.
Test 4: Megger the Motor Windings
This test requires a megger (insulation resistance tester). Disconnect the pump wires at the control box or well seal. Set the megger to 500V or 1000V.
Test each wire to ground. Any reading below 1 megaohm indicates insulation breakdown. Test between the wires as well.
The resistance between any two phase wires should match the manufacturer spec (typically 2 to 10 ohms). A reading of 0 ohms between phases means a shorted motor.
Test 5: Measure Amp Draw
If the pump runs but performs poorly, clamp an amp meter around each power wire at the control box. Compare the reading to the pump's nameplate rating. A draw that's significantly higher than spec indicates a worn motor or a pump fighting against a restriction.
A draw that's lower than spec indicates a partial winding failure or a pump that's running unloaded (broken pipe or no water).
Common Mistakes That Cost You Time and Money
Mistake | Why It Hurts | What to Do Instead
— | — | —
Pulling the pump without testing first | You waste hours and risk damaging the drop pipe | Run through all surface checks first
Replacing the pump without checking the tank | The new pump will short cycle and burn out faster | Test and replace the tank if needed
Ignoring the control box | A bad capacitor or relay looks like a dead pump | Test the control box components before condemning the motor
Using the wrong pressure switch setting | Mismatched settings cause short cycling or low pressure | Match the switch to your tank and system needs
Skipping the check valve | Water hammer and backflow damage the new pump | Always install a new check valve with a pump replacement
When to Fix It Yourself vs. When to Call a Pro
Not every well pump problem is a DIY job. Some are straightforward. Others require equipment, experience, or insurance that you don't have.
Fix it yourself when:
- The pressure switch needs replacement (simple electrical work)
- The capacitor or relay in the control box is bad (plug-and-play parts)
- The pressure tank bladder is failed (disconnect, drain, swap)
- You find a blown fuse or tripped breaker with an obvious cause
Call a pro when:
- The pump needs to be pulled (depth over 100 feet, heavy pipe, no pump puller)
- The drop cable is damaged below the well seal (requires splicing underground or replacing the run)
- The well water level has dropped significantly (may require well deepening or a new pump installation depth)
- You're unsure about electrical safety or local code requirements
- The motor tests show insulation damage (megger readings under 1 megaohm)
Real-World Numbers: What This Actually Costs
Here's what you can expect to pay based on average service rates across the US as of 2026. Prices vary by region and well depth.
Service | DIY Cost | Professional Cost
— | — | —
Pressure switch replacement | $25 | $150 to $250
Capacitor replacement | $15 | $100 to $200
Pressure tank replacement | $150 to $400 | $400 to $800
Check valve replacement | $20 to $50 | $200 to $400 (includes partial pull)
Control box replacement | $50 to $150 | $200 to $400
Pump replacement (100 ft depth) | $300 to $600 (pump only) | $1,200 to $2,500
Pump replacement (300 ft depth) | $500 to $900 (pump only) | $2,000 to $4,000
The biggest cost variable is labor. Pulling a pump at 300 feet takes a crew of two and specialized equipment. Most pros charge by the foot for the pull plus a flat rate for the pump swap.
Frequently Asked Questions
How do I know if my well pump is bad or the pressure switch?
Turn off the pump and check the pressure gauge. If the pressure is below the cut-in setting but the switch contacts are open, the switch is bad. If the contacts are closed but the pump doesn't run, check voltage at the control box.
Voltage present with no pump operation points to a bad motor or capacitor.
Can a well pump run for years without maintenance?
Submersible pumps are sealed and require no routine maintenance. The components above ground need attention. Check the pressure tank air charge yearly.
Inspect the pressure switch contacts every two years. Keep the control box clean and dry.
Why does my well pump run for a few seconds then stop?
That's short cycling. The most common cause is a waterlogged pressure tank. Check the air charge at the Schrader valve.
If water comes out instead of air, replace the tank. If the tank is fine, check the pressure switch for sticking or misalignment.
How deep can a submersible well pump be installed?
Standard residential submersible pumps work reliably down to about 400 feet. Some heavy-duty models go deeper. Most residential wells fall between 100 and 300 feet.
The pump should always sit at least 10 feet above the bottom of the well to avoid drawing in sediment.
What does a failing well pump sound like?
A healthy pump is quiet. You hear water moving. A failing pump may hum loudly, grind, or make a clicking sound.
If you hear a repetitive clicking from the control box, the relay is likely failing. A grinding sound from the well means the impeller is hitting the pump housing.
Should I replace the control box when I replace the pump?
Yes. The control box is relatively cheap (around $50 to $150). Installing it with a new pump ensures the starting components are matched to the motor.
Old capacitors and relays can fail shortly after a new pump installation, causing the same symptoms all over again.
Your Next Move: The 3-Step Decision Guide
Step 1: Identify your symptom. Match it to the correct branch in the decision map. Run the checks in order.
Stop when you find the problem.
Step 2: Decide if the fix is within your skill and tool range. Pressure switches, capacitors, and tank checks are beginner-friendly. Megger testing and pump pulling are not.
Step 3: If the fix is simple, buy the part and install it. If the pump needs replacement, get three quotes from licensed well contractors. Ask about warranties on both the pump and the labor.
Most well pump problems are not emergencies. They're predictable failures in a system of interconnected parts. Work through the branches.
Test before you pull. And remember that 70% of the time, the pump itself is not the problem.

Similar Posts