Mikuni Diaphragm Carburetor Troubleshooting
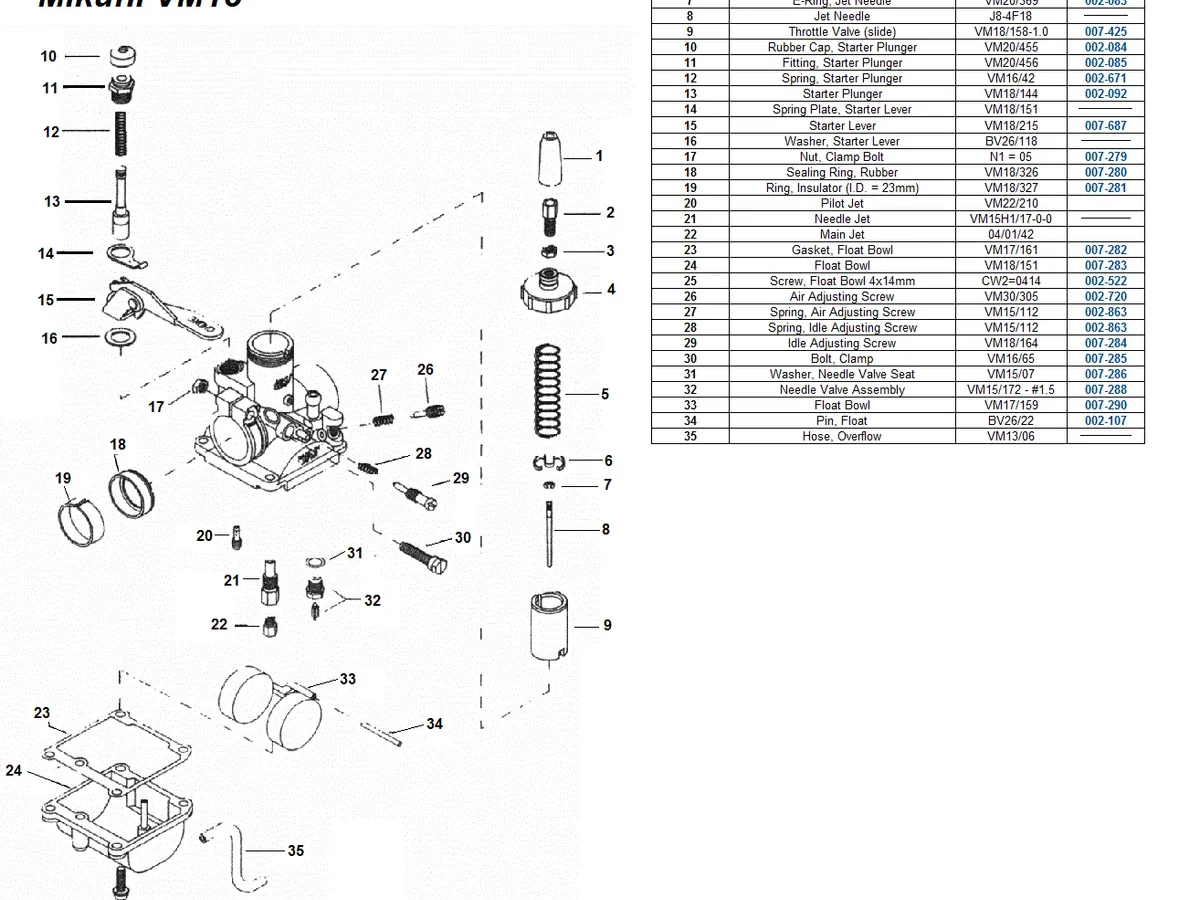
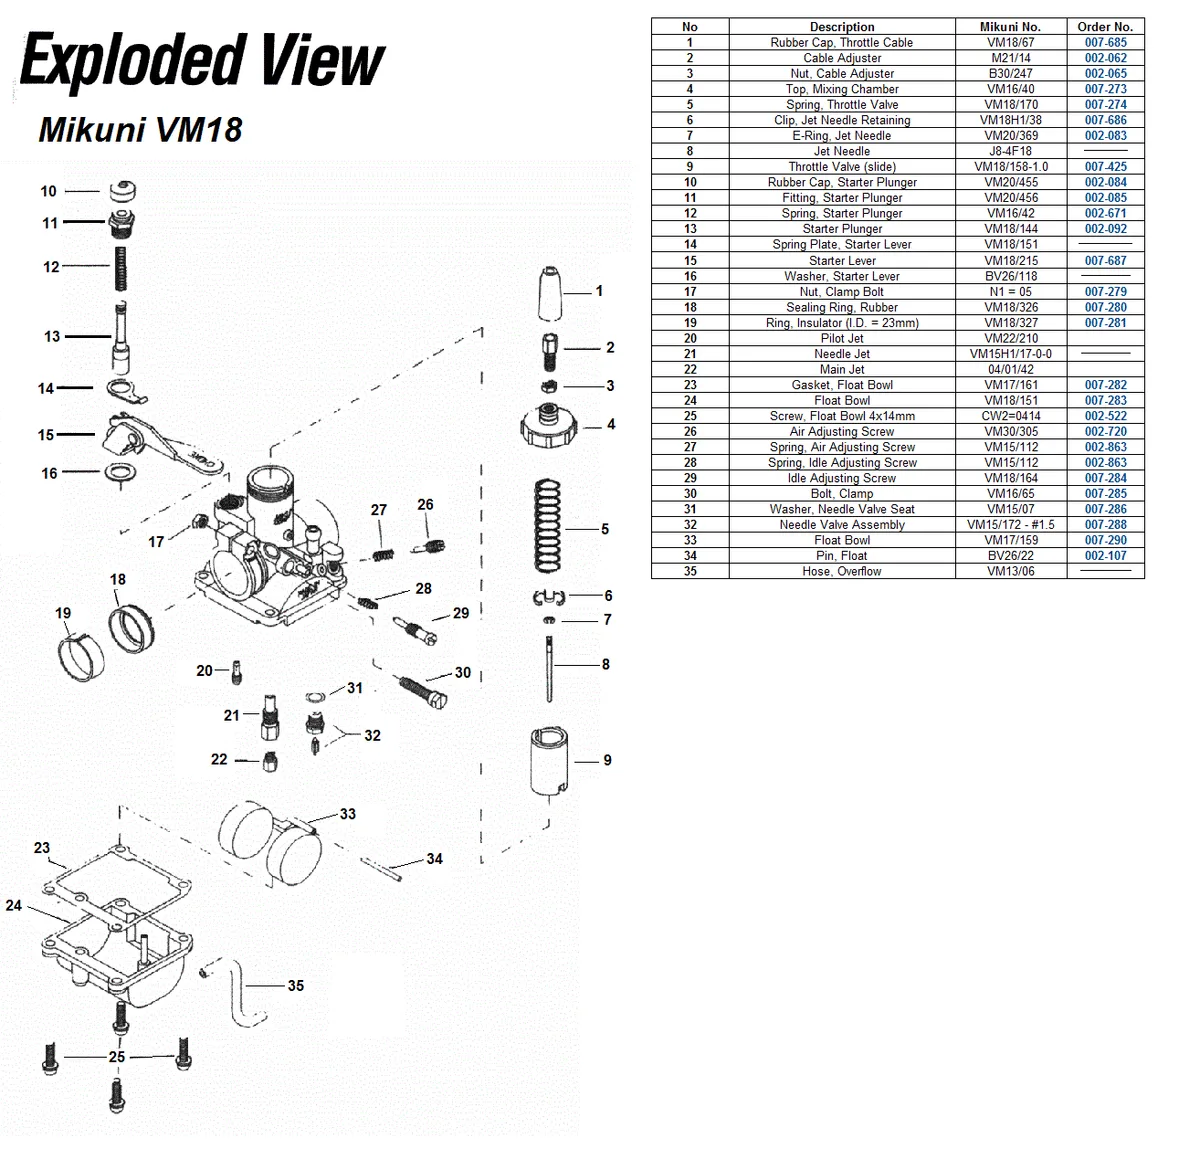
Image source: Bing (Web (fair-use with source credit))
If you're here, there's a decent chance your bike, snowmobile, or ATV is running rough. Maybe it's bogging when you twist the throttle. Maybe it's idling fine but sputtering under load.
Or maybe it's just flat-out refusing to start.
And if it has a Mikuni diaphragm carburetor, like the VM series with the round top or the flat-slide carbs used on everything from dirt bikes to jet skis, the problem often lives inside that little round cover on top.
Let's be honest: diaphragm carbs can be finicky. But they're not mysterious. Most issues fall into a surprisingly small handful of categories, and you can figure out which one you're dealing with in an afternoon with basic hand tools.
No expensive shop time required. No need to be a certified mechanic. Just a methodical approach and a little patience.
This guide is your walkthrough. We'll cover the most common symptoms, the likely culprits, and the step-by-step process to get you back running clean.
First, What Does the Diaphragm Actually Do?
Before we start pulling things apart, it helps to know what you're looking at.
The diaphragm is a thin, rubber disc that sits under the top cap of the carburetor. It's connected to the slide, which is that big moving part that opens and closes to let air into the engine.
Here's the job in simple terms:
- When you open the throttle, air velocity increases in the carburetor venturi.
- That faster air creates a vacuum (a pressure drop).
- That vacuum pulls up on the diaphragm.
- The diaphragm lifts the slide.
- Lifting the slide uncovers the needle jet, allowing fuel to flow.
So the diaphragm isn't just a passive part. It's the brain of the carburetor's main fuel delivery system. If it's torn, stiff, or not seating correctly, the slide won't lift properly.
And when the slide doesn't lift properly, you get a lean condition, a bog, or no power at all.
Simple enough, right? Now let's diagnose your problem.
Step 1: Identify Your Symptom
Different failures show up differently. Here's the quick breakdown.
Symptom: Bogging or Sputtering When You Open the Throttle
This is the most common one. You twist the throttle, and instead of pulling hard, the engine stumbles, sputters, or falls flat on its face. It might clear up if you roll the throttle on slower or if you pull the choke slightly.
This usually points to the diaphragm not lifting the slide fast enough, or not lifting it at all. The engine isn't getting the extra fuel it needs for the sudden air rush.
Symptom: Idles Fine, But WOT (Wide Open Throttle) Falls Flat
If the engine purrs at idle but hits a wall at high RPM, the slide might be reaching its limit. This could be a diaphragm that's not fully lifting, or it could be a needle jet / main jet issue. We'll cover both.
Symptom: Won't Idle or Dies When You Let Off the Throttle
This is less about the diaphragm and more about the pilot circuit. But a stuck or leaking diaphragm (one that's torn and letting air in) can cause an erratic idle because it's sucking unmetered air.
Symptom: Hard Starting, Especially When Cold
The choke circuit is separate from the diaphragm, but a dry, stiff diaphragm can make it harder to build the vacuum needed to pull fuel. If your carb is clean and your jets are right but it just won't fire, it's worth checking the diaphragm's flexibility.
Write down your primary symptom. We'll come back to it after we get the carb on the bench.
Step 2: Before You Tear It Apart—Try This First
I know you want to start wrenching, but do yourself a favor and check the easy stuff first. You'd be surprised how many "carburetor problems" are actually something else entirely.
- Look for air leaks. Spray some carb cleaner or starting fluid around the manifold and intake boot while the engine is running. If the RPM changes, you have an air leak. Fix that before touching the carb.
- Check your fuel flow. Make sure the petcock is flowing freely. A partially clogged fuel line or a faulty vacuum petcock can starve the carb and mimic every single diaphragm symptom you can think of.
- Verify the air filter. A clogged air filter creates an excessively rich condition, which can cause a bog. A torn or poorly sealed filter allows dirt in, which ruins slides and diaphragms. Check this first.
If all that checks out, it's time to open the carb.
Step 3: Bench Work—Getting to the Diaphragm
Take the carb off the bike. This is usually two bolts on the intake manifold and one cable connection on top. Be careful with the throttle cable, you don't want to lose the little fitting on the end.
Once it's on your workbench in good light, you're going to do these steps in order. Don't skip ahead. This order saves you time.
1. Remove the Top Cap
The top cap is the round (or sloped, on flat-slide carbs) aluminum cover with the throttle cable coming out of it. Unscrew it carefully. Inside, you'll see the slide spring.
Take that out.
2. Pull the Slide and Diaphragm Assembly
Gently pull the slide up and out of the carb body. The slide, diaphragm, and the metal sleeve it sits on come out as one unit.
Here's where you stop and look.
The Five-Second Visual Check:
- Look at the rubber diaphragm itself. Is it torn, cracked, or have a pinhole? Look at the edges, especially where it's clamped between the cap and the body.
- Stretch it gently with your fingers. Does it feel soft and pliable, or is it hard and brittle? A stiff diaphragm won't respond to vacuum properly.
- Check the center pin where the diaphragm attaches to the slide. Is it secure? Is the spring retainer in place?
- Look at the slide itself. Is it scratched? Scratches bind the slide in the bore and can cause sticking.
If you see a tear, a hole, or it feels like a piece of hard plastic instead of soft rubber, stop here. You've found your problem.
A diaphragm in that condition cannot be repaired. It must be replaced.
Sometimes you won't see an obvious tear but the engine still behaves like it's lean. There's a trick for that: hold the slide up to a bright light and flex the rubber gently. Micro-cracks will sometimes show up that way.
But honestly, if the rubber feels old, hard, or has any questionable spots, just replace it. They're not expensive, and it saves you from pulling the carb a second time.
Step 4: The Decision Tree—Based on What You Found
Here's where your symptom list comes back into play.
Scenario A: The Diaphragm Looks Bad
Do this: Replace it. Order the correct diaphragm for your exact carburetor model number. Don't guess.
Get the model number stamped on the carb body and find the OEM part or a known-quality aftermarket equivalent.
Before you install the new one, check the bore where the slide rides. Use some carb cleaner and a shop rag to wipe it out. If there's any varnish or gunk, the new slide will stick just like the old one.
Installation tip: When you install the new diaphragm, make sure it seats perfectly into the groove in the carb body before you tighten the top cap. If it's pinched, it won't seal, and you'll have the exact same bogging problem you started with.
After that: Reassemble and test. If the bog is gone, you're done. If it's better but still not perfect, move to Scenario C below.
Scenario B: The Diaphragm Looks Fine, But the Slide Is Sticking
Do this: Look at the slide. Can you slide it up and down the bore easily with your finger? It should glide smoothly with no resistance.
If it's sticky, it's not the diaphragm's fault. It's the slide or the bore.
- Wipe the bore with a clean shop rag soaked in carb cleaner.
- Check the slide for deep scratches. If you can feel them with a fingernail, the slide is worn and needs replacing. Scratched slides act like sandpaper on the bore and cause erratic operation.
- Check the slide needle (the tapered needle sticking out of the bottom of the slide). Is it bent? Roll it across a flat surface. If it's not straight, replace it. A bent needle hangs up in the needle jet and won't let the slide close all the way.
Once the slide moves freely, reassemble without the spring, push the slide up and down a few times to make sure it's smooth. If it's still catching, you may have an issue with the throttle cable routing, it might be pulling at an angle. Make sure the cable is routed smoothly from the twist grip or thumb throttle down to the carb.
Scenario C: Everything Looks Good, But It Still Bogs
This is where the carburetor gets interesting. If the diaphragm, slide, and cable all check out cleanly, the problem is in the fuel metering system. It's either too lean or too rich.
The Lean Bog:
This is the most common after a carb has been sitting with old gas. The passageways get plugged with varnish.
- Check the pilot jet (the small one visible when you remove the bottom float bowl). Clean it with a fine wire or carb cleaner. Don't use a drill bit, you'll enlarge the opening and ruin it.
- Check the main jet (the larger brass piece in the center of the float bowl). Same cleaning method.
- Check the needle jet (the tube the slide needle slides into). This one is often overlooked. If this is gunked up, you'll get a bog at partial throttle that goes away at full throttle. Clean it out thoroughly.
Make sure every single air passage and fuel passage is clear. Hold the carb body up to the light and look through every orifice. If you're not sure what's clogged, the safest bet is to clean everything and blow it all out with compressed air.
The Rich Bog:
If you've cleaned everything and it's still sputtering, check your float level.
- Remove the float bowl. You'll see the brass float.
- Check the height according to your manual. If it's set too high, the fuel level in the bowl is too high, and the engine is getting too much fuel. This can cause a rich bog.
- Check the float needle and seat. Is the needle worn? Is the seat scored? A worn needle won't seal properly, letting fuel overflow into the venturi and causing a rich, wet bog.
The Pop-Off Pressure Test (This Is the Pro Move):
This is one of the best bench tests for a diaphragm carb that you can do without special equipment.
- With the slide and diaphragm assembly still out, find the small spring-loaded check valve on the side of the carb body or inside the vacuum chamber. On most Mikuni VM carbs, there's a small air jet port. You're going to bypass that.
- The proper way to test this is with a pressure gauge, but here's a simpler version: Connect a squeeze bulb from a turkey baster or a small air pump to the vacuum port (the one that goes to the crankcase or the slide chamber).
- Apply light, steady pressure. You should see the slide move up smoothly and hold position when you stop applying pressure.
- If the slide drops immediately, you have an air leak somewhere, usually a bad diaphragm, a poorly seated groove, or a worn slide bore.
If you want a precise number, you can buy a dial indicator and a vacuum pump and test for the manufacturer's spec (usually between 5 and 10 psi depending on the carb). But for most home mechanics, the simple squeeze-bulb test, does it move and does it hold, is enough to point you in the right direction.
Step 5: The Flat-Slide Exception (TM and HSR Series)
If you have a newer flat-slide carb (like the TM series or the HSR used on Harley-Davidsons), the design is slightly different.
The flat-slide uses a more aggressive lift curve. The slide is shorter and wider, and it moves faster.
The troubleshooting is the same, but there's one important difference:
The diaphragm on flat-slide carbs is more sensitive to hardening. Because the slide is physically larger and moves more, a slightly stiff diaphragm causes a noticeable lag. If your flat-slide carb has more than a few years on it and you're experiencing a bog, don't bother with a bench test. Just replace the diaphragm.
Also, flat-slide carbs have a different throttle cable adjuster on top. Make sure you have at least 1mm of free play in the cable before the slide starts to move. If the cable is too tight, it will hold the slide slightly open, which messes with the idle and creates a false lean condition.
Step 6: Reassembly and On-Bike Adjustment
Once you've cleaned, replaced, or fixed the issue, it's time to put it all back together.
Reassembly checklist:
- Slide and diaphragm seated properly into the bore.
- Top cap tightened evenly. Don't crank it down tight, the diaphragm is clamped between two surfaces. Overtightening can distort it.
- Throttle cable routed smoothly with free play at the twist grip.
- No kinks in the cable.
On-bike startup:
Start the engine. Let it warm up.
- Set the idle screw so it idles at the recommended RPM.
- Do the "screwdriver test." On a VM carb, there's an air screw on the left side of the carb (or on the bottom on some models). This is the pilot air screw. With the engine warm and the bike on the stand, turn the screw in until the idle drops, then back it out 1.5 to 2 turns. This gives a baseline mixture.
- If it idles cleanly, do a test ride. Roll the throttle on slowly first. If it's smooth, then try aggressive roll-ons in a safe area.
If it still bogs after all this, go back to the float level. I know I keep mentioning it, but a misadjusted float is the #1 cause of a persistent mid-range bog that resists jetting changes. It's not the jets, it's the fuel height.
Common Mistakes to Avoid
I've seen people chase diaphragm issues for weeks when they're making one of these errors.
1. Using the wrong diaphragm.
Mikuni made dozens of different diaphragm sizes, and they look similar. The part number matters. A diaphragm meant for a 38mm carb won't work correctly in a 40mm carb.
Always cross-reference the exact model number stamped on the carb.
2. Installing the diaphragm dry.
Some people put them in dry. This is a mistake. A tiny bit of silicone grease or rubber-friendly lube on the lip of the diaphragm helps it seat and seal better.
It also prevents it from drying out and cracking in the groove.
3. Overtightening the top cap.
The cap is metal. The body is metal. The diaphragm is rubber.
If you crank the cap down, you'll squash the rubber and pinch it. Hand-tight plus a quarter turn is usually enough.
4. Assuming every bog is fuel.
If you've cleaned the carb and replaced the diaphragm and it still bogs, check your ignition system. Weak spark, a failing coil, or a bad spark plug cap can cause a misfire that feels exactly like a fueling problem. It's easy to get tunnel vision on the carb.
Step back and check for spark.
5. Not adjusting the float after cleaning.
This is a big one. When you clean the float bowl, it's easy to accidentally bend the float tab. Always verify the float height before reassembly.
It takes 30 seconds and saves you a headache.
When to Stop and Call a Pro
Listen, there's a limit. If you've done everything in this guide, checked the air leaks, cleaned the jets, replaced the diaphragm, checked the slide, verified the float height, and confirmed the ignition system is good, and it still runs poorly, it's time to consider something else.
- Worn throttle shaft: If the shaft that the slide rides on (on older designs) is sloppy, it can leak air and cause a lean condition that's impossible to tune out.
- Worn slide bore: This is rare, but it happens on high-mileage bikes. If the bore is ovalized from wear, you're fighting a losing battle. Replacing the carb body might be the only fix.
- Reed valve issues (on 2-strokes): A broken reed pedal can cause a weird intake pulse that messes with the vacuum signal. This can make a good carb act bad.
If you hit this wall, take it to a shop. A professional can do a leak-down test and isolate the problem quickly. Don't throw money at random parts, that's the most expensive way to fix an engine.
The Bottom Line
Diaphragm carburetors aren't rocket science. They're a mechanical vacuum pump. When something isn't sealing or moving smoothly, you get a bog.
When something is clogged, you get a lean condition.
The process is always the same:
- Inspect the diaphragm for tears and stiffness.
- Test the slide movement for free, smooth travel.
- Clean every single fuel and air passage.
- Verify the float height and needle seal.
- Reassemble carefully and adjust the throttle free play.
Follow that order, and you'll fix it. It might take you an hour, or it might take you a weekend if you're unlucky. But you'll get there.
And if you get stuck, take a break. Walk away. Come back to it with fresh eyes.
Most carburetor problems are solved by patience and a clean workbench, not by genius.
You've got this.

Similar Posts