Mirrorless Camera Dark Photos Troubleshooting
You press the shutter button. The viewfinder looked perfectly bright. But the image on the screen is too dark.
That’s the moment you realize something is off, and it’s the heart of mirrorless camera dark photos troubleshooting. Unlike an optical viewfinder, an electronic viewfinder (EVF) can show a boosted preview that doesn’t match the file you capture. That disconnect is why so many mirrorless users end up with consistently underexposed shots.
Per manufacturer documentation from Sony and Canon, nearly every mirrorless camera since 2020 includes an exposure simulation toggle. As of 2026, many users simply don’t know it exists. If it’s off, your EVF shows a brightened artificial preview regardless of your actual settings.
That’s a recipe for frustration. Let’s walk through what’s happening and how to fix it in seconds.
Quick Answer
Dark mirrorless photos usually come from exposure simulation being off. Check your viewfinder’s live preview. If it stays bright while you change aperture, shutter, or ISO, turn exposure simulation on in your menu.
Other common causes include a negative exposure compensation dial, spot metering aimed at a dark area, or an ND filter left on the lens. Every fix takes under 60 seconds once you know where to look.
Why Your Mirrorless Photos Come Out Dark
Most mirrorless owners come from DSLR backgrounds. In a DSLR, the optical viewfinder always shows the scene as your eye sees it. Your exposure settings don’t change the viewfinder brightness.
Mirrorless cameras work differently. They use the image sensor to generate a live feed for the EVF and rear LCD. That feed can either mimic your final exposure (exposure simulation on) or stay artificially bright (exposure simulation off).
When it’s off, you get a pretty preview, but the actual photo can be completely underexposed.
Think of it this way. You’re looking through a window that’s cleaned and lit to look inviting. The room you’re about to photograph is actually dark.
You adjust nothing because it looks fine. Then your shutter speed is too fast, or your aperture is too small, and you capture pure shadow. That’s exactly what happens when exposure simulation is turned off.
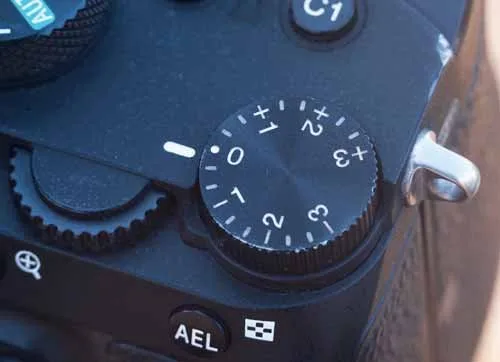
Another major culprit is the exposure compensation dial. These sit right near the shutter button on most mirrorless bodies. It’s very easy to nudge it to -2 or -3 EV without noticing.
Your camera then underexposes every shot until you dial it back to zero. This is especially common if you carry the camera in a bag or pull it out quickly. Systematic user reports confirm that the fix was often just turning that dial to 0.
Metering mode also matters more than many realize. If you’re using spot metering and your focus point lands on a shadow or a dark jacket, the camera tries to make that spot middle gray, turning the rest of the scene into night. Switch to evaluative or matrix metering for general use, and you’ll avoid that automatic underexposure.
For more on general underexposure issues, our detailed guide on fixing dark photos covers the same principles for DSLRs, and many root causes overlap.
The Two-Branch Decision Tree: Sharp but Dark vs. Blurry and Dark
Once you’ve checked exposure simulation and the compensation dial, look at the actual image you saved, not the scene or the preview. Two distinct patterns emerge, and each leads to a different fix.
Branch 1: The photo is dark but sharp
If the image is underexposed but details are crisp, your camera didn’t move and your subject didn’t blur. The problem is in the exposure triangle: aperture too small, ISO too low, or shutter speed too fast for the light. In semi-auto modes like Aperture Priority, the camera may have chosen a safe shutter speed that’s too fast and left ISO low.
In Manual mode, you might have simply set the wrong combination.
Fix: Open your aperture (lower f-number) if you can. Raise ISO. Slow the shutter speed if your subject is still.
Use exposure compensation in semi-auto modes to add positive stops. In Manual mode, adjust each setting until the exposure meter in the viewfinder reads zero.
Branch 2: The photo is dark and blurry
If the image is dark and shows motion blur or camera shake, shutter speed is too slow. Your camera couldn’t hold the light long enough for a clean exposure, and movement smeared the light across the sensor. This is especially common in dim indoor scenes, evening street photography, or events with low lighting.
Fix: Increase ISO first. This lets you use a faster shutter speed. Open the aperture wider if possible.
Use image stabilization if available, either lens or body. If you still can’t get a fast enough shutter, add light with a flash or find a brighter spot. For more on solving underexposure in low light, our troubleshooting guide for underexposed photos gives you the same workflow adapted for DSLRs, but the logic is identical for mirrorless.
Step-by-Step: Diagnose and Fix in 60 Seconds
You don’t need to dig through menus for ten minutes. Follow these steps in order. The moment you hit the fix, stop.
You’ve solved it.
Check exposure simulation. In your camera’s menu, look for “Live View Display” or “Exposure Simulation” depending on your brand. Set it to ON. Your EVF will now darken when you dial in settings that underexpose. If it was off, that was likely your problem. Sony’s official support documentation confirms this is the most common setting overlooked by new mirrorless users.
Look at the exposure compensation dial. Find it on the top plate. Rotate it to 0. If it was on a negative value like -1 or -2, you’ve been systematically underexposing. Reset to zero and test again.
Check metering mode. Set it to evaluative or matrix metering for now. If you were on spot metering, you’ll see an instant improvement.
Inspect your lens. Is the aperture ring set to a high f-number? Is a polarizer or ND filter screwed on? Remove the filter temporarily. If you’re using an adapted lens, clean the electronic contacts. A quick wipe can fix a communication error that pins the aperture closed. That issue is covered in our lens communication error guide.
Check Auto ISO. If you’re in a semi-auto mode, set Auto ISO with a minimum shutter speed around 1/125. Let the camera raise ISO to keep your shutter fast. This is often the best solution for walk-around shooting in variable light.
Take a test shot. Point at a mid-tone subject like a gray wall, green grass, or a person’s face. If it’s still dark, switch to full Manual mode. Set aperture to f/2.8 or f/4, ISO to 800, and shutter to 1/125. Adjust from there.
If none of those produce a normal exposure, the issue may be hardware related. A failing aperture mechanism, a stuck shutter, or a sensor issue could be the cause. In that case, a camera reset can rule out corrupted settings.
If the problem persists after a reset, the camera likely needs service.
Common Mirrorless-Specific Mistakes
Even experienced photographers fall into these traps when switching to mirrorless.
The EVF brightness trick
Your camera EVF has its own brightness setting. If you crank it up for a sunny day, it makes dim exposures look fine in the viewfinder even when exposure simulation is on. The fix is simple: set EVF brightness to automatic or to a neutral middle value.
Then trust the histogram, not your eyes.
Spot meter aimed at the wrong spot
Spot metering measures a tiny area, usually 2 to 4 percent of the frame. If you aim that spot at a dark tree trunk, the camera brightens that tree to middle gray and blows out the sky. The rest of the scene becomes dark by comparison.
Switch to evaluative or center-weighted metering unless you have a specific reason to use spot.
AE-L left locked
Auto Exposure Lock holds the exposure from where you last pressed it. If you locked exposure on a bright sky and recomposed to a darker scene, your camera still exposes for that bright area, making your new shot dark. Check that AE-L is not active.
Most cameras show an asterisk or AE-L icon in the viewfinder when locked.
Silent shutter and banding
Electronic shutter mode, sometimes called silent shutter, can cause horizontal banding under LED or fluorescent lights. Those bands create a dark strip across the image, making parts of the frame look improperly exposed. Switch to mechanical shutter or electronic first curtain in artificial light.
This is also a common issue when recording video with a DSLR, and the same advice applies.
Pro Tips for Tricky Situations
Once you’ve fixed the basics, these techniques help you nail exposure in the hardest lighting conditions.
Use the zebra stripes
Zebra patterns are a visual overlay that show clipped highlights. Set zebra to 95 to 100 percent for bright highlights or to 80 percent for skin tones. When you see zebras on your subject’s face, you’re overexposing.
If you see none at all, you may be underexposing. Dial exposure up until just a few zebra patches appear on the brightest areas, then back off slightly. That’s your ideal exposure.
Keep the live histogram visible
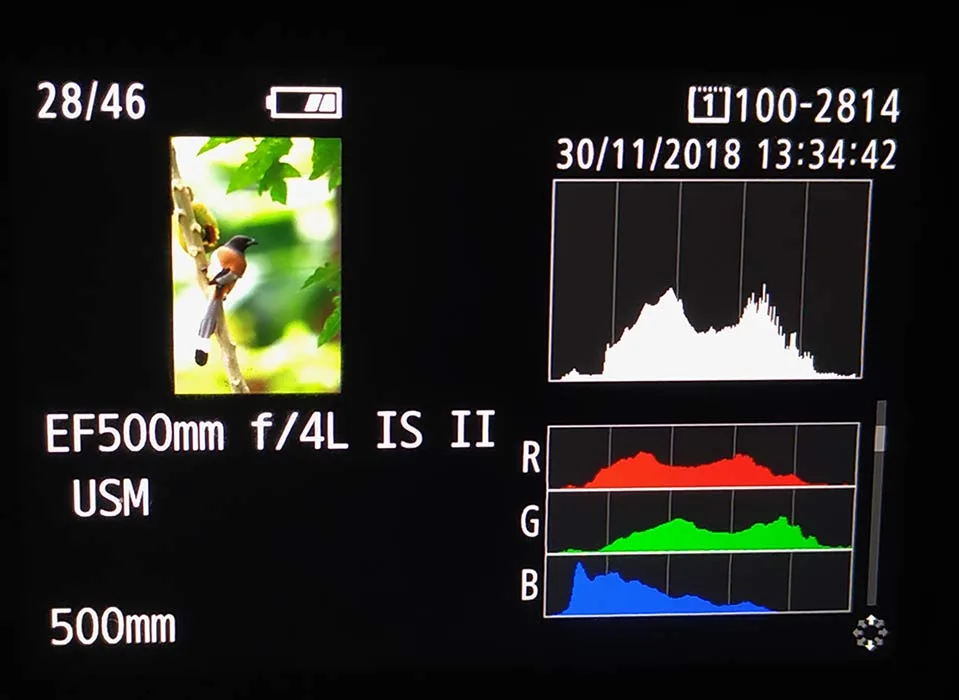
Most mirrorless cameras let you overlay a luminance histogram on the EVF or rear screen. A spike against the left edge means underexposure. A spike against the right means overexposure.
You want the graph spread roughly from mid-tones to the right without touching either edge. This is more reliable than your eye, and it works in every lighting condition. For achieving clean high-ISO performance, the histogram helps you balance noise against exposure without guessing.
Highlight-weighted metering
Sony and some newer Nikon bodies offer highlight-weighted metering. It biases exposure to protect the brightest parts of your scene. This is a lifesaver for weddings with white dresses, concerts with spotlights, and sunsets.
It leaves shadows darker than normal, which is fine since you can lift shadows in post if you shoot Raw. But if you’re troubleshooting a dark photo problem, switch back to evaluative metering when your shadows come out too dark.
Use Auto ISO with a shutter speed floor
This might be the single biggest quality-of-life improvement for mirrorless shooting. In Aperture Priority mode, set Auto ISO with a minimum shutter speed of 1/125 or 1/250. The camera raises ISO as light drops, keeping your shutter fast enough to avoid blur.
This eliminates the most common cause of dark and blurry shots. It also keeps your aperture wide open for a bright exposure. Pair this with body or lens stabilization for even better low-light results.
Exposure bracketing as a safety net
If a scene is especially high contrast and you’re not sure you nailed it, use auto exposure bracketing. Set it to take three frames: one at -1 EV, one at 0, and one at +1 EV. Later, you can pick the best one or blend them in post.
This is especially useful for backlit portraits and stage photography. Use this together with the decision tree from earlier, and you’ll rarely miss a shot to underexposure again.
Frequently Asked Questions
Why does my EVF look bright but the photo is dark?
Your exposure simulation setting is likely off. When it’s disabled, the camera shows you an artificially brightened preview regardless of your actual exposure settings. Turn it on in your camera’s display menu.
Once enabled, the viewfinder will darken to match your exposure, and you’ll see exactly what you’ll capture.
How do I reset everything fast during a shoot?
Use the two-button reset method on most mirrorless bodies. Hold down the Menu and trash/delete buttons for 10 seconds. This resets shooting settings to factory defaults without wiping custom presets or saved profiles.
If that doesn’t work, use the full factory reset option in the setup menu.
Does fixing dark photos in post work?
Yes, but only within limits. You can brighten an underexposed Raw file by 1 to 2 stops with minimal quality loss. Beyond that, you introduce noise and lose shadow detail.
JPG files have even less room. The goal is to get exposure right in camera so you don’t rely on fixing it later.
Why are my photos dark even in manual mode?
You’re likely setting the wrong combination of aperture, shutter speed, and ISO for the available light. Check your exposure meter in the viewfinder. It should read zero for a balanced exposure.
If it’s showing minus values, you’re underexposing. Open your aperture, slow your shutter, or raise ISO until the meter hits zero.
Can a lens adapter cause dark photos?
Yes, especially with adapted manual lenses that use an aperture ring. If the ring is set to f/11 or f/16, very little light reaches the sensor. Electronic adapters can also fail to communicate correct aperture values.
Make sure the aperture ring is set to its lowest f-number or use an adapter with confirmed electronic support for your lens-camera combination.

Similar Posts