Honeywell Doorbell Not Working
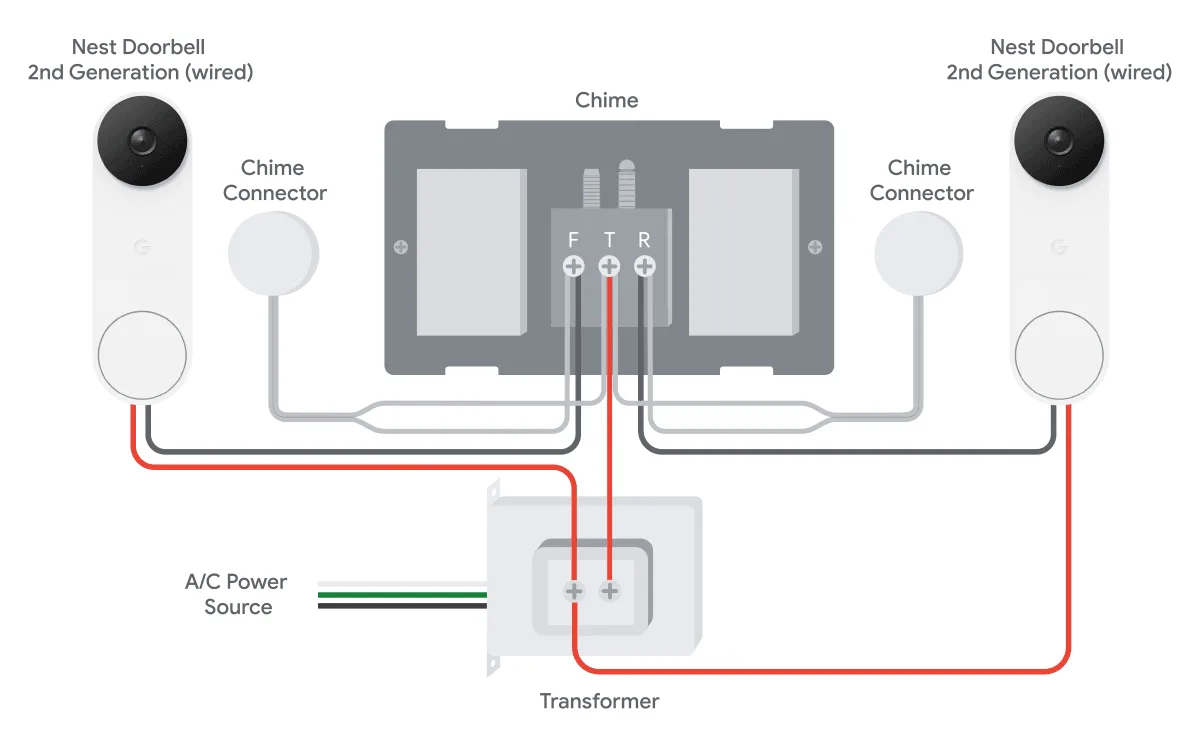
Image source: Bing (Web (fair-use with source credit))
There's something quietly frustrating about a doorbell that just stops working. You press the button, hear nothing, and suddenly you're stuck wondering if the whole system is shot or if it's something silly. Good news: most Honeywell doorbell failures are simple fixes that don't require an electrician or a pricey replacement unit.
Most dead doorbells trace back to one of just a few culprits: a tripped circuit breaker, a worn-out push button, a transformer that's underpowered or failed, or loose wiring at the chime. Honeywell's wired doorbell systems run on low-voltage power, typically 16 volts AC at 10 VA or higher, which means the components are safe to handle once you switch off the breaker. Let's walk through it methodically, symptom by symptom, until you find the fix.
Quick Answer: Why Your Honeywell Doorbell Stopped Working
| Symptom | Most Likely Cause | Fix Difficulty |
|---|---|---|
| Completely dead, no sound | Tripped breaker or dead transformer | Easy to moderate |
| Constant buzzing or humming | Short circuit at button or chime | Moderate |
| Chime works but button dead | Faulty button or corroded contacts | Easy |
| Smart doorbell offline | Wi-Fi issue or power supply problem | Easy |
| Intermittent ringing | Loose wiring or weak transformer | Easy |
The fastest way to narrow things down is to look at what the doorbell is doing, or not doing, and work from there. If the chime unit itself hums or buzzes when you press the button, that tells you power is reaching the system. If nothing at all happens, you're likely dealing with a power supply problem.
If the chime works but the button doesn't trigger it, the button itself is probably the weak link.
First: Figure Out What You're Dealing With
Before you start poking around, you need to know which type of Honeywell doorbell you own. The troubleshooting path changes significantly depending on whether you have a traditional wired model, a battery-powered wireless unit, or a smart video doorbell. Mixing these up leads to wasted time and frustration.
Wired vs. Wireless vs. Smart — The Diagnosis Changes
Honeywell makes three main types of doorbells, and each one fails differently:
- Wired doorbells run off your home's low-voltage transformer. They're the most common and usually the easiest to fix. If they die completely, it's almost always power-related.
- Wireless doorbells run on batteries (typically CR2032 or AAA). When they stop working, the first thing to check is always the battery, then the receiver's power connection.
- Smart video doorbells need both power and a stable Wi-Fi connection. They can work fine mechanically but still appear "broken" if the network drops or the chime adapter fails.
Here's a quick way to tell them apart: look at the button. If there are visible wires running into it, it's wired. If there's no wiring, it's wireless.
If it has a camera lens and a speaker, it's smart.
Three Main Symptoms and What Each One Tells You
Every doorbell failure falls into one of three categories. Identify yours and you've already cut the troubleshooting time in half:
| Symptom | What It Tells You |
|---|---|
| Dead silent, nothing happens | Power isn't reaching the system |
| Buzzing, humming, or clicking | Power is reaching it, but there's a short |
| Chime works sometimes or not at all | Intermittent connection or weak power |
If you're dealing with a wired system and nothing at all happens, power delivery is your prime suspect. If you hear buzzing, you're looking at a short circuit. If things work intermittently, you've likely got a loose wire or a failing transformer that can't sustain voltage under load.
Start with the dead silent scenario below, since it's the most common across all models.
Symptom 1: Doorbell Is Completely Dead (No Sound, No Light)
This is the most common complaint. You press the button, and absolutely nothing happens. No chime, no buzz, no flicker of a light on a smart model.
When that's the case, power delivery is your prime suspect, and there's a clear order of operations to follow.
Check the Circuit Breaker First
It sounds almost too simple, but you'd be surprised. Doorbells are usually wired into a general lighting or outlet circuit, and when that breaker trips, your doorbell dies right along with everything else on that circuit.
Go to your electrical panel and look for a breaker that's in the "off" position or sitting somewhere between on and off. Flip it fully to off, then fully back to on. Then test the doorbell.
Sometimes a breaker will trip without any obvious sign, especially if it's an older panel.
If the breaker looks fine, move on to the transformer. That's where the problem usually hides.
Test the Transformer with a Multimeter
The transformer is the small box that steps your home's 120-volt power down to the 16-volt (or sometimes 24-volt) signal your doorbell uses. It's typically mounted near your electrical panel, inside the chime unit, or in an attic or crawlspace near the chime.
Image:
Image source: Bing (Web (fair-use with source credit))
Here's how to test it safely:
- Turn off the breaker that feeds the doorbell circuit.
- Find the transformer and remove its cover if it has one.
- Turn the breaker back on so the transformer is live.
- Set your multimeter to AC voltage, around the 50-volt range.
- Touch the probes to the two low-voltage screw terminals on the transformer.
- Read the display. A healthy Honeywell doorbell transformer should read between 16 and 24 volts AC.
If you're getting zero voltage, the transformer is dead and needs replacing. If you're getting voltage but it's below 14 volts, the transformer is weak. That's often enough to light up the chime but not enough to activate the doorbell mechanism properly.
A replacement transformer is around $15 to $25 at any hardware store and takes about 20 minutes to swap.
| Multimeter Reading | Diagnosis |
|---|---|
| 16–24 VAC | Transformer is healthy |
| 10–14 VAC | Weak, may need replacement |
| 0 VAC | Dead transformer, replace it |
Inspect the Wiring at the Chime Unit
If the transformer checks out and you're still getting nothing, the problem might be in the wiring between the transformer, the chime, and the button. Wires can work themselves loose over time, especially if they're aluminum or if the chime unit vibrates when it rings.
Remove the chime cover and inspect the screw terminals. Look for wires that are loose, corroded, or touching each other. A loose connection here can interrupt the circuit even when voltage is present upstream.
Tighten any connection that feels loose. If you see corrosion, cut back the wire to expose fresh copper, strip it, and reconnect it. Vibration from normal use is the most common culprit, so if the wires feel snug and the voltage is good but the doorbell still doesn't ring, move on to the button.
Symptom 2: Doorbell Buzzes or Hums Constantly
A doorbell that buzzes or hums when you press the button is actually a great sign. It means power is reaching the system. The problem is that power is going somewhere it shouldn't, creating a short that causes the chime to vibrate instead of ring properly.
Why Buzzing Happens — Two Likely Causes
The buzzing sound you hear is the chime's solenoid oscillating rapidly instead of striking the tone bar once. That happens for one of two reasons:
- The push button is shorting out. Moisture can get inside the button housing and bridge the contacts, causing the circuit to stay closed even when you're not pressing it.
- The chime unit's wiring is reversed or crossed. A miswired chime can keep the solenoid energized, which produces that telltale hum.
You can test which one it is by disconnecting the button wires from the chime unit. If the buzzing stops, the button is the problem. If it continues, the wiring or chime itself is at fault.
The Chime Short Circuit Fix
If disconnecting the button stops the buzzing, you know the button has failed internally. Remove the button from the wall, disconnect the two wires, and test the circuit with your multimeter set to continuity mode. Press the button.
If you get continuity when you're not pressing it, or no continuity when you do press it, the button is bad.
Replacing a doorbell button is a five-minute job:
- Turn off the breaker at the panel.
- Remove the two screws holding the button to the wall.
- Disconnect the two wires from the button terminals.
- Connect the new button the same way. It doesn't matter which wire goes to which terminal for a standard mechanical button.
- Screw the new button to the wall and turn the breaker back on.
When the Transformer Is the Real Problem
There's a less obvious cause of buzzing that catches people off guard. If the transformer is oversized for the chime unit, it can deliver too much current and cause the solenoid to buzz continuously without ever striking the tone bar. This is more common after someone upgrades to a smart doorbell and leaves the original transformer in place.
Check the transformer's VA rating against your chime's requirements. Honeywell mechanical chimes typically need a transformer rated between 10 and 16 VA. If yours is rated higher, the chime may buzz.
The fix is either a lower-rated transformer or a chime that matches the transformer's output.
Symptom 3: Chime Works But Button Doesn't Ring
This one's a little more straightforward. The chime itself works fine. Press the button, nothing.
That tells you the power supply is healthy and the chime mechanism is functional. The breakdown is happening somewhere between the button and the chime.
Testing the Push Button
The push button is a simple momentary switch. When you press it, it connects two wires and completes the circuit. When you release it, it breaks the circuit.
Over time, these buttons fail, corrode, or accumulate dirt that prevents them from making contact.
Image:
Image source: Bing (Web (fair-use with source credit))
Here's how to test it:
- Turn off the breaker to the doorbell circuit.
- Remove the button from the wall with a screwdriver.
- Disconnect the two wires from the button terminals.
- Set your multimeter to continuity mode or resistance mode.
- Touch the probes to the two button terminals.
- Press the button. You should see continuity (or near-zero resistance) when pressed, and no continuity when released.
If the button fails either test, replace it. If the button passes, the problem is in the wiring between the button and the chime.
Cleaning Corroded Contacts
Often the button isn't completely dead, just dirty or corroded. Moisture finds its way into the housing over time, especially on exterior doors that face wind and rain. Corrosion on the contacts raises resistance enough that the circuit can't carry the power needed to trip the chime.
Use a small piece of fine sandpaper (220-grit or finer) to gently clean the metal contacts on both the button and the wire ends. If you see green or white crusty buildup, that's oxidation, and it needs to come off. Wipe everything dry after cleaning, then reconnect.
Replacing the Button the Right Way
If cleaning doesn't help, replacement is the move. Most Honeywell wired doorbell buttons are standard two-wire designs, which means any generic doorbell button from a hardware store will work. Match the voltage rating to your system (16 volts is standard for most Honeywell setups).
A couple of quick tips during installation:
- Strip about 1/4 inch of insulation off each wire before connecting.
- Use the screws or push terminals provided with the new button.
- Seal the edges with a tiny bead of silicone caulk if the button is outdoors and exposed to weather.
That last tip saves a lot of headaches later. Water ingress is the number one killer of outdoor doorbell buttons.
Symptom 4: Smart Doorbell Offline or Not Connecting
Smart Honeywell doorbells add a whole layer of complexity. They still need power to operate, but they also need a stable Wi-Fi connection and a functioning chime adapter. When one of those three things breaks down, you might think the doorbell is dead when it's actually just disconnected.
Power Check for Smart Models
The first step is confirming the doorbell is actually receiving power. On most Honeywell smart doorbells, you can check this in the app. Look for a battery percentage or a "power source" indicator.
If the doorbell is running on battery backup and it's drained below 20 percent, it will stop connecting to Wi-Fi before it fully dies.
If the status shows it's hardwired but not charging, you've got a transformer issue. Smart doorbells actually need more power than traditional units, typically a 16-volt transformer rated at 16 to 24 VA. Many older home transformers only deliver 10 VA, which is fine for a mechanical chime but not enough for a smart doorbell with a camera and two-way audio.
Check your existing transformer's rating using the same multimeter method from earlier. If it reads below 16 volts under load, or if the VA rating is stamped as 10 VA, you'll need an upgrade. A replacement transformer costs $15 to $30 and takes about 20 minutes to install.
Replacing a transformer is a straightforward DIY job, but if you're uncomfortable working near your electrical panel, an electrician can handle it in about 30 minutes.
Wi-Fi Reset and Re-pairing Steps
If power checks out, the next suspect is the network connection. Smart doorbells are notorious for dropping off Wi-Fi, especially if they're mounted on a metal door frame or the router is far away.
Start with the simplest fix: power cycle the doorbell. Turn off the breaker for 30 seconds, then turn it back on. This forces the doorbell to reinitialize its network stack.
If that doesn't work, perform a factory reset:
- Locate the reset button on the back or bottom of the doorbell. It's usually a small pinhole.
- Press and hold it for 10 to 15 seconds until the LED flashes.
- Remove the doorbell from the app in your Honeywell Home app.
- Re-pair it by following the app's setup wizard.
Wi-Fi dead zones are a common root cause. If your doorbell is far from your router or behind a thick exterior wall, a Wi-Fi extender or mesh node near the door often clears the problem up.
Chime Bypass Resistor Kits — What They Do and When You Need One
Here's a quirk that confuses a lot of people. When you install a smart doorbell on a system with a mechanical chime, the smart doorbell needs a constant flow of power to operate. But the mechanical chime isn't designed to handle continuous power.
It expects a momentary pulse only when the button is pressed.
To solve this, Honeywell includes a small bypass resistor in the box, or you can buy one separately. This little piece connects across the chime terminals and keeps the power flowing without making the chime buzz.
If you skipped installing the bypass resistor, your smart doorbell might not get enough power to stay online. Worse, the chime can buzz or hum constantly. Check your original installation instructions.
If the resistor is missing, install it across the "Front" and "Trans" terminals on the chime unit.
| Component | Role | Typical Cost |
|---|---|---|
| Bypass resistor | Maintains power flow to smart doorbell | $10 |
| Chime adapter | Converts wiring for smart doorbells | $15–$25 |
| Transformer upgrade | Provides adequate voltage and VA rating | $15–$30 |
Final Check: When to Call an Electrician
Not every doorbell issue is a DIY fix. If you've worked through all the steps above and the doorbell still isn't working, it's worth calling a licensed electrician. Here are the situations where professional help makes sense:
- You're not comfortable working near your electrical panel. That's completely fair. Doorbell circuits are low-voltage after the transformer, but the transformer itself is connected directly to your home's 120-volt system.
- The wiring in your walls appears damaged or frayed. If you see burnt or melted insulation, stop immediately and call a professional.
- You've tested everything and the doorbell still doesn't work. A pro can trace the entire circuit from panel to chime and identify issues that are hard to spot without specialized equipment.
An electrician typically charges $100 to $150 per hour, and most doorbell diagnostics take under an hour.
Common Questions About Honeywell Doorbells
Why does my Honeywell doorbell ring on its own?
A doorbell that rings randomly with nobody at the door usually has a short in the button wiring. Moisture inside the button housing is the most common cause. Replace the button and seal it with silicone caulk.
If the problem persists, check for loose or touching wires at the chime unit.
Can a dead doorbell drain my electric bill?
No. A doorbell circuit draws a negligible amount of power, usually less than 5 watts even when active. A dead doorbell won't noticeably affect your electric bill.
The bigger issue is convenience and security, not cost.
How long do Honeywell doorbells typically last?
A well-maintained wired doorbell can last 10 to 15 years or longer. The push button is usually the first component to fail, especially if it's exposed to weather. Smart doorbells have shorter lifespans, typically 5 to 7 years, because they contain electronics that wear out faster than simple mechanical switches.
Can I replace a Honeywell doorbell with a different brand?
Yes. Doorbell wiring is standardized across brands. Any wired doorbell that runs on 16 volts AC will work with your existing wiring.
Just match the transformer's voltage and VA rating to the new doorbell's requirements. If you're switching to a smart doorbell, check whether your transformer has enough power output, as covered earlier.
Final Thoughts: Diagnose Before You Replace
Nine out of ten Honeywell doorbell problems come down to one of four things: a tripped breaker, a dead transformer, a faulty button, or loose wiring. All four are quick fixes with basic tools and a multimeter.
The key is to diagnose before you replace. Test the breaker first, then the transformer, then the button, and only then consider swapping out major components. Following the symptom-based checklist above prevents you from wasting money on parts you don't need.
In most cases, you'll be back in business in under 30 minutes with a $10 part and a screwdriver.

Similar Posts