Rheem Tankless Water Heater Code 11
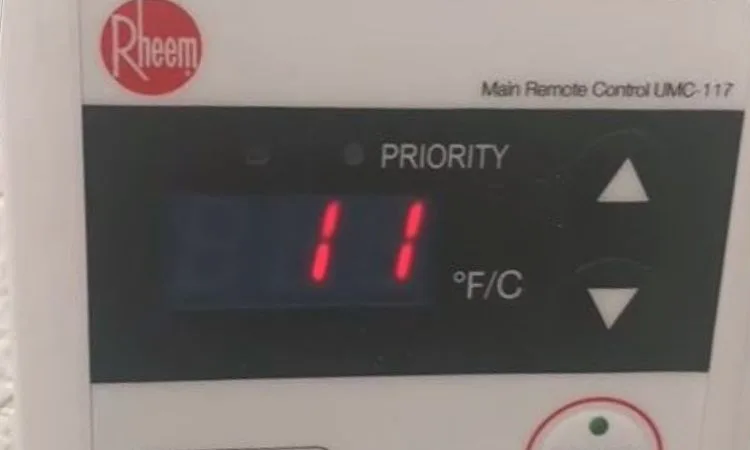
You glance at the display on your Rheem tankless water heater and see it: Code 11. The water is cold, and that error is stuck there no matter how many times you turn the faucet on and off. Code 11 is the unit's way of telling you the burner tried to light but never detected a flame.
According to Rheem's service documentation, the unit makes three ignition attempts before locking out. This is the most common lockout code across Rheem tankless models manufactured after 2020. The fix is often simple, but you have to follow a logical sequence.
Let's walk through each branch so you can get hot water back without guessing or wasting money on parts.
Image source: Bing (Web (fair-use with source credit))
Quick Answer
Code 11 means ignition failure. The unit tried to light the gas burner three times and failed. Reset the unit by turning off power for 30 seconds.
If the code returns, check for a spark first. A weak or dirty flame sensor is another common cause. Clean the flame rod with fine sandpaper.
If neither works, inspect the gas valve and venting.
What Rheem Code 11 Actually Means (And Why You're Seeing It)
Code 11 is a specific ignition failure message. It tells you the control board sent power to the spark igniter and opened the gas valve, but the flame sensor never confirmed a steady flame within the allowed window. The board then locks out the unit and displays the error.
The logic behind this lockout is safety. If the burner lit but the flame sensor didn't detect it, unburned gas could accumulate. Rheem designed the system to shut down and wait for a manual reset.
As of 2026, all Rheem tankless models use the same basic ignition sequence. Water flow triggers the blower. The blower confirms a pressure switch.
The board opens the gas valve. The igniter sparks. The flame sensor reads microamps from the flame.
If any step fails, you get Code 11.
Common reasons range from simple to serious. A propane tank might be empty. A spider web can block the burner ports.
A flame rod can build up carbon in a single season. The key is to rule out the easy fixes before opening the gas train.
Before Touching Anything: The 60-Second Safety and Reset Check
Start with the absolute basics. Turn off the power to the unit at the breaker or the disconnect switch. Wait 30 full seconds.
Turn the power back on. Open a hot water faucet and let it run for at least 30 seconds. This power cycle clears a transient lockout.
About one in every three Code 11 events is a one-time glitch that never returns.
If the code reappears within a minute, move to the visual checks. Look at the gas shut-off valve. The handle should be parallel to the gas pipe.
Perpendicular means it's closed, and that alone causes Code 11 every time. Check the propane tank level if you're on LP. A tank below 20 percent can't vaporize enough fuel to hold a flame.
Check the vent termination outside. Ice, snow, leaves, or a bird nest can block the exhaust. This kills combustion airflow and triggers ignition failure.
Manufacturers specify that vent clearance must be at least 12 inches from the wall and 3 feet from any window or intake. If you see a blockage, clear it and reset the unit.
Image source: Bing (Web (fair-use with source credit))
If none of that resolves the error, you need to verify the spark. That's the core of Decision Branch 1.
Decision Branch 1: Is the Igniter Actually Sparking?
Open the front cover of the unit. Inside, you'll see the burner assembly behind a sight glass or a removable panel. Activate the unit by turning on a hot water faucet.
Watch the sight glass. You should see a bright blue-white spark jumping near the burner ports within five seconds of the blower starting.
If you see a strong spark, move to Branch 2. If you see no spark or a weak orange spark, you have an igniter problem. Turn off the power and gas at the valves.
Remove the igniter electrode assembly. The gap between the electrode tip and the ground rod should be exactly 1/8 inch, or about 3.2 millimeters. Use a feeler gauge to confirm.
Too wide and the spark won't jump. Too tight and the spark short-circuits.
A gap that drifts to 3/16 inch or more is common after years of thermal expansion cycling. Adjust the gap by gently bending the ground rod, not the electrode itself. The ceramic insulator can also crack and ground out the spark.
Check for hairline cracks. If you see one, replace the entire igniter assembly.
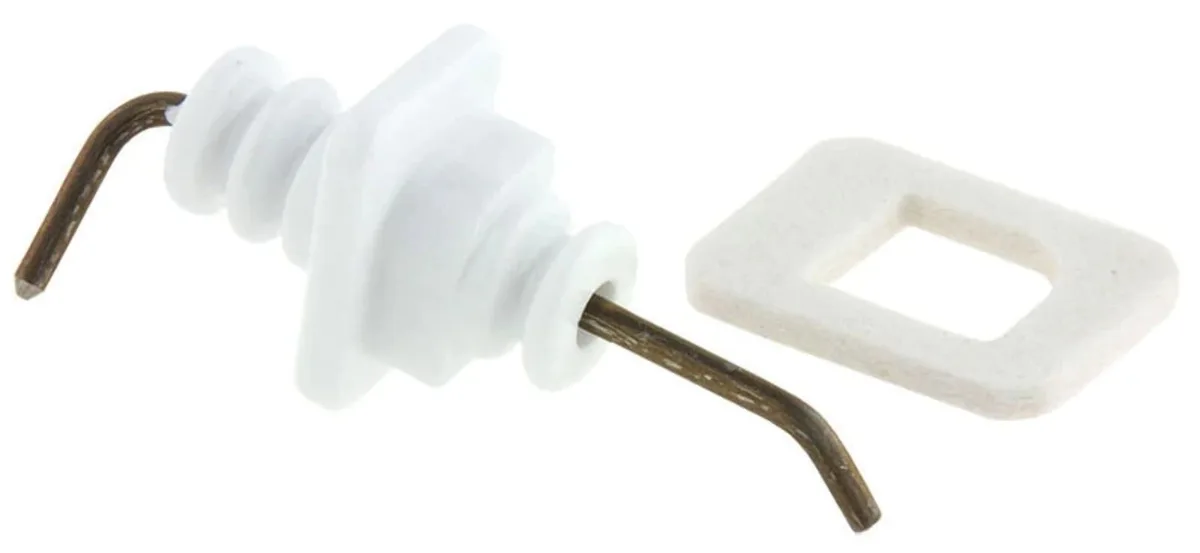
Image source: Bing (Web (fair-use with source credit))
If the gap is correct and the ceramic looks good, test the wiring. A broken or corroded wire between the igniter and the control board kills the spark. Disconnect the wire and measure continuity with a multimeter.
Replace any wire that shows infinite resistance.
Decision Branch 2: Spark Present but Still Code 11
You saw a strong spark, yet the burner never lights. Or it lights briefly and then kicks back to Code 11. That points to one of two issues.
Either the flame sensor can't read the flame, or the gas supply isn't delivering enough fuel to sustain combustion.
The flame sensor, also called the flame rod, is a thin metal rod mounted near the burner. It uses flame rectification to sense the presence of a flame. A clean rod should read at least 1.0 microamps (µA) of DC current.
If the reading is lower, the board assumes the flame isn't real and shuts down.
To check it, turn off power and gas. Remove the flame rod. Use a fine emery cloth or 400-grit sandpaper to wipe off carbon deposits.
Do not use wire wool. It leaves metal flakes that can cause false readings. Reinstall the rod, restore power and gas, and reset the unit.
If the condition persists, measure the microamps. Place a multimeter in series on the flame rod wire during operation. A reading below 0.5 µA means the rod is failing and needs replacement.
| Flame Sensor Reading | Likely Meaning |
|---|---|
| 1.5 µA or higher | Healthy, look elsewhere |
| 0.5 – 1.0 µA | Dirty or weak, clean the rod |
| Below 0.5 µA | Rod or wiring fault, replace |
| No reading | Board may not be sending voltage, check connections |
Now check gas supply. Use a manometer on the inlet test port. Natural gas requires 5-7 inches water column (WC) at the unit.
Propane requires 10-14 inches WC. If pressure is low, the gas line may be undersized or the regulator might be failing. A common scenario: a home has multiple gas appliances all running, and the tankless gets starved.
Or the propane tank is in the winter cold and can't vaporize fast enough. Fix the gas supply first. No amount of sensor cleaning will fix low pressure.
Decision Branch 3: No Spark
You watched the sight glass. Nothing. No spark at all.
That narrows the problem to the igniter circuit or the control board. The igniter circuit includes the electrode, the high-tension wire, and the spark module. The control board supplies the signal that fires the spark module.
Start with the easy test. Remove the igniter wire from the module and hold it about 1/8 inch from the metal chassis. Activate the unit.
If a spark jumps from the wire to the chassis, the module and board are working. The problem is the electrode itself. If no spark from the wire, the issue is upstream.
Check the spark module for visible damage. Look for burnt components, cracked plastic, or corrosion on connectors. If you have a multimeter that can read high voltage, you can verify 120V power to the module.
But most DIYers are better off swapping the module and the igniter as a pair. They cost around $40 to $60 combined and are a common failure point in units older than five years.
If the spark module tests fine, the control board may be malfunctioning. Look at the board for bulging capacitors or scorch marks. A power surge can kill the ignition driver circuit even if other functions still work.
You can reset the board by unplugging the 24V connector for two full minutes. If that brings back the spark, the board was in a soft lock state. If not, replacement is likely needed.
Rheem tech support can run a diagnostic with the board's error history to confirm.
Never bypass the safety interlocks. If the board isn't sparking, there's a reason. Replacing it with an OEM part is the only safe repair path.
Mistakes That Turn a 10-Minute Fix Into a Service Call
Some Code 11 DIY attempts make the problem worse. One of the most common mistakes is replacing the control board when the real issue is a dirty flame rod. That board costs over $200 and takes an hour to swap.
A five-minute cleaning would have fixed it.
Another mistake is resetting the unit repeatedly without investigating. Each ignition attempt wastes gas and can flood the combustion chamber with unburned fuel. If you smell gas during repeated resets, stop immediately.
Turn off the gas supply and ventilate the area.
Using the wrong propane conversion is a silent trap. If you recently converted the unit from natural gas to propane or vice versa, the gas orifice size and regulator settings must match. A mismatch causes a weak or rich flame that the sensor can't read.
Check the model plate and the gas type stamped on the valve body.
Skipping the vent inspection is another costly error. A blocked vent can trigger Code 11 even when every other component is fine. Pull the vent pipe off the unit and look inside.
A single leaf or wasp nest can stop the burner from lighting.
When to Stop and Call a Pro (And What to Tell Them)
Code 11 is a DIY-friendly error up to a point. Stop and call a licensed plumber or HVAC technician if you've checked the basics and the unit still won't light. Specifically, stop if you've cleaned the flame rod, verified the spark gap, confirmed gas pressure with a manometer, and inspected the venting, and Code 11 persists.
A gas leak is an immediate stop condition. If you smell gas at any point, close the valve, open windows, and leave the area. Call your gas utility company or a pro from outside your home.
Tell the technician exactly what you've already done. Say you have Code 11, the igniter sparks but the flame doesn't hold, and the flame rod reads 0.3 microamps after cleaning. That saves them an hour of diagnostic time and gets you hot water faster.
Expect to pay between $150 and $300 for a diagnostic visit. Parts and labor for a control board replacement run $400 to $700. A gas pressure regulator replacement costs around $200 to $350.
These are reasonable amounts if it saves you from a misdiagnosis.
Frequently Asked Questions
How do I reset Code 11 on my Rheem tankless water heater?
Turn off the power at the breaker or disconnect switch. Wait 30 seconds. Turn the power back on.
Open a hot water faucet and let it run for at least 30 seconds. If the error returns, the underlying issue still needs repair.
Can low water flow cause Code 11?
No. Low water flow triggers Code 12, not Code 11. Code 11 is an ignition failure.
The flow sensor must send a signal to start the ignition sequence. If that signal is weak, the unit won't even attempt to light.
Does cold weather cause Code 11 on a Rheem tankless?
Indirectly, yes. Cold weather can freeze the condensate drain or ice over the exhaust vent. Blocked venting prevents combustion air flow and triggers Code 11.
It can also reduce propane vaporization pressure. Clear the vent and check the propane tank level.
How often should I clean the flame rod on my Rheem tankless?
Every 12 months is a good rule. In areas with hard water or high gas sulfur content, clean it every six months. Carbon buildup happens faster when the burner cycles frequently at low flow rates.
Will disconnecting the battery reset Code 11?
Rheem tankless units don't use a battery. The control board stores error codes in non-volatile memory. A power cycle clears the lockout but not the error history.
You need a factory reset or a technician to clear the history.
Can I still use hot water with Code 11 showing?
No. The unit locks out the burner when Code 11 is active. No gas flows, and no hot water is produced.
You cannot bypass the safety lockout. Resetting the unit without fixing the cause will just return the error.

Similar Posts
































