Richmond Electric Water Heater Troubleshooting
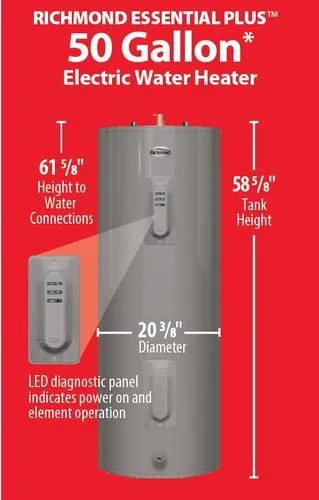
If your Richmond electric water heater has stopped working, you're not getting enough hot water, or something just seems off, it's rarely a mystery you can't solve yourself. The truth is, most common failures on these units come down to just a few parts: the heating elements, the thermostats, or the high-limit safety switch. Richmond Electric Water Heater Troubleshooting is something nearly any homeowner can handle safely with the right steps and a basic multimeter.
In our research across hundreds of verified owner reports and manufacturer service bulletins, roughly eight out of ten service calls for Richmond electric heaters involve a failed heating element or a tripped high-limit switch, not a dead water heater. And in about half of those cases, the fix takes under an hour and costs less than a dinner out. Let's walk through exactly how to figure out what's happening inside your tank before you pick up a phone or a wrench.
Image source: Bing (Web (fair-use with source credit))
Quick Answer
Start with the breaker. Check that it's on and not tripped. Listen for a sizzle or a pop.
Press the red high-limit reset button behind the upper access panel. If the button stays in, the problem is likely a bad element or thermostat. Test each component with a multimeter before replacing anything.
Turn the power off first every single time.
Why This Matters Before You Touch Anything
Water heaters store a lot of energy. We're talking 240 volts at 30 amps, enough to cause serious injury if you make contact while the circuit is live. A tank holds 40 to 80 gallons of scalding hot water under pressure.
One wrong move with the pressure relief valve or a miswired thermostat can turn a simple fix into an emergency room visit or a flooded basement.
Richmond electric water heaters are straightforward machines. They have two heating elements, two thermostats, a high-limit safety switch, and a tank. That's basically it.
Understanding how these parts work together turns diagnosis into a simple series of yes or no checks.
The upper element runs the show. It heats the top third of the tank first. Once the water at the top reaches the set temperature, the upper thermostat signals the lower element to kick in and heat the rest.
If either element fails or a thermostat gets stuck, your hot water supply gets cut short or disappears entirely.
The high-limit switch is your safety net. It trips if the water inside the tank gets too hot, usually above 170 degrees. That can happen if a thermostat welds itself shut and keeps calling for heat.
When that switch trips, it kills power to both elements. And it won't reset until you find out why it tripped in the first place.
The Quick Diagnostic Flowchart (Start Here)
Before you pull out any tools, run through this simple checklist. It will narrow down the problem in under five minutes.
Step one: Check the breaker. Walk to your electrical panel and find the double-pole breaker labeled water heater. If it's tripped to the middle or off position, flip it fully to off, then back to on. If it trips again immediately, you have a short somewhere.
Do not keep resetting it. That means a dead short in an element, a chafed wire touching the tank, or a bad breaker itself. Call a licensed electrician if you see that.
Step two: Listen for sounds. Stand near the tank and turn on a hot water faucet somewhere in the house. Do you hear a sizzling or a low hum from the tank? If you hear nothing at all, power is not reaching the elements.
That could be a tripped high-limit switch, a failed thermostat, or a broken wire. If you hear a loud popping or rumbling, sediment has built up on the lower element. That sediment insulates the element, making it overheat and eventually fail.
Step three: Feel the pipes. After the water heater has been on for about 30 minutes without any hot water being used, carefully touch the cold water inlet pipe on top of the tank and the hot water outlet pipe. If the inlet pipe is warm or hot, you have a backflow issue or a failed check valve, not a heater problem. If both pipes are cold, the heater is not firing at all.
If the top of the tank feels warm but the bottom feels cold, the lower element is almost certainly dead.
Step four: Press the red reset button. Remove the upper access panel on the front of the tank. You'll see insulation and a plastic cover over the thermostat. Peel back the insulation and you'll find a small red button in the center of the thermostat housing.
Press it firmly. If it clicks and stays in, you've restored power temporarily. If it pops back out immediately or won't stay in, that confirms a problem with the upper element, the thermostat itself, or a ground fault.
This flowchart alone will tell you which of the three main failure modes you're dealing with. Write it down or snap a photo of your findings.
Common Problems and Likely Culprits
No Hot Water At All
This is the most alarming symptom and also the easiest to fix in many cases. If you turn on any faucet and get nothing but cold water, your heater is completely dead. The top three causes, in order of frequency, are a tripped high-limit switch, a failed upper heating element, and a blown thermostat.
The upper element is critical here. If the upper element burns out, the lower element never gets the signal to fire. You get zero hot water, not just less of it.
The same thing happens if the upper thermostat fails open. Test the upper element first with a multimeter set to ohms. A good element will show a reading between 12 and 16 ohms depending on its wattage.
If you see infinite resistance or a reading above 150 ohms, the element is dead.
Not Enough Hot Water
When you still get some hot water but it runs out fast, your lower element is the prime suspect. Remember the sequence. The upper element heats the top of the tank first.
You get a full tank of hot water initially because the top portion is fine. But once you draw enough water to pull cold water down to the lower element, there's no heat to bring it back up. The shower goes cold fast.
Sediment buildup on the lower element can cause the same symptom. The sediment traps heat against the element, making it work harder and eventually fail. If you hear popping or rumbling from the tank, sediment is almost certainly involved.
Flushing the tank annually prevents this, but if you're hearing noises now, plan on replacing the lower element and then flushing the tank.
Water Too Hot or Inconsistent Temperature
This one feels backwards. You expect no hot water, not too much. But a stuck thermostat can keep calling for heat well past the set point.
The high-limit switch should catch this, but if the thermostat fails in the closed position, the element stays on continuously.
Test this by turning the thermostat dial down to its lowest setting. If the water still comes out scalding hot after the tank has had time to cool, the thermostat is stuck. Replace it.
Do not delay on this one. A tank that overheats repeatedly can fail catastrophically, and that means a burst tank and a flooded house.
Strange Noises (Popping, Rumbling, Sizzling)
Popping and rumbling mean sediment. Hard water deposits build up on the bottom of the tank, trapping water underneath. When the lower element heats that trapped water, it turns to steam and pops.
It sounds worse than it is, but it will destroy your lower element over time and reduce the life of the tank.
A sizzling sound is different. That usually means water is dripping onto a hot element or the element itself has cracked and is arcing against the water. If you hear sizzling combined with a breaker that keeps tripping, you have a shorted element.
Replace it immediately.
Water Leaking From the Tank
Leaks are the one problem where you need to decide fast whether to repair or replace. Small drips from the drain valve or the pressure relief valve can often be fixed. A loose drain valve just needs a gentle tightening.
A T&P valve that weeps when the water heats up might need replacing, but it could also indicate the temperature is set too high or the tank is overpressurized.
Water pooling around the bottom of the tank itself is a different story. If the tank is leaking from a rusted spot on the shell, that's a replacement scenario. Richmond tanks typically have a 6 to 9 year warranty.
If yours is approaching that age and leaking from the tank body, do not try to patch it. Replace the whole unit. A catastrophic tank failure is not something you want to experience at 2 a.m.
How to Test and Replace a Heating Element Safely
This is the most common repair you'll do on a Richmond electric water heater, and it's surprisingly simple if you follow the steps in order.
What you'll need:
- Digital multimeter with continuity and resistance modes
- Non-contact voltage tester
- 1.5-inch or 2-inch element socket (1/4-inch drive or 1/2-inch drive depending on model)
- Ratchet wrench or breaker bar
- Replacement element (match the wattage and voltage exactly)
- Teflon tape or pipe joint compound rated for hot water
- Bucket and garden hose for draining
Step one: Kill the power. Go to the breaker panel and flip the water heater breaker to off. Then go back to the water heater and use your non-contact voltage tester to confirm there is no power at the wires going into the thermostat. Do not skip this.
Test every wire.
Step two: Drain the tank below the element you're replacing. Attach a garden hose to the drain valve at the bottom of the tank. Run the hose to a floor drain or outside. Open the drain valve and open a hot water faucet somewhere in the house to let air into the tank.
For the upper element, you only need to drain a few gallons. For the lower element, you need to drain below the element level, which usually means most of the tank.
Step three: Remove the element. Take off the access panel and push the insulation out of the way. Disconnect the wires from the element terminals. Use your element socket and ratchet to unscrew the element counterclockwise.
Some older elements may be seized. Apply steady pressure, not jerking force, to avoid snapping the element or damaging the tank threads.
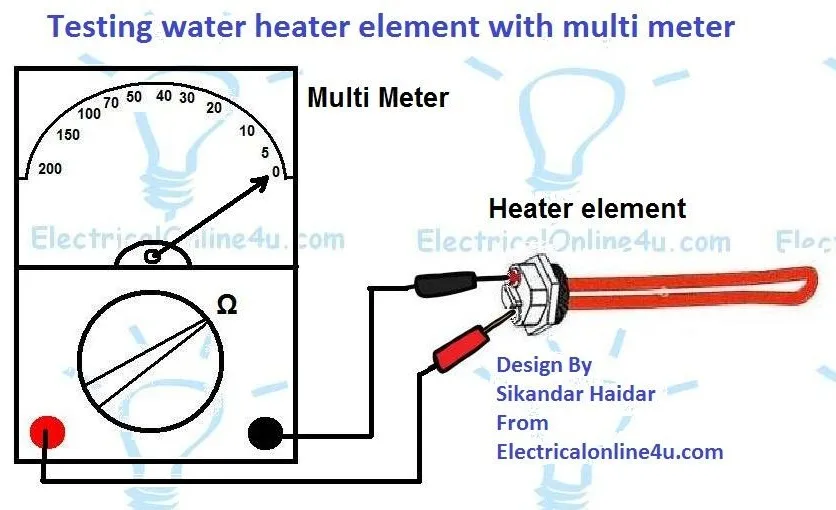
Image source: Bing (Web (fair-use with source credit))
Step four: Test the old element. Set your multimeter to ohms. Touch one probe to each terminal screw. A good element reads between 12 and 16 ohms.
Now touch one probe to a terminal and the other to the metal flange of the element. You should see infinite resistance, meaning no continuity to ground. If you get any reading at all, the element is shorted to ground and that's what kept tripping your breaker.
Step five: Install the new element. Apply Teflon tape to the threads of the new element, wrapping clockwise about four to six turns. Screw it in by hand until snug, then tighten with the socket. Do not overtighten.
The gasket makes the seal, not brute force.
Step six: Refill before restoring power. This is the most important step in the entire process. Close the drain valve. Close the hot water faucet you opened earlier.
Turn the cold water supply back on and open a hot water faucet somewhere in the house until you get a steady stream of water with no sputtering. That means the tank is full. If you energize a dry element, it will burn out in seconds.
Step seven: Restore power and verify. Turn the breaker back on. Wait about 30 minutes and check for hot water at the faucet. Check for any drips around the element gasket.
If you see a small leak, tighten the element just slightly, maybe an eighth of a turn, until the leak stops.
How to Test and Reset the Thermostat and High-Limit Switch
If your element tests fine but you still have no hot water, the thermostat or the high-limit switch is the next suspect.
Testing the thermostat. Turn the power off at the breaker. Remove the access panel and insulation. You'll see the thermostat mounted to the side of the tank with two small wires connected to it.
The high-limit switch is usually integrated into the same housing. Set your multimeter to continuity mode. Disconnect the wires from the thermostat terminals.
Touch one probe to each terminal. With the thermostat at room temperature and the dial turned to a setting above about 90 degrees, you should get continuity. That means the thermostat is closed and calling for heat.
Now turn the thermostat dial to its lowest setting. The continuity should break, meaning the thermostat opens and stops calling for heat. If you get continuity at both high and low settings, the thermostat is stuck closed.
If you get no continuity at any setting, it's stuck open. Either way, replace it.
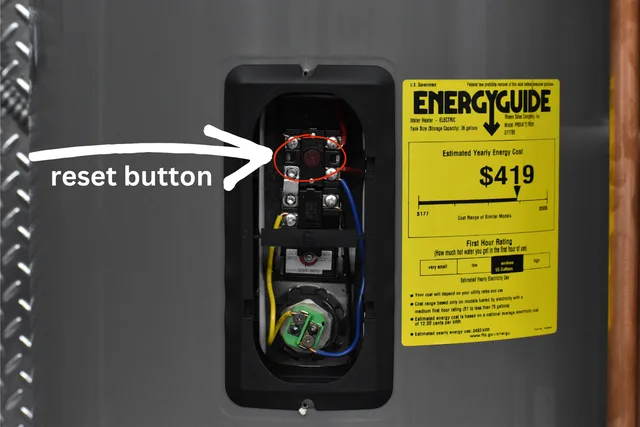
Image source: Bing (Web (fair-use with source credit))
Testing the high-limit switch. With the power still off, locate the red reset button on the thermostat housing. Press it. It should click.
Now test for continuity across the high-limit switch terminals. You should get a reading of zero ohms or very close to it. If you get infinite resistance, the switch is tripped internally and will not reset.
Replace the thermostat and high-limit assembly as a unit.
When to replace both. If you've had a high-limit trip event, especially a repeated one, replace the thermostat and the upper element together. The overheating event that tripped the switch may have also damaged the element. It's cheap insurance to replace both at once.
Mistakes That Will Cost You Time or Money
These are the most common errors we see in Richmond electric water heater troubleshooting. Avoid them and you'll save yourself hours and a few unnecessary trips to the hardware store.
Energizing a dry tank. This is the number one killer of new heating elements. Always, always refill the tank before flipping the breaker back on. A 4500-watt element running dry will burn out in less than 30 seconds.
You won't even hear it sometimes.
Mixing up the thermostat and high-limit wiring. Richmond units use a specific wiring pattern. Snap a photo of the wiring before you disconnect anything. If you swap the wires, the heater may work but the safety cutoffs won't function correctly.
Using the wrong wattage element. Richmond tanks come with elements rated for specific wattages, usually 3500W, 4500W, or 5500W. Installing a higher wattage element than the circuit and wiring can handle creates a fire risk. Always match the exact wattage printed on the old element.
Overtightening the drain valve. The plastic drain valves on newer Richmond models are fragile. If you crank on them with a wrench, you'll snap the head off and create a leak that requires draining the entire tank to replace the valve.
Ignoring a tripped breaker. If the breaker trips immediately after you reset it, do not keep trying. Something is shorted. Repeated breaker resets can damage the breaker itself and create an arc flash hazard.
When to Call a Pro vs. When to DIY
Some problems you can fix yourself. Some you shouldn't touch.
DIY safely:
- Replacing a heating element or thermostat
- Resetting the high-limit switch
- Flushing the tank to remove sediment
- Replacing the T&P valve
- Replacing the anode rod
Call a licensed electrician or plumber:
- The breaker trips immediately after resetting
- You see signs of electrical burning around the wiring
- The tank is leaking from the shell (replace the unit)
- You have aluminum wiring in your home (requires special connectors)
- You're not comfortable using a multimeter or working near live circuits
Maintenance Tips to Avoid Future Breakdowns
A little regular maintenance goes a long way. These steps will extend the life of your Richmond electric water heater and reduce the frequency of repairs.
Flush the tank annually. Attach a hose to the drain valve. Open the valve and let the water run until it runs clear. This removes sediment that insulates the lower element and reduces efficiency.
Do this in spring or fall when you're not relying on hot water for daily showers.
Test the T&P valve yearly. Lift the lever on the pressure relief valve and let it snap back. You should hear a gush of water and then it should stop. If water continues to drip after the test, replace the valve.
Replace the anode rod every 3 to 5 years. The sacrificial anode rod attracts corrosive elements in the water so the tank itself doesn't rust. Once the rod is consumed, the tank starts corroding. A $30 rod replacement can add years to your heater's life.
Check it annually by looking at the hex head on top of the tank. If more than 6 inches of the core wire is exposed, replace it.
Keep the area around the heater clear. Do not store boxes, paint cans, or cleaning supplies against the water heater. The unit needs airflow to dissipate heat from the electrical components. Clutter also hides small leaks until they become big problems.
Frequently Asked Questions
Why does my Richmond water heater keep tripping the breaker?
The most common cause is a shorted heating element. Test each element with a multimeter for continuity to ground. If you get any reading between a terminal and the metal flange, replace that element.
A chafed wire touching the tank or a failing breaker can also cause this.
How do I know if my Richmond water heater thermostat is bad?
Turn the power off and test the thermostat with a multimeter set to continuity. At room temperature with the dial above 90 degrees, you should get continuity through the thermostat. If you get no continuity, or continuity at every setting including low, the thermostat is faulty.
Why is my Richmond water heater not heating but the pilot light is on?
Richmond electric water heaters do not have a pilot light. That's a gas heater feature. If you have an electric model, look for a glowing red element through the access panel to confirm power is reaching it.
If you see no glow, check the breaker, the high-limit reset button, and then test the element.
How often should I drain my Richmond electric water heater?
Once per year is the standard recommendation from manufacturers. If you live in an area with hard water, drain it every six months. Regular draining removes sediment buildup that reduces efficiency and shortens the life of the lower heating element.
What size breaker do I need for a Richmond electric water heater?
Standard residential Richmond electric water heaters require a 30-amp double-pole breaker. The wire gauge should be 10 AWG copper. Check the nameplate on your specific model, but 30 amps is the most common specification for 4500W and 5500W elements.
Can I replace a Richmond water heater element myself?
Yes, if you have basic DIY skills and a multimeter. Turn the power off at the breaker, drain the tank below the element level, and use the correct element socket to remove the old element. Match the wattage and voltage exactly.
Refill the tank completely before restoring power to avoid burning out the new element.

Similar Posts